


注明:本人系统为centos7
解压tar.gz/tar/rar/zip/tgz.bin文件到指定位置
[root@localhost Software]# tar -zxvf rarlinux-x64-5.3.0.tar.gz --directory=/usr/local[root@localhost Software]# rar x Tunet2015_linux.rar[liuyao@localhost Libraries]$ unzip jpegsr6.zip [root@localhost opt]# chmod +x anylogic-professional-7.3.4.linux.x86_64.tgz.bin
[root@localhost opt]# ./anylogic-professional-7.3.4.linux.x86_64.tgz.bin
AnyLogic North America, LLC
……file1.tgz.bin 文件是可以自动解压的(self-extracting),先改变其权限,然后直接运行,即可产生 file1_extracted.tgz,然后解压成 file1,最后自动删除 file1_extracted.tgz,只剩下 file1 文件夹。
到指定位置处执行编译和安装操作
[root@localhost ~]# cd /usr/local/rar
[root@localhost rar]# make && make install
mkdir -p /usr/local/bin
mkdir -p /usr/local/lib
cp rar unrar /usr/local/bin
cp rarfiles.lst /etc
cp default.sfx /usr/local/lib
mkdir -p /usr/local/bin
mkdir -p /usr/local/lib
cp rar unrar /usr/local/bin
cp rarfiles.lst /etc
cp default.sfx /usr/local/lib
[root@localhost rar]# rar
RAR 5.30 Copyright (c) 1993-2015 Alexander Roshal 18 Nov 2015
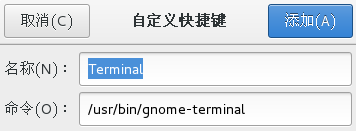
Trial version Type RAR -? for help设置Terminal快捷键
安装五笔输入法
[root@localhost Software]# yum install ibus-table-chinese-wubi-jidian安装anaconda(spyder)
[root@localhost Software]# ls
Anaconda3-4.0.0-Linux-x86_64.sh
[root@localhost Software]# bash Anaconda3-4.0.0-Linux-x86_64.sh
Please answer 'yes' or 'no':
>>> yes
Anaconda3 will now be installed into this location: /root/anaconda3
- Press ENTER to confirm the location
- Press CTRL-C to abort the installation
- Or specify a different location below
[/root/anaconda3] >>> /usr/local/anaconda3
PREFIX=/usr/local/anaconda3
installing: _cache-0.0-py35_x0 …
installing: python-3.5.1-0 …
……installation finished.
Do you wish the installer to prepend the Anaconda3 install location to PATH in your /root/.bashrc ? [yes|no]
[no] >>> yes
Prepending PATH=/usr/local/anaconda3/bin to PATH in /root/.bashrc
A backup will be made to: /root/.bashrc-anaconda3.bak安装完成后,就可以通过spyder直接打开spyder了
[root@localhost liuyao]# spyder注意此时无法使用普通用户运行spyder(为什么?如何修改?)
[liuyao@localhost ~]$ spyder
bash: spyder: 未找到命令...卸载anaconda:https://docs.continuum.io/anaconda/install#uninstall-anaconda
安装iso文件,以matlab为例
1.先挂载ISO文件到/mnt/cdrom,若没有该文件夹,需要先创建
[root@localhost Software]# mount -o loop R2015b_glnxa64.iso /mnt/cdrom
mount: 挂载点 /mnt/cdrom 不存在
[root@localhost Software]# mkdir /mnt/cdrom
[root@localhost Software]# mount -o loop R2015b_glnxa64.iso /mnt/cdrom
mount: /dev/loop0 写保护,将以只读方式挂载
2.打开该文件夹,开始安装
[root@localhost Software]# cd /mnt/cdrom/
[root@localhost cdrom]# ls
……  install  installer_input.txt install_guider.pdf  ……
[root@localhost cdrom]# ./install
Preparing installation files …
Installing …
3.安装完成后记得取消挂载
[root@localhost Software]# umount /mnt/cdrom/4.直接输入matlab就可以打开matlab
[liuyao@localhost ~]$ matlab安装R和RStudio
注意:不要通过在R官网上下载R源代码然后编译安装的方式去安装,这样在安装后RStudio并打开时,会提示”R shared library(/usr/local/lib64/R/lib/libR.so) not found”! 既然卸载R后按照提示的’./configure –enable-R-shlib’也没用。。。而是在添加好yum repository后,通过
yum install R来安装!
添加好yum repository后,直接
yum install R去RStudio官网下载RStudio,然后正常安装即可
rpm -ivh rstudio-0.99.896-x86_64.rpm
添加用户进sudoer
切换成root用户后,输入visudo:
[root@master liuyao]# visudo在打开的配置文件中,找到
root ALL=(ALL) ALL并在下面添加一行xxx ALL=(ALL) ALL,其中XXX为要添加的用户


 449
449

 被折叠的 条评论
为什么被折叠?
被折叠的 条评论
为什么被折叠?
 到【灌水乐园】发言


