


一、背景
当市面上诸如antd、element之类框架的日历组件无法满足需求时,只能考虑自己手写一个日历了。
在自己实现之前会觉得日期的展示这块不好处理,而实现过后会发现这块的处理逻辑很有通用性,无论是pc端还是移动端、vue栈还是react,都能套用同样的处理方式,其他的交互和自定义展示就没啥难度了,根据业务需要自己定制就行。
本文以react移动端日历组件为例,文末提供完整代码。
二、功能
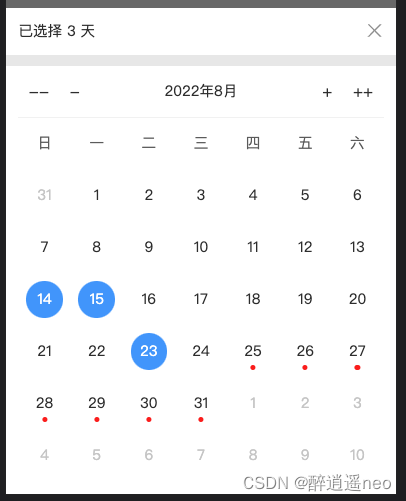
可实现的功能有:
- 默认展示当月日历
- 可切换年或月
- 可选中任意日期,支持多选
- 可对任意日期进行特殊标记展示
了解代码思路后,你可以随意修改代码,功能随意拓展。
三、实现
1、dom结构和样式
日历是纵向按星期来对齐的,
星期栏单独一个容器,flex布局,里面7个元素平分:
const weekList = ['日', '一', '二', '三', '四', '五', '六'];

<div className={styles.weekBar}>
  {weekList.map((v) => (
    <div key={v} className={styles.weekCol}>
      {v}
    </div>
  ))}
</div>

.weekBar {
  display: flex;
  align-items: center;
  color: #666;

  .weekCol {
    height: 100px;
    width: 14.28571%;
    display: flex;
    align-items: center;
    justify-content: center;
  }
}
日期列表参照 antd-mobile 的展示,固定6行,共42项,共用一个容器,和星期栏类似,flex布局,子元素占总宽度的1/7,溢出换行(flex-wrap: wrap)。
2、日期展示
前面日期列表的展示结构确定了,剩下的就是拿到42项日期的数组数据,然后遍历渲染dom即可。
我的思路是把这42项数据分成三部分,上月的部分数据 + 当前月的所有数据 + 下月的部分数据,拼接起来就是要展示日期表格数据。
- 变量:
cYear // 所选的年份
cMonth // 所选的月份
- 关键API:
new Date(cYeear, cMonth, 1) // 获取指定年月的第一天的日期对象
new Date(cYeear, cMonth, 0) // 获取指定年月的最后一天的日期对象
// 备注:cMonth比我们实际的月份小1,和getMonth()是对齐的,例如二月就是1;cMonth这里也可以传负值,API会智能计算,例如-1表示上一年的12月
- 用到的函数:
// 获取指定年月的当月所有天的数组,例如:2022年8月得到的是[1,2,3,4,......,31]
const getDateListByMonth = (year, month) => {
  const days = new Date(year, month, 0).getDate();
  return new Array(days).fill(null).map((v, i) => i + 1);
}

// 获取指定年月的1号是周几,备注:
const getWeekOfFirstDay = (year, month) => {
  return new Date(year, month - 1, 1).getDay();
}
- 上月的部分数据
根据当前月的1号是周几,来判断需要取几条上月的数据,然后拿到上月的完整数据进行数组截取。特殊情况:如果1号是周日就取7条。
// 上月的部分数据
const week = getWeekOfFirstDay(cYear, cMonth);
const lastMonthNums = getDateListByMonth(cYear, cMonth - 1);
const preffixList = lastMonthNums.slice(week === 0 ? -7 : -week).map((v) => ({
  id: tools.formatDate(new Date(cYear, cMonth - 2, v), '{y}-{m}-{d}'),
  monthType: 'last',
  disabled: true,
  num: v,
}));
- 当前月的全部数据
当前月会完全展示,取完整数据。
// 当月的数据
const curMonthNums = getDateListByMonth(cYear, cMonth);
const currentList = curMonthNums.map((v) => {
  const vDate = new Date(cYear, cMonth - 1, v);
  const isRedDot = +vDate >= +todayZeroDate;
  const id = tools.formatDate(vDate, '{y}-{m}-{d}');
  return {
    id,
    monthType: 'current',
    disabled: false,
    chose: choseDateList.includes(id),
    num: v,
    isRedDot,
  };
});
- 下月的部分数据
总共展示6行7列,共42条数据,减去上述中上月和当前月的数据条数,就是下月数据里要截取的数量。
// 下月的部分数据
const nextMonthNums = getDateListByMonth(cYear, cMonth + 1);
const nextList = nextMonthNums
  .slice(0, 6 * 7 - preffixList.length - currentList.length)
  .map((v) => ({
    id: tools.formatDate(new Date(cYear, cMonth, v), '{y}-{m}-{d}'),
    monthType: 'next',
    disabled: true,
    num: v,
  }));
- 数据字段解释:
{
  id, // 唯一标识,我这里格式为“2022-08-25”,方便取用
  monthType, // 月类型,分为:上月、当月、下月,备用
  disabled, // 是否置灰
  num, // 展示的日期数字
  isRedDot, // 是否展示红点标识
}
以上数据字段可以随意拓展,根据你的需要来对日历展示不同的状态、不同标记等,或者对日历点击事件做自定义的操作。
四、其他
1、农历
网上有一些公历转农历的插件,可以拿来用,例如:lunar-calendar,还包含传统节假日。
2、二十四节气
//计算节气
function getJQ(yyyy,mm,dd){
 var sTermInfo = new Array(0,21208,42467,63836,85337,107014,128867,150921,173149,195551,218072,240693,263343,285989,308563,331033,353350,375494,397447,419210,440795,462224,483532,504758);
 var solarTerm = new Array("小寒","大寒","立春","雨水","惊蛰","春分","清明","谷雨","立夏","小满","芒种","夏至","小暑","大暑","立秋","处暑","白露","秋分","寒露","霜降","立冬","小雪","大雪","冬至");
 var tmp1 = new Date((31556925974.7*(yyyy-1900)+sTermInfo[mm*2+1]*60000)+Date.UTC(1900,0,6,2,5));
 var tmp2 = tmp1.getUTCDate();
 var solarTerms = "";
 if (tmp2==dd)
   solarTerms = solarTerm[mm*2+1];
 tmp1 = new Date((31556925974.7*(yyyy-1900)+sTermInfo[mm*2]*60000)+Date.UTC(1900,0,6,2,5));
 tmp2= tmp1.getUTCDate();
 if (tmp2==dd)
   solarTerms = solarTerm[mm*2];
 return solarTerms;
}
3、法定节假日
法定节假日的安排是国家每年不同时间制定颁布的,只能手动录入,没法预测计算,这个可以找一些第三方API,例如阿里云、腾讯云的一些服务,可能需要付费。
五、示例代码
import React, { useState, useEffect } from 'react';
import styles from './styles.less';
import tools from 'ut-utils';

const todayDate = new Date(); // 今日日期,实际项目中推荐从接口拿服务器日期用
const todayZeroDate = new Date(todayDate.getFullYear(), todayDate.getMonth(), todayDate.getDate()); // 今日零点的日期,用于后续转换时间戳后日期大小的比较

const weekList = ['日', '一', '二', '三', '四', '五', '六'];

export default Page = () => {
  const [cYear, setCYear] = useState(todayZeroDate.getFullYear());
  const [cMonth, setCMonth] = useState(todayZeroDate.getMonth() + 1);

  const [dateList, setDateList] = useState([]);
  const [choseDateList, setChoseDateList] = useState([]);

  const onChangeYear = (num: number) => {
    setCYear(cYear + num);
  };

  const onChangeMonth = (num: number) => {
    if (cMonth + num <= 0) {
      setCYear(cYear - 1);
      setCMonth(12 - (cMonth + num));
    } else if (cMonth + num >= 13) {
      setCYear(cYear + 1);
      setCMonth(cMonth + num - 12);
    } else {
      setCMonth(cMonth + num);
    }
  };

  // 获取指定年月的当月所有天的数组
  const getDateListByMonth = (year, month) => {
    const days = new Date(year, month, 0).getDate();
    return new Array(days).fill(null).map((v, i) => i + 1);
  };

  // 获取指定年月的1号是周几
  const getWeekOfFirstDay = (year, month) => {
    return new Date(year, month - 1, 1).getDay();
  };

  // 获取日期渲染数据
  useEffect(() => {
    // 上月的部分数据
    const week = getWeekOfFirstDay(cYear, cMonth);
    const lastMonthNums = getDateListByMonth(cYear, cMonth - 1);
    const preffixList = lastMonthNums.slice(week === 0 ? -7 : -week).map((v) => ({
      id: tools.formatDate(new Date(cYear, cMonth - 2, v), '{y}-{m}-{d}'),
      monthType: 'last',
      disabled: true,
      num: v,
    }));
    // 当月的数据
    const curMonthNums = getDateListByMonth(cYear, cMonth);
    const currentList = curMonthNums.map((v) => {
      const vDate = new Date(cYear, cMonth - 1, v);
      const isRedDot = +vDate >= +todayZeroDate;
      const id = tools.formatDate(vDate, '{y}-{m}-{d}');
      return {
        id,
        monthType: 'current',
        disabled: false,
        chose: choseDateList.includes(id),
        num: v,
        isRedDot,
      };
    });
    // 下月的部分数据
    const nextMonthNums = getDateListByMonth(cYear, cMonth + 1);
    const nextList = nextMonthNums
      .slice(0, 6 * 7 - preffixList.length - currentList.length)
      .map((v) => ({
        id: tools.formatDate(new Date(cYear, cMonth, v), '{y}-{m}-{d}'),
        monthType: 'next',
        disabled: true,
        num: v,
      }));
    // 拼接
    setDateList([...preffixList, ...currentList, ...nextList]);
  }, [cYear, cMonth, choseDateList]);

  // 点击选中日期的事件
  const onClickDate = (item) => {
    if (item.disabled) {
      return;
    }
    const index = choseDateList.indexOf(item.id);
    if (index === -1) {
      choseDateList.push(item.id);
    } else {
      choseDateList.splice(index, 1);
    }
    setChoseDateList([...choseDateList]);
  };

  return (
    <div className={styles.popupBody}>
      <div className={styles.info}>
        <p className="chosed">已选择 {choseDateList.length} 天</p>
      </div>
      <div className={styles.main}>
        {/* 切换年月栏 */}
        <div className={styles.topBar}>
          <div className={styles.topBarL}>
            <span onClick={() => onChangeYear(-1)}>--</span>
            <span onClick={() => onChangeMonth(-1)}>-</span>
          </div>
          <p className={styles.dateTxt}>
            {cYear}年{cMonth}月
          </p>
          <div className={styles.topBarR}>
            <span onClick={() => onChangeMonth(1)}>+</span>
            <span onClick={() => onChangeYear(1)}>++</span>
          </div>
        </div>

        {/* 星期栏 */}
        <div className={styles.weekBar}>
          {weekList.map((v) => (
            <div key={v} className={styles.weekCol}>
              {v}
            </div>
          ))}
        </div>

        {/* 日期栏 */}
        <div className={styles.dateWrap}>
          {dateList.map((v) => (
            <div
              key={v.id}
              className={`${styles.dateItem}
                ${v.disabled ? styles.grey : ''}
                ${v.chose ? styles.chose : ''}`}
              onClick={() => onClickDate(v)}
            >
              <div className={styles.numWrap}>
                <span>{v.num}</span>
                {v.isRedDot ? <i className={styles.dot} /> : null}
              </div>
            </div>
          ))}
        </div>
      </div>
    </div>
  );
};
.popupBody {
  background-color: #eaeaea;
  font-size: 14px;

  .info {
    padding: 12px;
    margin-bottom: 10px;
    background-color: #fff;
    line-height: 1.5;
  }
  .main {
    padding: 0 12px 12px;
    background-color: #fff;

    .topBar {
      display: flex;
      align-items: center;
      justify-content: space-between;
      height: 50px;
      border-bottom: 1px solid #f3f3f3;
    }
    .topBarL, .topBarR {
      display: flex;
      align-items: center;
      font-size: 16px;

      span {
        margin: 0 10px;
      }
    }
    .weekBar {
      display: flex;
      align-items: center;
      color: #666;

      .weekCol {
        height: 50px;
        width: 14.28571%;
        display: flex;
        align-items: center;
        justify-content: center;
      }
    }
    .dateWrap {
      display: flex;
      align-items: center;
      flex-wrap: wrap;

      .dateItem {
        height: 50px;
        width: 14.28571%;
        display: flex;
        align-items: center;
        justify-content: center;

        &.grey {
          color: #ccc;
        }
        .numWrap {
          width: 70%;
          height: 70%;
          border-radius: 50%;
          display: flex;
          align-items: center;
          justify-content: center;
          position: relative;

          .dot {
            display: block;
            position: absolute;
            bottom: 0;
            left: 50%;
            transform: translateX(-50%);
            width: 5px;
            height: 5px;
            background-color: red;
            border-radius: 50%;
          }
        }
        &.chose {
          .numWrap {
            background-color: #409eff;
            color: #fff;
          }
        }
      }
    }
  }
}


 1164
1164


 被折叠的 条评论
为什么被折叠?
被折叠的 条评论
为什么被折叠?
 到【灌水乐园】发言


