


1. 前言:
在平时的开发中,我们在显示图片是有时候需要显示圆角图片,我们应该都知道圆角显示肯定是更加耗费内存和性能,会导致图片的过度绘制等问题。但是有时候产品的设计就是这样,我们开发也不得不做,本篇文章讲一下最基本的圆角图片实现方法:
2. 原理讲解之Paint.setXfermode:
2.1 Paint.setXfermode就是本次实现圆角图片的关键地方:
       /**
         * 我简单理解为设置画笔在绘制时图形堆叠时候的显示模式
         * SRC_IN:取两层绘制交集。显示上层。
         */
        paint.setXfermode(new PorterDuffXfermode(PorterDuff.Mode.SRC_IN));
这个方法很复杂,我这里只是为本次使用做出解释,这个方法大概的意思就是:设置画笔在绘制时图形堆叠时候的显示模式。画笔在绘制时图形堆叠时候的显示模式有16种之多,google也给出了图文解释:
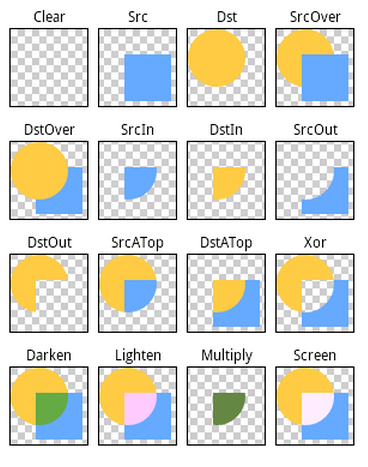
看上图就可以知道,就是两个view堆叠在一起的时候是怎么现实的,是显示交集部分,非交集部分,交集部分的上层还是下层等等。
具体的PorterDuff.Mode请看:
1.PorterDuff.Mode.CLEAR

   所绘制不会提交到画布上。

2.PorterDuff.Mode.SRC

   显示上层绘制图片

3.PorterDuff.Mode.DST

  显示下层绘制图片

4.PorterDuff.Mode.SRC_OVER

  正常绘制显示,上下层绘制叠盖。

5.PorterDuff.Mode.DST_OVER

  上下层都显示。下层居上显示。

6.PorterDuff.Mode.SRC_IN

   取两层绘制交集。显示上层。

7.PorterDuff.Mode.DST_IN

  取两层绘制交集。显示下层。

8.PorterDuff.Mode.SRC_OUT

 取上层绘制非交集部分。

9.PorterDuff.Mode.DST_OUT

 取下层绘制非交集部分。

10.PorterDuff.Mode.SRC_ATOP

 取下层非交集部分与上层交集部分

11.PorterDuff.Mode.DST_ATOP

  取上层非交集部分与下层交集部分

12.PorterDuff.Mode.XOR
    现实非交集部分
13.PorterDuff.Mode.DARKEN

14.PorterDuff.Mode.LIGHTEN

15.PorterDuff.Mode.MULTIPLY

16.PorterDuff.Mode.SCREEN
2.2 圆角图片实现原理:
3. 代码讲解
自定义控件的基本步骤就是测量控件大小,确定控件位置,绘制控件,我们这个圆角图片控件是不需要确定控件位置。
3.1 createRoundConerImage把源图片圆角显示:
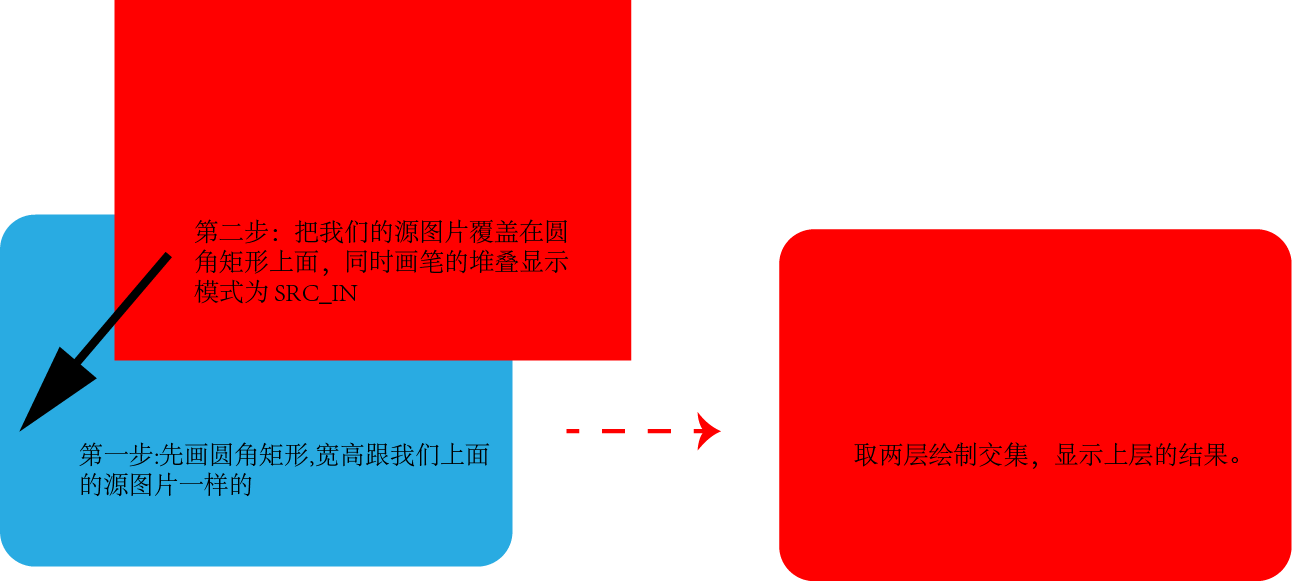
原理上面讲了,先绘制一个圆角矩形,再把我们的源图片绘制在这个圆角矩形的画布上,画笔的显示模式是SRC_IN,取上层交集部分,直接看代码:
    /**
     * 根据给定的图片和已经测量出来的宽高来绘制圆角图形
     * 原理:
     * 基本原理就是先画一个圆角的图形出来,然后在圆角图形上画我们的源图片,
     * 圆角图形跟我们的源图片堆叠时我们取交集并显示上层的图形
     * 原理就是这样,很简单。
     */
    private Bitmap createRoundConerImage(Bitmap source){
        final Paint paint = new Paint();
        /**开启抗锯齿**/
        paint.setAntiAlias(true);
        /****/
        Bitmap target  = Bitmap.createBitmap(mWidth,mHeight, Bitmap.Config.ARGB_8888);
        /**
         * Construct a canvas with the specified bitmap to draw into. The       bitmapmust be mutable
         * 以bitmap对象创建一个画布,则将内容都绘制在bitmap上,bitmap不得为null;
         */
        Canvas canvas = new Canvas(target);
        /**新建一个矩形绘制区域,并给出左上角和右下角的坐标**/
        RectF rect = new RectF(0 , 0 ,mWidth ,mHeight);
        /**
         * 把图片缩放成我们想要的大小
         */
        source = Bitmap.createScaledBitmap(source,mWidth,mHeight,false);
        /**在绘制矩形区域绘制用画笔绘制一个圆角矩形**/
        canvas.drawRoundRect(rect ,mRadius ,mRadius ,paint);
        /**
         * 我简单理解为设置画笔在绘制时图形堆叠时候的显示模式
         * SRC_IN:取两层绘制交集。显示上层。
         */
        paint.setXfermode(new PorterDuffXfermode(PorterDuff.Mode.SRC_IN));
        canvas.drawBitmap(source ,0 ,0 ,paint);
        /****/
        return target;
    }
需要注意,我们在绘制第二层,也就是我们的源图片的时候,所需要的绘制矩形的宽高一定是跟我们测量的宽高是一直的,要是图片的本身的宽高与测量得到的宽高不一致时,我们就对源图片进行缩放,所以会有下面的代码:
        /**新建一个矩形绘制区域,并给出左上角和右下角的坐标**/
        /**mWidt和mHeight是测量得到的控件宽高 **/
        RectF rect = new RectF(0 , 0 ,mWidth ,mHeight);
        /**
         * 把图片缩放成我们想要的大小
         */
        source = Bitmap.createScaledBitmap(source,mWidth,mHeight,false);
3.2 onMeasure测量控件大小:
    /**
     * 测量控件大小
     * @param widthMeasureSpec
     * @param heightMeasureSpec
     */
    @Override
    protected void onMeasure(int widthMeasureSpec, int heightMeasureSpec) {
        Log.d("danxx" ,"onMeasure");
//        super.onMeasure(widthMeasureSpec, heightMeasureSpec);
        /**获取宽高的测量模式**/
        int widthSpecMode = MeasureSpec.getMode(widthMeasureSpec);
        int heightSpecMode = MeasureSpec.getMode(heightMeasureSpec);
        /**获取宽高的尺寸**/
        int widthSpecSize = MeasureSpec.getSize(widthMeasureSpec);
        int heightSpecSize = MeasureSpec.getSize(heightMeasureSpec);
        /**
         * 测量宽度
         */
        if(widthSpecMode == MeasureSpec.EXACTLY){  //宽为具体值或者是填满父控件就直接赋值 match_parent , accurate
            mWidth = widthSpecSize;
        }else{
            /**图片显示时原始大小**/
            int srcWidth = mSrc.getWidth() + getPaddingLeft() + getPaddingRight();
            if(widthSpecMode == MeasureSpec.AT_MOST){ //wrap_content,子控件不能超过父控件,此时我们取传递过来的大小和图片本身大小的小者
                mWidth = Math.min(widthSpecSize , srcWidth);
            }else{
                //没有要求,可以随便大小
                mWidth = srcWidth;
            }
        }

        /**
         * 测量高度,逻辑跟测量宽度是一样的
         */
        if(heightSpecMode == MeasureSpec.EXACTLY){  //match_parent , accurate
            mHeight = heightSpecSize;
        }else{
            /**图片显示时原始大小**/
            int srcHeigth = mSrc.getHeight() + getPaddingTop() + getPaddingBottom();
            if(heightSpecMode == MeasureSpec.AT_MOST){ //wrap_content
                mHeight = Math.min(heightSpecSize , srcHeigth);
            }else{
                //没有要求,可以随便大小
                mHeight = srcHeigth;
            }
        }
        setMeasuredDimension(mWidth ,mHeight);
    }
宽高分两次测量,下面简单介绍一下控件的测量:
控件的测量就是处理我们在创建控件时设置的宽高大小,一般非为三种情况,具体宽高值、填满父控件,包含内容。在OnMeasure方法中我们使用MeasureSpec来获取控件宽高到底是哪一种情况。
一个MeasureSpec封装了父布局传递给子布局的布局要求,每个MeasureSpec代表了一组宽度和高度的要求。
三种测量模式解释:
- UNSPECIFIED:父布局没有给子布局任何限制,子布局可以任意大小。
- EXACTLY:父布局决定子布局的确切大小。不论子布局多大,它都必须限制在这个界限里。match_parent
- AT_MOST:此时子控件尺寸只要不超过父控件允许的最大尺寸,子布局可以根据自己的大小选择任意大小。wrap_content
简单的映射关系:
- wrap_content -> MeasureSpec.AT_MOST
- match_parent -> MeasureSpec.EXACTLY
- 具体值 -> MeasureSpec.EXACTLY
3.3 onDraw绘制控件:
    /**
     * 绘制控件
     * @param canvas
     */
    @Override
    protected void onDraw(Canvas canvas) {
        Log.d("danxx" ,"onDraw");
//        super.onDraw(canvas);
        canvas.drawBitmap(createRoundConerImage(mSrc) ,0 ,0 ,null);
    }
4. 全部代码:
package danxx.library.widget;

import android.content.Context;
import android.content.res.TypedArray;
import android.graphics.Bitmap;
import android.graphics.BitmapFactory;
import android.graphics.Canvas;
import android.graphics.Paint;
import android.graphics.PorterDuff;
import android.graphics.PorterDuffXfermode;
import android.graphics.RectF;
import android.util.AttributeSet;
import android.util.Log;
import android.view.View;

import danxx.library.R;

/**
 * Created by Danxx on 2016/7/29.
 * 最简单的方式实现圆角图片
 */
public class SampleCircleImageView extends View {
    /**
     * 默认圆角大小
     */
    private static final int DEFUALT_RADIUS = 20;
    /**
     * 源图片
     */
    private Bitmap mSrc;
    /**
     * 圆角大小,默认为20
     */
    private int mRadius = DEFUALT_RADIUS;
    /**
     * 控件的宽度
     */
    private int mWidth;
    /**
     * 控件的高度
     */
    private int mHeight;
    private Context mContext;


    public SampleCircleImageView(Context context) {
        super(context);
        init(context ,null ,0);
    }

    public SampleCircleImageView(Context context ,Bitmap bitmap) {
        super(context);
        Log.d("danxx" ,"create SampleCircleImageView");
        this.mSrc = bitmap;
        init(context ,null ,0);
    }

    public SampleCircleImageView(Context context, AttributeSet attrs) {
        super(context, attrs);
        init(context ,attrs ,0);
    }

    public SampleCircleImageView(Context context, AttributeSet attrs, int defStyleAttr) {
        super(context, attrs, defStyleAttr);
        init(context ,attrs ,defStyleAttr);
    }

    private void init(Context context ,AttributeSet attrs ,int defStyleAttr){
        mContext = context;
        if(attrs != null){
            /**Load the styled attributes and set their properties**/
            TypedArray typedArray = context.obtainStyledAttributes(attrs , R.styleable.SampleCircleImageView ,defStyleAttr ,0);
            mSrc = BitmapFactory.decodeResource(context.getResources() ,typedArray.getResourceId(R.styleable.SampleCircleImageView_src ,0));
            mRadius = (int) typedArray.getDimension(R.styleable.SampleCircleImageView_radius ,dp2px(DEFUALT_RADIUS));
            typedArray.recycle();
        }

    }

    /**
     * 测量控件大小
     * @param widthMeasureSpec
     * @param heightMeasureSpec
     */
    @Override
    protected void onMeasure(int widthMeasureSpec, int heightMeasureSpec) {
        Log.d("danxx" ,"onMeasure");
//        super.onMeasure(widthMeasureSpec, heightMeasureSpec);
        /**
         * 一个MeasureSpec封装了父布局传递给子布局的布局要求,每个MeasureSpec代表了一组宽度和高度的要求。
         * 三种测量模式解释:
         *  UNSPECIFIED:父布局没有给子布局任何限制,子布局可以任意大小。
         *  EXACTLY:父布局决定子布局的确切大小。不论子布局多大,它都必须限制在这个界限里。match_parent
         *  AT_MOST:此时子控件尺寸只要不超过父控件允许的最大尺寸,子布局可以根据自己的大小选择任意大小。wrap_content
         *
         * 简单的映射关系:
         *  wrap_content -> MeasureSpec.AT_MOST
         *  match_parent -> MeasureSpec.EXACTLY
         *  具体值 -> MeasureSpec.EXACTLY
         */

        /**获取宽高的测量模式**/
        int widthSpecMode = MeasureSpec.getMode(widthMeasureSpec);
        int heightSpecMode = MeasureSpec.getMode(heightMeasureSpec);
        /**获取宽高的尺寸**/
        int widthSpecSize = MeasureSpec.getSize(widthMeasureSpec);
        int heightSpecSize = MeasureSpec.getSize(heightMeasureSpec);
        /**
         * 测量宽度
         */
        if(widthSpecMode == MeasureSpec.EXACTLY){  //宽为具体值或者是填满父控件就直接赋值 match_parent , accurate
            mWidth = widthSpecSize;
        }else{
            /**图片显示时原始大小**/
            int srcWidth = mSrc.getWidth() + getPaddingLeft() + getPaddingRight();
            if(widthSpecMode == MeasureSpec.AT_MOST){ //wrap_content,子控件不能超过父控件,此时我们取传递过来的大小和图片本身大小的小者
                mWidth = Math.min(widthSpecSize , srcWidth);
            }else{
                //没有要求,可以随便大小
                mWidth = srcWidth;
            }
        }

        /**
         * 测量高度,逻辑跟测量宽度是一样的
         */
        if(heightSpecMode == MeasureSpec.EXACTLY){  //match_parent , accurate
            mHeight = heightSpecSize;
        }else{
            /**图片显示时原始大小**/
            int srcHeigth = mSrc.getHeight() + getPaddingTop() + getPaddingBottom();
            if(heightSpecMode == MeasureSpec.AT_MOST){ //wrap_content
                mHeight = Math.min(heightSpecSize , srcHeigth);
            }else{
                //没有要求,可以随便大小
                mHeight = srcHeigth;
            }
        }
        setMeasuredDimension(mWidth ,mHeight);
    }

    /**
     * 绘制控件
     * @param canvas
     */
    @Override
    protected void onDraw(Canvas canvas) {
        Log.d("danxx" ,"onDraw");
//        super.onDraw(canvas);
        canvas.drawBitmap(createRoundConerImage(mSrc) ,0 ,0 ,null);
    }

    /**
     * 设置圆角大小
     * @param radius
     */
    public void setRadius(int radius){
        this.mRadius = radius;
    }

    /**
     * 设置图片
     * @param bitmap
     */
    public void setSrc(Bitmap bitmap){
        this.mSrc = bitmap;
    }

    /**
     * 根据给定的图片和已经测量出来的宽高来绘制圆角图形
     * 原理:
     * 基本原理就是先画一个圆角的图形出来,然后在圆角图形上画我们的源图片,
     * 圆角图形跟我们的源图片堆叠时我们取交集并显示上层的图形
     * 原理就是这样,很简单。
     */
    private Bitmap createRoundConerImage(Bitmap source){
        final Paint paint = new Paint();
        /**开启抗锯齿**/
        paint.setAntiAlias(true);
        /****/
        Bitmap target  = Bitmap.createBitmap(mWidth,mHeight, Bitmap.Config.ARGB_8888);
        /**
         * Construct a canvas with the specified bitmap to draw into. The bitmapmust be mutable
         * 以bitmap对象创建一个画布,则将内容都绘制在bitmap上,bitmap不得为null;
         */
        Canvas canvas = new Canvas(target);
        /**新建一个矩形绘制区域,并给出左上角和右下角的坐标**/
        RectF rect = new RectF(0 , 0 ,mWidth ,mHeight);
        /**
         * 把图片缩放成我们想要的大小
         */
        source = Bitmap.createScaledBitmap(source,mWidth,mHeight,false);
        /**在绘制矩形区域绘制用画笔绘制一个圆角矩形**/
        canvas.drawRoundRect(rect ,mRadius ,mRadius ,paint);
        /**
         * 我简单理解为设置画笔在绘制时图形堆叠时候的显示模式
         * SRC_IN:取两层绘制交集。显示上层。
         */
        paint.setXfermode(new PorterDuffXfermode(PorterDuff.Mode.SRC_IN));
        canvas.drawBitmap(source ,0 ,0 ,paint);
        /****/
        return target;
    }

    protected int sp2px(float spValue) {
        final float fontScale = mContext.getResources().getDisplayMetrics().scaledDensity;
        return (int) (spValue * fontScale + 0.5f);
    }

    protected int dp2px(float dp) {
        final float scale = mContext.getResources().getDisplayMetrics().density;
        return (int) (dp * scale + 0.5f);
    }

}
5. 效果图和源码地址:
GitHub源码地址https://github.com/Dawish
三种宽高设置模式都有:
xml布局文件:
<?xml version="1.0" encoding="utf-8"?>
<ScrollView xmlns:android="http://schemas.android.com/apk/res/android"
    xmlns:danxx="http://schemas.android.com/apk/res-auto"
    android:layout_width="match_parent"
    android:padding="10dp"
    android:layout_height="match_parent">
    <LinearLayout
        android:layout_width="match_parent"
        android:layout_height="wrap_content"
        android:orientation="vertical">
        <TextView
            android:layout_width="wrap_content"
            android:layout_height="wrap_content"
            android:text="1. 180*120:"/>
        <danxx.library.widget.SampleCircleImageView
            android:layout_marginTop="6dp"
            android:layout_width="180dp"
            android:layout_height="120dp"
            danxx:src="@drawable/image"
            danxx:radius="10dp"/>

        <TextView
            android:layout_width="wrap_content"
            android:layout_height="wrap_content"
            android:layout_marginTop="20dp"
            android:text="2. wrap_content*wrap_content:"/>
        <danxx.library.widget.SampleCircleImageView
            android:layout_marginTop="6dp"
            android:layout_width="wrap_content"
            android:layout_height="wrap_content"
            danxx:src="@drawable/vp1"
            danxx:radius="10dp"/>

        <TextView
            android:layout_width="wrap_content"
            android:layout_height="wrap_content"
            android:layout_marginTop="20dp"
            android:text="3. match_parent*wrap_content:"/>
        <danxx.library.widget.SampleCircleImageView
            android:layout_marginTop="6dp"
            android:layout_width="match_parent"
            android:layout_height="wrap_content"
            danxx:src="@drawable/vp2"
            danxx:radius="10dp"/>

        <TextView
            android:layout_width="wrap_content"
            android:layout_height="wrap_content"
            android:layout_marginTop="20dp"
            android:text="4. wrap_content*wrap_content:"/>
        <danxx.library.widget.SampleCircleImageView
            android:layout_marginTop="6dp"
            android:layout_width="wrap_content"
            android:layout_height="wrap_content"
            danxx:src="@drawable/test2"
            danxx:radius="10dp"/>
    </LinearLayout>
</ScrollView>
attrs文件:
<?xml version="1.0" encoding="utf-8"?>
<resources>
 <declare-styleable name="SampleCircleImageView">
 <!-- 源图片 -->
 <attr name="src" format="reference"></attr>
 <!-- 圆角大小 -->
 <attr name="radius" format="dimension"></attr>
 </declare-styleable>
 </resources>


 被折叠的 条评论
为什么被折叠?
被折叠的 条评论
为什么被折叠?
 到【灌水乐园】发言


