


最近的任务可是不少,组织上面要求发布WebService进行旧系统和新系统之间的数据通信,旧系统使用了EJB实现远程调用,EJB本身是可以发布成WebService的,就单纯的在EJB的类上面多加一个@WebService注解就能发布成功了。
不过最近听说有个CXF框架挺好的,可以支持Map,然而我查的所有资料中都指出WebService不支持Map类型。。。还不如就随便搞一个http接口然后整一个json返回去- -。
然而既然花了时间去搞这个了,那就好好的总结一下。
首先我创建了一个maven项目,用maven一开始就有的maven-archetype-webapp项目就行,maven依赖添加下面两个。
  <properties>
    <cxf.version>3.1.6</cxf.version>
  </properties>
  <dependencies>
    <dependency>
      <groupId>org.apache.cxf</groupId>
      <artifactId>cxf-rt-frontend-jaxws</artifactId>
      <version>${cxf.version}</version>
    </dependency>
    <dependency>
      <groupId>org.apache.cxf</groupId>
      <artifactId>cxf-rt-transports-http</artifactId>
      <version>${cxf.version}</version>
    </dependency>
  </dependencies>
随便定义了一个实体。
/**
 * 机构
 */
public class Institution {
	/**
	 * 机构代码
	 */
	private String institutionCode;
	/**
	 * 机构名称
	 */
	private String institutionName;
	/**
	 * 学制
	 */
	private String schoolSystem;

	public String getInstitutionCode() {
		return institutionCode;
	}

	public void setInstitutionCode(String institutionCode) {
		this.institutionCode = institutionCode;
	}

	public String getInstitutionName() {
		return institutionName;
	}

	public void setInstitutionName(String institutionName) {
		this.institutionName = institutionName;
	}

	public String getSchoolSystem() {
		return schoolSystem;
	}

	public void setSchoolSystem(String schoolSystem) {
		this.schoolSystem = schoolSystem;
	}
}定义一个接口,在里面添加两个方法,加入@WebService注解。
@WebService
public interface InstitutionBean {
	/**
	 * WebService demo
	 *
	 * @param id
	 * @return
	 */
	@WebMethod
	@XmlJavaTypeAdapter(MapAdapter.class)
	@WebResult(partName = "return")
	Map<String, Object> queryProfessionalByCollageId(
			@WebParam(name = "collageId") String collageId, @WebParam(name = "dataBaseName") String dataBaseName, @WebParam(name = "name") String name);

	Institution  queryEntity(@WebParam(name="InstitutionId")String InstitutionId);
}
@WebService(endpointInterface = "api.service.InstitutionBean")
public class InstitutionBeanImpl  implements InstitutionBean {
	/**
	 * WebService demo
	 *
	 * @return
	 */
	@Override
	public Map<String, Object> queryProfessionalByCollageId(String collageId, String dataBaseName, String name) {
		// 随便写个方法,返回个Map
		Map<String, Object> map = new HashMap<String, Object>();

		for (int i=0;i<10;i++){
			Institution in=new Institution();
			in.setInstitutionCode(String.valueOf(i));
			in.setInstitutionName(String.valueOf(i));
			map.put(String.valueOf(i),in);
		}

		return map;
	}

	@Override
	public Institution queryEntity(String InstitutionId) {
		Institution in=new Institution();<span style="white-space:pre">	</span>//再随便创建个方法,返回实体
		in.setInstitutionCode(String.valueOf(i));
		in.setInstitutionName(String.valueOf(i));
		return in;
	}
}
在类的上面也加上@WebService注解,endpointInterface属性指向接口的全限定名。
创建一个spring的配置文件,加入JAX-WS的Schema
<?xml version="1.0" encoding="utf-8"?>
<beans xmlns="http://www.springframework.org/schema/beans"
       xmlns:xsi="http://www.w3.org/2001/XMLSchema-instance"
       xmlns:jaxws="http://cxf.apache.org/jaxws"
       xsi:schemaLocation=" http://www.springframework.org/schema/beans
        http://www.springframework.org/schema/beans/spring-beans.xsd
        http://cxf.apache.org/jaxws
        http://cxf.apache.org/schemas/jaxws.xsd">

    <import resource="classpath:META-INF/cxf/cxf.xml" />
    <import resource="classpath:META-INF/cxf/cxf-servlet.xml" />

    <jaxws:endpoint id="InstitutionService" implementor="serviceImpl.InstitutionBeanImpl" address="/InstitutionService"  />
</beans>jaxws标签里面写的是endpoint的bean,如果调用的是Spring里面已经声明的类,还可以这么写。
<bean id="hello" class="demo.spring.service.HelloWorldImpl" />

<jaxws:endpoint id="helloWorld" implementor="#hello" address="/HelloWorld" />
<web-app version="3.0" xmlns="http://java.sun.com/xml/ns/javaee"
         xmlns:xsi="http://www.w3.org/2001/XMLSchema-instance"
         xsi:schemaLocation="http://java.sun.com/xml/ns/javaee
    http://java.sun.com/xml/ns/javaee/web-app_3_0.xsd">

    <context-param>
        <param-name>contextConfigLocation</param-name>
        <param-value>
            classpath:config/application*-webservice.xml
        </param-value>
    </context-param>

    <listener>
        <listener-class>
            org.springframework.web.context.ContextLoaderListener
        </listener-class>
    </listener>

    <servlet>
        <description>Apache CXF Endpoint</description>
        <display-name>cxf</display-name>
        <servlet-name>cxf</servlet-name>
        <servlet-class>org.apache.cxf.transport.servlet.CXFServlet</servlet-class>
        <load-on-startup>1</load-on-startup>
    </servlet>
    <servlet-mapping>
        <servlet-name>cxf</servlet-name>
        <!--CXF服务发布的路径-->
        <!--例如我这里发布好了,访问的是:http://localhost:8080/cxfdemo/ws/InstitutionService-->
        <url-pattern>/*</url-pattern>
    </servlet-mapping>
</web-app>OK,用你的IDE部署项目,启动tomcat就能访问了。
我这里使用了tomcat,默认打开了localhost:8080,会出现这个页面
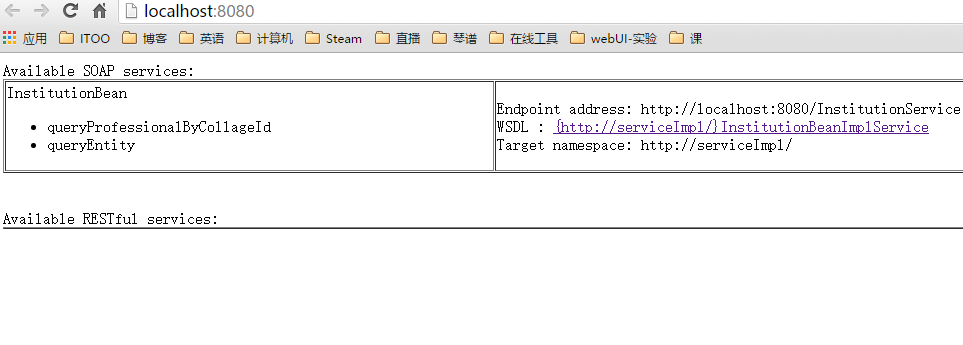
点击页面上的连接,就能看到wsdl地址了,然后发给需要的人就行了~


 263
263

 被折叠的 条评论
为什么被折叠?
被折叠的 条评论
为什么被折叠?
 到【灌水乐园】发言


