


android其实有一个getRootView()的方法,但是通常拿不到id,这是为什么呢?这是因为拿到的getRootView 是在ContentView外的DecorView。在《Android群英传》中说到:Android的Window对象由PhoneWindow实现,
DecorView将显示内容呈现在PhoneWindow上,所有的View监听由
WindowManagerService接收,通过Activity对象回调onClickListener;
DecorView包含TitleView 和ContentView,
这就是为什么
requestWindowFeature(Window.FEATURE_NO_TITLE)要放在setContent之前。
要想拿到布局文件的视图id,可以用这种方法:
((ViewGroup)findViewById(android.R.id.content)).getChildAt(0);空口无凭,以实验为证:
布局
<?xml version="1.0" encoding="utf-8"?>
<LinearLayout xmlns:android="http://schemas.android.com/apk/res/android"
    xmlns:tools="http://schemas.android.com/tools"
    android:id="@+id/activity_main"
    android:layout_width="match_parent"
    android:layout_height="match_parent"
    android:orientation="vertical"
    tools:context="com.example.caoyujie.decorviewdemo.MainActivity">

    <TextView
        android:id="@+id/tv_1"
        android:layout_width="wrap_content"
        android:layout_height="wrap_content"
        android:text="Hello World!" />

</LinearLayout>
测试代码
 LinearLayout ll = (LinearLayout) findViewById(R.id.activity_main);
        TextView tv1 = (TextView) findViewById(R.id.tv_1);
        Log.e("TAG","xmlroot = " + ll.getId());
        Log.e("TAG","RootView = " + tv1.getRootView().getId());
        Log.e("TAG","DecorView = " + getWindow().getDecorView().getId());
        Log.e("TAG","DecorView.getRootView() = " + getWindow().getDecorView().getRootView().getId());
        Log.e("TAG","android.R.id.content.getChildAt(0) = " + ((ViewGroup)findViewById(android.R.id.content)).getChildAt(0).getId());
结果打印:

我们清楚地看到,只有((ViewGroup)findViewById(android.R.id.content)).getChildAt(0).getId()与根布局LinearLayout的id相同,其他都返回了-1。
setContentView 流程(window DecorView 装载流程)
一、activity window 引出 PhoneWindow类
setContentView -> getWindow().setContentView(view)
getWindow() -> mWindow = new PhoneWindow(this);
二、 PhoneWindow 类分析
分析setContentView 知道里主要做两步操作:
->1 装载DecorView 基础布局 installDecor()
->2 装载setContentView的具体布局 mLayoutInflater.inflate(layoutResID, mContentParent);
@Override
    public void setContentView(int layoutResID) {

        if (mContentParent == null) {
            //1、装载 DecorView
            installDecor();
        } else if (!hasFeature(FEATURE_CONTENT_TRANSITIONS)) {
            mContentParent.removeAllViews();
        }

        if (hasFeature(FEATURE_CONTENT_TRANSITIONS)) {
            final Scene newScene = Scene.getSceneForLayout(mContentParent, layoutResID,getContext());
            transitionTo(newScene);
        } else {
            //2、把layoutResID 装载到 R.id.content对应的ViewGroup
            mLayoutInflater.inflate(layoutResID, mContentParent);
        }
        mContentParent.requestApplyInsets();
        final Callback cb = getCallback();
        if (cb != null && !isDestroyed()) {
            cb.onContentChanged();
        }
    }
布局装载图如下,后面详细描述加载的2步:
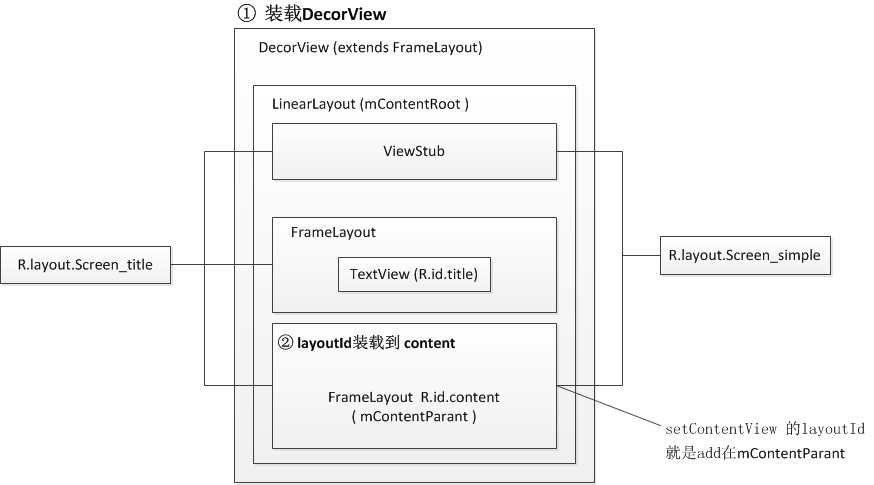
2.1、装载过程(基础模板layoutId, 与activity 传入的layout)
->1、generateDecor() 加载DecorView 作为最外层布局。比较简单该函数不展开
->2.1、generateLayout(mDecor) 装载基础模板布局(如:R.layout.screen_title 或者 R.layout.screen_simple)
->2.2、generateLayout(mDecor) 找到R.id.content 的viewGroup 作为 mContentParent
->补充 findViewById -> getDecorView().findViewById(id) -> (getDecorView() 就是 mDecor)
private void installDecor() {
    if (mDecor == null) {
        //1、加载DecorView(extends FrameLayout) 作为最外层布局
        mDecor = generateDecor();
        mDecor.setDescendantFocusability(ViewGroup.FOCUS_AFTER_DESCENDANTS);
        mDecor.setIsRootNamespace(true);
        if (!mInvalidatePanelMenuPosted && mInvalidatePanelMenuFeatures != 0) {
            mDecor.postOnAnimation(mInvalidatePanelMenuRunnable);
        }
    }
    if (mContentParent == null) {
        //2.1、装载基础模板布局(如:R.layout.screen_title 或者 R.layout.screen_simple)
        //2.2、找到R.id.content 的viewGroup 作为 mContentParent
        mContentParent = generateLayout(mDecor);
    }
    ...
}


protected ViewGroup generateLayout(DecorView decor) {

        ...

        else if ((features & (1 << FEATURE_NO_TITLE)) == 0) {
            // If no other features and not embedded, only need a title.
            // If the window is floating, we need a dialog layout
            if (mIsFloating) {
                TypedValue res = new TypedValue();
                getContext().getTheme().resolveAttribute(
                        R.attr.dialogTitleDecorLayout, res, true);
                layoutResource = res.resourceId;
            } else if ((features & (1 << FEATURE_ACTION_BAR)) != 0) {
                layoutResource = a.getResourceId(
                        R.styleable.Window_windowActionBarFullscreenDecorLayout,
                        R.layout.screen_action_bar);
            } else {
                layoutResource = R.layout.screen_title;
            }
            // System.out.println("Title!");
        } else if ((features & (1 << FEATURE_ACTION_MODE_OVERLAY)) != 0) {
            layoutResource = R.layout.screen_simple_overlay_action_mode;
        } else {
            // Embedded, so no decoration is needed.
            layoutResource = R.layout.screen_simple;
            // System.out.println("Simple!");
        }

        mDecor.startChanging();

        //2.1、装载基础模板layoutId 到decor (mDecor)
        View in = mLayoutInflater.inflate(layoutResource, null);
        decor.addView(in, new ViewGroup.LayoutParams(MATCH_PARENT, MATCH_PARENT));
        mContentRoot = (ViewGroup) in;

        //2.2、找到R.id.content 对应的ViewGroup 作为contentParent(mContentParent)
        //ID_ANDROID_CONTENT = com.android.internal.R.id.content;
        //findViewById -> getDecorView().findViewById(id) -> (getDecorView() -> mDecor)

        ViewGroup contentParent = (ViewGroup)findViewById(ID_ANDROID_CONTENT);
        if (contentParent == null) {
            throw new RuntimeException("Window couldn't find content container view");
        }
        ...
        return contentParent;
}
三、 获取setContentView的layout
public static View getContentView(Activity context)
{
    return ((ViewGroup)context.findViewById(android.R.id.content)).getChildAt(0);
}
参考
[1] http://blog.csdn.net/qinjuning/article/details/7226787


 2133
2133

 被折叠的 条评论
为什么被折叠?
被折叠的 条评论
为什么被折叠?
 到【灌水乐园】发言


