


1、vue生命周期
<template>
	<view>
		<button @click="click">提交</button>
		<view>
			{{text}}
		</view>
	</view>
</template>

<script>
	export default {
		data() {
			return {
				text: 'hello'
			}
		},
		methods: {
			click(){
				this.text = '你好'
			}
		},
		beforeCreate() {
			console.log(this.text)
		},
		created() {
			console.log(this.text)
		},
		beforeMount() {
			console.log(1)
		},
		mounted() {
			console.log(2)
		},
		beforeUpdate() {
			console.log("beforeupdate 如果页面没有重新渲染,则不会执行")
		},
		updated() {
			console.log("updated")
		}
	}
</script>

<style>
</style>
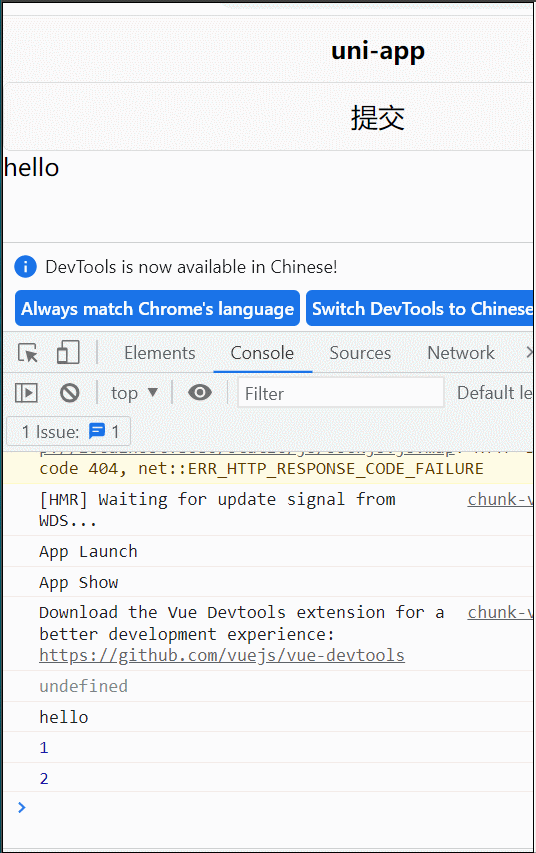
运行程序,可以看到程序依次执行了
beforeCreate() 、created()、beforeMount() 、mounted()
由于页面没有重新渲染,所以没有执行beforeUpdate,当我们点击了 button 更新了页面,然后执行了beforeUpdate 和 updated
2、计算属性、方法、监听
计算属性
<template>
	<view>
		{{fullText}}
		<button @click="click">提交</button>
		{{test}}
	</view>
</template>

<script>
	export default {
		data() {
			return {
				firstText: 'hello',
				lastText: 'world',
				test : '测试'
			}
		},
		methods: {
			click(){
				this.firstText = '你好'
			}
		},
		computed: {
			fullText() {
				console.log('计算属性')
				return this.firstText + " " + this.lastText
			}
		}
	}
</script>

<style>
</style>
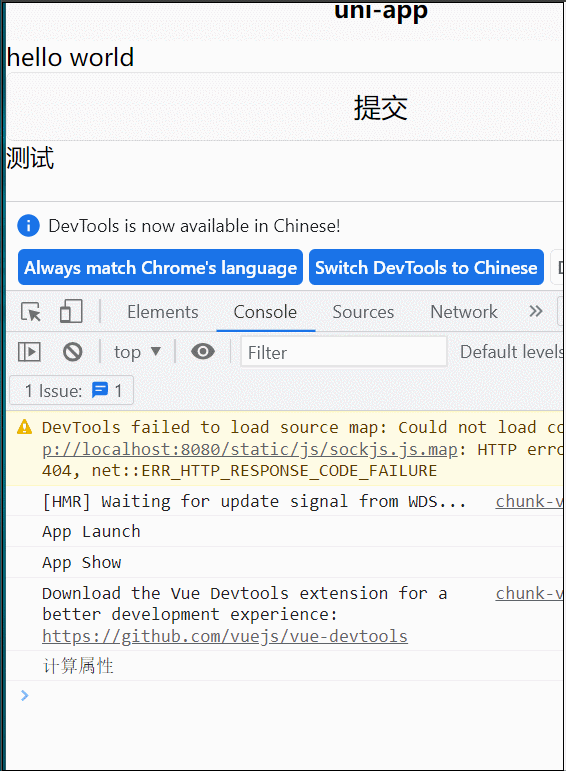
只有计算属性相关的值发生变化时,computed 才会执行,如果点击按钮改变的是 test
click(){
	this.test = '你好'
}
computed 就不会执行
方法
接下来把字符串的拼接改成 fullText() 方法:
<template>
	<view>
		{{fullText()}}
		<button @click="click">提交</button>
		{{test}}
	</view>
</template>

<script>
	export default {
		data() {
			return {
				firstText: 'hello',
				lastText: 'world',
				test : '测试',
			}
		},
		methods: {
			click(){
				this.test = '你好'
			},
			fullText() {
				console.log('方法')
				return this.firstText + " " + this.lastText
			}

		},
	}
</script>

<style>
</style>
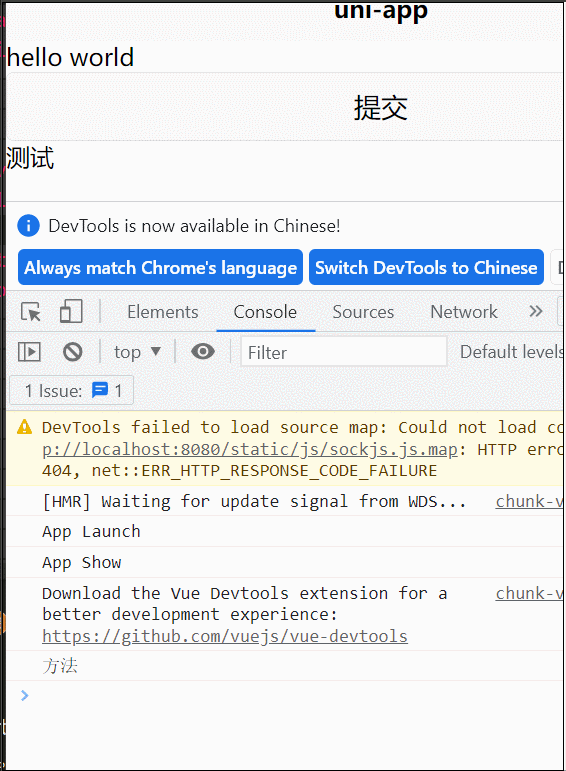
展示 hello world 的是 fullText() 方法将 firstText 和 lastText 拼接的,然后点击 button 按钮改变的虽然不是 firstText 或 lastText ,但是 fullText() 还是执行了
所以如果能实现同样的功能,应该优先使用计算属性,它只有在改变 firstText 或 lastText 才执行。而 fullText() 方法只要页面重新渲染了,都会执行
watch监听
<template>
	<view>
		{{fullText}}
		<button @click="click">提交</button>
		{{test}}
	</view>
</template>

<script>
	export default {
		data() {
			return {
				firstText: 'hello',
				lastText: 'world',
				fullText: 'hello world',
				test: '测试'
			}
		},
		methods: {
			click() {
				this.aa = '你好'
			},
		},
		watch: {
			firstText() {
				console.log('监听')
				this.fullText = this.firstText + " " + this.lastText
			},
			lastText() {
				console.log('监听')
				this.fullText = this.firstText + " " + this.lastText
			}
		}
	}
</script>

<style>
</style>
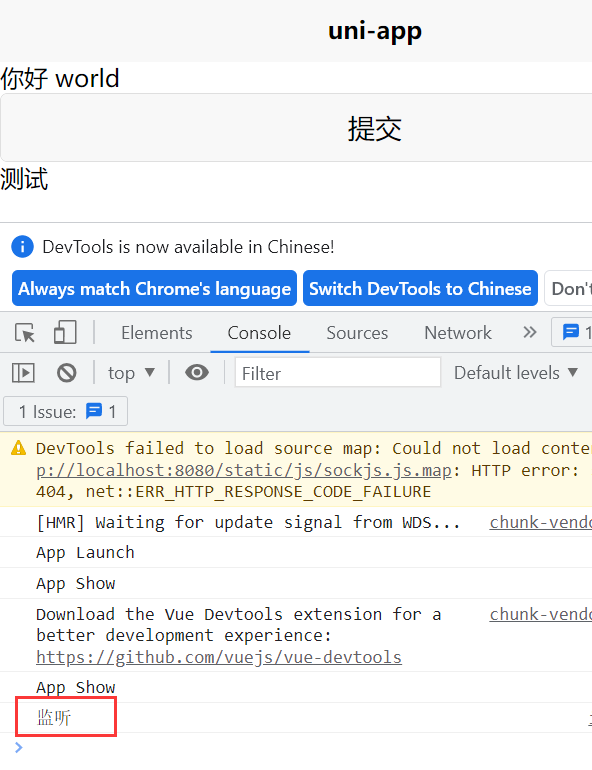
监听了 firstText 和 lastText,只有当 firstText 或 lastText 改变时,监听才执行,如果我们点击 button 改变的是 test 的值,监听不会执行
所以总结下来,实现这个功能 方法 是最不可取的
3、父子组件传值
父组件向子组件传值
在 components 文件夹下新建一个 child.vue 组件,首先需要在 index.vue 中引用,然后使用,在 child 中传入一个 myText 参数,值就是 text
<template>
<view>
<child :myText="text"></child>
</view>
</template>
<script>
import child from '../../components/child.vue'
export default {
components: {
child
},
data() {
return {
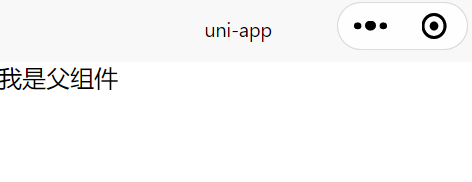
text: '我是父组件'
}
},
methods: {
},
}
</script>
<style>
</style>
child.vue
在子组件中,用 props 接收参数 myText,然后展示在页面即可
<template>
	<view>
		{{myText}}
	</view>
</template>

<script>
	export default {
		props:['myText'],
		data() {
			return {

			};
		}
	}
</script>

<style>

</style>
运行程序:
子组件向父组件传值
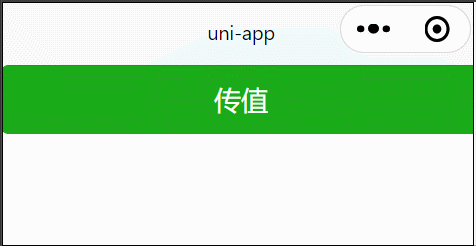
child.vue中,我们在 button 中绑定一个 click 事件,点击执行 click 方法,用 $emit 方法,传入一个参数 myChange,值是 title
<template>
	<view>
		<button type=primary @click="click">传值</button>
	</view>
</template>

<script>
	export default {
		data() {
			return {
				title: '我是子组件'
			};
		},
		methods: {
			click() {
				this.$emit('myChange', this.title)
			}
		}
	}
</script>

<style>

</style>
index.vue 父组件中,child 组件绑定 上个页面的 myChange 方法,执行本页面的 change 方法,可以接收上个页面的参数
<template>
	<view>
		<child @myChange="change"></child>
		{{title}}
	</view>
</template>

<script>
	import child from '../../components/child.vue'
	export default {
		components: {
			child
		},
		data() {
			return {
				title: ''
			}
		},
		methods: {
			change(res) {
				this.title = res
			}
		},
	}
</script>

<style>
</style>
运行结果:
4、组件参数校验
上边的父组件向子组件传值后,在子组件页面可以进行校验,修改 child.vue
props:{
	myText:Number
},
虽然能正常显示,但是控制台有警告,我们还可以这样写:
props:{
	myText:[String,Number]
},
或者
myText:{
	type:Number,
	default:3
}
5、pages.json
{
	"pages": [ //pages数组中第一项表示应用启动页,参考:https://uniapp.dcloud.io/collocation/pages
		{
			"path": "pages/index/index",
			"style": {
				"navigationBarTitleText": "uni-app"
			}
		}
	    ,{
            "path" : "pages/info/info",
            "style" :
            {
                "navigationBarTitleText": "",
                "enablePullDownRefresh": false
            }

        }
    ],
	"globalStyle": {
		"navigationBarTextStyle": "black",
		"navigationBarTitleText": "uni-app",
		"navigationBarBackgroundColor": "#F8F8F8",
		"backgroundColor": "#F8F8F8"
	},
	"condition": { //模式配置,仅开发期间生效
	    "current": 0, //当前激活的模式(list 的索引项)
	    "list": [{
	            "name": "info", //模式名称
	            "path": "pages/info/info", //启动页面,必选
	            "query": "newsid=5310906" //启动参数,在页面的onLoad函数里面得到。
	        }]
	},
	"tabBar": {
	    "color": "#7A7E83",
	    "selectedColor": "#3cc51f",
	    "borderStyle": "black",
	    "backgroundColor": "#ffffff",
	    "list": [{
	        "pagePath": "pages/index/index",
	        "iconPath": "",
	        "selectedIconPath": "",
	        "text": "组件"
	    }, {
	        "pagePath": "pages/info/info",
	        "iconPath": "",
	        "selectedIconPath": "",
	        "text": "接口"
	    }]
	}
}
6、navigator
官方教程
open-type 跳转方式的有效值:
- navigate:保留当前界面,跳转到应用内的某个界面
- redirect:关闭当前界面,跳转到应用内的某个界面
- reLaunch:关闭所有页面,打开跳转的页面,配合属性
delta使用 - switchTab:跳转到TabBar页面,关闭其他非tabBar页面
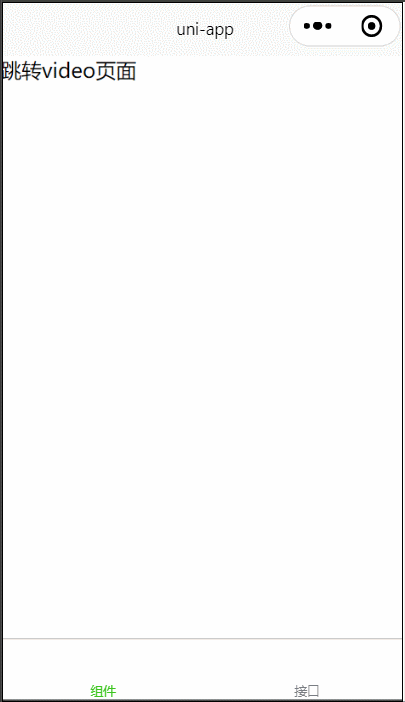
index.vue
<navigator url="/pages/video/video?id=123">跳转video页面</navigator>
video.vue
<navigator url="/pages/index/index" open-type="switchTab">我是video,跳转index页面</navigator>
{{id}}

export default {
	props:['id'],
	data() {
		return {
	}
}
1、因为上边的 pages.json 设置的 tabbar 里有 index.vue,所以当 video.vue 跳转 index.vue,必须使用 open-type="switchTab"
2、页面跳转在 url 后传值,然后在跳转页面用 props 接收
3、跳转 tabbar 没有办法传值


 9192
9192


 被折叠的 条评论
为什么被折叠?
被折叠的 条评论
为什么被折叠?
 到【灌水乐园】发言


