三分钟看懂Android事件处理机制

前面介绍了Android应用层的第一个主要机制,现在我们来看事件处理机制。很简单,只要看懂这幅图即可。
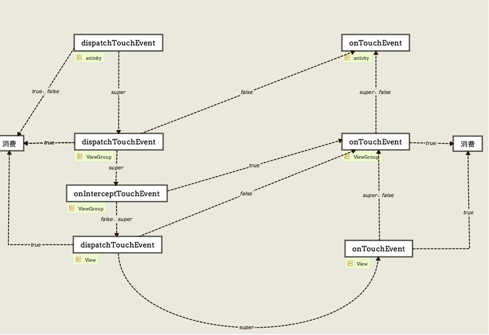


总结一下这幅图,

    触摸事件的横向流程是先ACTION_DOWN ->ACTION_MOVE -> ACTION_UP

    触摸事件的纵向流程是先从Activity -> ViewGroup -> View(如上图所示,包裹关系Activity包裹了ViewGroup,ViewGroup包裹了View,触摸View)


前面一个ACTION的层级将决定后面ACTION的层级(后面ACTION的层级不能高于前面ACTION的层级,取决于前一个事件消费在哪个层级)

如果消费层级在ViewGroup上,则下一个ACTION不会调用该ViewGrouponInterceptTouchEvent方法,没必要分发,

直接通过dispatchTouchEvent方法跳到onTouchEvent方法去处理,其实最终也是要看是消费在哪个层级

消费在哪个层级就从该层级dispatchTouchEvent方法跳到onTouchEvent方法去处理。


源码分析:

ViewGroupdispatchTouchEvent方法调用super.dispatchTouchEvent中,如下

if (dispatchTransformedTouchEvent(ev, false, child, idBitsToAssign)) 

{

。。。。。

newTouchTarget = addTouchTarget(child, idBitsToAssign);

。。。。。

}


dispatchTransformedTouchEvent(ev, false, child, idBitsToAssign)

中会去处理子ViewdispatchTouchEvent方法,

最终会调用子ViewonTouchEvent事件,

如果dispatchTransformedTouchEvent(ev, false, child, idBitsToAssign)

返回true则会调用addTouchTarget(child, idBitsToAssign)方法,使得mFirstTouchTarget不为null,


super.dispatchTouchEvent方法的后续流程中,

if (mFirstTouchTarget == null) {

handled = dispatchTransformedTouchEvent(ev,canceled,

 null,TouchTarget.ALL_POINTER_IDS);

}


dispatchTransformedTouchEvent(ev,canceled,null,TouchTarget.ALL_POINTER_IDS)该方法中传入的null参数则使得调用ViewGroup

super.dispatchTouchEvent方法中,super.dispatchTouchEvent方法中会调用

onTouchEvent方法,继而实现了从ViewViewGrouponTouchEvent方法的上层传递


好的,@Mapper注解是Mybatis框架中用于标识数据访问层接口的注解,用于告诉Spring容器将该接口类实例化并注入到其他Bean中。其使用步骤如下: 1. 在Spring Boot项目中引入Mybatis和Mybatis-Spring的依赖 2. 在配置文件中配置数据源和Mybatis的相关属性 3. 创建一个数据访问层接口,使用@Mapper注解标识该接口 4. 在该数据访问层接口中定义需要操作的数据库方法 5. 在Service或Controller中注入该数据访问层接口的实例,并调用其中的方法 下面是一个示例: 1. 在pom.xml中添加Mybatis和Mybatis-Spring的依赖: ```xml <dependency> <groupId>org.mybatis</groupId> <artifactId>mybatis</artifactId> <version>3.4.6</version> </dependency> <dependency> <groupId>org.mybatis.spring.boot</groupId> <artifactId>mybatis-spring-boot-starter</artifactId> <version>2.1.1</version> </dependency> ``` 2. 在application.properties中配置数据源和Mybatis的相关属性: ```properties spring.datasource.url=jdbc:mysql://localhost:3306/test spring.datasource.username=root spring.datasource.password=123456 mybatis.type-aliases-package=com.example.demo.entity mybatis.mapper-locations=classpath:mapper/*.xml ``` 3. 创建一个数据访问层接口UserMapper,使用@Mapper注解标识该接口: ```java @Mapper public interface UserMapper { User selectByPrimaryKey(Integer id); int insert(User record); int updateByPrimaryKey(User record); int deleteByPrimaryKey(Integer id); } ``` 4. 在mapper目录下创建UserMapper.xml,定义需要操作的数据库方法: ```xml <mapper namespace="com.example.demo.mapper.UserMapper"> <resultMap id="BaseResultMap" type="com.example.demo.entity.User"> <id column="id" property="id" jdbcType="INTEGER"/> <result column="username" property="username" jdbcType="VARCHAR"/> <result column="password" property="password" jdbcType="VARCHAR"/> </resultMap> <select id="selectByPrimaryKey" resultMap="BaseResultMap" parameterType="java.lang.Integer"> select * from user where id = #{id,jdbcType=INTEGER} </select> <insert id="insert" parameterType="com.example.demo.entity.User" useGeneratedKeys="true" keyProperty="id"> insert into user (username, password) values (#{username,jdbcType=VARCHAR}, #{password,jdbcType=VARCHAR}) </insert> <update id="updateByPrimaryKey" parameterType="com.example.demo.entity.User"> update user set username = #{username,jdbcType=VARCHAR}, password = #{password,jdbcType=VARCHAR} where id = #{id,jdbcType=INTEGER} </update> <delete id="deleteByPrimaryKey" parameterType="java.lang.Integer"> delete from user where id = #{id,jdbcType=INTEGER} </delete> </mapper> ``` 5. 在Service或Controller中注入UserMapper的实例,并调用其中的方法: ```java @Service public class UserServiceImpl implements UserService { @Autowired private UserMapper userMapper; @Override public User selectByPrimaryKey(Integer id) { return userMapper.selectByPrimaryKey(id); } @Override public int insert(User user) { return userMapper.insert(user); } @Override public int updateByPrimaryKey(User user) { return userMapper.updateByPrimaryKey(user); } @Override public int deleteByPrimaryKey(Integer id) { return userMapper.deleteByPrimaryKey(id); } } ``` 这就是使用@Mapper注解的基本步骤,希望对你有所帮助。
评论
添加红包

请填写红包祝福语或标题

红包个数最小为10个

红包金额最低5元

当前余额3.43前往充值 >
需支付:10.00
成就一亿技术人!
领取后你会自动成为博主和红包主的粉丝 规则
hope_wisdom
发出的红包
实付
使用余额支付
点击重新获取
扫码支付
钱包余额 0

抵扣说明:

1.余额是钱包充值的虚拟货币,按照1:1的比例进行支付金额的抵扣。
2.余额无法直接购买下载,可以购买VIP、付费专栏及课程。

余额充值