


源码下载http://download.csdn.net/detail/u010387196/7257487
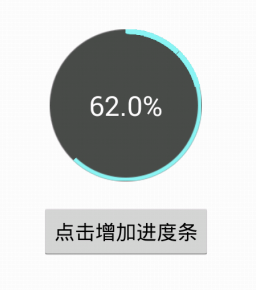
在学习了android入门知识后,第一次尝试制作android自定义控件。如图,这是一个圆形进度条。
制作思路如下:
1.利用framelayout形成组合控件,底层ImageView显示背景,中间层ImageView显示进度,最上层TextView显示百分比;
2.其中中间层的ImageView需要做到:随进度改变而截取相对应的区域显示。于是自定义View继承ImageView,添加progress,max属性,更改onDraw显示,利用clipPath截取想要的部分显示;
3.最上层的TextView只需随进度改变而setText就可以了。
用到了的知识有:
a)组合控件
b)重写已有控件
c)自定义属性
d)图片剪裁
组合控件
首先编写组合控件的xml布局文件,该xml用来对应自定义的控件样式,里面放置用于组合的控件。
例如:
<?xml version="1.0" encoding="utf-8"?>

<FrameLayout xmlns:android="http://schemas.android.com/apk/res/android"
    android:layout_width="wrap_content"
    android:layout_height="wrap_content"
    android:layout_gravity="center"
    >
    <ImageView
        android:id="@+id/background"
        android:layout_width="wrap_content"
        android:layout_height="wrap_content"
        android:contentDescription="@string/app_name"
        />

    <TextView
        android:id="@+id/text"
        android:layout_gravity="center"
        android:layout_height="fill_parent"
        android:layout_width="fill_parent"
        android:textColor="#ffffff"
        android:textSize="24sp"
        />
</FrameLayout>那么,自定义的控件则是由一个ImageView和一个TextView组合而成。
接着,如何使用该布局文件?
我们只需要新建一个java类,继承FrameLayout并使其对应该xml布局文件即可。
要对应布局文件并能够获取布局文件中的控件,需要在构造函数中调用
LayoutInflater.from(context).inflate(布局文件id, this, true);
之后即可使用布局文件中的控件了。
如下:
public class TestView extends FrameLayout {
    private TextView mText;
    private ImageView mBackground;


    public TestView (Context context) {
        super(context);
        //解析反射资源文件,然后将布局附加到当前的控件
        LayoutInflater.from(context).inflate(布局文件id, this, true);
        //获取控件
        mText = (TextView)findViewById(R.id.text);
        mBackground=(ImageView)findViewById(R.id.background);
    }

    public TestView (Context context, AttributeSet attrs) {
        super(context,attrs);
        //解析反射资源文件,然后将布局附加到当前的控件
        LayoutInflater.from(context).inflate(布局文件id, this, true);
        //获取控件
        mText = (TextView)findViewById(R.id.text);
        mBackground=(ImageView)findViewById(R.id.background);
    }

}
接下来,要使用这个自定义的组合控件,只需要在要使用的布局文件中应用该类文件即可。
如下:
<?xml version="1.0" encoding="utf-8"?>

<LinearLayout xmlns:android="http://schemas.android.com/apk/res/android"
    android:layout_width="fill_parent"
    android:layout_height="fill_parent"
    android:orientation="vertical"
    android:gravity="center"
    >
    <com.janbean.test.TestView
        android:layout_height="wrap_content"
        android:layout_width="wrap_content"
         />
</LinearLayout>
重写已有控件
要重写控件,首先要继承欲改变的控件,然后主要是重写你想改变的函数,如onDraw(),onKeyDown()等等,重写onDraw可能需要掌握好canvas和paint的用法。
如:
public class MyTextView extends TextView {

    public MyTextView(Context context, AttributeSet ats, int defStyle) {
        super(context, ats, defStyle);
    }

    public MyTextView(Context context) {
        super(context);
    }

    public MyTextView(Context context, AttributeSet attrs) {
        super(context, attrs);
    }

    @Override
    public void onDraw(Canvas canvas) {
        // 在画布上画文本之下的内容

        // 保证默认的文本渲染
        super.onDraw(canvas);

        // 在画布上画文本之上的内容

    }

    @Override
    public boolean onKeyDown(int keyCode, KeyEvent keyEvent) {
        // 写自己的控制

        // 保持父类默认的控制
        return super.onKeyDown(keyCode, keyEvent);
    }
}
自定义属性
在自定义控件时,有时我们需要使用自定义的属性,那么如何在xml布局文件中使用这些自定义的属性呢?
一、在res/values文件下定义一个attrs.xml文件,这就是你自定义的属性名称和格式
如:
<?xml version="1.0" encoding="utf-8"?>
<resources>
    <declare-styleable name="ProgressCircle">
        <attr name="foreground" format="reference|color" />
        <attr name="background" format="reference|color" />
        <attr name="progress" format="integer" />
        <attr name="max" format="integer" />
    </declare-styleable>
</resources>更多具体属性可以参考《Android中自定义属性的格式详解》
二、在控件的类文件中使用
例如我们已经定义了attr.xml文件如下:
<?xml version="1.0" encoding="utf-8"?>
<resources>
    <declare-styleable name="ProgressCircle">
        <attr name="foreground" format="reference|color" />
        <attr name="background" format="reference|color" />
        <attr name="progress" format="integer" />
        <attr name="max" format="integer" />
    </declare-styleable>
</resources>在类文件中使用则需要TypedArray ,如下:
public ProgressCircle(Context context, AttributeSet attrs) {
    super(context,attrs);
    TypedArray a = context.obtainStyledAttributes(attrs,
                R.styleable.ProgressCircle);

    //获取xml布局文件中属性名为max的
    //以下的ProgressCircle_max代表着attr.xml文件中ProgressCircle这个declare-styleable
    //中的max属性,另一个参数代表在xml布局文件中没有定义时使用的默认值
    int max=a.getInteger(R.styleable.ProgressCircle_max, 100);
    //继续获取xml资源文件中的属性数据
    int progress=a.getInteger(R.styleable.ProgressCircle_progress, 0);
    Drawable background=a.getDrawable(R.styleable.ProgressCircle_background );
    Drawable foreground=a.getDrawable(R.styleable.ProgressCircle_foreground );
    //使用完毕需要调用recycle
    a.recycle();
}
三、在布局文件中使用
在布局文件中使用自定义属性需要声明命名空间,xmlns:命名空间名称=”包名”
如:
<?xml version="1.0" encoding="utf-8"?>

<LinearLayout xmlns:android="http://schemas.android.com/apk/res/android"
    xmlns:progress_circle="http://schemas.android.com/apk/res/com.janbean.progresscircle"
    android:layout_width="fill_parent"
    android:layout_height="fill_parent"
    android:orientation="vertical"
    android:gravity="center"
    >
    <com.janbean.progresscircle.ProgressCircle
        android:id="@+id/test_progress_circle"
        android:layout_height="wrap_content"
        android:layout_width="wrap_content"
        progress_circle:progress="0"
        progress_circle:max="100"
        progress_circle:foreground="@drawable/foreground"
        progress_circle:background="@drawable/background"
         />
    <Button
        android:id="@+id/add_progress"
        android:layout_width="wrap_content"
        android:layout_height="wrap_content"
        android:text="@string/add"
        android:layout_margin="20dp"/>
</LinearLayout>
图片剪裁
使用Path或Region指定路径区域,我使用的是Path。
使用前可以先Path.reset(),再使用Path各种指定路径的函数。
之后canvas有clipPath方法来剪裁画布,并能进行多次剪裁组合。
具体说明可以查看该博客:《android图形图像编程-第三章 路径(Path)与剪裁(Clipping)》
在使用clipPath时发生一个奇怪的现象,即第一次使用时似乎没有产生效果,再次使用才能发挥作用,不知道为什么。
最后感谢以下博客博主,给了我很多参考:
《android图形图像编程-第三章 路径(Path)与剪裁(Clipping)》
《Android高手进阶教程(四)之----Android 中自定义属性(attr.xml,TypedArray)的使用!》


 1006
1006

 被折叠的 条评论
为什么被折叠?
被折叠的 条评论
为什么被折叠?
 到【灌水乐园】发言


