


BIO/NIO/AIO区别
强力推荐Java架构师学习网址:https://qiuyadongsite.github.io/
同步异步阻塞非阻塞-通俗理解
首先来举个例子说明吧,假设你想吃一份盖饭:
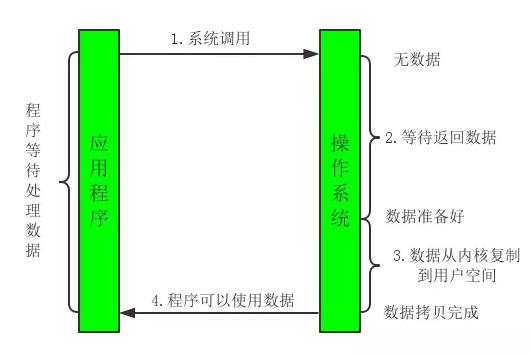
同步阻塞:你到饭馆点餐,然后在那等着,还要一边喊:好了没啊!
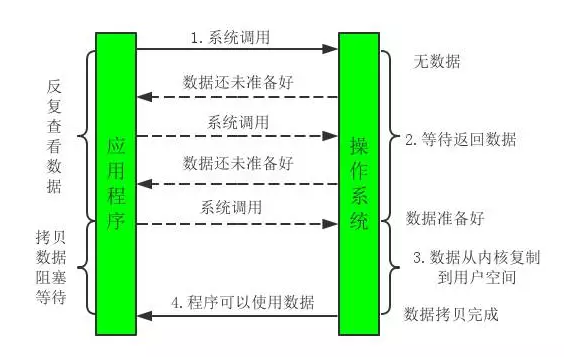
同步非阻塞:在饭馆点完餐,就去遛狗了。不过溜一会儿,就回饭馆喊一声:好了没啊!
异步阻塞:遛狗的时候,接到饭馆电话,说饭做好了,让您亲自去拿。
异步非阻塞:饭馆打电话说,我们知道您的位置,一会给你送过来,安心遛狗就可以了。
BIO
同步并阻塞,服务器实现模式为一个连接一个线程,即客户端有连接请求时服务器端就需要启动一个线程进行处理,如果这个连接不做任何事情会造成不必要的线程开销,当然可以通过线程池机制改善。
服务器处理类:
public class ServerHandler implements Runnable{

	private Socket socket ;

	public ServerHandler(Socket socket){
		this.socket = socket;
	}

	@Override
	public void run() {
		BufferedReader in = null;
		PrintWriter out = null;
		try {
			in = new BufferedReader(new InputStreamReader(this.socket.getInputStream()));
			out = new PrintWriter(this.socket.getOutputStream(), true);
			String body = null;
			while(true){
				body = in.readLine();
				if(body == null) break;
				System.out.println("Server :" + body);
				out.println("服务器端回送响的应数据.");
			}

		} catch (Exception e) {
			e.printStackTrace();
		} finally {
			if(in != null){
				try {
					in.close();
				} catch (IOException e) {
					e.printStackTrace();
				}
			}
			if(out != null){
				try {
					out.close();
				} catch (Exception e) {
					e.printStackTrace();
				}
			}
			if(socket != null){
				try {
					socket.close();
				} catch (IOException e) {
					e.printStackTrace();
				}
			}
			socket = null;
		}


	}

}
服务器类:
public class Server {
	final static int PROT = 8765;
	public static void main(String[] args) {
		ServerSocket server = null;
		try {
			server = new ServerSocket(PROT);
			System.out.println(" server start .. ");
			//进行阻塞
			Socket socket = server.accept();
			//新建一个线程执行客户端的任务
			new Thread(new ServerHandler(socket)).start();
		} catch (Exception e) {
			e.printStackTrace();
		} finally {
			if(server != null){
				try {
					server.close();
				} catch (IOException e) {
					e.printStackTrace();
				}
			}
			server = null;
		}
	}
}
客户端类:
public class Client {

	final static String ADDRESS = "127.0.0.1";
	final static int PORT = 8765;

	public static void main(String[] args) {

		Socket socket = null;
		BufferedReader in = null;
		PrintWriter out = null;

		try {
			socket = new Socket(ADDRESS, PORT);
			in = new BufferedReader(new InputStreamReader(socket.getInputStream()));
			out = new PrintWriter(socket.getOutputStream(), true);

			//向服务器端发送数据
			out.println("接收到客户端的请求数据...");
			out.println("接收到客户端的请求数据1111...");
			String response = in.readLine();
			System.out.println("Client: " + response);

		} catch (Exception e) {
			e.printStackTrace();
		} finally {
			if(in != null){
				try {
					in.close();
				} catch (IOException e) {
					e.printStackTrace();
				}
			}
			if(out != null){
				try {
					out.close();
				} catch (Exception e) {
					e.printStackTrace();
				}
			}
			if(socket != null){
				try {
					socket.close();
				} catch (IOException e) {
					e.printStackTrace();
				}
			}
			socket = null;
		}
	}
}
改进版(线程池):
服务器处理类:
public class ServerHandler implements Runnable {

	private Socket socket;
	public ServerHandler (Socket socket){
		this.socket = socket;
	}

	@Override
	public void run() {
		BufferedReader in = null;
		PrintWriter out = null;
		try {
			in = new BufferedReader(new InputStreamReader(this.socket.getInputStream()));
			out = new PrintWriter(this.socket.getOutputStream(), true);
			String body = null;
			while(true){
				body = in.readLine();
				if(body == null) break;
				System.out.println("Server:" + body);
				out.println("Server response");
			}
		} catch (Exception e) {
			e.printStackTrace();
		} finally {
			if(in != null){
				try {
					in.close();
				} catch (Exception e1) {
					e1.printStackTrace();
				}
			}
			if(out != null){
				try {
					out.close();
				} catch (Exception e2) {
					e2.printStackTrace();
				}
			}
			if(socket != null){
				try {
					socket.close();
				} catch (Exception e3) {
					e3.printStackTrace();
				}
			}
			socket = null;
		}


	}

}
服务器类:
public class Server {

	final static int PORT = 8765;

	public static void main(String[] args) {
		ServerSocket server = null;
		BufferedReader in = null;
		PrintWriter out = null;
		try {
			server = new ServerSocket(PORT);
			System.out.println("server start");
			Socket socket = null;
			HandlerExecutorPool executorPool = new HandlerExecutorPool(50, 1000);
			while(true){
				socket = server.accept();
				executorPool.execute(new ServerHandler(socket));
			}

		} catch (Exception e) {
			e.printStackTrace();
		} finally {
			if(in != null){
				try {
					in.close();
				} catch (Exception e1) {
					e1.printStackTrace();
				}
			}
			if(out != null){
				try {
					out.close();
				} catch (Exception e2) {
					e2.printStackTrace();
				}
			}
			if(server != null){
				try {
					server.close();
				} catch (Exception e3) {
					e3.printStackTrace();
				}
			}
			server = null;
		}


	}
}
public class HandlerExecutorPool {

private ExecutorService executor;
public HandlerExecutorPool(int maxPoolSize, int queueSize){
  this.executor = new ThreadPoolExecutor(
      Runtime.getRuntime().availableProcessors(),
      maxPoolSize,
      120L,
      TimeUnit.SECONDS,
      new ArrayBlockingQueue<Runnable>(queueSize));
}

public void execute(Runnable task){
  this.executor.execute(task);
}


}
客户类如何上:
NIO
同步非阻塞,服务器实现模式为一个请求一个线程,即客户端发送的连接请求都会注册到多路复用器上,多路复用器轮询到连接有I/O请求时才启动一个线程进行处理。
NIO本身是基于事件驱动思想来完成的,其主要想解决的是BIO的大并发问题: 在使用同步I/O的网络应用中,如果要同时处理多个客户端请求,或是在客户端要同时和多个服务器进行通讯,就必须使用多线程来处理。也就是说,将每一个客户端请求分配给一个线程来单独处理。这样做虽然可以达到我们的要求,但同时又会带来另外一个问题。
由于每创建一个线程,就要为这个线程分配一定的内存空间(也叫工作存储器),而且操作系统本身也对线程的总数有一定的限制。如果客户端的请求过多,服务端程序可能会因为不堪重负而拒绝客户端的请求,甚至服务器可能会因此而瘫痪。
NIO基于Reactor,当socket有流可读或可写入socket时,操作系统会相应的通知引用程序进行处理,应用再将流读取到缓冲区或写入操作系统。
也就是说,这个时候,已经不是一个连接就要对应一个处理线程了,而是有效的请求,对应一个线程,当连接没有数据时,是没有工作线程来处理的。
BIO与NIO一个比较重要的不同,是我们使用BIO的时候往往会引入多线程,每个连接一个单独的线程;
而NIO则是使用单线程或者只使用少量的多线程,每个连接共用一个线程。
IO的最重要的地方是当一个连接创建后,不需要对应一个线程,这个连接会被注册到多路复用器上面,所以所有的连接只需要一个线程就可以搞定,当这个线程中的多路复用器进行轮询的时候,发现连接上有请求的话,才开启一个线程进行处理,也就是一个请求一个线程模式。在NIO的处理方式中,当一个请求来的话,开启线程进行处理,可能会等待后端应用的资源(JDBC连接等),其实这个线程就被阻塞了,当并发上来的话,还是会有BIO一样的问题。
服务器类:
public class Server implements Runnable{
	//1 多路复用器(管理所有的通道)
	private Selector seletor;
	//2 建立缓冲区
	private ByteBuffer readBuf = ByteBuffer.allocate(1024);
	//3
	private ByteBuffer writeBuf = ByteBuffer.allocate(1024);
	public Server(int port){
		try {
			//1 打开路复用器
			this.seletor = Selector.open();
			//2 打开服务器通道
			ServerSocketChannel ssc = ServerSocketChannel.open();
			//3 设置服务器通道为非阻塞模式
			ssc.configureBlocking(false);
			//4 绑定地址
			ssc.bind(new InetSocketAddress(port));
			//5 把服务器通道注册到多路复用器上,并且监听阻塞事件
			ssc.register(this.seletor, SelectionKey.OP_ACCEPT);

			System.out.println("Server start, port :" + port);

		} catch (IOException e) {
			e.printStackTrace();
		}
	}

	@Override
	public void run() {
		while(true){
			try {
				//1 必须要让多路复用器开始监听
				this.seletor.select();
				//2 返回多路复用器已经选择的结果集
				Iterator<SelectionKey> keys = this.seletor.selectedKeys().iterator();
				//3 进行遍历
				while(keys.hasNext()){
					//4 获取一个选择的元素
					SelectionKey key = keys.next();
					//5 直接从容器中移除就可以了
					keys.remove();
					//6 如果是有效的
					if(key.isValid()){
						//7 如果为阻塞状态
						if(key.isAcceptable()){
							this.accept(key);
						}
						//8 如果为可读状态
						if(key.isReadable()){
							this.read(key);
						}
						//9 写数据
						if(key.isWritable()){
							//this.write(key); //ssc
						}
					}

				}
			} catch (IOException e) {
				e.printStackTrace();
			}
		}
	}

	private void write(SelectionKey key){
		//ServerSocketChannel ssc =  (ServerSocketChannel) key.channel();
		//ssc.register(this.seletor, SelectionKey.OP_WRITE);
	}

	private void read(SelectionKey key) {
		try {
			//1 清空缓冲区旧的数据
			this.readBuf.clear();
			//2 获取之前注册的socket通道对象
			SocketChannel sc = (SocketChannel) key.channel();
			//3 读取数据
			int count = sc.read(this.readBuf);
			//4 如果没有数据
			if(count == -1){
				key.channel().close();
				key.cancel();
				return;
			}
			//5 有数据则进行读取 读取之前需要进行复位方法(把position 和limit进行复位)
			this.readBuf.flip();
			//6 根据缓冲区的数据长度创建相应大小的byte数组,接收缓冲区的数据
			byte[] bytes = new byte[this.readBuf.remaining()];
			//7 接收缓冲区数据
			this.readBuf.get(bytes);
			//8 打印结果
			String body = new String(bytes).trim();
			System.out.println("Server : " + body);

			// 9..可以写回给客户端数据

		} catch (IOException e) {
			e.printStackTrace();
		}

	}

	private void accept(SelectionKey key) {
		try {
			//1 获取服务通道
			ServerSocketChannel ssc =  (ServerSocketChannel) key.channel();
			//2 执行阻塞方法
			SocketChannel sc = ssc.accept();
			//3 设置阻塞模式
			sc.configureBlocking(false);
			//4 注册到多路复用器上,并设置读取标识
			sc.register(this.seletor, SelectionKey.OP_READ);
		} catch (IOException e) {
			e.printStackTrace();
		}
	}

	public static void main(String[] args) {

		new Thread(new Server(8765)).start();;
	}


}
客户端类:
public class Client {

	//需要一个Selector
	public static void main(String[] args) {
		//创建连接的地址
		InetSocketAddress address = new InetSocketAddress("127.0.0.1", 8765);
		//声明连接通道
		SocketChannel sc = null;
		//建立缓冲区
		ByteBuffer buf = ByteBuffer.allocate(1024);
		try {
			//打开通道
			sc = SocketChannel.open();
			//进行连接
			sc.connect(address);

			while(true){
				//定义一个字节数组,然后使用系统录入功能:
				byte[] bytes = new byte[1024];
				System.in.read(bytes);

				//把数据放到缓冲区中
				buf.put(bytes);
				//对缓冲区进行复位
				buf.flip();
				//写出数据
				sc.write(buf);
				//清空缓冲区数据
				buf.clear();
			}
		} catch (IOException e) {
			e.printStackTrace();
		} finally {
			if(sc != null){
				try {
					sc.close();
				} catch (IOException e) {
					e.printStackTrace();
				}
			}
		}

	}

}
AIO
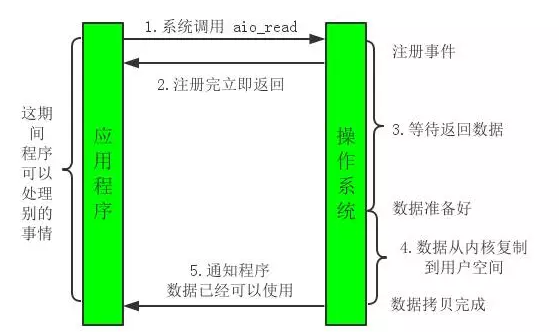
与NIO不同,当进行读写操作时,只须直接调用API的read或write方法即可。
这两种方法均为异步的:
对于读操作而言,当有流可读取时,操作系统会将可读的流传入read方法的缓冲区,并通知应用程序;
对于写操作而言,当操作系统将write方法传递的流写入完毕时,操作系统主动通知应用程序。
即可以理解为,read/write方法都是异步的,完成后会主动调用回调函数。
在JDK1.7中,这部分内容被称作NIO.2,主要在java.nio.channels包下增加了下面四个异步通
道:AsynchronousSocketChannelAsynchronousServerSocketChannelAsynchronousFileChannelAsynchronousDatagramChannel其中的read/write方法,会返回一个带回调函数的对象,当执行完读取/写入操作后,直接调用回调函数。
服务器类:
public class Server {
	//线程池
	private ExecutorService executorService;
	//线程组
	private AsynchronousChannelGroup threadGroup;
	//服务器通道
	public AsynchronousServerSocketChannel assc;

	public Server(int port){
		try {
			//创建一个缓存池
			executorService = Executors.newCachedThreadPool();
			//创建线程组
			threadGroup = AsynchronousChannelGroup.withCachedThreadPool(executorService, 1);
			//创建服务器通道
			assc = AsynchronousServerSocketChannel.open(threadGroup);
			//进行绑定
			assc.bind(new InetSocketAddress(port));

			System.out.println("server start , port : " + port);
			//进行阻塞
			assc.accept(this, new ServerCompletionHandler());
			//一直阻塞 不让服务器停止
			Thread.sleep(Integer.MAX_VALUE);

		} catch (Exception e) {
			e.printStackTrace();
		}
	}

	public static void main(String[] args) {
		Server server = new Server(8765);
	}

}
ServerCompletionHandler:
public class ServerCompletionHandler implements CompletionHandler<AsynchronousSocketChannel, Server> {

	@Override
	public void completed(AsynchronousSocketChannel asc, Server attachment) {
		//当有下一个客户端接入的时候 直接调用Server的accept方法,这样反复执行下去,保证多个客户端都可以阻塞
		attachment.assc.accept(attachment, this);
		read(asc);
	}

	private void read(final AsynchronousSocketChannel asc) {
		//读取数据
		ByteBuffer buf = ByteBuffer.allocate(1024);
		asc.read(buf, buf, new CompletionHandler<Integer, ByteBuffer>() {
			@Override
			public void completed(Integer resultSize, ByteBuffer attachment) {
				//进行读取之后,重置标识位
				attachment.flip();
				//获得读取的字节数
				System.out.println("Server -> " + "收到客户端的数据长度为:" + resultSize);
				//获取读取的数据
				String resultData = new String(attachment.array()).trim();
				System.out.println("Server -> " + "收到客户端的数据信息为:" + resultData);
				String response = "服务器响应, 收到了客户端发来的数据: " + resultData;
				write(asc, response);
			}
			@Override
			public void failed(Throwable exc, ByteBuffer attachment) {
				exc.printStackTrace();
			}
		});
	}

	private void write(AsynchronousSocketChannel asc, String response) {
		try {
			ByteBuffer buf = ByteBuffer.allocate(1024);
			buf.put(response.getBytes());
			buf.flip();
			asc.write(buf).get();
		} catch (InterruptedException e) {
			e.printStackTrace();
		} catch (ExecutionException e) {
			e.printStackTrace();
		}
	}

	@Override
	public void failed(Throwable exc, Server attachment) {
		exc.printStackTrace();
	}

}
客户类
public class Client implements Runnable{

	private AsynchronousSocketChannel asc ;

	public Client() throws Exception {
		asc = AsynchronousSocketChannel.open();
	}

	public void connect(){
		asc.connect(new InetSocketAddress("127.0.0.1", 8765));
	}

	public void write(String request){
		try {
			asc.write(ByteBuffer.wrap(request.getBytes())).get();
			read();
		} catch (Exception e) {
			e.printStackTrace();
		}
	}

	private void read() {
		ByteBuffer buf = ByteBuffer.allocate(1024);
		try {
			asc.read(buf).get();
			buf.flip();
			byte[] respByte = new byte[buf.remaining()];
			buf.get(respByte);
			System.out.println(new String(respByte,"utf-8").trim());
		} catch (InterruptedException e) {
			e.printStackTrace();
		} catch (ExecutionException e) {
			e.printStackTrace();
		} catch (UnsupportedEncodingException e) {
			e.printStackTrace();
		}
	}

	@Override
	public void run() {
		while(true){

		}
	}

	public static void main(String[] args) throws Exception {
		Client c1 = new Client();
		c1.connect();

		Client c2 = new Client();
		c2.connect();

		Client c3 = new Client();
		c3.connect();

		new Thread(c1, "c1").start();
		new Thread(c2, "c2").start();
		new Thread(c3, "c3").start();

		Thread.sleep(1000);

		c1.write("c1 aaa");
		c2.write("c2 bbbb");
		c3.write("c3 ccccc");
	}

}
BIO、NIO、AIO适用场景分析:
•BIO方式适用于连接数目比较小且固定的架构,这种方式对服务器资源要求比较高,并发局限于应用中,JDK1.4以前的唯一选择,但程序直观简单易理解。
•NIO方式适用于连接数目多且连接比较短(轻操作)的架构,比如聊天服务器,并发局限于应用中,编程比较复杂,JDK1.4开始支持。
•AIO方式使用于连接数目多且连接比较长(重操作)的架构,比如相册服务器,充分调用OS参与并发操作,编程比较复杂,JDK7开始支持。
同步IO和异步IO的区别就在于:数据访问的时候进程是否阻塞!
阻塞IO和非阻塞IO的区别就在于:应用程序的调用是否立即返回!


 1781
1781


 被折叠的 条评论
为什么被折叠?
被折叠的 条评论
为什么被折叠?
 到【灌水乐园】发言


