


1.BasicNameValuePair(基础的NAME-VALUE对)
java.lang.Object
继承者 org.apache.http.message.BasicNameValuePair
由此可看出使用于网络通信.
主要用于存放即将传输给服务器端的 数据对!
如服务器设置数据为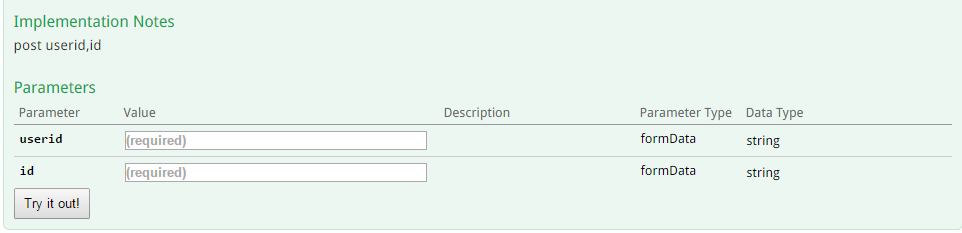
那么在程序中的数据封装就应该为
ArrayList arrayList2 = new ArrayList();
arrayList2.add(new BasicNameValuePair(“userid”, userid));
arrayList2.add(new BasicNameValuePair(“id”, strid));
2.数据封装完毕之后,就是网络传输。
这里要注意的是服务器地址拼接,不同的地址是进行不同的操作的。
可以在string 里面定义一个自己服务器的ip
http://www.kailiche.com/dsshop_app/
然后加上自己的请求IP 如下(即IP拼接请求)
String strURL=getResources().getString(R.string.myip) + “/api/my/delete_deliver_address”;
这里完成了对请求的封装
以下为整个网络通信的流程
1.定义抽象类 对象的传递
public abstract class Post_nent {
protected abstract void ok(String info);
}
2.在使用处直接使用封装好的方法 添加参数分别为。
1.拼接好的网址
2.重写定义的Post_nent()方法
2.1先结束dialogProgressDla;og();
2.2定义了JSONObject jsonObject=new JSONObject(info);这里是为了传递对象的方法,后面会解释这个info 是什么信息.
2.3主要完成的操作为获取JSON数据然后得到服务返回的结果,若不成功返回服务器返回的内容。
即
if (“1”.equals(status)) {
showToast(“删除成功”);
setResult(RESULT_OK,(new Intent()).setAction(uid));
finish();
} else {
String content = jsonObject.getString(“content”);
showToast(content);
}
Post_PHPSESSID(strURL, arrayList2,
new Post_nent() {
@Override
protected void ok(String info) {
                    closeProgressDialog();
                    // TODO Auto-generated method stub
                    try {
                        JSONObject jsonObject = new JSONObject(info);
                        String status = jsonObject.getString("status");
                        if ("1".equals(status)) {
                            showToast("删除成功");
                            setResult(RESULT_OK,(new Intent()).setAction(uid));
                            finish();
                        } else {
                            String content = jsonObject.getString("content");
                            showToast(content);
                        }


                    } catch (JSONException e) {
                        // TODO Auto-generated catch block
                        e.printStackTrace();
                    }

                }

            }, null);
3.上面只是看到了传参数和重写方法 下面我们看看这个方法到底干了一些什么
3.1对之前的网络对象进行初始化
this.post_nent = null;
this.post_to_net = null;
3.2然后将重新定义好的post_nent传递进来
this.post_nent = post_nent;
3.3写一个线程将传递来的信息交给Connect 在connect连接结束之后,有handler进行对post_nent的操作
public void Post_PHPSESSID(final String path,
final List list, Post_nent post_nent,
final String sisionid) {
this.post_nent = null;
this.post_to_net = null;
this.post_nent = post_nent;
thread = new Thread() {
@Override
public void run() {
post_to_net = Connect.post_to_net(BeastActivity.this, path,
list, sisionid);
if (post_to_net != null) {
handler.sendEmptyMessage(8);
} else {
handler.sendEmptyMessage(HD_NULL);
}
}
};
thread.start();
}
4.看看handler中对post_nent的操作,其实就是一个启动之前重写post.nent.ok方法
post_nent.ok(post_to_net);
注意前面的写的生命周期,一定是得到了返回值然后调用handler然后启动post方法,将对象传递过去
public void run() {
post_to_net = Connect.post_to_net(BeastActivity.this, path,
list, sisionid);
if (post_to_net != null) {
handler.sendEmptyMessage(8);
} else {
handler.sendEmptyMessage(HD_NULL);
}
}
5.最后看看Connect里面内容
connect中主要进行的是一些网络的封装。
connect 主要还是使用了一些对网络request和response的封装。
这里要的是path , Object
public class Connect {
static String sessionId;
private static int code;
private static DefaultHttpClient defaultHttpClient;
public static String getJsonContent(String path,String token,String sionid) {
    try {
        System.out.println("22222222222222222"+path);
        URL url = new URL(path);
        HttpURLConnection connection = (HttpURLConnection) url
                .openConnection();
        if((sionid!=null))
        connection.setRequestProperty("cookie", "PHPSESSID=" + sionid);

        connection.setConnectTimeout(3000);
        connection.setRequestMethod("GET");
        connection.setDoInput(true);
        if(token!=null)
        connection.setRequestProperty("Authorization", "Token "+ token);
        System.out.println("wwwwww" + connection);
        int code = connection.getResponseCode();
        System.out.println("qqqqqqqq:" + code);

        if (code == 200) {
            String responseMessage = connection.getResponseMessage();
            System.out.println("wwwwwwwwww返回:"+responseMessage);
            return changeInputStream(connection.getInputStream());
        }
    } catch (MalformedURLException e) {
        e.printStackTrace();
    } catch (IOException e) {
        System.out.println("异常————————--"+e.toString());
        e.printStackTrace();
    }
    return null;
}


 7399
7399


 被折叠的 条评论
为什么被折叠?
被折叠的 条评论
为什么被折叠?
 到【灌水乐园】发言


