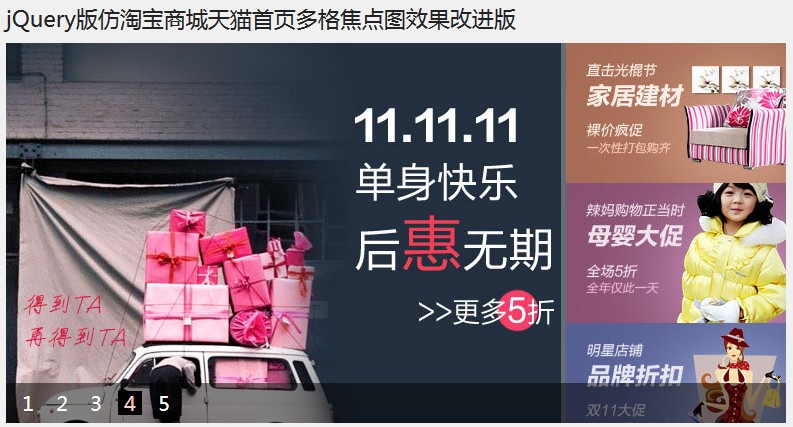
图片轮播是网站中的常用功能,用于在有限的网页空间内展示一组产品图片或者照片,同时还有非常吸引人的动画效果。相信很多同学都在各种类型的网站上看过花样百出的轮播效果图,不少同学也想尝试下自己做出来一个,但网上的代码纰漏百出,不能学以致用,这里我将给大家介绍两种方式的图片轮播实现供大家参考。
实现一
1.制作界面
- <div class="wrapper">
- <h1>仿2012QQ商城jQuery轮播图效果</h1>
- <div id="focus">
- <ul>
- <li><a href="#"><img src="img/01.jpg" alt="" /></a></li>
- <li><a href="#"><img src="img/02.jpg" alt="" /></a></li>
- <li><a href="#"><img src="img/03.jpg" alt="" /></a></li>
- <li><a href="#"><img src="img/04.jpg" alt="" /></a></li>
- </ul>
- </div>
- </div>
 <div class="wrapper">
	<h1>仿2012QQ商城jQuery轮播图效果</h1>
	<div id="focus">
		<ul>
			<li><a href="#"><img src="img/01.jpg" alt="" /></a></li>
			<li><a href="#"><img src="img/02.jpg" alt="" /></a></li>
			<li><a href="#"><img src="img/03.jpg" alt="" /></a></li>
			<li><a href="#"><img src="img/04.jpg" alt="" /></a></li>
		</ul>
	</div>
</div>
这里我们着重关注id为focus的div,里面我们放了<ul><li></li></ul>,首先我们要做的就是把所有轮播图片编排进去,其次才是对其操作。
1.1统一设置一个样式
- * {
- margin:0;
- padding:0;
- }
- body {
- font-size:12px;
- color:#222;
- font-family:Verdana,Arial,Helvetica,sans-serif;
- background:#f0f0f0;
- }
- ul,li {
- list-style:none;
- }
- .wrapper {
- width:800px;
- margin:0 auto;
- padding-bottom:50px;
- }
- h1 {
- height:50px;
- line-height:50px;
- font-size:22px;
- font-weight:normal;
- font-family:"Microsoft YaHei",SimHei;
- }
* {
	margin:0;
	padding:0;
}
body {
	font-size:12px;
	color:#222;
	font-family:Verdana,Arial,Helvetica,sans-serif;
	background:#f0f0f0;
	}
ul,li {
	list-style:none;
}
.wrapper {
	width:800px;
	margin:0 auto;
	padding-bottom:50px;
}
h1 {
	height:50px;
	line-height:50px;
	font-size:22px;
	font-weight:normal;
	font-family:"Microsoft YaHei",SimHei;
}
1.2给轮播图设置样式
- #focus {
- height:280px;
- width:800px;
- overflow:hidden;
- position:relative;
- }
- #focus ul {
- position:absolute;
- }
- #focus ul li {
- float:left;
- width:800px;
- height:280px;
- background:#000;
- }
#focus {
	height:280px;
	width:800px;
	overflow:hidden;
	position:relative;
}
#focus ul {
	position:absolute;
}
#focus ul li {
	float:left;
	width:800px;
	height:280px;
	background:#000;
}
由于图片的高宽分别是280px、800px,这里我们给div设置这个高宽应该很好理解,overflow:hidden;也好理解li经过左浮动以后长度已经远远超出div的width值,需要把多出的部分隐藏。
1.3给轮播图下方的半透明横幅设置样式,这里提供手动鼠标移动切换图片的功能
- #focus div.btn {
- position:absolute;
- width:800px;
- height:10px;
- padding:5px 10px;
- right:0;
- bottom:0;
- text-align:right;
- background:#000;
- opacity:0.5;
- filter:alpha(opacity=50);
- }
- #focus div.btn span {
- display:inline-block;
- width:25px;
- height:10px;
- margin-left:5px;
- cursor:pointer;
- background:#fff;
- border:1px solid #A020F0;
- }
#focus div.btn {
	position:absolute;
	width:800px;
	height:10px;
	padding:5px 10px;
	right:0;
	bottom:0;
	text-align:right;
	background:#000;
 	opacity:0.5;
	filter:alpha(opacity=50);
}
#focus div.btn span {
	display:inline-block;
	width:25px;
	height:10px;
	margin-left:5px;
	cursor:pointer;
	background:#fff;
	border:1px solid #A020F0;
}1.4点击图片左半部分、右半部分出现的箭头指示,切换上下张图片的效果样式
- #focus div.preNext {
- width:45px;
- height:100px;
- position:absolute;
- top:90px;
- background-image:url(../img/sprite.png);
- background-repeat:no-repeat;
- opacity:0;
- filter:alpha(opacity=0);
- cursor:pointer;
- }
- #focus div.pre {
- left:0;
- background-position:left top;
- }
- #focus div.next {
- right:0;
- background-position:right top;
- }
- #focus span.hidden {
- display:block;
- width:400px;
- height:260px;
- background:#000;
- opacity:0;
- filter:alpha(opacity=0);
- position:absolute;
- cursor:pointer;
- }
- #focus span.left {
- top:0;
- left:0;
- }
- #focus span.right {
- top:0;
- right:0;
- }
#focus div.preNext {
	width:45px;
	height:100px;
	position:absolute;
	top:90px;
	background-image:url(../img/sprite.png);
	background-repeat:no-repeat;
	opacity:0;
	filter:alpha(opacity=0);
	cursor:pointer;
}
#focus div.pre {
	left:0;
	background-position:left top;
}
#focus div.next {
	right:0;
	background-position:right top;
}
#focus span.hidden {
	display:block;
	width:400px;
	height:260px;
	background:#000;
	opacity:0;
	filter:alpha(opacity=0);
	position:absolute;
	cursor:pointer;
}
#focus span.left {
	top:0;
	left:0;
}
#focus span.right {
	top:0;
	right:0;
}
span.hidden这里虽然我们定义了,但是只是为了把图片一分为2的效果,事实上我们也是把它设为全透明的,界面上根本看不到任何效果
div.preNext 设置了箭头指向,然后再通过图片定位分离出来
2、制作动画效果
由于代码中我都有相关的注释,这里就不再重复的累赘,有不明白的地方可以评论或留言。再多说一句,由于图片轮播效果用到了大量的jquery事件、动画,以及css稍微深一点的知识,如果看起本代码还是费力的同学可以适当的重温下基础。
- $(function() {
- var sWidth = $("#focus").width(); //获取焦点图的宽度(显示面积)
- var len = $("#focus ul li").length; //获取焦点图个数
- var index = 0;
- var picTimer;
- //以下代码添加数字按钮和按钮后的半透明条,还有上一页、下一页两个按钮
- var btn = "<div class='btn'>";
- for(var i=0; i < len; i++) {btn += "<span></span>";}
- btn += "</div>";
- btn +="<div class='preNext pre'></div>"+"<div class='preNext next'></div>"+
- "<span class='hidden left'></span>"+"<span class='hidden right'></span>";
- $("#focus").append(btn);
- //为小按钮添加鼠标滑入事件,以显示相应的内容
- $("#focus div.btn span").css("opacity",0.4).mouseenter(function() {
- index = $("#focus div.btn span").index(this);
- showPics(index);
- });
- //图片鼠标划过
- $('#focus span.left').hover(function(){
- $('#focus div.pre').animate({opacity:'0.5'},500);
- },function(){
- $('#focus div.pre').animate({opacity:'0'},500);
- });
- $('#focus span.right').hover(function(){
- $('#focus div.next').animate({opacity:'0.5'},500);
- },function(){
- $('#focus div.next').animate({opacity:'0'},500);
- });
- //上一页按钮
- $("#focus span.left").click(function() {
- if(index == -1) {index = len - 1;}
- showPics(index);
- index--;
- });
- //下一页按钮
- $("#focus span.right").click(function() {
- if(index == len){
- index = 0;
- showFirstPic();
- }else{
- showPics(index);
- }
- index ++;
- });
- //本例为左右滚动,即所有li元素都是在同一排向左浮动,所以这里需要计算出外围ul元素的宽度
- $("#focus ul").css("width",sWidth * (len+1));
- //鼠标滑上焦点图时停止自动播放,滑出时开始自动播放
- $("#focus").hover(function() {
- clearInterval(picTimer);
- },function() {
- picTimer = setInterval(function() {
- if(index == len) { //如果索引值等于li元素个数,说明最后一张图播放完毕,接下来要显示第一张图,即调用showFirPic(),然后将索引值清零
- index = 0;
- showFirstPic();
- } else { //如果索引值不等于li元素个数,按普通状态切换,调用showPics()
- showPics(index);
- }
- index++;
- },2000); //此2000代表自动播放的间隔,单位:毫秒
- });
- //显示图片函数,根据接收的index值显示相应的内容
- function showPics(index) { //普通切换
- var nowLeft = -index*sWidth; //根据index值计算ul元素的left值
- $("#focus ul").stop(true,false).animate({"left":nowLeft},500); //通过animate()调整ul元素滚动到计算出的position
- $("#focus div.btn span").animate({"opacity":"0.4"},300).eq(index).animate({"opacity":"1"},100); //为当前的按钮切换到选中的效果
- }
- function showFirstPic() { //最后一张图自动切换到第一张图时专用
- $("#focus ul").append($("#focus ul li:first").clone());//为了达到从最右边到最左边还是往左移动效果,而不是往右移动
- var nowLeft = -len*sWidth; //通过li元素个数计算ul元素的left值,也就是最后一个li元素的右边
- $("#focus ul").stop(true,false).animate({"left":nowLeft},500,function() {
- //通过callback,在动画结束后把ul元素重新定位到起点,然后删除最后一个复制过去的元素
- $("#focus ul").css("left","0");
- $("#focus ul li:last").remove();
- });
- $("#focus div.btn span").animate({"opacity":"0.4"},300).eq(index).animate({"opacity":"1"},100); //为当前的按钮切换到选中的效果
- }
- });
$(function() {
	var sWidth = $("#focus").width(); //获取焦点图的宽度(显示面积)
	var len = $("#focus ul li").length; //获取焦点图个数
	var index = 0;
	var picTimer;

	//以下代码添加数字按钮和按钮后的半透明条,还有上一页、下一页两个按钮
	var btn = "<div class='btn'>";
	for(var i=0; i < len; i++) {btn += "<span></span>";}
	btn += "</div>";
	btn +="<div class='preNext pre'></div>"+"<div class='preNext next'></div>"+
			  "<span class='hidden left'></span>"+"<span class='hidden right'></span>";
	$("#focus").append(btn);


	//为小按钮添加鼠标滑入事件,以显示相应的内容
	$("#focus div.btn span").css("opacity",0.4).mouseenter(function() {
		index = $("#focus div.btn span").index(this);
		showPics(index);
	});

	//图片鼠标划过
	$('#focus span.left').hover(function(){
		$('#focus div.pre').animate({opacity:'0.5'},500);
	},function(){
		$('#focus div.pre').animate({opacity:'0'},500);
	});
	$('#focus span.right').hover(function(){
		$('#focus div.next').animate({opacity:'0.5'},500);
	},function(){
		$('#focus div.next').animate({opacity:'0'},500);
	});

	//上一页按钮
	$("#focus span.left").click(function() {
		if(index == -1) {index = len - 1;}
		showPics(index);
		index--;
	});
	//下一页按钮
	$("#focus span.right").click(function() {
		if(index == len){
			index = 0;
			showFirstPic();
		}else{
			showPics(index);
		}
		index ++;
	});

	//本例为左右滚动,即所有li元素都是在同一排向左浮动,所以这里需要计算出外围ul元素的宽度
	$("#focus ul").css("width",sWidth * (len+1));

	//鼠标滑上焦点图时停止自动播放,滑出时开始自动播放
	$("#focus").hover(function() {
		clearInterval(picTimer);
	},function() {
		picTimer = setInterval(function() {
			if(index == len) { //如果索引值等于li元素个数,说明最后一张图播放完毕,接下来要显示第一张图,即调用showFirPic(),然后将索引值清零
				index = 0;
				showFirstPic();
			} else { //如果索引值不等于li元素个数,按普通状态切换,调用showPics()
				showPics(index);
			}
			index++;
		},2000); //此2000代表自动播放的间隔,单位:毫秒
	});

	//显示图片函数,根据接收的index值显示相应的内容
	function showPics(index) { //普通切换
		var nowLeft = -index*sWidth; //根据index值计算ul元素的left值
		$("#focus ul").stop(true,false).animate({"left":nowLeft},500); //通过animate()调整ul元素滚动到计算出的position
		$("#focus div.btn span").animate({"opacity":"0.4"},300).eq(index).animate({"opacity":"1"},100); //为当前的按钮切换到选中的效果
	}
	function showFirstPic() { //最后一张图自动切换到第一张图时专用
		$("#focus ul").append($("#focus ul li:first").clone());//为了达到从最右边到最左边还是往左移动效果,而不是往右移动
		var nowLeft = -len*sWidth; //通过li元素个数计算ul元素的left值,也就是最后一个li元素的右边
		$("#focus ul").stop(true,false).animate({"left":nowLeft},500,function() {
			//通过callback,在动画结束后把ul元素重新定位到起点,然后删除最后一个复制过去的元素
			$("#focus ul").css("left","0");
			$("#focus ul li:last").remove();
		});
		$("#focus div.btn span").animate({"opacity":"0.4"},300).eq(index).animate({"opacity":"1"},100); //为当前的按钮切换到选中的效果
	}
});
天猫商城图片轮播效果
![]()

主要代码是一样的,主要是界面不再是一张图片占用整个板块,而是划分好几块,且鼠标移动到相关小图片块,颜色会变亮。
实现二
页面代码
- <!DOCTYPE html>
- <html>
- <head>
- <title>banner.html</title>
- <meta http-equiv="keywords" content="keyword1,keyword2,keyword3">
- <meta http-equiv="description" content="this is my page">
- <meta http-equiv="content-type" content="text/html; charset=UTF-8">
- <link rel="stylesheet" type="text/css" href="style/banner.css">
- <script type="text/javascript" src="js/jquery-1.5.2.js"></script>
- <script type="text/javascript" src="js/banner.js"></script>
- </head>
- <body>
- <div id="banner">
- <img src="img/img1.jpg" alt="轮播器第一张" />
- <img src="img/img2.jpg" alt="轮播器第二张" />
- <img src="img/img3.jpg" alt="轮播器第三张" />
- <img src="img/img4.jpg" alt="轮播器第四张" />
- <span></span>
- <strong></strong>
- </div>
- </body>
- </html>
<!DOCTYPE html>
<html>
  <head>
    <title>banner.html</title>

    <meta http-equiv="keywords" content="keyword1,keyword2,keyword3">
    <meta http-equiv="description" content="this is my page">
    <meta http-equiv="content-type" content="text/html; charset=UTF-8">

    <link rel="stylesheet" type="text/css" href="style/banner.css">
    <script type="text/javascript" src="js/jquery-1.5.2.js"></script>
    <script type="text/javascript" src="js/banner.js"></script>
  </head>

  <body>
		<div id="banner">
			<img src="img/img1.jpg" alt="轮播器第一张" />
			<img src="img/img2.jpg" alt="轮播器第二张" />
			<img src="img/img3.jpg" alt="轮播器第三张" />
			<img src="img/img4.jpg" alt="轮播器第四张" />
			<span></span>
			<strong></strong>
		</div>
  </body>
</html>
页面这里我们只在外围定义了一个div,里面的span用于轮播图下方的半透明横幅,strong用于显示图片文字描述
- * {
- margin:0;
- padding:0;
- }
- ul,li {
- list-style:none;
- }
- #banner {
- width:750px;
- height:280px;
- margin:50px auto;
- position:relative;
- overflow:hidden;
- }
- #banner img {
- display:block;
- position:absolute;
- top:0;
- left:0;
- z-index:1
- }
- #banner ul {
- position:absolute;
- bottom:0px;
- right:50px;
- z-index:4;
- }
- #banner ul li {
- float:left;
- padding:0 5px;
- font-size:16px;
- color:#999;
- cursor:pointer;
- }
- #banner span {
- width:750px;
- height:25px;
- position:absolute;
- top:255px;
- left:0;
- background:#333;
- opacity:0.3;
- filter:alpha(opacity=30);
- z-index:3;
- }
- #banner strong {
- position:absolute;
- top:260px;
- left:10px;
- color:#fff;
- z-index:4;
- }
* {
	margin:0;
	padding:0;
}
ul,li {
	list-style:none;
}
#banner {
	width:750px;
	height:280px;
	margin:50px auto;
	position:relative;
	overflow:hidden;
}
#banner img {
	display:block;
	position:absolute;
	top:0;
	left:0;
	z-index:1
}
#banner ul {
	position:absolute;
	bottom:0px;
	right:50px;
	z-index:4;
}
#banner ul li {
	float:left;
	padding:0 5px;
	font-size:16px;
	color:#999;
	cursor:pointer;
}
#banner span {
	width:750px;
	height:25px;
	position:absolute;
	top:255px;
	left:0;
	background:#333;
	opacity:0.3;
	filter:alpha(opacity=30);
	z-index:3;
}
#banner strong {
	position:absolute;
	top:260px;
	left:10px;
	color:#fff;
	z-index:4;
}
我们给img定义的样式都层叠放在一个位置top: 0, left:0,再轮播的时候让它上下或者左右滑动,注意一下banner的
overflow:hidden;
属性这个样式的同学肯定它的用意,就是隐藏溢出,不能在banner外围看到滑动图片。
这里再提到一点我们给banner的div定义了一个相对定位,所以我们其他元素的定位都以绝对定位相对于banner来讲。
js控制代码
- $(function(){
- //轮播器初始化
- var len = $("#banner img").length;
- var ul = "<ul>";
- for(var i=0; i < len; i++){ul += "<li>●</li>";}
- ul += "</ul>";
- $(ul).appendTo($("#banner"));
- $('#banner img').css("opacity",0).css("filter",'alpha(opacity=' + (0*100) + ')');
- $('#banner img').eq(0).css("opacity",1).css("filter",'alpha(opacity=' + (1*100) + ')');
- $('#banner ul li').eq(0).css('color', '#333');
- $('#banner strong').html($('#banner img').eq(0).attr('alt'));
- //轮播器计数器
- var banner_index = 0;
- //轮播器的种类
- var banner_type = 2; //1表示左右,2表示上下滚动
- //自动轮播器
- var banner_timer = setInterval(banner_fn, 4000);
- //手动轮播器
- $('#banner ul li').hover(function () {
- clearInterval(banner_timer);
- if ($(this).css('color') != 'rgb(51, 51, 51)' && $(this).css('color') != '#333') {
- banner(this, banner_index == 0 ? $('#banner ul li').size() - 1 : banner_index - 1);
- }
- }, function () {
- banner_index = $(this).index() + 1;
- banner_timer = setInterval(banner_fn, 3000);
- });
- function banner(obj, prev) {
- $('#banner ul li').css('color', '#999');
- $(obj).css('color', '#333');
- $('#banner strong').html($('#banner img').eq($(obj).index()).attr('alt'));
- if (banner_type == 1)
- {
- $('#banner img').eq(prev).animate({
- opacity : '0',
- left:"-900px"
- },1500).css('z-index', 1);
- $('#banner img').eq($(obj).index()).animate({
- opacity : '1',
- left:"0"
- },1500).css('z-index', 2);
- }
- else if (banner_type == 2)
- {
- $('#banner img').eq(prev).animate({
- opacity : '0',
- top : '150px'
- },1500).css('z-index', 1);
- $('#banner img').eq($(obj).index()).animate({
- opacity : '1',
- top : '0'
- },1500).css('z-index', 2);
- }
- }
- function banner_fn() {
- if (banner_index >= $('#banner ul li').size())
- banner_index = 0;
- banner($('#banner ul li').eq(banner_index),
- banner_index == 0 ? $('#banner ul li').size() - 1 : banner_index - 1);
- banner_index++;
- }
- });
$(function(){

		//轮播器初始化
		var len = $("#banner img").length;
		var ul = "<ul>";
		for(var i=0; i < len; i++){ul += "<li>●</li>";}
		ul += "</ul>";
		$(ul).appendTo($("#banner"));
		$('#banner img').css("opacity",0).css("filter",'alpha(opacity=' + (0*100) + ')');
		$('#banner img').eq(0).css("opacity",1).css("filter",'alpha(opacity=' + (1*100) + ')');
		$('#banner ul li').eq(0).css('color', '#333');
		$('#banner strong').html($('#banner img').eq(0).attr('alt'));

		//轮播器计数器
		var banner_index = 0;
		//轮播器的种类
		var banner_type = 2; 		//1表示左右,2表示上下滚动
		//自动轮播器
		var banner_timer = setInterval(banner_fn, 4000);
		//手动轮播器
		$('#banner ul li').hover(function () {
			clearInterval(banner_timer);
			if ($(this).css('color') != 'rgb(51, 51, 51)' && $(this).css('color') != '#333') {
				banner(this, banner_index == 0 ? $('#banner ul li').size() - 1 : banner_index - 1);
			}
		}, function () {
			banner_index = $(this).index() + 1;
			banner_timer = setInterval(banner_fn, 3000);
		});
		function banner(obj, prev) {
			$('#banner ul li').css('color', '#999');
			$(obj).css('color', '#333');
			$('#banner strong').html($('#banner img').eq($(obj).index()).attr('alt'));

			if (banner_type == 1)
			{
				$('#banner img').eq(prev).animate({
					opacity : '0',
					left:"-900px"
				},1500).css('z-index', 1);

				$('#banner img').eq($(obj).index()).animate({
					opacity : '1',
					left:"0"
				},1500).css('z-index', 2);
			}
			else if (banner_type == 2)
			{
				$('#banner img').eq(prev).animate({
					opacity : '0',
					top : '150px'
				},1500).css('z-index', 1);

				$('#banner img').eq($(obj).index()).animate({
					opacity : '1',
					top : '0'
				},1500).css('z-index', 2);
			}
		}

		function banner_fn() {
			if (banner_index >= $('#banner ul li').size())
				banner_index = 0;
			banner($('#banner ul li').eq(banner_index),
															banner_index == 0 ? $('#banner ul li').size() - 1 : banner_index - 1);
			banner_index++;
		}

});
这段代码其实我们主要应该看banner方法,它的两个参数分别是当前图片对象,上一个图片对象,并操作它的定位以及透明度直至消失。
总结:关于图片轮播,相信它的实现方式肯定不止上述的两个,但总归一点,无论何种方式都需要一定的css功底,以及熟练的js应用能力。


 3911
3911


 被折叠的 条评论
为什么被折叠?


