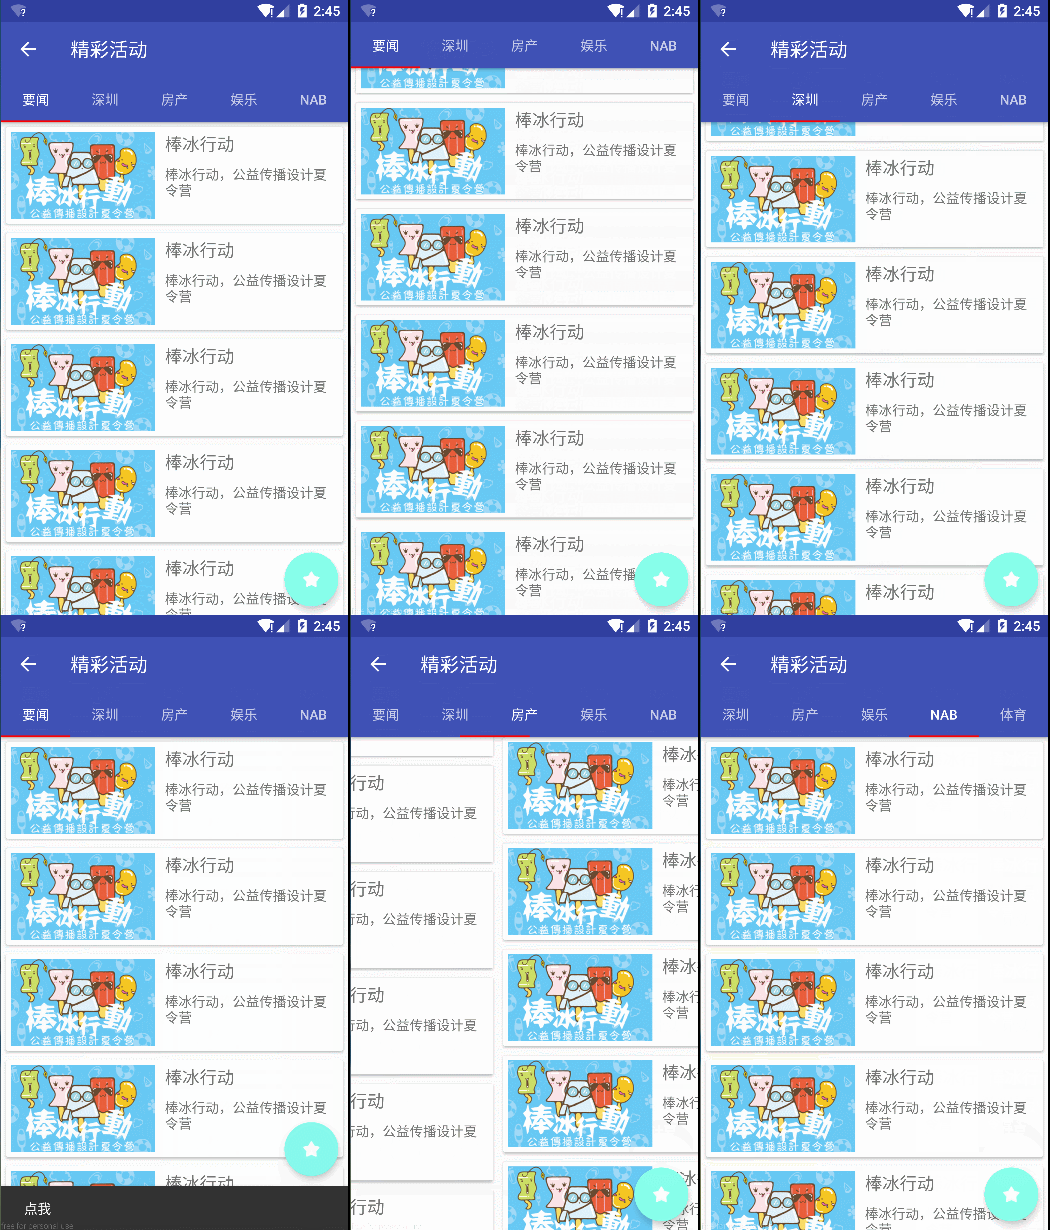
最终效果
说明
本文主要讲解CoordinatorLayout、AppBarLayout、Toolbar、TabLayout之间协调动画;前面有简单的讲过AppBarLayout设置安卓Activity的导航可以点击查看;
CoordinatorLayout作为顶层布局,协调子布局;
CoordinatorLayout与AppBarLayout,AppBarLayout嵌套TabLayout实现Toolbar的显隐,
添加所需库
dependencies {
    compile fileTree(include: ['*.jar'], dir: 'libs')
    testCompile 'junit:junit:4.12'
    compile 'com.android.support:appcompat-v7:24.2.0'
    compile 'com.android.support:design:24.2.0'
    compile 'com.android.support:cardview-v7:24.2.0'
}
CoordinatorLayout协调AppBarLayout实现Toolbar显隐关系;
activity_main.xml文件布局
<?xml version="1.0" encoding="utf-8"?>
<android.support.design.widget.CoordinatorLayout xmlns:android="http://schemas.android.com/apk/res/android"
    xmlns:app="http://schemas.android.com/apk/res-auto"
    xmlns:tools="http://schemas.android.com/tools"
    android:layout_width="match_parent"
    android:layout_height="match_parent">

    <android.support.design.widget.AppBarLayout
        android:id="@+id/appbar"
        android:layout_width="match_parent"
        android:layout_height="wrap_content"
        app:theme="@style/AppTheme.AppBarOverlay">

        <android.support.v7.widget.Toolbar
            android:id="@+id/toolbar"
            android:layout_width="match_parent"
            android:layout_height="?attr/actionBarSize"
            app:layout_scrollFlags="scroll|enterAlways"
            app:popupTheme="@style/AppTheme.PopupOverlay" />

        <android.support.design.widget.TabLayout
            android:id="@+id/tabLayout"
            android:layout_width="match_parent"
            android:layout_height="wrap_content"
            app:tabIndicatorColor="#FE0000"
            app:tabMode="scrollable" />
    </android.support.design.widget.AppBarLayout>

    <android.support.v4.view.ViewPager
        android:id="@+id/viewpager"
        android:layout_width="match_parent"
        android:layout_height="match_parent"
        app:layout_behavior="@string/appbar_scrolling_view_behavior" />

    <android.support.design.widget.FloatingActionButton
        android:layout_width="wrap_content"
        android:layout_height="wrap_content"
        android:layout_margin="10dp"
        android:clickable="true"
        android:onClick="onClick"
        android:src="@drawable/ic_start"
        app:layout_anchor="@id/viewpager"
        app:layout_anchorGravity="bottom|right|end"
        app:backgroundTint="#ff87ffeb"
        app:rippleColor="#33728dff"/>

</android.support.design.widget.CoordinatorLayout>
MainActivity.java文件
public class MainActivity extends AppCompatActivity {

    private Toolbar toolbar;
    private TabLayout tabLayout;
    private ViewPager viewPager;

    @Override
    protected void onCreate(Bundle savedInstanceState) {
        super.onCreate(savedInstanceState);
        setContentView(R.layout.activity_main);

        //设置导航条标题
        toolbar = (Toolbar)findViewById(R.id.toolbar);
        toolbar.setTitle("精彩活动");
        setSupportActionBar(toolbar);
        getSupportActionBar().setDisplayHomeAsUpEnabled(true);

        //设置侧滑标题
        tabLayout = (TabLayout)findViewById(R.id.tabLayout);
        viewPager = (ViewPager)findViewById(R.id.viewpager);

        List<String> list = new ArrayList();
        list.add("要闻");
        list.add("深圳");
        list.add("房产");
        list.add("娱乐");
        list.add("NAB");
        list.add("体育");
        MyPagerAdapter adapter = new MyPagerAdapter(getSupportFragmentManager(),list);
        viewPager.setAdapter(adapter);
        viewPager.setOffscreenPageLimit(list.size());
        tabLayout.setupWithViewPager(viewPager);
    }

    public void onClick(View view){
        Snackbar.make(view,"点我", Snackbar.LENGTH_SHORT).show();
    }

    public class MyPagerAdapter extends FragmentPagerAdapter{

        private List<String> titleList;

        public MyPagerAdapter(FragmentManager fm, List<String> list){
            super(fm);
            this.titleList = list;
        }

        @Override
        public int getCount() {
            return titleList.size();
        }

        @Override
        public CharSequence getPageTitle(int position) {
            return titleList.get(position);
        }

        @Override
        public Fragment getItem(int position) {
            return MyTitleFragment.newInstance(titleList.get(position));
        }
    }
}
fragment_my_title.xml文件
<?xml version="1.0" encoding="utf-8"?>
<android.support.v7.widget.RecyclerView xmlns:android="http://schemas.android.com/apk/res/android"
   android:id="@+id/recyclerView"
    android:layout_width="match_parent"
    android:layout_height="match_parent">

</android.support.v7.widget.RecyclerView>
MyTitleFragment.java文件
public class MyTitleFragment extends Fragment{

    private RecyclerView recyclerView;

    public static MyTitleFragment newInstance(String id){
        MyTitleFragment fragment = new MyTitleFragment();
        //设置传递给fragment的参数id等
        Bundle bundle = new Bundle();
        bundle.putString("id",id);
        fragment.setArguments(bundle);

        return fragment;
    }

    @Nullable
    @Override
    public View onCreateView(LayoutInflater inflater, @Nullable ViewGroup container, @Nullable Bundle savedInstanceState) {
        recyclerView = (RecyclerView) inflater.inflate(R.layout.fragment_my_title,null);
        return recyclerView;
    }

    @Override
    public void onActivityCreated(@Nullable Bundle savedInstanceState) {
        super.onActivityCreated(savedInstanceState);
        recyclerView.setItemAnimator(new DefaultItemAnimator());
        recyclerView.setLayoutManager(new LinearLayoutManager(recyclerView.getContext()));
        recyclerView.setAdapter(new NewAdapter(getActivity()));
    }
}
item_new_adapter.xml文件
<?xml version="1.0" encoding="utf-8"?>
<android.support.v7.widget.CardView
    xmlns:android="http://schemas.android.com/apk/res/android"
    android:layout_width="match_parent"
    android:layout_height="wrap_content"
    android:layout_margin="5dp">

    <LinearLayout
        android:layout_width="match_parent"
        android:layout_height="100dp"
        android:orientation="horizontal">

        <ImageView
            android:layout_width="150dp"
            android:layout_height="match_parent"
            android:layout_margin="5dp"
            android:scaleType="centerCrop"
            android:src="@drawable/sng" />

        <LinearLayout
            android:layout_width="match_parent"
            android:layout_height="match_parent"
            android:orientation="vertical">

            <TextView
                android:layout_width="match_parent"
                android:layout_height="wrap_content"
                android:padding="5dp"
                android:text="棒冰行动"
                android:textSize="18sp"/>

            <TextView
                android:layout_width="match_parent"
                android:layout_height="wrap_content"
                android:padding="5dp"
                android:text="棒冰行动,公益传播设计夏令营" />
        </LinearLayout>
    </LinearLayout>
</android.support.v7.widget.CardView>
NewAdapter.java文件
public class NewAdapter extends  RecyclerView.Adapter<NewAdapter.ViewHolder>{

    private Context mContext;

    public NewAdapter(Context context){
        this.mContext = context;
    }

    @Override
    public NewAdapter.ViewHolder onCreateViewHolder(ViewGroup parent, int viewType) {
        View view =
                LayoutInflater.from(parent.getContext()).inflate(R.layout.item_new_adapter, parent, false);
        return new ViewHolder(view);
    }

    @Override
    public void onBindViewHolder(final ViewHolder holder, int position) {
        final View view = holder.mView;
        view.setOnClickListener(new View.OnClickListener() {
            @Override
            public void onClick(View v) {
                Toast.makeText(mContext,"点我",Toast.LENGTH_SHORT).show();
            }
        });
    }

    @Override
    public int getItemCount() {
        return 10;
    }

    public static class ViewHolder extends RecyclerView.ViewHolder {
        public final View mView;

        public ViewHolder(View view) {
            super(view);
            mView = view;
        }
    }
}
解析:
Toolbar隐藏;通过设置app:layout_scrollFlags标签值;
- scroll: 所有想滚动出屏幕的view都需要设置这个flag,没有设置这个flag的view将被固定在屏幕顶部。例如,TabLayout 没有设置这个值,将会停留在屏幕顶部。
- enterAlways: 设置这个flag时,向下的滚动都会导致该view变为可见,启用快速“返回模式”。
- enterAlwaysCollapsed:当你的视图已经设置minHeight属性又使用此标志时,你的视图只能已最小高度进入,只有当滚动视图到达顶部时才扩大到完整高度。
- exitUntilCollapsed: 滚动退出屏幕,最后折叠在顶端。
为了使得Toolbar有滑动效果,必须做到如下三点:
1. CoordinatorLayout作为布局的父布局容器。
2. 给需要滑动的组件设置 app:layout_scrollFlags=”scroll|enterAlways” 属性。
3. 给滑动的组件设置app:layout_behavior属性
在此简单的使用已讲完。


 1万+
1万+

 被折叠的 条评论
为什么被折叠?


