


flume应用案例
1 flume用法
flume的使用非常简单,只需书写一个配置文件,在配置文件中描述source,channel和sink的具体实现,然后运行一个agent的实例,在运行agent实例的过程中会读取配置文件中的内容,这样flume就会采集数据了。
配置文件编写规则
1 整体描述agent中的sources、sink、channel:
#其中a1为agent的名字,r1为source名称,k1为sink名称,c1为channel名称
a1.sources = r1
a1.sinks = k1
a1.channels = c1
2 agent中的source、sink和channel的具体实现
需要指定source的类型,即source是接收文件还是接受http的还是接受thrift的;对于sink同理,需要指定结果是输出到hdfs还是和base上等。对于channel需要指定使用内存还是文件进行缓存。
#描述和配置source
a1.sources.r1.type = netcat
a1.sources.r1.bind = localhost
a1.sources.r1.port = 44444

#描述和配置sink
a1.sinks.k1.type = logger

#描述和配置channel
a1.channels.c1.type = memory
a1.channels.c1.capacity = 1000
a1.channels.c1.transactionCapacity = 100
3 通过channel将source与sink连接起来
#通过channel将source与sink连接起来
a1.sources.r1.channels = c1
a1.sinks.k1.channel = c1
4 在shell中启动agent
$ bin/flume-ng agent -n $agent_name -c conf -f conf/flume-conf.properties.template -Dflume.root.logger=DEBUG,console
参数说明
-n : 制定agent的名称(与配置文件中的agent名字一样)
-c : 指定了flume中配置文件的目录
-f : 制定配置文件
-Dflume.root.logger=DEBUG,console : 设置日志等级
2 案例一
案例描述
监听一个指定的网络端口,即只要应用程序向这个端口写入数据的时候,这个source组建就可以获取到信息。三个组建的类型如下:
source  : NetCat
sink    : logger
channel : memory
配置文件
# Name the components on this agent
a1.sources = r1
a1.sinks = k1
a1.channels = c1

# Describe/configure the source
a1.sources.r1.type = netcat
a1.sources.r1.bind = 192.168.32.130
a1.sources.r1.port = 44444

# Describe the sink
a1.sinks.k1.type = logger

# Use a channel which buffers events in memory
a1.channels.c1.type = memory
a1.channels.c1.capacity = 1000
a1.channels.c1.transctionCapacity = 100

#Bind the source and sink to the channel
a1.sources.r1.channels = c1
a1.sinks.k1.channel = c1
启动flume agent a1服务端
$flume-ng agent -n a1 -c ../conf -f ../conf/netcat.conf -Dflume.root.logger=DEBUG,console
在另一个终端下使用netCat发送数据
$nc localhost 44444
然后在下面随意输入内容进行测试。
3 案例二
案例描述
监听一个指定的网络端口,然后将数据写入hdfs上。三个组建的类型如下:
source  : NetCat
sink    : hdfs
channel : file
配置文件
# Name the components on this agent
a1.sources = r1
a1.sinks = k1
a1.channels = c1

# Describe/configure the source
a1.sources.r1.type = netcat
a1.sources.r1.bind = 192.168.32.130
a1.sources.r1.port = 44444

# Describe the sink
a1.sinks.k1.type = hdfs
a1.sinks.k1.hdfs.path = hdfs://hadoop200:9000/dataoutput
a1.sinks.k1.hdfs.writeFormat = Text
a1.sinks.k1.hdfs.fileType = DataStream
a1.sinks.k1.hdfs.rollInterval = 10
a1.sinks.k1.hdfs.rollSize = 0
a1.sinks.k1.hdfs..rollCount = 0
a1.sinks.k1.hdfs.filePrefix = %Y-%m-%d-%H-%M-%S
a1.sinks.k1.hdfs.useLocalTimeStamp = true

# Use a channel which buffers events in file
a1.channels.c1.type = file
a1.channels.c1.checkpointDir = /usr/flume/checkpoint
a1.channels.c1.dataDirs = /usr/flume/data

# Bind the source and sink to the channel
a1.sources.r1.channels = c1
a1.sinks.k1.channel = c1
启动flume agent a1服务端
$flume-ng agent -n a1 -c ../conf -f ../conf/netcat.conf -Dflume.root.logger=DEBUG,console
在另一个终端下使用netCat发送数据
$nc localhost 44444
然后在下面随意输入内容进行测试,测试结果如下图:
4 案例三
案例描述
监听一个指定的目录,只要应用程序向这个目录中添加新的文件,source组件就可以获取到消息,并解析该文件的内容,然后写入到channel。写入完成后,标记该文件已完成或者删除该文件。三个组建的类型如下:
source  : Spooling Directory
sink    : logger
channel : memory
Spooling Directory Source注意事项:
1.正在拷贝的文件不能再进行编辑,否则flume就会在log中报错并停掉进程。
2.不能将具有相同文件名的文件拷贝到这个目录,否则flume就会在log中报错并停掉进程。
配置文件
# Name the components on this agent
a1.sources = r1
a1.sinks = k1
a1.channels = c1

# Describe/configure the source
a1.sources.r1.type = spooldir
a1.sources.r1.spoolDir = /usr/local/datainput
a1.sources.r1.fileHeader = true
a1.sources.r1.interceptors = i1
a1.sources.r1.interceptors.i1.type = timestamp

# Describe the sink
a1.sinks.k1.type = logger

# Use a channel which buffers events in memory
a1.channels.c1.type = memory
a1.channels.c1.capacity = 1000
a1.channels.c1.transactionCapacity = 100

# Bind the source and sink to the channel
a1.sources.r1.channels = c1
a1.sinks.k1.channel = c1
启动flume agent a1服务端
$flume-ng agent -n a1 -c ../conf -f ../conf/netcat.conf -Dflume.root.logger=DEBUG,console
测试
向指定的文件夹/usr/local/datainput添加数据观察控制台的变化以及该目录文件的变化。
5 案例四
案例描述
监听一个指定的目录,只要应用程序向这个目录中添加新的文件,source组件就可以获取到消息,并解析该文件的内容,然后写入到channel。写入完成后,标记该文件已完成或者删除该文件。三个组建的类型如下:
source  : Spooling Directory
sink    : hdfs
channel : file
配置文件
# Name the components on this agent
a1.sources = r1
a1.sinks = k1
a1.channels = c1

# Describe/configure the source
a1.sources.r1.type = spooldir
a1.sources.r1.spoolDir = /usr/local/datainput
a1.sources.r1.fileHeader = true
a1.sources.r1.interceptors = i1
a1.sources.r1.interceptors.i1.type = timestamp

# Describe the sink
a1.sinks.k1.type = hdfs
a1.sinks.k1.hdfs.path = hdfs://hadoop200:8020/dataoutput
a1.sinks.k1.hdfs.writeFormat = Text
a1.sinks.k1.hdfs.fileType = DataStream
a1.sinks.k1.hdfs.roolInterval = 10
a1.sinks.k1.hdfs.roolSize = 0
a1.sinks.k1.hdfs.roolCount = 0
a1.sinks.k1.hdfs.filePrefix = %Y-%m-%d-%H-%M-%S
a1.sinks.k1.hdfs.useLocalTimeStamp = true

# Use a channel which buffers in file
a1.channels.c1.type = file
a1.channels.c1.checkpointDir = /usr/flume/checkpoint
a1.channels.c1.dataDirs = /usr/flume/data

# Bind the source and sink to the channel
a1.sources.r1.channels = c1
a1.sinks.k1.channel = c1
启动flume agent a1服务端
$flume-ng agent -n a1 -c ../conf -f ../conf/netcat.conf -Dflume.root.logger=DEBUG,console
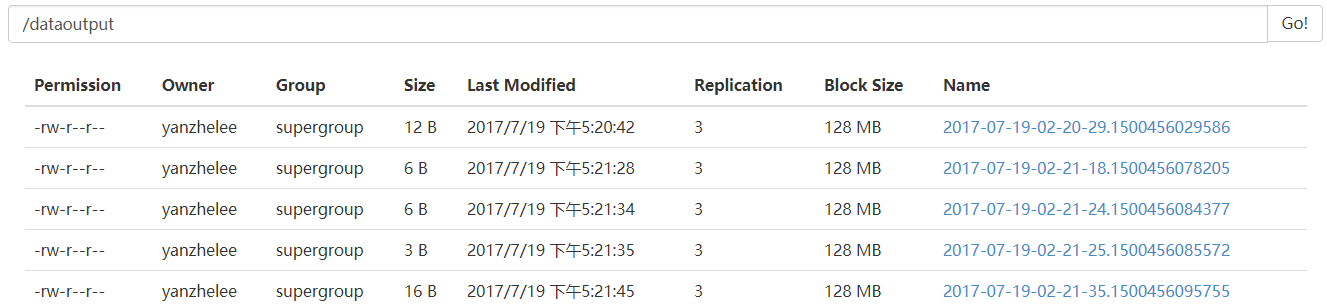
测试
向指定的文件夹/usr/local/datainput添加数据,然后通过web观察hdfs的变化以及该目录文件的变化。


 1万+
1万+

 被折叠的 条评论
为什么被折叠?
被折叠的 条评论
为什么被折叠?
 到【灌水乐园】发言


