


介绍:
AIDL是用于进程之间的通信。
比如应用程序A拥有一套复杂的计算方法,我新的应用程序B也想使用这个计算方法。这时候就能使用AIDL。说白了就是从应用程序B里拿出参数,扔到应用程序A里面,让A来计算,最后返回计算结果给应用程序B。
用法:
使用AIDL要创建 .aidl文件.
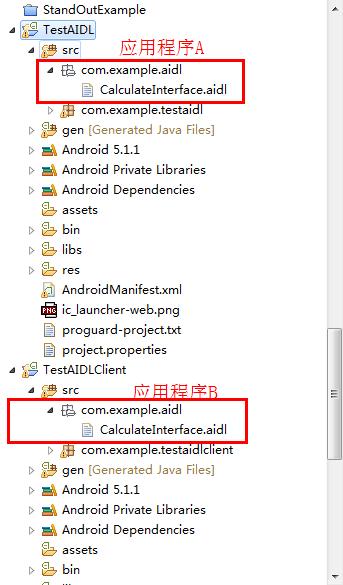
应用程序A相当于服务端,提供方法。
应用程序B相当于客户端,提供参数并得到结果。
应用程序A和应用程序B的 .aidl文件所在的包名和自身名字必须相同!
在构建好 .aidl文件后IDE会自动在gen目录下生成对应的java文件,我们不需要改动!
CalculateInterface.aidl
 package com.example.aidl;

 interface CalculateInterface {
     double doCalculate(double a, double b);
 }
CalculateInterface.aidl (xxx.aidl)这个文件在应用程序A和应用程序B都要创建,并且它们的包名以及自身名字必须相等!
应用程序A(相当于服务端)
CalculateService
package com.example.testaidl;

import com.example.aidl.CalculateInterface;

import android.app.Service;
import android.content.Intent;
import android.os.IBinder;
import android.os.RemoteException;

public class CalculateService extends Service {

    @Override
    public int onStartCommand(Intent intent, int flags, int startId) {
        return super.onStartCommand(intent, flags, startId);
    }

    @Override
    public IBinder onBind(Intent intent) {
        return new CalculateInterface.Stub() {

            @Override
            public double doCalculate(double a, double b)
                    throws RemoteException {
                // 实际上在这里可以调用应用程序A中非常多的类,做非常复杂的算法!
                // 这里地方就是aidl的意义所在!
                return a + b;
            }
        };
    }


}
应用程序B(相当于客户端)
MainActivity
package com.example.testaidlclient;

import com.example.aidl.CalculateInterface;

import android.app.Activity;
import android.content.ComponentName;
import android.content.Context;
import android.content.Intent;
import android.content.ServiceConnection;
import android.os.Bundle;
import android.os.Handler;
import android.os.IBinder;
import android.os.RemoteException;
import android.util.Log;

public class MainActivity extends Activity {

    private CalculateInterface mService;
    private ServiceConnection mServiceConnection = new ServiceConnection() {

        @Override
        public void onServiceDisconnected(ComponentName name) {
              mService = null;
        }

        @Override
        public void onServiceConnected(ComponentName name, IBinder service) {
             mService = CalculateInterface.Stub.asInterface(service);
             mHandler.obtainMessage().sendToTarget();
        }
    };


    private Handler mHandler = new Handler(){
        public void handleMessage(android.os.Message msg) {

            try {
                double c = mService.doCalculate(1.0, 2.0);
                Log.v("TAG", "c = " + c);
            } catch (RemoteException e) {
                e.printStackTrace();
            }

        };
    };

    @Override
    protected void onCreate(Bundle savedInstanceState) {
        super.onCreate(savedInstanceState);
        setContentView(R.layout.activity_main);


        // bind
        Intent intent = new Intent("com.action.aidl");
        bindService(intent, mServiceConnection, Context.BIND_AUTO_CREATE);


        // 这里有一个深坑!!!
        // 在bindService后,mService不是立刻被赋值的!
        // mService赋值实际是在一个回调函数!
        // 所在如下的写法会程序奔溃!因为在bindService后,mService还是等于null!!
        // 这个教训要切记啊!!!

//      try {
//          double c = mService.doCalculate(1.0, 2.0);
//          Log.v("TAG", "c = " + c);
//      } catch (RemoteException e) {
//          e.printStackTrace();
//      }
//

    }
@Override
    protected void onDestroy() {
        super.onDestroy();
        unbindService(mServiceConnection);
    }
}
为应用程序A(相当于服务端)配置ANDROIDMANIFEST
<service
            android:name="com.example.testaidl.CalculateService" >
            <intent-filter>
                <action android:name="com.action.aidl"/>
                <category android:name="android.intent.category.DEFAULT" />
            </intent-filter>
</service>小结:因为service的bind这块没怎么使用过,不了解bindservice的过程。导致学习aidl过程好费了大量的时间~TvT
转载于:
http://www.cnblogs.com/BeyondAnyTime/p/3204119.html
2016/5/23日更新
权限认证功能
应用程序A修改onBind()方法
@Override
    public IBinder onBind(Intent intent) {

        // 权限验证
        int check = checkCallingOrSelfPermission("com.example.testaidlclient.permission.CHECK");
        if (check == PackageManager.PERMISSION_DENIED) {
            return null;
        }

        return new CalculateInterface.Stub() {

            @Override
            public double doCalculate(double a, double b)
                    throws RemoteException {
                // 实际上在这里可以调用应用程序A中非常多的类,做非常复杂的算法!
                // 这里地方就是aidl的意义所在!
                return a + b;
            }
        };
    }
应用程序B AndroidManifest.xml声明自定义权限
<uses-permission android:name="com.example.testaidlclient.permission.CHECK"/>应用程序A AndroidManifest.xml 声明自定义权限
注意: 应用程序B和应用程序A声明权限的方式不同!
 <permission
        android:name="com.example.testaidlclient.permission.CHECK"
        android:protectionLevel="normal"/>
这样代表应用程序A有权限访问应用程序B


 1338
1338

 被折叠的 条评论
为什么被折叠?
被折叠的 条评论
为什么被折叠?
 到【灌水乐园】发言


