前面我们介绍了Mybatis的使用,当然有配置xml方式的实现,还有基于注解的实现,只能起一个入门,里面当然还有很多知识没有讲到的,还没有用过,个人癖好基于xml实现。
现在开始我开始将Spring整合进来,使用Spring+Mybatis。
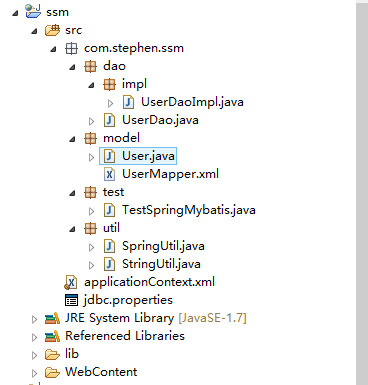
1. 加入Spring后的代码结构
由于加入了spring所以我把代码的名给修改了。修改成最终我们要搭建的ssm。
另外大家可能看到我的项目已经改成动态web项目了,其实这个是为以后测试API用的,目前还用不上。目前我们还是使用java的main来测试。
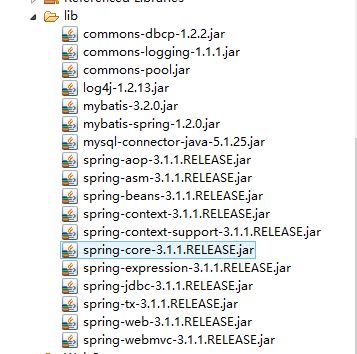
还有一个比较重要的就是我们要引入spring所用的jar包,我这里使用的spring3.1版本,有点老了的样子。当然还要加入mybatis整个spring的jar包,mybatis-spring,还有三个commons包,连接数据库时要用到,相信这些包再网上都还是比较好找的。
- 这里我们是采用一步一步的整合的,所以第一步先引进spring。后续会不断深入整合。
2. 代码改进
2.1 增加了jdbc配置文件
我们将关于数据库的配置文件提取出来了,方便修改。
driver=com.mysql.jdbc.Driver
url=jdbc:mysql://localhost:3306/mybatis
username=root
password=root
2.2 spring上下文applicationContext.xml文件
这个文件是最重要的。首先看一下该文件的内容:
<?xml version="1.0" encoding="UTF-8"?>
<beans xmlns="http://www.springframework.org/schema/beans"
    xmlns:xsi="http://www.w3.org/2001/XMLSchema-instance"
    xmlns:context="http://www.springframework.org/schema/context"
    xmlns:mvc="http://www.springframework.org/schema/mvc"
    xsi:schemaLocation="http://www.springframework.org/schema/beans
     http://www.springframework.org/schema/beans/spring-beans-3.0.xsd
     http://www.springframework.org/schema/context
     http://www.springframework.org/schema/context/spring-context-3.0.xsd
     http://www.springframework.org/schema/mvc
     http://www.springframework.org/schema/mvc/spring-mvc-3.0.xsd">

    <bean class="org.springframework.beans.factory.config.PropertyPlaceholderConfigurer">
        <property name="locations">
           <list>
                <value>classpath:jdbc.properties</value>
           </list>
        </property>
    </bean>

    <bean id="dataSource" class="org.apache.commons.dbcp.BasicDataSource" destroy-method="close">
       <property name="driverClassName" value="${driver}" />
       <property name="url" value="${url}" />
       <property name="username" value="${username}" />
       <property name="password" value="${password}" />
    </bean>

    <bean id="sqlSessionFactory" class="org.mybatis.spring.SqlSessionFactoryBean">
        <property name="dataSource" ref="dataSource" />
        <property name="mapperLocations" value="classpath:com/stephen/ssm/model/*Mapper.xml" />
        <property name="typeAliasesPackage" value="com.stephen.ssm.model" />
    </bean>

    <bean id="sqlSessionTemplate" class="org.mybatis.spring.SqlSessionTemplate">
        <constructor-arg index="0" ref="sqlSessionFactory" />
    </bean>

    <bean class="com.stephen.ssm.util.SpringUtil"></bean>

    <bean id="userDao" class="com.stephen.ssm.dao.impl.UserDaoImpl">
        <property name="sqlSessionTemplate" ref="sqlSessionTemplate" />
    </bean>

</beans>
spring可以管理我们所有的bean对象,我们有了spring就不应该使用new关键字来创建我们的对象了。
第一个配置的bean是加载我们的配置文件,再配置了我们的dataSource数据源。
关于Mybatis的配置,我们使用mybatis整个的spring这个包全部整合到spring容器中,让spring容器管理我们的bean,前面我们获取sqlSession来执行我们的sql,现在我们使用SqlSessionTemplate。
再下来我们就是把SpringUtil和UserDaoImpl两个类让spring容器托管。
2.3 我们的model包没有咋变化
User.java实体类:
 package com.stephen.ssm.model;

public class User {

    private Integer id;
    private String name;
    private Integer age;

    public Integer getId() {
        return id;
    }

    public void setId(Integer id) {
        this.id = id;
    }

    public String getName() {
        return name;
    }

    public void setName(String name) {
        this.name = name;
    }

    public Integer getAge() {
        return age;
    }

    public void setAge(Integer age) {
        this.age = age;
    }

    @Override
    public String toString() {
        return "User [id=" + id + ", name=" + name + ", age=" + age + "]";
    }
}
UserMapper.xml映射文件
<?xml version="1.0" encoding="UTF-8" ?>
<!DOCTYPE mapper PUBLIC "-//mybatis.org//DTD Mapper 3.0//EN" "http://mybatis.org/dtd/mybatis-3-mapper.dtd">

<mapper namespace="com.stephen.ssm.model.User">
    <resultMap type="User" id="userMap">
        <id property="id" column="id"/>
        <result property="name" column="name"/>
        <result property="age" column="age"/>
    </resultMap>

    <insert id="add" parameterType="User" useGeneratedKeys="true" keyProperty="id">
        <![CDATA[
            INSERT INTO users(name, age) VALUES(#{name}, #{age})
        ]]>
    </insert>

    <select id="get" resultMap="userMap" parameterType="Integer">
        <![CDATA[
            SELECT * FROM users WHERE id = #{id}
        ]]>
    </select>

    <delete id="delete" parameterType="Integer">
        <![CDATA[
            DELETE FROM users WHERE id = #{id}
        ]]>
    </delete>

    <update id="update" parameterType="User">
        <![CDATA[
            UPDATE users SET name = #{name}, age = #{age} WHERE id = #{id}
        ]]>
    </update>

</mapper>
2.4 dao层数据持久层
UserDao.java关于User的CRUD的接口
package com.stephen.ssm.dao;

import com.stephen.ssm.model.User;

public interface UserDao {

    Boolean add(User user);

    Boolean delete(Integer id);

    Boolean update(User user);

    User get(Integer id);
}
UserDaoImpl.java接口的实现
package com.stephen.ssm.dao.impl;

import org.mybatis.spring.SqlSessionTemplate;

import com.stephen.ssm.dao.UserDao;
import com.stephen.ssm.model.User;

public class UserDaoImpl implements UserDao {

    private static final String CLASS_NAME = User.class.getName();
    private static final String SQL_ID_ADD = ".add";
    private static final String SQL_ID_DELETE = ".delete";
    private static final String SQL_ID_GET = ".get";
    private static final String SQL_ID_UPDATE = ".update";

    private SqlSessionTemplate sqlSessionTemplate;

    public void setSqlSessionTemplate(SqlSessionTemplate sqlSessionTemplate) {
        this.sqlSessionTemplate = sqlSessionTemplate;
    }

    @Override
    public Boolean add(User user) {
        this.sqlSessionTemplate.insert(CLASS_NAME + SQL_ID_ADD, user);
        return Boolean.TRUE;
    }

    @Override
    public Boolean delete(Integer id) {
        this.sqlSessionTemplate.delete(CLASS_NAME + SQL_ID_DELETE, id);
        return Boolean.TRUE;
    }

    @Override
    public Boolean update(User user) {
        this.sqlSessionTemplate.update(CLASS_NAME + SQL_ID_UPDATE, user);
        return Boolean.TRUE;
    }

    @Override
    public User get(Integer id) {
        return this.sqlSessionTemplate.selectOne(CLASS_NAME + SQL_ID_GET, id);
    }

}
我们使用setSqlSessionTemplate()方法将sqlSessionTemplate注入spring容器。
2.5 util包我们的工具包
养成好的习惯工具包可以抽出来,以便复用。
package com.stephen.ssm.util;

public class StringUtil {

    public static boolean isEmpty(String str) {
        return str == null || str.isEmpty() || str.equalsIgnoreCase("null");
    }

}
目前关于字符串的只用到了这一个,以后需要就可以把相关字符串操作做的放在这里面。
package com.stephen.ssm.util;

import org.springframework.beans.BeansException;
import org.springframework.context.ApplicationContext;
import org.springframework.context.ApplicationContextAware;
import org.springframework.context.support.ClassPathXmlApplicationContext;

/**
 * This is the ApplicationContext for spring.
 * Developer can get the bean from container.
 */
public class SpringUtil implements ApplicationContextAware {

    private final static String APP_CONTEXT = "applicationContext.xml";
    private static ApplicationContext applicationContext = null;

    @Override
    public void setApplicationContext(ApplicationContext ac)
            throws BeansException {
        applicationContext = ac;
    }

    public static ApplicationContext getApplicationContext() {
        if (applicationContext == null) {
            applicationContext = new ClassPathXmlApplicationContext(APP_CONTEXT);
        }
        return applicationContext;
    }

    public static Object getBean(String beanId) {
        ApplicationContext applicationContext = getApplicationContext();
        return applicationContext.getBean(beanId);
    }
}
这个就是一个spring的工具类,可以通过bean Id拿到相应的对象。
3 测试
3.1 测试类TestSpringMybatis.java
和以前的测试基本一样
package com.stephen.ssm.test;

import com.stephen.ssm.dao.UserDao;
import com.stephen.ssm.model.User;
import com.stephen.ssm.util.SpringUtil;

public class TestSpringMybatis {

    /**
     * @param args
     */
    public static void main(String[] args) {
        UserDao userDao = (UserDao) SpringUtil.getBean("userDao");

        User user = new User();
        user.setName("Stephen Huang");
        user.setAge(18);
        userDao.add(user);
        System.out.println("add user:" + user);

        System.out.println("get user id:" + user.getId());
        System.out.println(userDao.get(user.getId()));

        user.setAge(28);
        userDao.update(user);
        System.out.println("update user age=28:" + user);

        Integer userId = user.getId();
        userDao.delete(userId);
        System.out.println("delete user id=" + userId);
        System.out.println("get deleted user: " + userDao.get(userId));

    }
}
3.2 展示一下测试结果
log4j:WARN No appenders could be found for logger (org.springframework.core.env.StandardEnvironment).
log4j:WARN Please initialize the log4j system properly.
add user:User [id=3, name=Stephen Huang, age=18]
get user id:3
User [id=3, name=Stephen Huang, age=18]
update user age=28:User [id=3, name=Stephen Huang, age=28]
delete user id=3
get deleted user: null


 63万+
63万+

 被折叠的 条评论
为什么被折叠?


