


整合Thymeleaf
什么是thymeleaf?
thymeleaf是一个Java模板引擎,支持HTML原型,他可以让开发人员在没有后台数据的情况下直接用浏览器打开就能查看样式,也可以根据后端提供的数据查看显示效果
SpringBoot整合Thymeleaf
创建工程,添加spring-boot-start-web和spring-boot-thymeleaf依赖
<dependency>
      <groupId>org.springframework.boot</groupId>
      <artifactId>spring-boot-starter-thymeleaf</artifactId>
</dependency>
<dependency>
      <groupId>org.springframework.boot</groupId>
      <artifactId>spring-boot-starter-web</artifactId>
</dependency>
配置Thymeleaf
hymeleaf有相应的默认配置,如果想自定义配置可以在application.properties里进行相关配置,如下:
#是否开启缓存
spring.thymeleaf.cache=true
#检查模板是否存在
spring.thymeleaf.check-template=true
#是否检查模板位置
spring.thymeleaf.check-template-location=true
#模板文件编码
spring.thymeleaf.encoding=utf-8
#设置thymeleaf路径
spring.thymeleaf.prefix=classpath:/templates/
#content-type配置
spring.thymeleaf.servlet.content-type=text/html
#模板文件后缀
spring.thymeleaf.suffix=.html
创建实体类
public class Book {
    private Integer id;
    private String author;
    private String name;
   //TODO get set
}
配置控制器
@Controller
public class BookController {
    @GetMapping("/books")
    public ModelAndView books() {
        List<Book> books = new ArrayList<>();
        Book b1 = new Book();
        b1.setId(1);
        b1.setAuthor("刘慈欣");
        b1.setName("三体");
        Book b2 = new Book();
        b2.setId(2);
        b2.setAuthor("罗贯中");
        b2.setName("三国演义");
        books.add(b1);
        books.add(b2);
        ModelAndView mv = new ModelAndView();
        mv.addObject("books",books);
        mv.setViewName("books");
        return mv;
    }
}
控制器返回ModelAndView对象 控制器,控制器中创建实体类对象,将实体类对象加入到创建的ModelAndView对象里。
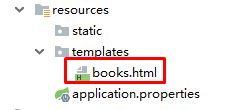
创建视图
在sources目录下的templates中创建html用于展示给用户,
在html文件中,首先要导入Thymeleaf的名称空间,然后主体里通过th:each进行集合遍历,通过th:text展示数据
<!DOCTYPE html>
<html lang="en" xmlns="http://www.w3.org/1999/xhtml" xmlns:th="http://www.thymeleaf.org" >
<head>
    <meta charset="UTF-8">
    <title>图书列表</title>
</head>
<body>
<table border="1">
    <tr>
        <td>图书编号</td>
        <td>图书名称</td>
        <td>图书作者</td>
    </tr>
    <tr th:each="book:${books}">
        <td th:text="${book.id}"></td>
        <td th:text="${book.name}"></td>
        <td th:text="${book.author}"></td>
    </tr>
</table>
</body>
</html>
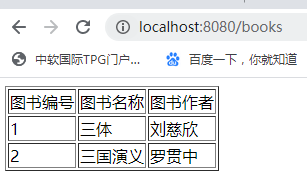
启动服务器后,用http://localhost:8080/books访问获得页面内容如下
整合FreeMarker
什么是FreeMarker?
FreeMarker是一个模板引擎,可以用在web或非web环境,但是需要经过解析才能在浏览器中展示,它可以用来配置HTML页面模板,也可以作为电子邮件模板、配置文件模板以及源码模板等
SpringBoot整合FreeMarker
创建工程,添加spring-boot-start-web和spring-boot-freemarker依赖
<dependency>
      <groupId>org.springframework.boot</groupId>
      <artifactId>spring-boot-starter-freemarker</artifactId>
</dependency>
<dependency>
      <groupId>org.springframework.boot</groupId>
      <artifactId>spring-boot-starter-web</artifactId>
</dependency>
配置FreeMarker
FreeMarker有相应的默认配置,如果想自定义配置可以在application.properties里进行相关配置,如下:
#是否开启缓存
spring.freemarker.cache=false
#模板文件编码
spring.freemarker.charset=utf-8
#是否检查模板位置
spring.freemarker.check-template-location=false
#content-type的值
spring.freemarker.content-type=text/html
#是否将HttpServletRequest中的属性添加到Model中
spring.freemarker.expose-request-attributes=false
#是否将HttpSession中的属性添加到Model中
spring.freemarker.expose-session-attributes=false
#模板文件后缀
spring.freemarker.suffix=.ftl
#模板文件位置
spring.freemarker.template-loader-path=classpath:/templates/
创建实体类和控制器:同Thymeleaf
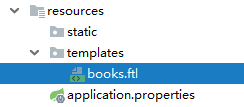
创建视图:
在resources/templates目录下创建ftl文件
<!DOCTYPE html>
<html lang="en" >
<head>
    <meta charset="UTF-8">
    <title>图书列表</title>
</head>
<body>
<table border="1">
    <tr>
        <td>图书编号</td>
        <td>图书名称</td>
        <td>图书作者</td>
    </tr>
    <#if books ??&&(books?size>0)>
       <#list books as book>
           <tr>
               <td>${book.id}</td>
               <td>${book.name}</td>
               <td>${book.author}</td>
           </tr>
       </#list>
    </#if>
</table>
</body>
</html>
文件中首先判断对象不为空并且有数据,然后进行遍历,将数据展示出来
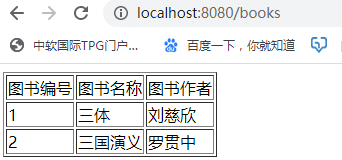
启动服务器并用浏览器访问http://localhost:8080/books可以获得页面


 1417
1417


 被折叠的 条评论
为什么被折叠?
被折叠的 条评论
为什么被折叠?
 到【灌水乐园】发言


