


写在前面
笔者近来在学习Android自定义View,收集了一些不算复杂但又“长得”还可以的自定义View效果实现,之前分享过两个效果:一个水平的进度条,一个圆形温度显示器,如果你有兴趣的话可以看看:
一个水平的进度条
一个圆形温度显示器
今天我要来分享的是这样的效果——图片合并
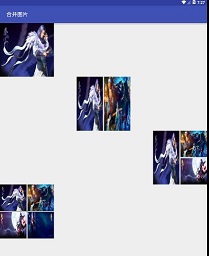
当你使用微信进入某一个人的朋友圈列表,如果他们某条信息所携带的图片超过一张,就会做成如图所示这种显示效果,是将多张图片合并在一起形成的预览效果。当然对于朋友圈的实现方式我不清楚,有可能是服务器端已经合并好图片了,返回给客户端的就是一张合并之后的图片,只要一个ImageView就可以了。不过对于自定义View的学习,你是否想过,如果服务器给你的是若干张图片,你要自己拼接成一张,该怎么搞,今天我们来讲这个。
所涉及的知识点
其实在绘图方面本文所牵扯到的知识点还没有多少,反而是关于bitmap的内存占用,控制显得更加重要。总的来说大概如下:
- canvas.drawBitmap()方法里面各个参数含义。
- 如果要显示的图片区域(或者像素点)明显的比原图片小(因为我们只是做缩略图),怎么节约内存使用。这将涉及到加载"bitmap"时利用"BitmapFactory.Options"对象计算压缩的比例等等知识。
- 一些很简单的数学计算,如前面的图片所示,是需要在一、二、三、四张图片的情况下,计算裁剪图片大小以及摆放在什么样的位置上。
设计思路
想象一下,如果我现在给你一张白纸(canvas,其实如果我说一个相框,可能更方便你想象),再给你一到四张照片,你要怎么“摆”出我的截图里的效果。其实很简单,笔者提出思路如下:
- 首先你需要判断下图片张数,然后分别进行处理。
- 如果是一张图片,我们就将整张原图“绘制”到我们的canvas上面。
- 如果是两张图片,我们就将它们分别横向压缩一半,然后分别绘制到canvas里面,每张图片占一半位置。
- 如果是三张图片,将第一张压缩一半,绘制到canvas的左半边,另外两张图片压缩成原来的四分之一,绘制到canvas右上角,右下角。
- 如果是四张图片,将四张图片全部都压缩成原来的四分之一,绘制到canvas的四个角上。
- 为了美观,图片之间画条白线分隔一下。
一步一步,切分代码
关于图片源,在你的项目当中,图片来源大多应该来自网络,不过作为一个样例,贪图方便(方便偷懒),图片来源直接来自本地,在drawable文件夹下面,所以我在生成bitmap时,调用的是"BitmapFactory.decodeResource()"方法。如果你的图片来自网络,可能需要别的方法,还有,如果你是用glide之类网络框架下载图片,请搞清楚这些框架下载图片之后对图片所做的事情,笔者曾经在实际项目里,使用一些框架导致数据错乱,需要另外进行其他调试。
- 一张图片时的代码片段
decodeSampledBitmapFromResource()方法是个自定义的内部方法,根据实际需要尺寸加载图片,用来防止内存耗尽,这个将在稍后展开来讲。
if(length == 1){
	//如果只有一张图片,则将该图片裁剪成合适大小,直接绘制就可以了
	bitmap = decodeSampledBitmapFromResource(drawableIds[0], measuredWidth, measuredHeight);
	//要截取的原图片的范围
	srcRect.set(0, 0, bitmap.getWidth(), bitmap.getHeight());
	//图片绘制在canvas上的范围
	dstRect.set(0, 0, measuredWidth, measuredHeight);
	canvas.drawBitmap(bitmap, srcRect, dstRect, bitmapPaint);
}
- 两张图片时的代码片段
两张图片,图片的最终宽度就成了控件宽度减去白色分隔线的宽度,再除以2。
if(length == 2){
	//如果有两张图片,则两张图片各占左右一半位置,中间画一条分隔线
	//两张图片中间分隔线的宽度
	int lineWidth = 4;
	//图片的目标宽度
	int dstWidth = (measuredWidth-lineWidth)/2;
	//绘制第一张图片
	bitmap = decodeSampledBitmapFromResource(drawableIds[0], dstWidth, measuredHeight);
	srcRect.set(0, 0, bitmap.getWidth(), bitmap.getHeight());
	dstRect.set(0, 0, dstWidth, measuredHeight);
	canvas.drawBitmap(bitmap, srcRect, dstRect, bitmapPaint);
	//绘制分割线
	linePaint.setColor(Color.WHITE);
	canvas.drawLine(dstWidth, 0, dstWidth+lineWidth, getMeasuredHeight(), linePaint);
	//绘制第二张图片
	bitmap = decodeSampledBitmapFromResource(drawableIds[1], dstWidth, getMeasuredHeight());
	srcRect.set(0, 0, bitmap.getWidth(), bitmap.getHeight());
	dstRect.set(dstWidth+lineWidth, 0, getMeasuredWidth(), getMeasuredHeight());
	canvas.drawBitmap(bitmap, srcRect, dstRect, bitmapPaint);
}
三张图片和四张图片的情况,类似,只要按着上面的逻辑来,就差不多。是不是感觉很简单?确实,其实相当一部分的自定义View,不像想象中的那么复杂。而且这次分享的这一个效果,其重点也并不在绘制的逻辑上面,而是在于从一个来源(或者说叫做大小,尺寸)不确定的图片上面,根据你自己需要的大小,加载、裁剪出合适尺寸的图片,同时还要考虑内存占用,不要发生OOM。
加载尺寸不确定的Bitmap时的内存占用问题
解决这个问题的思路是:
- 先将"BitmapFactory.Options"对象的"inJustDecodeBounds"属性设置为true,这样子能获取图片相关信息。
- 根据我们所需要的最终尺寸,以及图片原来信息,计算以及设置压缩比例。
- 设置好压缩比例,将刚才的那个属性设置为false,将一个“比较小的”bitmap给加载进来。
- 通过"Bitmap.createScaledBitmap(Bitmap, int , int , boolean)"方法,得到最终我们要的尺寸的Bitmap。
关于这个解决思路背后的原理,推荐参考这篇博客:
根据ImageView的大小来压缩Bitmap,避免OOM
具体代码跟下面的完整用例贴在一起。
完整用例
类代码
public class MergePictureView extends View{

    //要显示的图片资源数组(即要合并的图片)
    private int[] drawableIds;
    //裁剪图片时的裁剪区域
    private Rect srcRect = new Rect();
    //要将图片绘制到哪一个区域
    private Rect dstRect = new Rect();
    private Paint bitmapPaint = new Paint();
    private Paint linePaint = new Paint();

    public MergePictureView(Context context) {
        super(context);
    }

    public MergePictureView(Context context, AttributeSet attrs) {
        super(context, attrs);
    }

    @Override
    protected void onMeasure(int widthMeasureSpec, int heightMeasureSpec) {
        setMeasuredDimension(getMeasureSize(widthMeasureSpec), getMeasureSize(heightMeasureSpec));
    }

    @Override
    protected void onDraw(Canvas canvas) {
        if(drawableIds == null || drawableIds.length == 0){
            super.onDraw(canvas);
            return;
        }
        int length = drawableIds.length;
        int measuredWidth = getMeasuredWidth();
        int measuredHeight = getMeasuredHeight();
        Bitmap bitmap;
        if(length == 1){
            //如果只有一张图片,则将该图片裁剪成合适大小,直接绘制就可以了
            bitmap = decodeSampledBitmapFromResource(drawableIds[0], measuredWidth, measuredHeight);
            srcRect.set(0, 0, bitmap.getWidth(), bitmap.getHeight());
            dstRect.set(0, 0, measuredWidth, measuredHeight);
            canvas.drawBitmap(bitmap, srcRect, dstRect, bitmapPaint);
        }else if(length == 2){
            //如果有两张图片,则两张图片各占左右一半位置,中间画一条分隔线
            //两张图片中间分隔线的宽度
            int lineWidth = 4;
            //图片的目标宽度
            int dstWidth = (measuredWidth-lineWidth)/2;
            //绘制第一张图片
            bitmap = decodeSampledBitmapFromResource(drawableIds[0], dstWidth, measuredHeight);
            srcRect.set(0, 0, bitmap.getWidth(), bitmap.getHeight());
            dstRect.set(0, 0, dstWidth, measuredHeight);
            canvas.drawBitmap(bitmap, srcRect, dstRect, bitmapPaint);
            //绘制分割线
            linePaint.setColor(Color.WHITE);
            canvas.drawLine(dstWidth, 0, dstWidth+lineWidth, getMeasuredHeight(), linePaint);
            //绘制第二张图片
            bitmap = decodeSampledBitmapFromResource(drawableIds[1], dstWidth, getMeasuredHeight());
            srcRect.set(0, 0, bitmap.getWidth(), bitmap.getHeight());
            dstRect.set(dstWidth+lineWidth, 0, getMeasuredWidth(), getMeasuredHeight());
            canvas.drawBitmap(bitmap, srcRect, dstRect, bitmapPaint);
        }else if(length == 3){
            //如果有三张图片,则第一张图片在左边占一半位置,其余两张在右边占四分之一位置,图片之间画线分隔
            //左右分割线宽度,上下分割线高度
            int leftRightWidth = 4, topBottomHeight = 4;
            //每一张图片的宽度
            int dstWidth = (getMeasuredWidth()-leftRightWidth)/2;
            //绘制第一张图片
            bitmap = decodeSampledBitmapFromResource(drawableIds[0], dstWidth, getMeasuredHeight());
            srcRect.set(0, 0, bitmap.getWidth(), bitmap.getHeight());
            dstRect.set(0, 0, dstWidth, getMeasuredHeight());
            canvas.drawBitmap(bitmap, srcRect, dstRect, bitmapPaint);
            //绘制左右分割线
            linePaint.setColor(Color.WHITE);
            canvas.drawLine(dstWidth, 0, dstWidth+leftRightWidth, getMeasuredHeight(), linePaint);
            //绘制第二张图片
            bitmap = decodeSampledBitmapFromResource(drawableIds[1], dstWidth, getMeasuredHeight()/2);
            srcRect.set(0, 0, bitmap.getWidth(), bitmap.getHeight());
            dstRect.set(dstWidth+leftRightWidth, 0, getMeasuredWidth(), (getMeasuredHeight()-topBottomHeight)/2);
            canvas.drawBitmap(bitmap, srcRect, dstRect, bitmapPaint);
            //回执上下分割线
            canvas.drawLine(measuredWidth/2, measuredHeight/2, measuredWidth, measuredHeight/2, linePaint);
            //绘制第三张图片
            Bitmap thirdBitmap = decodeSampledBitmapFromResource(drawableIds[2], dstWidth, getMeasuredHeight());
            srcRect.set(0, 0, thirdBitmap.getWidth(), thirdBitmap.getHeight());
            dstRect.set(dstWidth+leftRightWidth, (measuredHeight-topBottomHeight)/2+topBottomHeight, measuredWidth, getMeasuredHeight());
            canvas.drawBitmap(thirdBitmap, srcRect, dstRect, bitmapPaint);
        }else{
            //四张以及以上图片统一处理,最多只能显示四张,将四张图片已“田”字形分布
            //这是分割线的尺寸,横线的高,竖线的宽,都等于他
            int lineSize = 4;
            //四张图片都是相同宽度,相同高度
            int dstWidth = (measuredWidth-lineSize)/2;
            int dstHeight = (measuredHeight-lineSize)/2;
            //先将四张图画上去
            bitmap = decodeSampledBitmapFromResource(drawableIds[0], dstWidth, dstHeight);
            srcRect.set(0, 0, bitmap.getWidth(), bitmap.getHeight());
            dstRect.set(0, 0, dstWidth, dstHeight);
            canvas.drawBitmap(bitmap, srcRect, dstRect, bitmapPaint);

            bitmap = decodeSampledBitmapFromResource(drawableIds[1], dstWidth, dstHeight);
            srcRect.set(0, 0, bitmap.getWidth(), bitmap.getHeight());
            dstRect.set(dstWidth+lineSize, 0, measuredWidth, dstHeight);
            canvas.drawBitmap(bitmap, srcRect, dstRect, bitmapPaint);

            bitmap = decodeSampledBitmapFromResource(drawableIds[2], dstWidth, dstHeight);
            srcRect.set(0, 0, bitmap.getWidth(), bitmap.getHeight());
            dstRect.set(0, dstHeight+lineSize, dstWidth, measuredHeight);
            canvas.drawBitmap(bitmap, srcRect, dstRect, bitmapPaint);

            bitmap = decodeSampledBitmapFromResource(drawableIds[3], dstWidth, dstHeight);
            srcRect.set(0, 0, bitmap.getWidth(), bitmap.getHeight());
            dstRect.set(dstWidth+lineSize, dstHeight+lineSize, measuredWidth,measuredHeight);
            canvas.drawBitmap(bitmap, srcRect, dstRect, bitmapPaint);
            //最后画两条分割线
            canvas.drawLine(dstWidth, 0, dstWidth, measuredHeight, linePaint);
            canvas.drawLine(0, dstHeight, measuredWidth, dstHeight, linePaint);
        }
        super.onDraw(canvas);
    }


    public void setDrawableIds(int[] drawableIds){
        this.drawableIds = drawableIds;
        invalidate();
    }

    /**
     * 从Resources中加载图片
     * @param resId 图片资源
     * @param reqWidth 目标宽度
     * @param reqHeight 目标高度
     * @return
     */
    private Bitmap decodeSampledBitmapFromResource(int resId, int reqWidth, int reqHeight) {
        final BitmapFactory.Options options = new BitmapFactory.Options();
        options.inJustDecodeBounds = true; // 设置成了true,不占用内存,只获取bitmap宽高
        BitmapFactory.decodeResource(getResources(), resId, options); // 读取图片长宽,目的是得到图片的宽高
        options.inSampleSize = calculateInSampleSize(options, reqWidth, reqHeight); // 调用上面定义的方法计算inSampleSize值
        // 使用获取到的inSampleSize值再次解析图片
        options.inJustDecodeBounds = false;
        Bitmap src = BitmapFactory.decodeResource(getResources(), resId, options); // 载入一个稍大的缩略图
        return createScaleBitmap(src, reqWidth, reqHeight, options.inSampleSize); // 通过得到的bitmap,进一步得到目标大小的缩略图
    }

    //根据"measureSpec"返回具体尺寸值
    private static int getMeasureSize(int measureSpec){
        int measureMode = MeasureSpec.getMode(measureSpec);
        //先给一个默认值
        int measureSize = 200;
        if(measureMode == MeasureSpec.EXACTLY){
            measureSize = MeasureSpec.getSize(measureSpec);
        }else if(measureMode == MeasureSpec.AT_MOST){
            measureSize = Math.min(measureSize, MeasureSpec.getSize(measureSpec));
        }
        return measureSize;
    }

    /**
     * 计算图片的压缩比率
     * @param options 参数
     * @param reqWidth 目标的宽度
     * @param reqHeight 目标的高度
     * @return inSampleSize 压缩比率
     */
    private static int calculateInSampleSize(BitmapFactory.Options options, int reqWidth, int reqHeight) {
        //源图片的高度和宽度
        final int height = options.outHeight;
        final int width = options.outWidth;
        int inSampleSize = 1;
        if (height > reqHeight || width > reqWidth) {
            final int halfHeight = height / 2;
            final int halfWidth = width / 2;
            // Calculate the largest inSampleSize value that is a power of 2 and keeps both
            // height and width larger than the requested height and width.
            while ((halfHeight / inSampleSize) > reqHeight && (halfWidth / inSampleSize) > reqWidth) {
                inSampleSize *= 2;
            }
        }
        return inSampleSize;
    }

    /**
     * 通过传入的bitmap,进行压缩,得到符合标准的bitmap
     * @param src 原图片Bitmap
     * @param dstWidth 目标宽度
     * @param dstHeight 目标高度
     * @return 压缩后的图片Bitmap
     */
    private static Bitmap createScaleBitmap(Bitmap src, int dstWidth, int dstHeight, int inSampleSize) {
        // 如果是放大图片,filter决定是否平滑,如果是缩小图片,filter无影响,我们这里是缩小图片,所以直接设置为false
        Bitmap dst = Bitmap.createScaledBitmap(src, dstWidth, dstHeight, false);
        //如果图片有缩放,回收原来的图片
        if (src != dst) src.recycle();
        return dst;
    }

}
在XML文件里
<?xml version="1.0" encoding="utf-8"?>
<LinearLayout xmlns:android="http://schemas.android.com/apk/res/android"
    android:orientation="vertical"
	android:layout_width="match_parent"
    android:layout_height="match_parent">

    <!--四张图片展示效果-->
    <com.jf.simplecustomview.view.MergePictureView
        android:id="@+id/merge_picture_view"
        android:layout_width="wrap_content"
        android:layout_height="wrap_content"
        android:layout_gravity="start"/>
</LinearLayout>
Activity里面
public class MergePictureActivity extends AppCompatActivity{

    @Override
    protected void onCreate(@Nullable Bundle savedInstanceState) {
        super.onCreate(savedInstanceState);
        setContentView(R.layout.activity_merge_picture);

        //展示四张图片合并效果
        int[] resourcesIdsFirst = new int[]{R.mipmap.t1, R.mipmap.t2, R.mipmap.t3, R.mipmap.t4};
        ((MergePictureView)findViewById(R.id.merge_picture_view)).setDrawableIds(resourcesIdsFirst);
}
项目源码:
https://github.com/kingfarou/SimpleCustomView
这个项目里面集合了好几个自定义View,本文所对应的View类名叫做"MergePictureView"。


 1万+
1万+

 被折叠的 条评论
为什么被折叠?
被折叠的 条评论
为什么被折叠?
 到【灌水乐园】发言


