android中getLocationInWindow 和 getLocationOnScreen的区别

一个控件在其父窗口中的坐标位置

View.getLocationInWindow(int[] location)


一个控件在其整个屏幕上的坐标位置

View.getLocationOnScreen(int[] location)


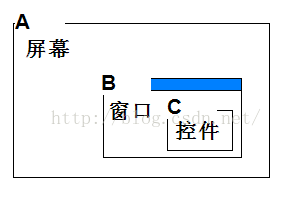
getLocationInWindow是以B为原点的C的坐标

getLocationOnScreen以A为原点。


下面是getLocationOnScreen示例

[java]  view plain copy
  1. start = (Button) findViewById(R.id.start);  
  2.         int []location=new int[2];  
  3.         start.getLocationOnScreen(location);  
  4.         int x=location[0];//获取当前位置的横坐标  
  5.         int y=location[1];//获取当前位置的纵坐标  


下面是getLocationInWindow示例

[java]  view plain copy
  1. start = (Button) findViewById(R.id.start);  
  2.         int []location=new int[2];  
  3.         start.getLocationInWindow(location);  
  4.         int x=location[0];//获取当前位置的横坐标  
  5.         int y=location[1];//获取当前位置的纵坐标  

==================================================================================================

 附上源代码

==================================================================================================

View.getLocationInWindow(int[] location)

[java]  view plain copy
  1. /** 
  2.      * <p>Computes the coordinates of this view in its window. The argument 
  3.      * must be an array of two integers. After the method returns, the array 
  4.      * contains the x and y location in that order.</p> 
  5.      * 
  6.      * @param location an array of two integers in which to hold the coordinates 
  7.      */  
  8.     public void getLocationInWindow(int[] location) {  
  9.         if (location == null || location.length < 2) {  
  10.             throw new IllegalArgumentException("location must be an array of two integers");  
  11.         }  
  12.   
  13.         if (mAttachInfo == null) {  
  14.             // When the view is not attached to a window, this method does not make sense  
  15.             location[0] = location[1] = 0;  
  16.             return;  
  17.         }  
  18.   
  19.         float[] position = mAttachInfo.mTmpTransformLocation;  
  20.         position[0] = position[1] = 0.0f;  
  21.   
  22.         if (!hasIdentityMatrix()) {  
  23.             getMatrix().mapPoints(position);  
  24.         }  
  25.   
  26.         position[0] += mLeft;  
  27.         position[1] += mTop;  
  28.   
  29.         ViewParent viewParent = mParent;  
  30.         while (viewParent instanceof View) {  
  31.             final View view = (View) viewParent;  
  32.   
  33.             position[0] -= view.mScrollX;  
  34.             position[1] -= view.mScrollY;  
  35.   
  36.             if (!view.hasIdentityMatrix()) {  
  37.                 view.getMatrix().mapPoints(position);  
  38.             }  
  39.   
  40.             position[0] += view.mLeft;  
  41.             position[1] += view.mTop;  
  42.   
  43.             viewParent = view.mParent;  
  44.          }  
  45.   
  46.         if (viewParent instanceof ViewRootImpl) {  
  47.             // *cough*  
  48.             final ViewRootImpl vr = (ViewRootImpl) viewParent;  
  49.             position[1] -= vr.mCurScrollY;  
  50.         }  
  51.   
  52.         location[0] = (int) (position[0] + 0.5f);  
  53.         location[1] = (int) (position[1] + 0.5f);  
  54.     }  
View.getLocationOnScreen(int[] location)

[java]  view plain copy
  1. /** 
  2.    * <p>Computes the coordinates of this view on the screen. The argument 
  3.    * must be an array of two integers. After the method returns, the array 
  4.    * contains the x and y location in that order.</p> 
  5.    * 
  6.    * @param location an array of two integers in which to hold the coordinates 
  7.    */  
  8.   public void getLocationOnScreen(int[] location) {  
  9.       getLocationInWindow(location);  
  10.   
  11.       final AttachInfo info = mAttachInfo;  
  12.       if (info != null) {  
  13.           location[0] += info.mWindowLeft;  
  14.           location[1] += info.mWindowTop;  
  15.       }  
  16.   }  


                             ====================================================================================

  作者:欧阳鹏  欢迎转载,与人分享是进步的源泉!

  转载请保留原文地址http://blog.csdn.net/ouyang_peng

  • 5
    点赞
  • 17
    收藏
    觉得还不错? 一键收藏
  • 6
    评论
FadingActionBar 仿美团上拉背景渐变,默认背景透明,下拉bar完全隐藏  。开发者使用此依赖,只需要2个方法就可以实现美团外卖上拉titlebar背景渐变,下拉titlebar隐藏效果。效果图:准备工作:1.注意actionbar的依赖库,目前仅支持import android.app.ActionBar;2.actionbar背景渐变需要监听headerview的位置,放在添加headerview后调用该方法     private void initScroll() {         //设置动态改变         mlistview.setOnScrollListener(new AbsListView.OnScrollListener() {             @Override             public void onScrollStateChanged(AbsListView view, int scrollState) {             }             @Override             public void onScroll(AbsListView view, int firstVisibleItem, int visibleItemCount, int totalItemCount) {                 // [0]代表x坐标,location [1] 代表y坐标。                 int[] location = new int[2];                 // 实时设置actionbar透明度,监听header位置(必须是移除屏幕会产生负数的view)                 llheaderview.getLocationInWindow(location);                 helper.setActionBarAlpha(location[1] - XMSettings.getStatusBarHeight(mContext));                 Log.i("tag", "onScroll: "   (location[1] - XMSettings.getStatusBarHeight(mContext)));             }         });      }3.注意activity对应的theme添加属性<style name="AppTheme" parent="android:Theme.Holo.Light.DarkActionBar">      <item name="android:windowActionBarOverlay">true</item>      <item name="android:windowContentOverlay">@null</item> </style>使用1.添加Gradle依赖dependencies {     compile 'com.github.ximencx.fadeactionbar:library:1.0.1'     }2.activity获取actionbar对象,初始化XMFadeBarHelper类    private void initbar() {         //获取actionbar对象         mActionBar = getActionBar();         mActionBar.setDisplayOptions(ActionBar.DISPLAY_SHOW_CUSTOM);         mActionBar.setCustomView(R.layout.ab_title);         /**          * actionbar辅助类          * parameter1:action对象          * parameter2:acitonbar背景          * parameter3:初始透明度          */         helper = new XMFadeBarHelper(mActionBar, getResources().getDrawable(R.drawable.bg_actionbar), 0) {             /**              * 设置需要隐藏view的透明度              * 注意:是否设置background的区别              *              * @param customView  actionbar布局对象              * @param alpha 回调的alpha              */             @Override             public void setViewAlpha(View customView, int alpha) {                 ButterKnife.findById(customView, R.id.tv_info).setAlpha(alpha);                 ButterKnife.findById(customView, R.id.rl_bg).getBackground().setAlpha(alpha);             }             /**              * 设置隐藏速度              * 默认返回actionbar布局的高度,当然也可以以其它view为参照物              * @param customView actionbar布局              * @return              */             @Override             public int setHeight(View customView) {                 return customView.getHeight();             }         };     }3.listview的监听调用helper.setActionBarAlpha(),注意减去状态栏的高度    private void initScroll() {         //设置动态改变         mlistview.setOnScrollListener(new AbsListView.OnScrollListener() {             @Override             public void onScrollStateChanged(AbsListView view, int scrollState) {             }             @Override             public void onScroll(AbsListView view, int firstVisibleItem, int visibleItemCount, int totalItemCount) {                 // [0]代表x坐标,location [1] 代表y坐标。                 int[] location = new int[2];                 // 实时设置actionbar透明度,监听header位置(必须是移除屏幕会产生负数的view)                 llheaderview.getLocationInWindow(location);                 helper.setActionBarAlpha(location[1] - XMSettings.getStatusBarHeight(mContext));                 Log.i("tag", "onScroll: "   (location[1] - XMSettings.getStatusBarHeight(mContext)));             }         });      }sample使用到的第三方库:BGAAdapterBGARefreshLayout-Android

“相关推荐”对你有帮助么?

  • 非常没帮助
  • 没帮助
  • 一般
  • 有帮助
  • 非常有帮助
提交
评论 6
添加红包

请填写红包祝福语或标题

红包个数最小为10个

红包金额最低5元

当前余额3.43前往充值 >
需支付:10.00
成就一亿技术人!
领取后你会自动成为博主和红包主的粉丝 规则
hope_wisdom
发出的红包
实付
使用余额支付
点击重新获取
扫码支付
钱包余额 0

抵扣说明:

1.余额是钱包充值的虚拟货币,按照1:1的比例进行支付金额的抵扣。
2.余额无法直接购买下载,可以购买VIP、付费专栏及课程。

余额充值