


1.配置
硬件:树莓派B4
硬盘:4T机械硬盘
系统:ubuntu-22.04.2-preinstalled-server-arm64+raspi(树莓派官网下载)
2.前期准备
根据树莓派官网设置烧录系统并运行起来。
3.挂载硬盘
参考:Ubuntu Server搭建SVN服务器_鱼听禅的博客-CSDN博客
4.安装Git
4.1 安装Git服务器
ubuntu@ubuntu:~$ sudo apt-get install git
Reading package lists... Done
Building dependency tree... Done
Reading state information... Done
git is already the newest version (1:2.34.1-1ubuntu1.8).
git set to manually installed.
The following packages were automatically installed and are no longer required:
  ibverbs-providers libboost-iostreams1.74.0 libboost-thread1.74.0 libcephfs2 libgfapi0
  libgfrpc0 libgfxdr0 libglusterfs0 libibverbs1 libldb2 librados2 librdmacm1 libtalloc2
  libtevent0 liburing2 libwbclient0 python3-dnspython python3-gpg python3-ldb
  python3-markdown python3-pygments python3-requests-toolbelt python3-samba python3-talloc
  python3-tdb samba-common samba-common-bin samba-dsdb-modules samba-libs samba-vfs-modules
  tdb-tools
Use 'sudo apt autoremove' to remove them.
0 upgraded, 0 newly installed, 0 to remove and 2 not upgraded.
4.2 查看git版本
ubuntu@ubuntu:~$ git --version
git version 2.34.1
4.3 创建git仓库
ubuntu@ubuntu:/mnt$ cd /DbDisk
-bash: cd: /DbDisk: No such file or directory
ubuntu@ubuntu:/mnt$ cd DbDisk
ubuntu@ubuntu:/mnt/DbDisk$ cd git
-bash: cd: git: No such file or directory
ubuntu@ubuntu:/mnt/DbDisk$ sudo mkdir git
ls
ubuntu@ubuntu:/mnt/DbDisk$ ls
'System Volume Information'   git   svn
ubuntu@ubuntu:/mnt/DbDisk$ cd git
4.4 创建版本库
ubuntu@ubuntu:/mnt/DbDisk/git$ sudo mkdir Test
ubuntu@ubuntu:/mnt/DbDisk/git$ ll
total 4
drwxrwxrwx 1 root root  144 Apr 12 14:35 ./
drwxrwxrwx 1 root root 4096 Apr 12 14:30 ../
drwxrwxrwx 1 root root    0 Apr 12 14:35 Test/
ubuntu@ubuntu:/mnt/DbDisk/git$ cd Test
ubuntu@ubuntu:/mnt/DbDisk/git/Test$ git init --bare # 进入版本库后再初始化
hint: Using 'master' as the name for the initial branch. This default branch name
hint: is subject to change. To configure the initial branch name to use in all
hint: of your new repositories, which will suppress this warning, call:
hint:
hint:   git config --global init.defaultBranch <name>
hint:
hint: Names commonly chosen instead of 'master' are 'main', 'trunk' and
hint: 'development'. The just-created branch can be renamed via this command:
hint:
hint:   git branch -m <name>
Initialized empty Git repository in /mnt/DbDisk/git/Test/.git/
4.5本地直接使用ssh访问git库。
ssh://用户名@公网IP:端口(默认ssh端口时可省略)/mnt/DbDisk/git/Test/.git5.问题总结:
5.1 克隆后推送报git did not exit cleanly (exit code 1)或者git did not exit cleanly (exit code 128)
remote: error: refusing to update checked out branch: refs/heads/master
remote: error: By default, updating the current branch in a non-bare repository
remote: is denied, because it will make the index and work tree inconsistent
remote: with what you pushed, and will require 'git reset --hard' to match
remote: the work tree to HEAD.
remote:
remote: You can set the 'receive.denyCurrentBranch' configuration variable
remote: to 'ignore' or 'warn' in the remote repository to allow pushing into
remote: its current branch;  however, this is not recommended unless you
remote: arranged to update its work tree to match what you pushed in some
remote: other way.
remote:
remote: To squelch this message and still keep the default behaviour, set
实际否面发现,服务器端初始化版本库时需要添加“--bare”参数,即“git init --bare”,创建空的数据库。本地推送就没有这种问题
5.2 Ubuntu Server中用agent管理私钥
ubuntu@ubuntu:~/.ssh$ ssh-agent bash        #先启动服务
ubuntu@ubuntu:~/.ssh$ ssh-add id_ed25519    #添加私钥
@@@@@@@@@@@@@@@@@@@@@@@@@@@@@@@@@@@@@@@@@@@@@@@@@@@@@@@@@@@
@         WARNING: UNPROTECTED PRIVATE KEY FILE!          @
@@@@@@@@@@@@@@@@@@@@@@@@@@@@@@@@@@@@@@@@@@@@@@@@@@@@@@@@@@@
Permissions 0664 for 'id_ed25519' are too open.
It is required that your private key files are NOT accessible by others.
This private key will be ignored.
ubuntu@ubuntu:~/.ssh$ chmod 600 id_ed25519        # 设置权限
ubuntu@ubuntu:~/.ssh$ ssh-add id_ed25519            #重新添加
6.配置Git免密访问
华为云云耀云服务器L实例评测|从零搭建Git服务器并配置ssh免密访问_华为云如何配置ssh-CSDN博客
Linux学习笔记-Ubuntu系统下配置ssh免密访问,创建多用户免密访问_ubuntu ssh免密-CSDN博客
7 踩坑经历
ubuntu服务器配置了openssh,然后客户端也安装了openssh用作ssh服务,然后遇到了powershell可以免密访问,但是git推送或拉取操作每次都需要输入密码。然后使用TortoiseGit同步数据要输入密码,使用vscode拉取获取推送的时候直接报错。

TypeError: Cannot read properties of undefined (reading 'replace')
    at c:\Program Files\Microsoft VS Code\resources\app\extensions\git\dist\askpass-main.js:1:1703
    at c:\Program Files\Microsoft VS Code\resources\app\extensions\git\dist\askpass-main.js:1:1922
    at c:\Program Files\Microsoft VS Code\resources\app\extensions\git\dist\askpass-main.js:1:1938
    at Object.<anonymous> (c:\Program Files\Microsoft VS Code\resources\app\extensions\git\dist\askpass-main.js:1:2044)
    at Module._compile (node:internal/modules/cjs/loader:1165:14)
    at Module._extensions..js (node:internal/modules/cjs/loader:1220:10)
    at Module.load (node:internal/modules/cjs/loader:1035:32)
    at Module._load (node:internal/modules/cjs/loader:876:12)
    at c._load (node:electron/js2c/asar_bundle:5:13343)
    at Function.executeUserEntryPoint [as runMain] (node:internal/modules/run_main:77:12)
ubuntu@远程ip: Permission denied (publickey,password).
fatal: Could not read from remote repository.

Please make sure you have the correct access rights
and the repository exists.
我尝试用控制台输入git指令进行同步,发现会提示输入密码,只要输入密码了就可以正常推送,分析应该是不能免密推动所以才报错的。问题又回到配置免密登陆。
然后我开始再网上各种搜解决方案找处理措施,发现网上都是什么生成密钥,把公钥拷贝到服务器等等。
一堆的都是访问github的,基本只需要把密码复制到网站上的指定位置就行。
结果不顶用,我是自己架设的git服务器,没有简单的密钥输入位置。
什么修改服务器文件夹,配置文件权限,修改ssh配置文件,添加密钥,重新生成等等。
然后试了好多都不顶用,只能自己搞。理论上git服务假设好了就可以访问才对。
6.2 解决思路
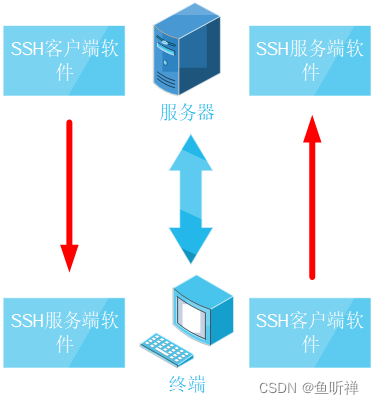
ssh连接后虽然看起来双向传输,但是其实都是单项的,都是需要通过ssh客户端软件访问远端的ssh服务器段软件。
我们架设私人git服务器,就是需要使用本地的ssh客户端软件访问服务器上的ssh服务器端软件。
就是要确保本地和远程服务器上的ssh密钥是一对的。
6.3 生成密钥对
首先生成一套ssh密钥(我这边生成的是rsa密钥),注意生成密钥对时使用默认密钥名称,不要修改,因为git for windows只能识别默认名称的密钥。
window密钥地址:C:\Users\username(电脑登陆的用户名)\.ssh
ubuntu密码地址:.ssh

然后接下来就是配置git了。
6.4 配置git
windows 下载:
- git for windows,下载路径:Git for Windows
- TortoiseGit,下载路径:Download – TortoiseGit – Windows Shell Interface to Git
下载之后安装软件。
右键点击空白处,选择Git GUI Here,打开git窗体。

选择Help菜单下的Show SSH Key:
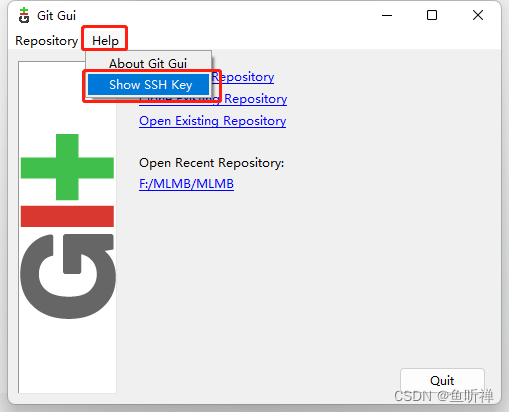
git会自动识别ssh目录下的密钥文件,注意,这个识别到的是公钥,即.pub格式的密钥。
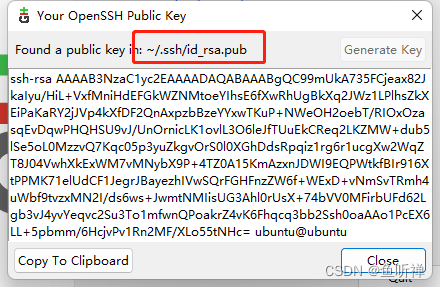
通过scp将密钥(私钥)拷贝到服务器上,然后添加密钥,由于git识别的是公钥,为了配对 ,所以我们只能把私钥复制到服务器上。
将私钥使用cat指令添加到服务器端的密钥管理文件authorized_keys中。
cat id_rsa >> authorized_keys
完事。
注意:使用过程中发现需要先配置好ssh,在cmd中可以通过ssh直接免密访问服务器(就按照常规的方法,将本地的私钥添加到agant,然后公钥放到服务器上)。
其实我一时没反应过来,ssh使用的是密钥对,但是并没有要求客户端只能使用私钥,也要规定服务器端的authorized_keys文件只能管理公钥。
只要把私钥和公钥配对配置好就可以实现免密登陆。
同时需要注意使用的用户需要有ssh的对应权限,测试中发现不同的用户文件路径访问权限不一致也会报错。
另外需要注意远程ssh访问得用户名需要与进行远程配置得用户名保持一致(例如:我通过git用户登录ubuntu服务器进行配置,那么我git访问服务器时就需要用git@公网ip来进行访问,目前猜测是不同用户权限问题,刚开始接触linux,后面在研究怎么改)
发现问题总是难受的,特别是发现问题,网上还搜不到解决方案时,更是难过的,痛苦的,这时候往往需要静下心来理解发现问题,也许能有新的发现。
6.5 添加另一组密钥(2024.04.07)
最近我又碰到了这个问题,按照上述操作TortoiseGit可以免密,但是使用visual studio或者vs code却无法免密访问。
后面我发现Visual studio和vs code有自带的git程序,而且我尝试了无法正常访问,最终我再安装的git for window添加id_rsa.pub密钥,然后将将私钥添加到服务器中。
然后将令一组密钥的公钥添加到服务器中,然后私钥添加本地客户端的ssh-agent中,然后就可以了,记录下。


 981
981


 被折叠的 条评论
为什么被折叠?
被折叠的 条评论
为什么被折叠?
 到【灌水乐园】发言


