


Spring Cloud Eureka 是 Spring Cloud Netflix 微服务套件中的一部分, 它基于 NetflixEureka 做了二次封装, 主要负责完成微服务架构中的服务治理功能。 Spring Cloud 通过为Eureka 增加了 Spring Boot 风格的自动化配置,我们只需通过简单引入依赖和注解配置就能
让
Spring Boot
构建的微服务应用轻松地与
Eureka
服务治理体系进行整合。
使用的boot版本是 1.4.2.RELEASE cloud版本是 Camden.SR3
直接上代码 :
首先需要注册中心 结合 actuator 监控
application.yml 这里使用yml配置
server:
    #tomcat:
     #   uri-encoding: UTF-8
      #  max-threads: 1000
       # min-spare-threads: 30
    port: 8888
spring:
    application:
        name: eureka-server

management:
    contextPath: /hello
endpoints:
    info:
        path: /appinfo
    health:
        path: /checkHealth
eureka:
    instance:
        statusPageUrlPath: ${management.contextPath}/${endpoints.info.path}
        healthCheckUrlPath: ${management.contextPath}/${endpoints.health.path}
    client:
        #不向注册中心注册自己
        registerWithEureka: false
        #检索服务 这里是注册中心
        fetchRegistry: false
        serviceUrl:
            defaultZone: http://localhost:8888/eureka/
注册中心只需要加入注解 @EnableEurekaServer
/**
 * 注册中心
 * @author Administrator
 *
 */
@EnableEurekaServer
@SpringBootApplication
public class ServerApplication {

	public static void main(String[] args) {
//		SpringApplication.run(DemoApplication.class, args);
		new SpringApplicationBuilder(ServerApplication.class).web(true).run(args);
	}
}
pom文件
 <parent>
		<groupId>org.springframework.boot</groupId>
		<artifactId>spring-boot-starter-parent</artifactId>
		<version>1.4.2.RELEASE</version>
		<relativePath/> <!-- lookup parent from repository -->
	</parent>
  <!--依赖管理,用于管理spring-cloud的依赖,其中Camden.SR3是版本号 -->
	<dependencyManagement>
		<dependencies>
			<dependency>
				<groupId>org.springframework.cloud</groupId>
				<artifactId>spring-cloud-dependencies</artifactId>
				<version>Camden.SR3</version>
				<type>pom</type>
				<scope>import</scope>
			</dependency>
		</dependencies>
	</dependencyManagement>
	<dependencies>
		<dependency>
			<groupId>org.springframework.boot</groupId>
			<artifactId>spring-boot-starter</artifactId>
		</dependency>
		<dependency>
			<groupId>org.springframework.boot</groupId>
			<artifactId>spring-boot-starter-web</artifactId>
		</dependency>

		<dependency>
			<groupId>org.springframework.boot</groupId>
			<artifactId>spring-boot-starter-test</artifactId>
			<scope>test</scope>
		</dependency>
		<!-- 监控 -->
	    <dependency>
			<groupId> org.springframework.boot</groupId>
			<artifactId>spring-boot-starter-actuator</artifactId>
		</dependency>
		 <dependency>
            <groupId>org.springframework.cloud</groupId>
            <artifactId>spring-cloud-starter-eureka-server</artifactId>
        </dependency>
		<!-- 服务中心 -->
	</dependencies>
服务提供者
新建一个项目做为服务提供者,需要注册到注册者中去 注意端口
配置 application.properties
spring.application.name=springcloud-register
eureka.client.serviceUrl.defaultZone=http://localhost:8888/eureka/
@EnableDiscoveryClient
@SpringBootApplication
public class DemoRegisterApplication {

	public static void main(String[] args) {
		SpringApplication.run(DemoRegisterApplication.class, args);
	}
}
@RestController
public class HelloController {
	private final Logger logger = Logger.getLogger(getClass());

	@Autowired
	private  DiscoveryClient client;

	@RequestMapping(value = "/hello", method = RequestMethod.GET)
	public String index() {
		ServiceInstance instance = client.getLocalServiceInstance();
		logger.info("/hello, host:" + instance.getHost() + "     service id:" + instance.getServiceId());
		return "Hello World";
	}
	<dependencies>
		<dependency>
			<groupId>org.springframework.boot</groupId>
			<artifactId>spring-boot-starter-web</artifactId>
		</dependency>
		<dependency>
			<groupId>org.springframework.boot</groupId>
			<artifactId>spring-boot-starter</artifactId>
		</dependency>

		<dependency>
			<groupId>org.springframework.boot</groupId>
			<artifactId>spring-boot-starter-test</artifactId>
			<scope>test</scope>
		</dependency>
		<dependency>
			<groupId>org.springframework.cloud</groupId>
			<artifactId>spring-cloud-starter-eureka</artifactId>
		</dependency>
	</dependencies>
消费者
application.properties 需要注意的事 端口不要冲突
spring.application.name=springcloud-consumer
server.port=9000
eureka.client.serviceUrl.defaultZone=http://localhost:8888/eureka/
/**
 * 消费者
 * @author Administrator
 *
 */
@EnableDiscoveryClient
@SpringBootApplication
public class DemoConsumerApplication {

	@Bean
	@LoadBalanced
	RestTemplate restTemplate() {
		return new RestTemplate();
	}

	public static void main(String[] args) {
		SpringApplication.run(DemoConsumerApplication.class, args);
	}
}
重点来了
@RestController
public class ConsumerController {

	@Autowired
	RestTemplate restTemplate;

	/**
	 * 调用服务
	 * @return
	 */
	@RequestMapping(value = "/ribbon-consumer", method = RequestMethod.GET)
	public String helloConsumer() {
		//与配置一致
		return restTemplate.getForEntity("http://springcloud-register/hello", String.class).getBody();
	}
}
	<dependencies>
		<dependency>
			<groupId>org.springframework.boot</groupId>
			<artifactId>spring-boot-starter</artifactId>
		</dependency>
		<dependency>
			<groupId>org.springframework.cloud</groupId>
			<artifactId>spring-cloud-starter-eureka</artifactId>
		</dependency>
		<dependency>
			<groupId>org.springframework.boot</groupId>
			<artifactId>spring-boot-starter-test</artifactId>
			<scope>test</scope>
		</dependency>
		<dependency>
			<groupId>org.springframework.cloud</groupId>
			<artifactId>spring-cloud-starter-ribbon</artifactId>
		</dependency>
	</dependencies>
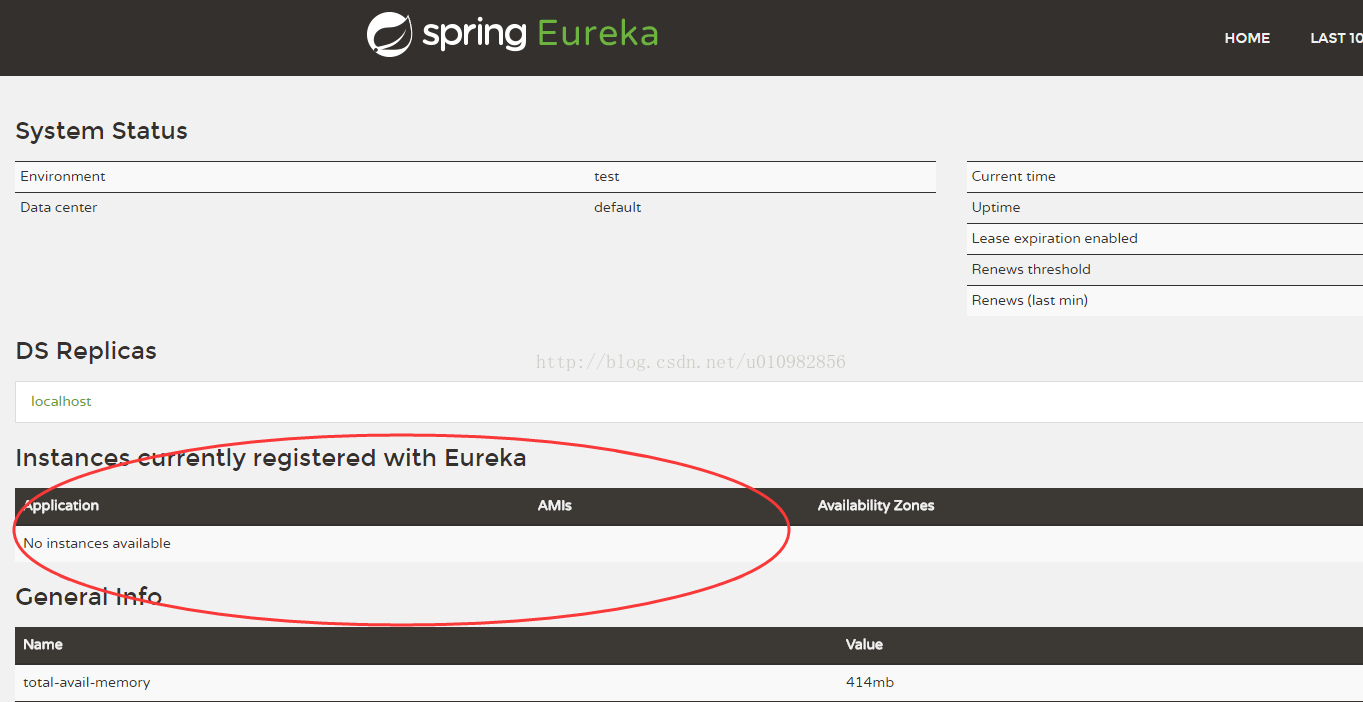
先启动注册中心,查看服务 访问地址http://localhost:8888/ 会发现还没有服务注册进来
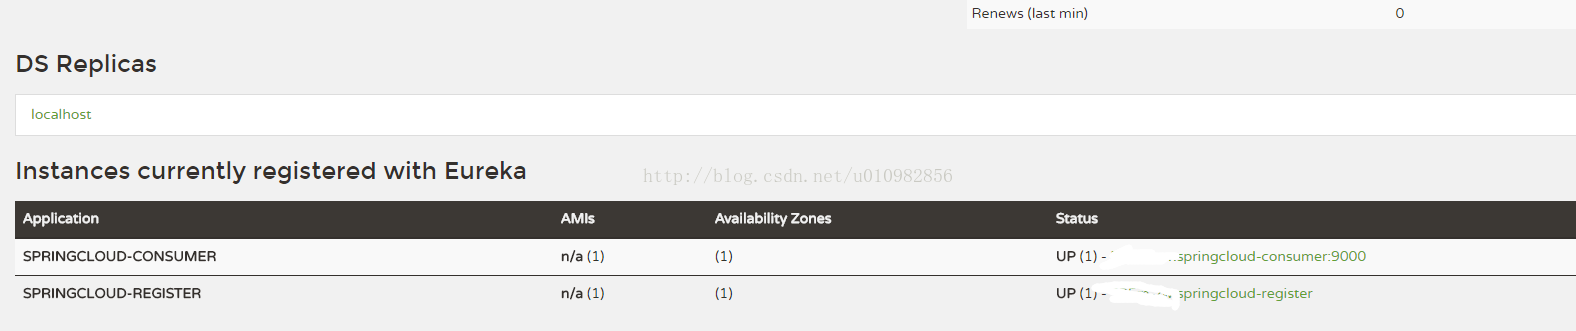
然后分别启动提供者和消费者后会发现多了两个服务
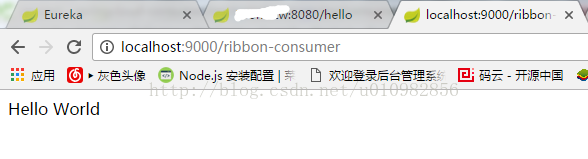
服务注册进来后,消费者就可以访问提供者的服务了
服务就完成 代码地址: 代码地址
如有疑问加群联系我 :278947305


 117
117


 被折叠的 条评论
为什么被折叠?
被折叠的 条评论
为什么被折叠?
 到【灌水乐园】发言


