C++ AMP 介绍
阅读前提:《C++ AMP介绍(一)》
环境:Windows 8.1 64bit英文版,Visual Studio 2013 Update1英文版,Nvidia QuadroK600 显卡
内容简介
介绍C++ AMP的 array、array_view、extent类和平铺的知识。
正文
数据的移动
array和 array_view两个数据容器(模板类)用于把数据从运行时库(CPU)移到加速器(显卡或通用计算卡)上,array类在构造时建立数据的深拷贝,把数据复制到加速器(GPU)上,而array_view类是个包装类,仅仅当核心函数(kernel function)要用到数据时,才把源数据复制到加速器上。
- #include <amp.h>
- using namespace concurrency;
-
-
- void test_array()
- {
-
- std::vector<int> data(5);
- for (int count = 0; count < 5; count++)
- {
- data[count] = count;
- }
-
-
- array<int, 1> a(5, data.begin(), data.end());
-
- parallel_for_each(
- a.extent,
- [=, &a](index<1> idx) restrict(amp)
- {
- a[idx] = a[idx] * 10;
- }
- );
-
-
-
- data = a;
-
-
- for (int i = 0; i < 5; i++)
- {
- std::cout << data[i] << "\n";
- }
- }
array_view同array之间几乎有相同的成员,但是它们底层的行为不一样,所以当你建立两个指向同一个数据源的array_view实例时,实际上它们指向同一个内存地址,数据只有当需要的时候才会被复制到加速器中,所以你得注意数据的同步,array_view类的主要好处是数据仅当要被加速器用到的时候才会被移动。
共享内存是能被CPU和GPU访问的内存,array类可以控制共享内存的存取方式,但是首先我们需要测试加速器是不是支持共享内存,下面是array使用共享内存的示例代码。
- int test_sharedMemory()
- {
-
- accelerator acc = accelerator(accelerator::default_accelerator);
-
-
- if (!acc.supports_cpu_shared_memory)
- {
- std::cout << "The default accelerator does not support shared memory" << std::endl;
- return 1;
- }
-
-
- acc.set_default_cpu_access_type(access_type_read_write);
-
-
-
- accelerator_view acc_v = acc.default_view;
-
-
- extent<1> ex(10);
-
-
- array<int, 1> arr_w(ex, acc_v, access_type_write);
-
-
- array<int, 1> arr_r(ex, acc_v, access_type_read);
-
-
- array<int, 1> arr_rw(ex, acc_v, access_type_read_write);
-
- return 0;
- }
index 类
index类指定元素在array或array_view对象中的位置,下面是index类的使用示例代码
- void test_indexClass()
- {
- int aCPP[] = { 1, 2, 3,
- 4, 5, 6 };
-
- array_view<int, 2> a(2, 3, aCPP);
- index<2> idx(1, 2);
-
-
- std::cout << a[idx] << "\n";
- }
extent类
虽然extent类在很多场合下不是必要的,但是微软的部分示例代码使用到了extent class,所以有必要介绍下extent class。
extentclass用来指定array或array_view各个维度的元素数量,你可以使用extent class建立array或array_view对象,也可以从array或array_view对象中存取extent,下面的例子演示了extent class的使用。
- void test_extentClass()
- {
- int aCPP[] = { 111, 112, 113, 114,
- 121, 122, 123, 124,
- 131, 132, 133, 134,
-
- 211, 212, 213, 214,
- 221, 222, 223, 224,
- 231, 232, 233, 234 };
- extent<3> e(2, 3, 4);
- array_view<int, 3> a(e, aCPP);
-
-
- assert(2 == a.extent[0]);
- assert(3 == a.extent[1]);
- assert(4 == a.extent[2]);
- }
parallel_for_each函数
我们在上篇文章中调用过parallel_for_each函数,它有两个入口参数,第一个入口参数为计算域,是个extent或tiled_extent对象,定义了要在加速器上并发运行的线程集合,它会为每个元素生成一根用于计算的线程。第二个参数是lambda表达式,定义了要在每根线程上运行的代码。
加速代码: 砖面(Tiles )和边界(Barriers)
将全体线程划分为若干个具有相等数量矩形(M*N根)线程集合,每个集合称为tile(砖面),多个tile(砖面)组成全体线程,叫做平铺(tiling)。
若要使用平铺,在parallel_for_each 方法中的计算域上调用 extent::tile 方法,并在 lambda 表达式中使用 tiled_index 对象。
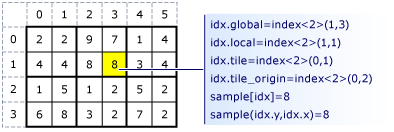
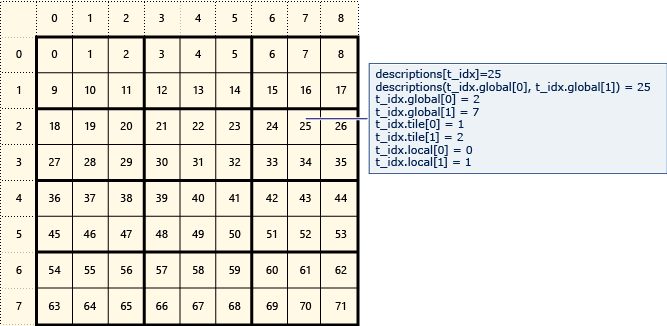
下面是两张来自微软官网的砖面(tile)的组织图,可以看到如何索引元素。
图中的idx是index类,sample是全局空间(array或array_view对象)
下图中的t_idx是index类,descriptions是全局空间(array或array_view对象)
下面这个来自微软官方的例子,每2*2=4根线程组成一个砖面(tile),计算砖面(tile)中元素的平均值。
- void test_tile()
- {
-
- int sampledata[] = {
- 2, 2, 9, 7, 1, 4,
- 4, 4, 8, 8, 3, 4,
- 1, 5, 1, 2, 5, 2,
- 6, 8, 3, 2, 7, 2 };
-
-
-
-
-
-
-
-
-
- int averagedata[] = {
- 0, 0, 0, 0, 0, 0,
- 0, 0, 0, 0, 0, 0,
- 0, 0, 0, 0, 0, 0,
- 0, 0, 0, 0, 0, 0,
- };
-
-
- array_view<int, 2> sample(4, 6, sampledata);
- array_view<int, 2> average(4, 6, averagedata);
-
-
- parallel_for_each(
-
- sample.extent.tile<2, 2>(),
- [=](tiled_index<2, 2> idx) restrict(amp)
- {
-
-
- tile_static int nums[2][2];
-
-
-
- nums[idx.local[1]][idx.local[0]] = sample[idx.global];
-
-
- idx.barrier.wait();
-
-
-
-
-
- int sum = nums[0][0] + nums[0][1] + nums[1][0] + nums[1][1];
-
-
- average[idx.global] = sum / 4;
- }
- );
-
-
- for (int i = 0; i < 4; i++) {
- for (int j = 0; j < 6; j++) {
- std::cout << average(i, j) << " ";
- }
- std::cout << "\n";
- }
-
-
-
-
-
-
- }
使用平铺的好处是,从tile_static变量存取数据要比从全局空间(array和array_view对象)要快。为了从平铺中得到性能优势,我们的算法必须把计算域拆分为tile(砖面)然后把数据放到tile_static变量中加快数据存取速度。
注意不要使用类似下面的代码来累加tile(砖面)中的数据,
tile_static float total;
total += matrix[t_idx];‘
原因[1]total的初始值是不确定的,所以第二句代码的运算没有意义。
原因[2]由于tile(砖面)中的多根线程竞争同一个title_static变量,计算结果会不确定。
内存屏障(MemoryFences)
在restrict(amp)限定中,有两种内存必须要同步:
全局内存:array或array_view实例
tile_static内存:tile(砖面)内存
内存屏障确保两种内存的线程同步,要调用内存屏障可以使用下面三种方法:
tile_barrier::wait(或tile_barrier::wait_with_all_memory_fence)方法: 建立全局内存和tile_static内存的屏障。
tile_barrier::wait_with_global_memory_fence方法 : 仅建立全局内存的屏障
tile_barrier::wait_with_tile_static_memory_fence 方法 :仅建立tile_static内存的屏障
调用特定类型的屏障(fence)可以提高你应用的性能,在下面的例子中 tile_barrier::wait_with_tile_static_memory_fence 方法的调用代替tile_barrier::wait方法的调用提高了应用的性能。
-
- parallel_for_each(matrix.extent.tile<SAMPLESIZE, SAMPLESIZE>(),
- [=, &averages](tiled_index<SAMPLESIZE, SAMPLESIZE> t_idx) restrict(amp)
- {
-
- tile_static floattileValues[SAMPLESIZE][SAMPLESIZE];
- tileValues[t_idx.local[0]][t_idx.local[1]] = matrix[t_idx];
-
-
- t_idx.barrier.wait_with_tile_static_memory_fence();
-
-
-
- if (t_idx.local[0] == 0&& t_idx.local[1] == 0) {
- for (int trow = 0; trow <SAMPLESIZE; trow++) {
- for (int tcol = 0; tcol< SAMPLESIZE; tcol++) {
- averages(t_idx.tile[0],t_idx.tile[1]) += tileValues[trow][tcol];
- }
- }
- averages(t_idx.tile[0],t_idx.tile[1]) /= (float) (SAMPLESIZE *SAMPLESIZE);
- }
- });
restrict(amp)修饰的代码段是在加速器(GPU)上运行的,默认在里面的代码段,下断点不会Break(进入),在[Solution Explorer]窗口中点击项目名称,快捷键[Alt]+[Enter],打开当前项目属性页,[Configuration Properties]->[Debugging]->[Debugger Type]默认为“Auto”,改为“GPU Only”就可以Debug当前项目加速器(GPU)上运行的代码了。


 1万+
1万+

 被折叠的 条评论
为什么被折叠?
被折叠的 条评论
为什么被折叠?
 到【灌水乐园】发言


