一.LED流水灯
在stm32中所有GPIO都是挂在在APB2外设总线上,GPIO外设的名称是按照GPIOOA,GPIOB,GPIOC这种格式来命名,每个GPIO外设总共有16个引脚,编号是从0到15。GPIOA的第0号引脚,一般称作PA0......
每个GPIO模块中主要包含了寄存器(只负责存储数据)和驱动器。
寄存器是一段特殊的存储器,内核可以通过APB2总线对寄存器进行读写,来完成输出电平和读取电平,寄存器每一位对应一个引脚,当输出寄存器写1,对应的引脚就会输出高电平,写0,就会输出低电平,输入寄存器读取为1,就证明对应的端口目前是高电平,读取为0,就是低电平。stm32是32位单片机,所以内部的寄存器是32位,但是端口只有16位,只有低16位。
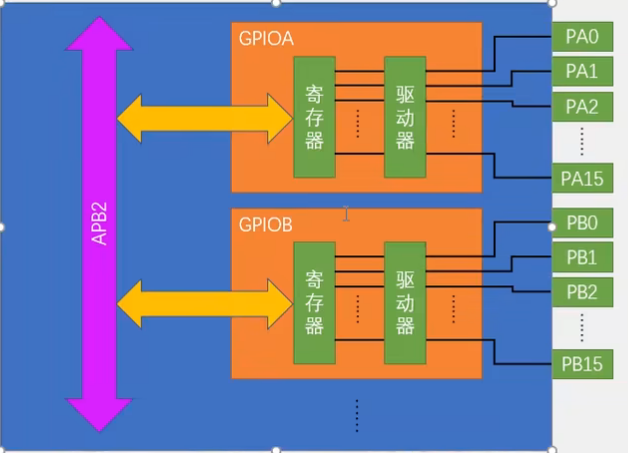
.驱动器是用来增加信号的驱动能力
操作stm32的GPIO有三个步骤。
一.使用RCC开启GPIO的时钟。
这里使用到了RCC_APB2PeriphClockCmd,APB2外设时钟设置
二.使用GPIO_Init函数初始化GPIO。
GPIO_InitTypeDef是一个结构体类型,包含Mode,Pin,Speed三个成员变量。这里选择推挽输出模式。
这个实验用到了0-7号端口,所以直接用ALL。
三.使用输出或者输入的函数控制GPIO口。
while主函数里,需要分别向指定端口写入数据,所以用GPIO_Write。
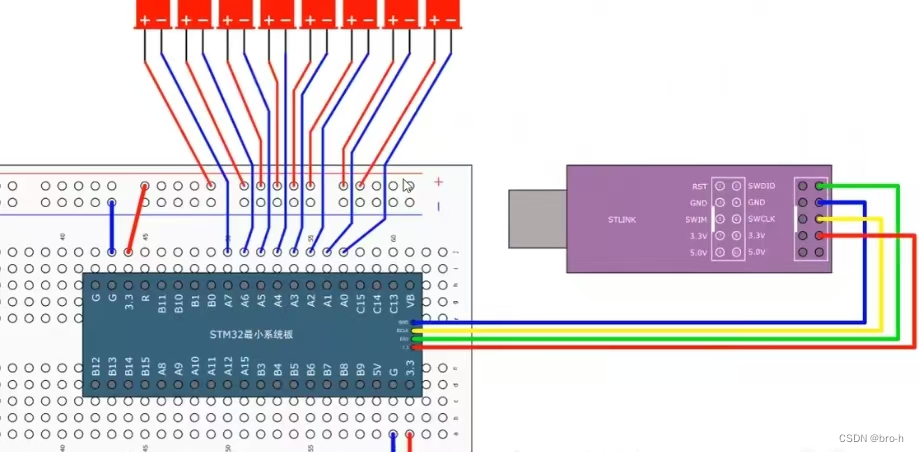
线路连接:
main.c代码
#include "stm32f10x.h" // Device header
#include "Delay.h"
int main(void)
{
RCC_APB2PeriphClockCmd(RCC_APB2Periph_GPIOA,ENABLE);
GPIO_InitTypeDef GPIO_InitStructure;
GPIO_InitStructure.GPIO_Mode = GPIO_Mode_Out_PP;
GPIO_InitStructure.GPIO_Pin = GPIO_Pin_All; //初始化端口
GPIO_InitStructure.GPIO_Speed = GPIO_Speed_50MHz;
GPIO_Init(GPIOA,&GPIO_InitStructure);
while(1)
{
GPIO_Write(GPIOA,0x0001);//0000 0000 0000 0001
Delay_ms(100);
GPIO_Write(GPIOA,0x0002);//0000 0000 0000 0010
Delay_ms(100);
GPIO_Write(GPIOA,0x0004);//0000 0000 0000 0100
Delay_ms(100);
GPIO_Write(GPIOA,0x0008);//0000 0000 0000 1000
Delay_ms(100);
GPIO_Write(GPIOA,0x0010);//0000 0000 0001 0000ggggfff
Delay_ms(100);
GPIO_Write(GPIOA,0x0020);//0000 0000 0010 0000
Delay_ms(100);
GPIO_Write(GPIOA,0x0040);//0000 0000 0100 0000
Delay_ms(100);
GPIO_Write(GPIOA,0x0080);//0000 0000 1000 0000
Delay_ms(100);
}
}
二.蜂鸣器
首先也是先初始化GPIO,然后在while循环中使用GPIO_ResetBits和GPIO_SetBits函数设置电平,再用延时函数来控制时间,就可以让蜂鸣器有节奏的发出声音。
电路接法:
main.c
#include "stm32f10x.h" // Device header
#include "Delay.h"
int main(void)
{
RCC_APB2PeriphClockCmd(RCC_APB2Periph_GPIOB,ENABLE);
GPIO_InitTypeDef GPIO_InitStructure;
GPIO_InitStructure.GPIO_Mode = GPIO_Mode_Out_PP;
GPIO_InitStructure.GPIO_Pin = GPIO_Pin_12;
GPIO_InitStructure.GPIO_Speed = GPIO_Speed_50MHz;
GPIO_Init(GPIOB,&GPIO_InitStructure);
while(1)
{
GPIO_ResetBits(GPIOB,GPIO_Pin_12);
Delay_ms(100);
GPIO_SetBits(GPIOB,GPIO_Pin_12);
Delay_ms(100);
GPIO_ResetBits(GPIOB,GPIO_Pin_12);
Delay_ms(100);
GPIO_SetBits(GPIOB,GPIO_Pin_12);
Delay_ms(500);
}
}
也可以把初始化GPIO的函数进行封装,
首先在工程文件夹中创建一个新的文件夹(命名不能是中文),在keil5中工程模块中添加,并创建一个.c文件一个.h文件。
.c文件
#include "stm32f10x.h" // Device header
void LED_Init(void)
{
RCC_APB2PeriphClockCmd(RCC_APB2Periph_GPIOA,ENABLE);
GPIO_InitTypeDef GPIO_InitStructure;
GPIO_InitStructure.GPIO_Mode = GPIO_Mode_Out_PP;
GPIO_InitStructure.GPIO_Pin = GPIO_Pin_12;
GPIO_InitStructure.GPIO_Speed = GPIO_Speed_50MHz;
GPIO_Init(GPIOA,&GPIO_InitStructure);
GPIO_SetBits(GPIOA,GPIO_Pin_12);
.h文件
#ifndef __LED_H
#define __LED_H
void LED_Init(void);
#endif
main.c文件
#include "stm32f10x.h" // Device header
#include "Delay.h"
#include "LED.H"
int main(void)
{
LED_Init();
while(1)
{
GPIO_ResetBits(GPIOB,GPIO_Pin_12);
Delay_ms(100);
GPIO_SetBits(GPIOB,GPIO_Pin_12);
Delay_ms(100);
GPIO_ResetBits(GPIOB,GPIO_Pin_12);
Delay_ms(100);
GPIO_SetBits(GPIOB,GPIO_Pin_12);
Delay_ms(500);
}
}
三.按键控制LED灯闪烁
线路接法:
这个例程用到了按键,所以可以写一个按键的函数。
在key.c中,首先也是先初始化按键的端口,初始化为上拉输入模式。
然后使用uint8_t Key_GetNum(void)函数,这个函数可以返回按下这个键的键码,将按键键码数值设置为0,如果没有按键按下就返回0。GPIO_ReadInputDataBit是用来读取输入读取寄存器的某i一个端口的输入值,使用if语句,如果输入电平为0,则进行下面的操作,如果按键一直按下,输入值为0,当松手按键将按键赋值为1,然后通过return,将按键值返回为0,另外一个函数同理。这里的延时函数是用来消除按键的抖动。
Key.c
#include "stm32f10x.h" // Device header
#include "Delay.h"
void key_Init(void)
{
RCC_APB2PeriphClockCmd(RCC_APB2Periph_GPIOB,ENABLE);
GPIO_InitTypeDef GPIO_InitStructure;
GPIO_InitStructure.GPIO_Mode = GPIO_Mode_IPU;//上拉输入
GPIO_InitStructure.GPIO_Pin = GPIO_Pin_1 | GPIO_Pin_11;
GPIO_InitStructure.GPIO_Speed = GPIO_Speed_50MHz;
GPIO_Init(GPIOB,&GPIO_InitStructure);
}
uint8_t Key_GetNum(void)
{
uint8_t KeyNum = 0;
if (GPIO_ReadInputDataBit(GPIOB,GPIO_Pin_1) == 0)
{
Delay_ms(20);//设置时间消除按键抖动
while(GPIO_ReadInputDataBit(GPIOB,GPIO_Pin_1) == 0)
Delay_ms(20);//设置时间消除按键抖动
KeyNum = 1;
}
if (GPIO_ReadInputDataBit(GPIOB,GPIO_Pin_11) == 0)
{
Delay_ms(20);//设置时间消除按键抖动
while(GPIO_ReadInputDataBit(GPIOB,GPIO_Pin_1) == 0)
Delay_ms(20);//设置时间消除按键抖动
KeyNum = 2;
}
return KeyNum;
}
key.h
#ifndef __KEY_H
#define __KEY_H
#include "stdint.h"
void key_Init(void);
uint8_t Key_GetNum(void);
#endif
如果出现error:unknown type name ‘uint8_t‘,是因为没有加#include "stdint.h"
main.c
#include "stm32f10x.h" // Device header
#include "Delay.h"
#include "LED.H"
#include "Key.H"
uint8_t KeyNum;
int main(void)
{
LED_Init();
key_Init();
while(1)
{
KeyNum = Key_GetNum();
if (KeyNum == 1)
{
LED1_ON();
}
if (KeyNum == 2)
{
LED2_OFF();
}
}
}