


使用远程推送首先要在capacity中打开后推送服务开关,有两个地方要打开。
参考:http://www.jianshu.com/p/bb89d636f989
Notifications 回顾
-
iOS 3 - Apple 引入推送通知
-
iOS 4 - 引入本地通知
-
iOS 5 - 有了通知中心
-
iOS 6 - 通知中心与iCloud同步
-
iOS 7 - 后台静默推送
-
iOS 8 - 重新设置了通知权限,可交互通知
-
iOS 9 - 支持在通知中回复消息,
Provider API等等
远程推送就是苹果的APNs服务,在手机联网的情况下,手机会和苹果的的服务器建立一个长连接,应用程序处于退出或者在后台的状态时,可以接受到远程推送的消息.这个服务需要99美金.
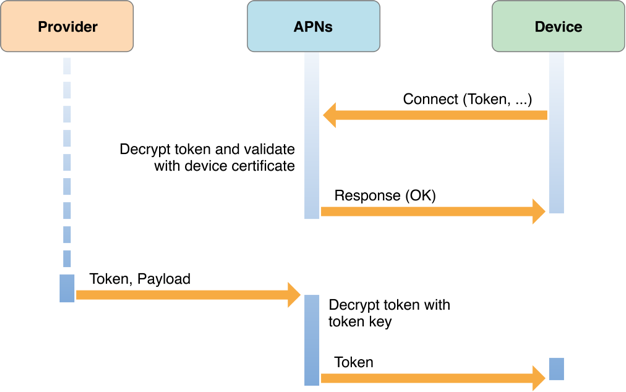

联网的时候,iOS系统会自动的把设备UDID和app的bundleID发送给苹果的服务器,调用苹果的API生成一个devicetoken,然后苹果服务器会吧devicetoken打包成一个NSData对象发送给苹果设备,苹果设备把这个devicetoken告诉app应用,app在启动的时候,app应用吧devicetoken发给对应的app后台服务器.并保存在服务器上.此时有了登录账号ID和对应的devicetoken在服务器上.
如果app卸载了重装,deviceToken会变;
同一个账号,更换手机,device token会跟新;
同一个账号,多点登录会保存多个device token ;告诉苹果服务器几个devicetoken,就给您推送几个设备;
同一个手机,登录有多个账号时,如果devictoken之前存在,并且对应的账号ID不是和现在的账号ID一样,就清空之前账号的devicetoken,保存现在账号的devicetoken.
当我发消息给其他用户时,服务器会根据对方账号ID找到对应的deviceToken,告诉苹果服务器,苹果服务器根据devicetoken发送消息;
开发是的token和生产环境 的token是不一样的,release版本的需要打包成Ahoc测试;
//=======================
//
// AppDelegate.m
// iOS10通知使用
//
// Created by lambo on 2016/11/4.
// Copyright © 2016年 cn.lr. All rights reserved.
//
#import "AppDelegate.h"
@interface AppDelegate ()<UNUserNotificationCenterDelegate>
@end
@implementation AppDelegate
//程序完成启动
- (BOOL)application:(UIApplication *)application didFinishLaunchingWithOptions:(NSDictionary *)launchOptions {
//程序进入前台,角标清零
[UIApplicationsharedApplication].applicationIconBadgeNumber=0;
//注册通知,本地通知和远程通知都用这个
UNUserNotificationCenter *center=[UNUserNotificationCentercurrentNotificationCenter];
center.delegate=self;//设置代理
//请求获取通知权限(角标,声音,弹框)
[center requestAuthorizationWithOptions:(UNAuthorizationOptionBadge |UNAuthorizationOptionSound |UNAuthorizationOptionAlert)completionHandler:^(BOOL granted,NSError * _Nullable error) {
if (granted) {
//获取用户是否同意开启通知
NSLog(@"request authorization successed!");
}else{
//请开启通知推送
}
}];
// //注册远程通知的时候一定加上要这个
// [[UIApplication sharedApplication]registerForRemoteNotifications];
//********************* 获取通知授权和设置
[center getNotificationSettingsWithCompletionHandler:^(UNNotificationSettings *_Nonnull settings) {
if (settings.authorizationStatus ==UNAuthorizationStatusNotDetermined)
{
NSLog(@"未选择");
}elseif (settings.authorizationStatus ==UNAuthorizationStatusDenied){
NSLog(@"未授权");
}elseif (settings.authorizationStatus ==UNAuthorizationStatusAuthorized){
NSLog(@"已授权");
}
}];
returnYES;
}
//**********************设置本地通知*********************
-(void)touchesBegan:(NSSet<UITouch *> *)touches withEvent:(UIEvent *)event{
//注册通知
UNUserNotificationCenter *center = [UNUserNotificationCentercurrentNotificationCenter];
//**************************/设置推送的内容
UNMutableNotificationContent *content = [[UNMutableNotificationContentalloc]init];
content.title =@"wwwwww";//标题
content.subtitle =@"wwwwwww 707";//子标题
content.body =@"Woah!wwwww?";//内容
content.badge = @3;//数字角标
//***********************本地通知添加声音*******************
// UNNotificationSound *sound=[UNNotificationSound soundNamed:@""];
// content.sound=sound;
//********************************本地通知添加图像附件**********************
NSError *error=nil;
NSString *imagePath=[[NSBundlemainBundle]pathForResource:@"1"ofType:@"jpg"];
UNNotificationAttachment *imageAttachment=[UNNotificationAttachmentattachmentWithIdentifier:@"imageIdentifier"URL:[NSURLfileURLWithPath:imagePath]options:nilerror:&error];
content.attachments=@[imageAttachment];
//*********************本地通知添加视频(注意天加视频的时候默认不是添加到bundle中的,需要手动add target to )**************
// NSString *videoPath=[[NSBundle mainBundle] pathForResource:@"1" ofType:@"png"];
// UNNotificationAttachment *videoAttachment=[UNNotificationAttachment attachmentWithIdentifier:@"imageIdentifier" URL:[NSURL fileURLWithPath:videoPath] options:nil error:&error];
// content.attachments=@[videoAttachment];
//******************************按钮*********************
//文本交互(iOS10之后支持对通知的文本交互)
/**options
UNNotificationActionOptionAuthenticationRequired 用于文本
UNNotificationActionOptionForeground 前台模式,进入APP
UNNotificationActionOptionDestructive 销毁模式,不进入APP
*/
NSMutableArray *mArr=[NSMutableArrayarrayWithCapacity:0];
UNNotificationAction *actionA=[UNNotificationActionactionWithIdentifier:@"needUnlock"title:@"需要解锁"options:UNNotificationActionOptionForeground];//需要解锁,不进入app
UNNotificationAction *actionB=[UNNotificationActionactionWithIdentifier:@"red"title:@"红色文字"options:UNNotificationActionOptionForeground];//点击不会进入app;
UNTextInputNotificationAction *actionC=[UNTextInputNotificationActionactionWithIdentifier:@"text"title:@"文本"options:UNNotificationActionOptionForegroundtextInputButtonTitle:@"我的文本"textInputPlaceholder:@"输入文本"];
[mArr addObjectsFromArray:@[actionA,actionB,actionC]];
UNNotificationCategory *category=[UNNotificationCategorycategoryWithIdentifier:@"categoryIdentifier"actions:mArrintentIdentifiers:@[]options:UNNotificationCategoryOptionCustomDismissAction];
[[UNUserNotificationCentercurrentNotificationCenter]setNotificationCategories:[NSSetsetWithObject:category]];
content.categoryIdentifier=@"categoryIdentifier";
//内容的分类标识,必须和categaryIdentifier一致,和自定义的内容扩展中info.plist中的 UNNotificationExtensionCategory 的值一样
//******************/triger---根据指定的日期和时间来展示本地通知,并且支持循环条件
// UserNotifications提供了三种触发器:
// UNTimeIntervalNotificationTrigger:一定时间后触发
// UNCalendarNotificationTrigger:在某月某日某时触发
// UNLocationNotificationTrigger:在用户进入或是离开某个区域时触发
//3秒钟后提醒
UNTimeIntervalNotificationTrigger *trigger1 = [UNTimeIntervalNotificationTriggertriggerWithTimeInterval:3 repeats:NO];
// //每小时重复 1次(循环)
// UNTimeIntervalNotificationTrigger *trigger2 = [UNTimeIntervalNotificationTrigger triggerWithTimeInterval:3600 repeats:YES];
// //每周一早上 8:00提醒我
// NSDateComponents *components = [[NSDateComponents alloc] init];
// components.weekday = 2;
// components.hour = 8;
// UNCalendarNotificationTrigger *trigger3 = [UNCalendarNotificationTrigger triggerWithDateMatchingComponents:components repeats:YES];
// //#import <CoreLocation/CoreLocation.h>
// //一到麦当劳就喊我下车
// CLRegion *region = [[CLRegion alloc] init];
// UNLocationNotificationTrigger *trigger4 = [UNLocationNotificationTrigger triggerWithRegion:region repeats:NO];
//*****************发送请求********************************8
NSString *requestIdentifier =@"sampleRequest";//发送请求标识符
UNNotificationRequest *request = [UNNotificationRequestrequestWithIdentifier:requestIdentifier
content:contenttrigger:trigger1];
[center addNotificationRequest:requestwithCompletionHandler:^(NSError *_Nullable error) {
NSLog(@"error001---%@",error);
}];
// - 获取未展示的通知
[center getPendingNotificationRequestsWithCompletionHandler:^(NSArray<UNNotificationRequest *> * _Nonnull requests) {
NSLog(@"未展示的通知%@",requests);
}];
// - 获取展示过的通知
[center getDeliveredNotificationsWithCompletionHandler:^(NSArray<UNNotification *> * _Nonnull notifications) {
NSLog(@"展示过的通知%@",notifications);
}];
// - 移除还未展示的通知
// [center removePendingNotificationRequestsWithIdentifiers: @[@"sampleRequest"]];
// [center removeAllPendingNotificationRequests]; // - (void)cancelAllLocalNotifications;
- 移除已经展示过的通知
// [center removeDeliveredNotificationsWithIdentifiers:@[@"my_notification"]];
// [center removeAllDeliveredNotifications];
//添加推送成功后的处理!
[center addNotificationRequest:requestwithCompletionHandler:^(NSError *_Nullable error) {
// UIAlertController *alert = [UIAlertController alertControllerWithTitle:@"本地通知" message:@"成功添加推送" preferredStyle:UIAlertControllerStyleAlert];
// UIAlertAction *cancelAction = [UIAlertAction actionWithTitle:@"取消" style:UIAlertActionStyleCancel handler:nil];
// [alert addAction:cancelAction];
// [[UIApplication sharedApplication].keyWindow.rootViewController presentViewController:alert animated:YES completion:nil];
}];
}
- (void)applicationWillResignActive:(UIApplication *)application {
}
- (void)applicationDidEnterBackground:(UIApplication *)application {
}
- (void)applicationWillEnterForeground:(UIApplication *)application {
}
- (void)applicationDidBecomeActive:(UIApplication *)application {
}
- (void)applicationWillTerminate:(UIApplication *)application {
}
//本地推送的时候,都是设定好的内容,可以设置推送的时间和是否循环推送,
如果没有新的推送内容,则每次打开都是以前那个推送内容。哪怕app删了重新装上也是一样推送以前的内容。
程序退出和在后台都会推送通知。
//在应用内展示通知。App处于前台时获取并处理即将触发的推送:
-(void)userNotificationCenter:(UNUserNotificationCenter *)center willPresentNotification:(UNNotification *)notification withCompletionHandler:(void (^)(UNNotificationPresentationOptions))completionHandler{
NSDictionary *userInfo = notification.request.content.userInfo;
//前台运行推送显示红色Label
[selfshowLabelWithUserInfo:userInfocolor:[UIColorredColor]];
//可以设置当收到通知后,有哪些效果呈现(声音/提醒/数字角标);默认App在前台运行时不会进行弹窗,在程序接收通知调用此接口可实现指定的推送弹窗。--iOS10以下还可继续使用,iOS10以上在[UNUserNotificationCenterDelegate willPresentNotification:withCompletionHandler:]方法中调用completionHandler(UNNotificationPresentationOptionSound | UNNotificationPresentationOptionAlert);即可
completionHandler(UNNotificationPresentationOptionBadge|
UNNotificationPresentationOptionSound|UNNotificationPresentationOptionAlert);
NSLog(@"前台掉用");
// //1. 处理通知
// 在发送通知前,有机会修改通知;(要用到UNNotificationServiceExtension ,提供在远程推送将要被 push 出来前,处理推送显示内容的机会)
// //2. 处理完成后条用 completionHandler,用于指示在前台显示通知的形式
// completionHandler(UNNotificationPresentationOptionAlert);
//
//====================
NSDictionary * userInfo = notification.request.content.userInfo;
UNNotificationRequest *request = notification.request;//收到推送的请求
UNNotificationContent *content = request.content;//收到推送的消息内容
NSNumber *badge = content.badge; //推送消息的角标
NSString *body = content.body; //推送消息体
UNNotificationSound *sound = content.sound; //推送消息的声音
NSString *subtitle = content.subtitle; //推送消息的副标题
NSString *title = content.title; //推送消息的标题
if([notification.request.triggerisKindOfClass:[UNPushNotificationTriggerclass]]) {
NSLog(@"iOS10前台收到远程通知:");
}
else {
// 判断为本地通知
NSLog(@"iOS10前台收到本地通知:{\\\\nbody:%@,\\\\ntitle:%@,\\\\nsubtitle:%@,\\\\nbadge:%@,\\\\nsound:%@,\\\\nuserInfo:%@\\\\n}",body,title,subtitle,badge,sound,userInfo);
}
completionHandler(UNNotificationPresentationOptionBadge|UNNotificationPresentationOptionSound|UNNotificationPresentationOptionAlert);//需要执行这个方法,选择是否提醒用户,有Badge、Sound、Alert三种类型可以设置}
}
//在前台或者点击通知进入app时调用,收到通知响应时的处理工作。用户与你推送的通知进行交互时被调用:
//打开应用程序,删除通知,选择通知按钮
-(void)userNotificationCenter:(UNUserNotificationCenter *)center didReceiveNotificationResponse:(UNNotificationResponse *)response withCompletionHandler:(void (^)())completionHandler{
NSDictionary *userInfo = response.notification.request.content.userInfo;
//后台及退出推送显示绿色Label
[selfshowLabelWithUserInfo:userInfocolor:[UIColorgreenColor]];
completionHandler();//必须掉用;
NSLog(@"点击通知");
if([response.notification.request.triggerisKindOfClass:[UNPushNotificationTriggerclass]]) {
NSLog(@"iOS10收到远程通知:");
}
else {
// 判断为本地通知
NSLog(@"iOS10点击了通知收到本地通知:{\\\\nbody:%@,\\\\ntitle:%@,\\\\nsubtitle:%@,\\\\nbadge:%@,\\\\nsound:%@,\\\\nuserInfo:%@\\\\n}",body,title,subtitle,badge,sound,userInfo);
}
NSDictionary * userInfo = response.notification.request.content.userInfo;
UNNotificationRequest *request = response.notification.request;//收到推送的请求
UNNotificationContent *content = request.content;//收到推送的消息内容
NSNumber *badge = content.badge; //推送消息的角标
NSString *body = content.body; //推送消息体
UNNotificationSound *sound = content.sound; //推送消息的声音
NSString *subtitle = content.subtitle; //推送消息的副标题
NSString *title = content.title; //推送消息的标题
if([response.notification.request.triggerisKindOfClass:[UNPushNotificationTriggerclass]]) {
NSLog(@"iOS10收到远程通知:");
NSLog(@"iOS10点击了通知收到远程通知:{\\\\nbody:%@,\\\\ntitle:%@,\\\\nsubtitle:%@,\\\\nbadge:%@,\\\\nsound:%@,\\\\nuserInfo:%@\\\\n}",body,title,subtitle,badge,sound,userInfo);
[UIApplicationsharedApplication].applicationIconBadgeNumber=1;//修改角标为1
}
else {
// 判断为本地通知
NSLog(@"iOS10点击了通知收到本地通知:{\\\\nbody:%@,\\\\ntitle:%@,\\\\nsubtitle:%@,\\\\nbadge:%@,\\\\nsound:%@,\\\\nuserInfo:%@\\\\n}",body,title,subtitle,badge,sound,userInfo);
}
completionHandler(); // 系统要求执行这个方法
}
- (void)showLabelWithUserInfo:(NSDictionary *)userInfo color:(UIColor *)color
{
UILabel *label = [UILabelnew];
label.backgroundColor = color;
label.frame =CGRectMake(0,250, [UIScreenmainScreen].bounds.size.width,300);
label.text = userInfo.description;
label.numberOfLines =0;
[[UIApplicationsharedApplication].keyWindowaddSubview:label];
}
//静默通知(静默通知app死掉的时候不进行)
iOS Silent Notification(静默通知),属于特殊的远程推送通知,其目的不是为了弹出通知框提醒用户,而是用于后台运行的App和服务端同步数据。例:App在后台放置一段时间,网络已不再活跃,App内数据可能已经过时;服务端可推送一条携带参数的静默通知,处于后台的App可以触发静默通知回调,在后台运行状态下获取对应参数并发起网络请求,获取最新数据更新,整个过程用户无感知。
静默通知限制和注意事项:
- 静默通知主要用于更新和同步数据,用户对其无感知,因此静默通知一般
不设置通知内容、声音和角标; - 静默通知唤醒后台App并执行下载任务时,最多有
30秒时间执行; - App处于前台/后台时均可触发对应通知回调,App关闭后不能触发;
- 静默通知请求在APNs属于低优先级任务,苹果不保证静默通知的到达率;
- 不要利用静默通知对App进行保活,APNs若检测到较高频率的静默通知发送请求,可能会终止其发送(具体策略苹果未公开)。
静默推送:收到推送(没有文字没有声音),不用点开通知,不用打开APP,就能执行
使用静默通知的关键意义是程序在后台的时候能够在不点击通知的(应为静默通知本身就没有通知栏)敲敲的执行后台的代码
不管使用哪种三方的推送(极光,融云,个推,pushmeBaby),一定要设置
一定要加"content-available" : 1 (只设置这个字段的话,可以实现后台推送完成接收)
还有
sound,alert badge也不能加,加入的话也是静默推送,可以测试时添加
实例静默推送内容
静默推送: iOS7以后出现, 不会出现提醒及声音.
要求:
推送的payload中不能包含alert及sound字段
需要添加content-available字段, 并设置值为1
例如: {"aps":{"content-available":"1"},"PageKey”":"2"}
因为静默推送的关键意义在于后台的推松,所以一定要记得打开app后台推送的功能
iOS静默通知
iOS Silent Notification(静默通知),属于特殊的远程推送通知,其目的不是为了弹出通知框提醒用户,而是用于后台运行的App和服务端同步数据。例:App在后台放置一段时间,网络已不再活跃,App内数据可能已经过时;服务端可推送一条携带参数的静默通知,处于后台的App可以触发静默通知回调,在后台运行状态下获取对应参数并发起网络请求,获取最新数据更新,整个过程用户无感知。
静默通知限制和注意事项:
- 静默通知主要用于更新和同步数据,用户对其无感知,因此静默通知一般
不设置通知内容、声音和角标; - 静默通知唤醒后台App并执行下载任务时,最多有30秒时间执行;
- App处于前台/后台时均可触发对应通知回调,App关闭后不能触发;
- 静默通知请求在APNs属于低优先级任务,苹果不保证静默通知的到达率;
- 不要利用静默通知对App进行保活,APNs若检测到较高频率的静默通知发送请求,可能会终止其发送。
//用于静默推送,当静默推送的时候调用此方法从iOS7开始有的,iOS10 任然有效
-(void)application:(UIApplication *)application didReceiveRemoteNotification:(NSDictionary *)userInfo fetchCompletionHandler:(void (^)(UIBackgroundFetchResult))completionHandler{
NSLog(@"用于静默推送");
completionHandler(UIBackgroundFetchResultNewData);
}
//注册远程通知成功;获取远程推送的deviceToken;
-(void)application:(UIApplication *)application didRegisterForRemoteNotificationsWithDeviceToken:(NSData *)deviceToken{
//将来需要将此Token上传给后台服务器
NSString *token = [deviceToken description];//获取deviceToken
// 注意,在把NSData 转化为NSString 的时候,不能使用 [[NSString alloc]initWithData:deviceToken encoding:NSUTF8StringEncoding]; 这个方法,同时,使用系统json 解析 [NSJSONSerialization JSONObjectWithData:deviceToken options:kNilOptions error:&error]; 也失败了。错误原因为 是不正确的解析格式。
我们先用 NSString *token = [deviceToken description]; 获取token字符串。
token = [token stringByReplacingOccurrencesOfString:@" "withString:@""];
token = [token stringByReplacingOccurrencesOfString:@"<"withString:@""];
token = [token stringByReplacingOccurrencesOfString:@">"withString:@""];
NSLog(@"request notificatoin token success. %@",token);
}
//注册远程通知失败;
-(void)application:(UIApplication *)application didFailToRegisterForRemoteNotificationsWithError:(NSError *)error{
}
//iOS10以下使用这个方法接收通知
- (void)application:(UIApplication *)application didReceiveRemoteNotification:(NSDictionary *)userInfo
{}
下载地址:https://github.com/stefanhafeneger/PushMeBaby
1.运行如果报错,那么导入CoreServices.framawork替换这句 #include <CoreServices/../Frameworks/CarbonCore.framework/Headers/MacTypes.h> 为 #include <MacTypes.h>
2.把你的开发证书.cer 文件更改名为apns.cer,放入工程中,代码中是通过
self.certificate = [[NSBundle mainBundle] pathForResource:@"apns" ofType:@"cer”];取你的证书文件的
3.在输入框中粘贴进去你的deviceToken,注意不要带<>,空格可以有,接下来就可以运行了。
@end
[UIApplicationsharedApplication].applicationIconBadgeNumber+=1;
当app处于后台或关闭状态时,就需要后台推送;
客户端读取通知后立即吧还有多少条未读消息告诉服务器,服务器保存下来,下次推送时,吧赏赐未读消息加上这次要推送的消息得到badge的值,再推送出去。
本地通知角标的设置:--------
1.在前台:在下面的方法中设置
- (void)userNotificationCenter:(UNUserNotificationCenter *)center willPresentNotification:(UNNotification *)notification withCompletionHandler:(void (^)(UNNotificationPresentationOptions))completionHandler {
[UIApplication sharedApplication].applicationIconBadgeNumber+=1;
2。处于后台:需要后台推送;
3.//app由关闭到点击启动时,角标清零----
- (BOOL)application:(UIApplication *)application didFinishLaunchingWithOptions:(NSDictionary *)launchOptions {
//程序启动角标清零
[UIApplicationsharedApplication].applicationIconBadgeNumber=0;
}
//app处于后台或挂起时,点击进入app,角标清零
- (void)applicationWillEnterForeground:(UIApplication *)application {
//程序进入前台,角标清零
[UIApplicationsharedApplication].applicationIconBadgeNumber=0;
}
//点击横幅通知时,角标清零
- (void)userNotificationCenter:(UNUserNotificationCenter *)center didReceiveNotificationResponse:(UNNotificationResponse *)response withCompletionHandler:(void (^)())completionHandler{
[UIApplication sharedApplication].applicationIconBadgeNumber=0;
- (void)userNotificationCenter:(UNUserNotificationCenter *)center willPresentNotification:(UNNotification *)notification withCompletionHandler:(void (^)(UNNotificationPresentationOptions))completionHandler {
[UIApplication sharedApplication].applicationIconBadgeNumber+=1;
2.处于后台:由后台推送过来
3.//app由关闭到点击启动时,角标清零----
- (BOOL)application:(UIApplication *)application didFinishLaunchingWithOptions:(NSDictionary *)launchOptions {
//程序启动角标清零
[UIApplication sharedApplication].applicationIconBadgeNumber=0;
}
//app处于后台或挂起时,点击进入app,角标清零
- (void)applicationWillEnterForeground:(UIApplication *)application {
//程序进入前台,角标清零
[UIApplication sharedApplication].applicationIconBadgeNumber=0;
}
//点击横幅通知时,角标清零
- (void)userNotificationCenter:(UNUserNotificationCenter *)center didReceiveNotificationResponse:(UNNotificationResponse *)response withCompletionHandler:(void (^)())completionHandler{
[UIApplication sharedApplication].applicationIconBadgeNumber=0;
=======通知扩展=======添加附件
- UNNotificationServiceExtension(通知服务扩展)是在收到通知后,展示通知前,做一些事情的。比如,增加附件,网络请求等。
- 想要给通知创建一个自定义的用户界面,需要 UNNotificationContentExtension(通知内容扩展)。
iOS10给通知添加附件有两种情况:本地通知和远程通知。
- 本地推送通知,只需给content.attachments设置UNNotificationAttachment附件对象
- 远程推送通知,需要实现 UNNotificationServiceExtension(通知服务扩展),在回调方法中处理 推送内容时设置 request.content.attachments(请求内容的附件) 属性,之后调用 contentHandler 方法即可。
1.为了能在service extension 里面的attachment,必须给apns增加 "mutable-content":1 字段,使你的推送通知是动态可变的。
{
"aps":{
"alert":"Testing.. (34)",
"badge":1,
"sound":"default",
"mutable-content":1
}
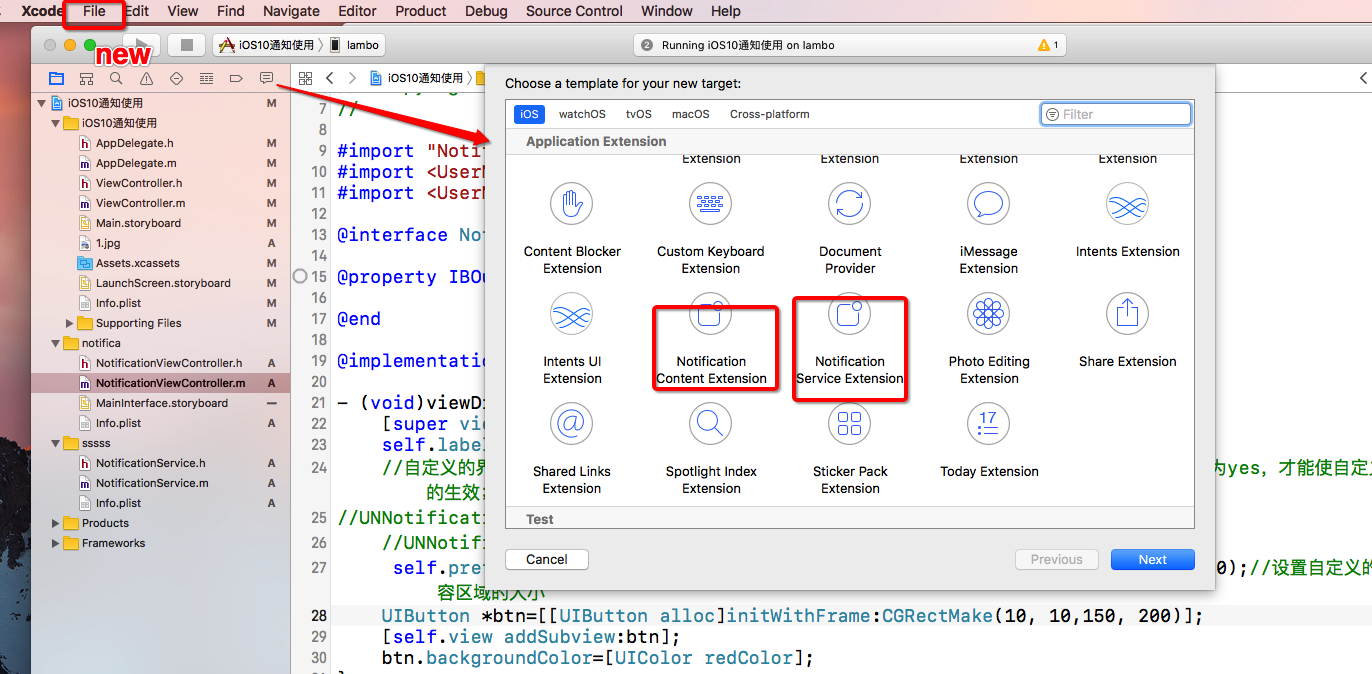
}2.给项目新建一个Notification Service Extension的扩展。
3.在-didReceiveNotificationRequest:withContentHandler:方法中处理request.content,用来给通知的内容做修改。如面代码示例了收到通知后,给通知增加图片附件:
#import "NotificationService.h"
@interface NotificationService ()
@property (nonatomic,strong)void (^contentHandler)(UNNotificationContent *contentToDeliver);
@property (nonatomic,strong)UNMutableNotificationContent *bestAttemptContent;
@end
@implementation NotificationService
//UNNotificationServiceExtension 提供在远程推送将要被 push 出来前,处理推送显示内容的机会。此时可以对通知的 request.content 进行内容添加,如添加附件,userInfo 等。
- (void)didReceiveNotificationRequest:(UNNotificationRequest *)request withContentHandler:(void (^)(UNNotificationContent * _Nonnull))contentHandler {
    self.contentHandler = contentHandler;
//重新设置通知的内容 self.bestAttemptContent = [request.content mutableCopy];
self.bestAttemptContent.title = [NSString stringWithFormat:@"%@ [modified]", self.bestAttemptContent.title];
//1. 下载
NSURL *url = [NSURL URLWithString:@"http://img1.gtimg.com/sports/pics/hv1/194/44/2136/138904814.jpg"];
NSURLSessionConfiguration *config = [NSURLSessionConfiguration defaultSessionConfiguration];
NSURLSession *session = [NSURLSession sessionWithConfiguration:config];
NSURLSessionDataTask *task = [session dataTaskWithURL:url completionHandler:^(NSData * _Nullable data, NSURLResponse * _Nullable response, NSError * _Nullable error) {
if (!error) {
//2. 保存数据
NSString *path = [NSSearchPathForDirectoriesInDomains(NSLibraryDirectory, NSUserDomainMask, YES).firstObject
stringByAppendingPathComponent:@"download/image.jpg"];
UIImage *image = [UIImage imageWithData:data];
NSError *err = nil;
[UIImageJPEGRepresentation(image, 1) writeToFile:path options:NSAtomicWrite error:&err];
//3. 添加附件
UNNotificationAttachment *attachment = [UNNotificationAttachment attachmentWithIdentifier:@"remote-atta1" URL:[NSURL fileURLWithPath:path] options:nil error:&err];
if (attachment) {
self.bestAttemptContent.attachments = @[attachment];
}
}
//4. 返回新的通知内容
self.contentHandler(self.bestAttemptContent);
}];
[task resume];
}注意:使用UNNotificationServiceExtension,你有30秒的时间处理这个通知,可以同步下载图像和视频到本地,然后包装为一个UNNotificationAttachment扔给通知,这样就能展示用服务器获取的图像或者视频了。这里需要注意:如果数据处理失败,超时,extension会报一个崩溃信息,但是通知会用默认的形式展示出来,app不会崩溃。
附件通知所带的附件格式大小都是有限的,并不能做所有事情。
=======自定义推送的页面UI============
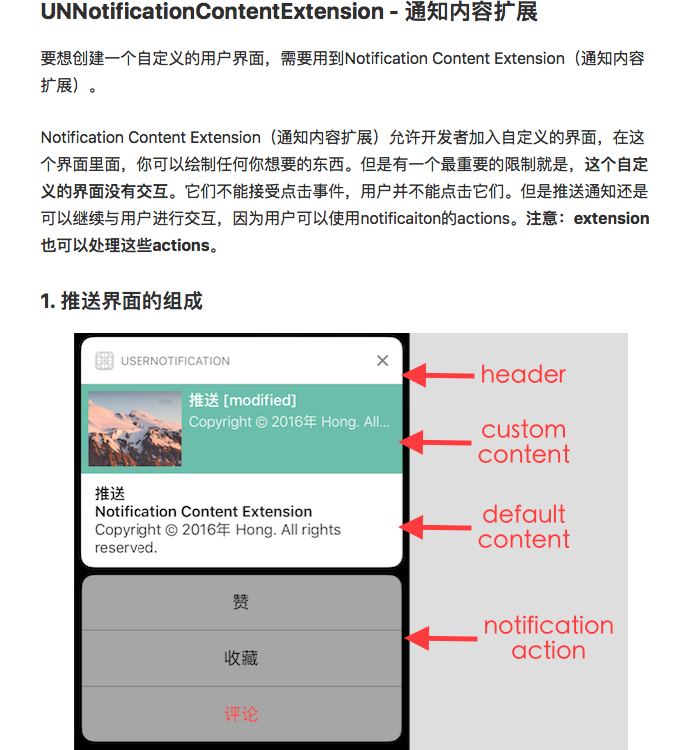
简单来说,在 Content Extension的 Info.plist中提前配置 categoryIdentifier类型,当收到的推送中的 categoryIdentifier和 Content Extension中提前配置的 categoryIdentifier一样就会去走自定义的UI展示。
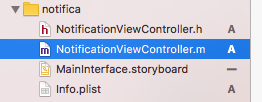
#import "NotificationViewController.h"
#import <UserNotifications/UserNotifications.h>
#import <UserNotificationsUI/UserNotificationsUI.h>
@interface NotificationViewController () <UNNotificationContentExtension>
@property IBOutletUILabel *label;
@end
@implementation NotificationViewController
- (void)viewDidLoad {
[superviewDidLoad];
self.label.textColor=[UIColorblackColor];
//自定义的界面需要在info.plist中设置UNNotificationExtensionDefaultContentHidden为yes,才能使自定义的生效;
//UNNotificationExtensionCategory 设置要更改的通知的category
//UNNotificationExtensionInitialContentSizeRatio 调整自定义的界面的比例;
self.preferredContentSize =CGSizeMake(CGRectGetWidth(self.view.frame), 300);//设置自定义的内容区域的大小
UIButton *btn=[[UIButtonalloc]initWithFrame:CGRectMake(10, 10,150, 200)];
[self.viewaddSubview:btn];
btn.backgroundColor=[UIColorredColor];
}
- (void)didReceiveNotification:(UNNotification *)notification {
self.label.text = notification.request.content.body;//这里拿到的是请求通知中的内容
NSLog(@"--notification----%@", notification);
}
@end
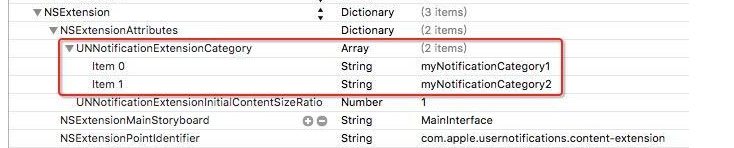
3. 配置category
接下来就是要让推送到达后,系统怎样找到自定义的UI。这时候就需要配置extension的info.plist文件。

也可以设置成数组,对应的category是可以为一个数组的,里面可以为多个category,这样做的目的是多个category共用同一套UI。
发现这里的ViewController就是一个普通的UIViewController, 但是它实现了UNNotificationContentExtension协议。
UNNotificationContentExtension协议有一个required方法didReceiveNotification:。当收到指定categroy的推送时, didReceiveNotification:方法会随着ViewController的生命周期方法,一起被调用,这样就能接受notification object,更新UI。
设置了category后, 只要在通知里面增加category字段,值是上面在extension的plist里面配置的category id, 收到的通知就会通过自定义的样式显示。
远程通知在apns里面增加category字段。
{
    "aps":{
        "alert":"Testing.. (34)",
         "badge":1,
           "sound":"default",
        "category":"myNotificationCategory1"
     }
}
======自定义操作============
iOS8开始引入的action的工作原理:
默认系统的Action的处理是,当用户点击的按钮,就把action传递给app,与此同时,推送通知会立即消失。这种做法很方便。
但是有的情况是,希望用户点击action按钮后,效果及时响应在我们自定义的UI上。这个时候,用户点击完按钮,我们把这个action直接传递给extension,而不是传递给app。当actions传递给extension时,它可以延迟推送通知的消失时间。在这段延迟的时间之内,我们就可以处理用户点击按钮的事件了,并且更新UI,一切都处理完成之后,我们再去让推送通知消失掉。
//
//点击按钮的操作后出发下面的方法
- (void)didReceiveNotificationResponse:(UNNotificationResponse *)response completionHandler:(void (^)(UNNotificationContentExtensionResponseOption option))completion
{
if ([response.actionIdentifierisEqualToString:@"needUnlock"]) {
self.label.text =@"解锁成功";
}elseif ([response.actionIdentifierisEqualToString:@"red"]){
self.label.text =@"红色文字";
}elseif ([response.actionIdentifierisEqualToString:@"text"]){
self.label.text = [(UNTextInputNotificationResponse *)response userText];
}
//这里如果点击的action类型为UNNotificationActionOptionForeground,
//则即使completion设置成Dismiss的,通知也不能消失
dispatch_after(dispatch_time(DISPATCH_TIME_NOW, (int64_t)(1.5 * NSEC_PER_SEC)), dispatch_get_main_queue(), ^{
completion(UNNotificationContentExtensionResponseOptionDismiss);//让通知消失
});
// 在这个方法里判断所有的action,更新界面,并延迟1.5秒后让通知消失。真实情况可能是,点击“赞”按钮后,发送请求给服务器,根据服务器返回结果,展示不同的UI效果在通知界面上,然后消失。如果是评论,则将评论内容更新到界面上。
//
// 如果还想把这个action传递给app,最后消失的参数应该这样: completion(UNNotificationContentExtensionResponseOptionDismissAndForwardAction);
}
普通的推送-----{
"aps" : {
"alert" : {
"title" :"title",
"subtitle" :"subtitle",
"body" :"Copyright © 2016年 Hong. All rights reserved."
},
"badge" : 1,
"sound":"default"
},
}
静默推送--------
APNS去掉alert、badge、sound字段实现静默推送,增加增加字段:"content-available":1,也可以在后台做一些事情。
{
"aps":{
"content-available":1
}
}
后台推送-------------iOS7以后要想在后台做一些操作,需要在APNS增加字段:"content-available":1。并且在Background Modes中增加Remote notifications。
{
"aps":{
"alert":"Testing.. (34)",
"badge":1,
"sound":"default",
"content-available":1
}
}
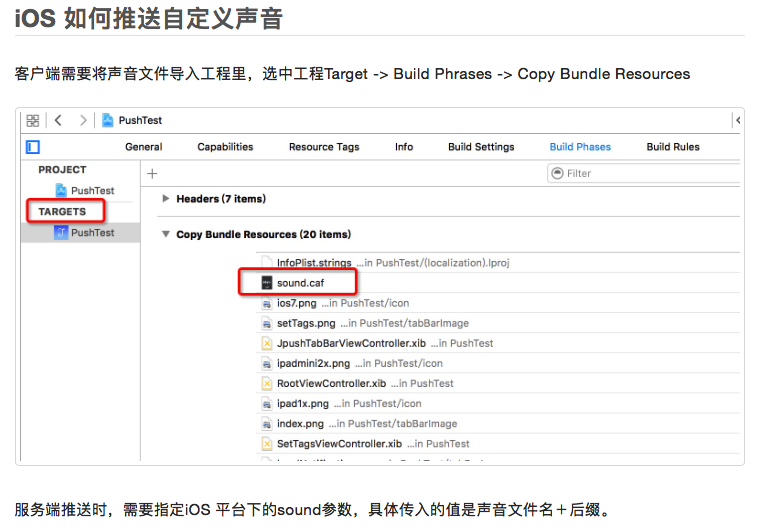
========推送声音的设置
JPUSH的自定义消息,不是APNS推送,在需要的控制器中监听通知;然后执行需要的操作,默认是不执行任何操作;需要自己实现;


 被折叠的 条评论
为什么被折叠?
被折叠的 条评论
为什么被折叠?
 到【灌水乐园】发言


