


参考:http://www.jianshu.com/p/2920d2f74fb4
开发环境及调试设备:
Xcode7或以上,iOS9或以上,iPhone6s或以上
3DTouch功能主要分为两大块:主屏幕Icon上的快捷标签(Home Screen Quick Actions); Peek(预览)和Pop(跳至预览的详细界面)
Home Screen Quick Actions的实现
主屏幕icon上的快捷标签的实现方式有两种,一种是在工程文件info.plist里静态设置,另一种是代码的动态实现。
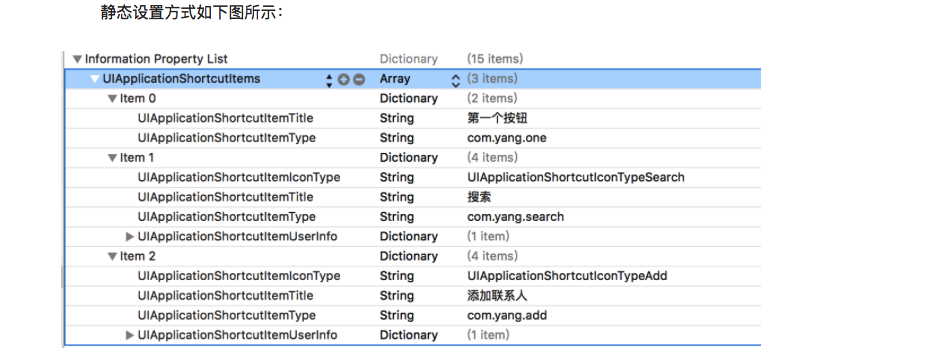
下面是各个标签类型的说明,plist文件里还没提供UIApplicationShortcutItems选项,没办法,只能手动敲了,或者直接复制粘贴过去。
UIApplicationShortcutItems:数组中的元素就是我们的那些快捷选项标签。
UIApplicationShortcutItemTitle:标签标题(必填)
UIApplicationShortcutItemType:标签的唯一标识 (必填)
UIApplicationShortcutItemIconType:使用系统图标的类型,如搜索、定位、home等(可选)
UIApplicationShortcutItemIcon File:使用项目中的图片作为标签图标 (可选)
UIApplicationShortcutItemSubtitle:标签副标题 (可选)
UIApplicationShortcutItemUserInfo:字典信息,如传值使用 (可选)
动态实现:举例一:
- (void)creatShortcutItem {
//创建系统风格的icon
UIApplicationShortcutIcon *icon = [UIApplicationShortcutIcon iconWithType:UIApplicationShortcutIconTypeShare];
//创建快捷选项
UIApplicationShortcutItem * item = [[UIApplicationShortcutItem alloc]initWithType:@"com.yang.share" localizedTitle:@"分享" localizedSubtitle:@"分享副标题" icon:icon userInfo:nil];
//添加到快捷选项数组
[UIApplication sharedApplication].shortcutItems = @[item];
}
到此,主屏幕icon上的快捷标签创建就介绍完了,而他们点击进入页面的实现就有点类似消息通知的实现方式了,只要增加两处代码就好:首次启动APP和APP没被杀死从后台启动。
//首次启动APP调用的方法
- (BOOL)application:(UIApplication *)application didFinishLaunchingWithOptions:(NSDictionary *)launchOptions {
// Override point for customization after application launch.
[self creatShortcutItem]; //动态创建应用图标上的3D touch快捷选项
UIApplicationShortcutItem *shortcutItem = [launchOptions valueForKey:UIApplicationLaunchOptionsShortcutItemKey];
//如果是从快捷选项标签启动app,则根据不同标识执行不同操作,然后返回NO,防止调用- (void)application:(UIApplication *)application performActionForShortcutItem:(UIApplicationShortcutItem *)shortcutItem completionHandler:(void (^)(BOOL))completionHandler
if (shortcutItem) {
//判断设置的快捷选项标签唯一标识,根据不同标识执行不同操作
if([shortcutItem.type isEqualToString:@"com.yang.one"]){
NSLog(@"新启动APP--第一个按钮");
} elseif ([shortcutItem.type isEqualToString:@"com.yang.search"]) {
//进入搜索界面
NSLog(@"新启动APP--搜索");
} elseif ([shortcutItem.type isEqualToString:@"com.yang.add"]) {
//进入分享界面
NSLog(@"新启动APP--添加联系人");
}elseif ([shortcutItem.type isEqualToString:@"com.yang.share"]) {
//进入分享页面
NSLog(@"新启动APP--分享");
}
returnNO;
}
returnYES;
}
//如果APP没被杀死,还存在后台,点开Touch会调用该代理方法
- (void)application:(UIApplication *)application performActionForShortcutItem:(UIApplicationShortcutItem *)shortcutItem completionHandler:(void (^)(BOOL))completionHandler {
if (shortcutItem) {
//判断设置的快捷选项标签唯一标识,根据不同标识执行不同操作
if([shortcutItem.type isEqualToString:@"com.yang.one"]){
NSLog(@"APP没被杀死--第一个按钮");
} elseif ([shortcutItem.type isEqualToString:@"com.yang.search"]) {
//进入搜索界面
NSLog(@"APP没被杀死--搜索");
} elseif ([shortcutItem.type isEqualToString:@"com.yang.add"]) {
//进入分享界面
NSLog(@"APP没被杀死--添加联系人");
}elseif ([shortcutItem.type isEqualToString:@"com.yang.share"]) {
//进入分享页面
NSLog(@"APP没被杀死--分享");
}
}
if (completionHandler) {
completionHandler(YES);
}
}
————————————————Peek和Pop的实现-四部曲
1、注册(在哪个页面上使用该功能就注册在哪个页面上)
[self registerForPreviewingWithDelegate:selfsourceView:cell];
2、继承协议UIViewControllerPreviewingDelegate
3、实现UIViewControllerPreviewingDelegate方法
//peek(预览)
- (nullableUIViewController *)previewingContext:(id <UIViewControllerPreviewing>)previewingContext viewControllerForLocation:(CGPoint)location
{
//获取按压的cell所在行,[previewingContext sourceView]就是按压的那个视图
NSIndexPath *indexPath = [_myTableView indexPathForCell:(UITableViewCell* )[previewingContext sourceView]];
//设定预览的界面
MyPreviewingViewController *childVC = [[MyPreviewingViewController alloc] init];
childVC.preferredContentSize = CGSizeMake(0.0f,500.0f);
childVC.myStr = [NSString stringWithFormat:@"我是%@,用力按一下进来-------",_myArray[indexPath.row]];
//调整不被虚化的范围,按压的那个cell不被虚化(轻轻按压时周边会被虚化,再少用力展示预览,再加力跳页至设定界面)
CGRect rect =CGRectMake(0, 0, self.view.frame.size.width,40);
previewingContext.sourceRect = rect;
//返回预览界面
return childVC;
}
//pop(按用点力进入)
- (void)previewingContext:(id <UIViewControllerPreviewing>)previewingContext commitViewController:(UIViewController *)viewControllerToCommit {
// [self.view addSubview: viewControllerToCommit.view];
[selfshowViewController:viewControllerToCommitsender:self];
}
4、当弹出预览时,上滑预览视图,出现预览视图中快捷选项
- (NSArray<id<UIPreviewActionItem>> *)previewActionItems {
// setup a list of preview actions
UIPreviewAction *action1 = [UIPreviewActionactionWithTitle:@"删除"style:UIPreviewActionStyleDefaulthandler:^(UIPreviewAction *_Nonnull action,UIViewController * _Nonnull previewViewController) {
UIAlertView *alert = [[UIAlertViewalloc] initWithTitle:@"你点了-删除"message:nildelegate:nilcancelButtonTitle:@"确定"otherButtonTitles: nil];
[alert show];
}];
UIPreviewAction *action2 = [UIPreviewActionactionWithTitle:@"置顶"style:UIPreviewActionStyleDefaulthandler:^(UIPreviewAction *_Nonnull action,UIViewController * _Nonnull previewViewController) {
UIAlertView *alert = [[UIAlertViewalloc] initWithTitle:@"你点了-置顶"message:nildelegate:nilcancelButtonTitle:@"确定"otherButtonTitles: nil];
[alert show];
}];
UIPreviewAction *action3 = [UIPreviewActionactionWithTitle:@"啥也不干"style:UIPreviewActionStyleDefaulthandler:^(UIPreviewAction *_Nonnull action,UIViewController * _Nonnull previewViewController) {
UIAlertView *alert = [[UIAlertViewalloc] initWithTitle:@"真的啥也不干?"message:nildelegate:nilcancelButtonTitle:@"确定"otherButtonTitles: nil];
[alert show];
}];
NSArray *actions = @[action1,action2,action3];
// and return them (return the array of actions instead to see all items ungrouped)
return actions;
}
============举例二:
必填项(下面两个键值是必须设置的):
UIApplicationShortcutItemType 这个键值设置一个快捷通道类型的字符串
UIApplicationShortcutItemTitle 这个键值设置标签的标题
选填项(下面这些键值不是必须设置的):
UIApplicationShortcutItemSubtitle 设置标签的副标题
UIApplicationShortcutItemIconType 设置标签Icon类型
UIApplicationShortcutItemIconFile 设置标签的Icon文件
② 动态在 appdelegate 中实现
动态标签是我们在程序中,通过代码添加的,与之相关的类,主要有三个:
UIApplicationShortcutItem 创建3DTouch标签的类
UIMutableApplicationShortcutItem 创建可变的3DTouch标签的类
UIApplicationShortcutIcon 创建标签中图片Icon的类
因为这些类是iOS9中新增加的类,所以其api的复杂程度并不大,下面我们来对其中方法与属性进行简要讲解:
@interface UIApplicationShortcutItem : NSObject
//下面是两个初始化方法 通过设置type,title等属性来创建一个标签,这里的icon是UIApplicationShortcutIcon对象,我们后面再说
- (instancetype)initWithType:(NSString *)type localizedTitle:(NSString *)localizedTitle localizedSubtitle:(nullable NSString *)localizedSubtitle icon:(nullable UIApplicationShortcutIcon *)icon userInfo:(nullable NSDictionary *)userInfo NS_DESIGNATED_INITIALIZER;
- (instancetype)initWithType:(NSString *)type localizedTitle:(NSString *)localizedTitle;
//下面这是一些只读的属性,获取相应的属性值
@property (nonatomic, copy, readonly) NSString *type;
@property (nonatomic, copy, readonly) NSString *localizedTitle;
@property (nullable, nonatomic, copy, readonly) NSString *localizedSubtitle;
@property (nullable, nonatomic, copy, readonly) UIApplicationShortcutIcon *icon;
@property (nullable, nonatomic, copy, readonly) NSDictionary> *userInfo;
//这个类继承于 UIApplicationShortcutItem,创建的标签可变
@interface UIMutableApplicationShortcutItem : UIApplicationShortcutItem
@property (nonatomic, copy) NSString *type;
@property (nonatomic, copy) NSString *localizedTitle;
@property (nullable, nonatomic, copy) NSString *localizedSubtitle;
@property (nullable, nonatomic, copy) UIApplicationShortcutIcon *icon;
@property (nullable, nonatomic, copy) NSDictionary> *userInfo;
@end
//这个类创建标签中的icon
@interface UIApplicationShortcutIcon : NSObject
//创建系统风格的icon
+ (instancetype)iconWithType:(UIApplicationShortcutIconType)type;
//创建自定义的图片icon
+ (instancetype)iconWithTemplateImageName:(NSString *)templateImageName;
@end
创建好标签后,将其添加如application的hortcutItems数组中即可,示例如下:
- (void)viewDidLoad {
[super viewDidLoad];
// Do any additional setup after loading the view, typically from a nib.
//创建
UIApplicationShortcutItem * item = [[UIApplicationShortcutItem alloc]initWithType:@"two"localizedTitle:@"第二个标签"localizedSubtitle:@"看我哦"icon:[UIApplicationShortcutIcon iconWithType:UIApplicationShortcutIconTypePlay] userInfo:nil];
//添加
[UIApplication sharedApplication].shortcutItems = @[item];
}
也可以在appdelegate 中写
UIApplicationShortcutIcon *icon1 = [UIApplicationShortcutIcon iconWithTemplateImageName:@"iCon1"];
UIApplicationShortcutIcon *icon2 = [UIApplicationShortcutIcon iconWithTemplateImageName:@"iCon2"];
UIApplicationShortcutIcon *icon3 = [UIApplicationShortcutIcon iconWithTemplateImageName:@"iCon3"];
// create several (dynamic) shortcut items
UIMutableApplicationShortcutItem
*item1 = [[UIMutableApplicationShortcutItem
alloc]initWithType:@"com.test.dynamic" localizedTitle:@"Dynamic
Shortcut" localizedSubtitle:@"available after first launch" icon:icon1
userInfo:nil];
UIMutableApplicationShortcutItem
*item2 = [[UIMutableApplicationShortcutItem
alloc]initWithType:@"com.test.deep1" localizedTitle:@"Deep Link 1"
localizedSubtitle:@"Launch Nav Controller" icon:icon2 userInfo:nil];
UIMutableApplicationShortcutItem
*item3 = [[UIMutableApplicationShortcutItem
alloc]initWithType:@"com.test.deep2" localizedTitle:@"Deep Link 2"
localizedSubtitle:@"Launch 2nd Level" icon:icon3 userInfo:nil];
// add all items to an array
NSArray *items = @[item1, item2, item3];
// add this array to the potentially existing static UIApplicationShortcutItems
NSArray *existingItems = [UIApplication sharedApplication].shortcutItems;
NSArray *updatedItems = [existingItems arrayByAddingObjectsFromArray:items];
[UIApplication sharedApplication].shortcutItems = updatedItems;
- (void)application:(UIApplication *)application
performActionForShortcutItem:(UIApplicationShortcutItem *)shortcutItem
completionHandler:(void (^)(BOOL))completionHandler
**********在控制器中pop和peek
首先控制器该继承UIViewControllerPreviewingDelegate应该判断该控制器当前是否实现了3dtouch手势 如果实现的话最好禁用长按手势 (如果你的添加了该手势的话)
if (self.traitCollection.forceTouchCapability == UIForceTouchCapabilityAvailable) {
[self registerForPreviewingWithDelegate:(id)self sourceView:self.view];
NSLog(@"3D Touch is available! Hurra!");
// no need for our alternative anymore
self.longPress.enabled = NO;
} else {
NSLog(@"3D Touch is not available on this device. Sniff!");
// handle a 3D Touch alternative (long gesture recognizer)
self.longPress.enabled = YES;
}
点击进入预览模式: 实现该协议方法
- (UIViewController *)previewingContext:(id)previewingContext viewControllerForLocation:(CGPoint)location
继续按压进入:实现该协议
- (void)previewingContext:(id)previewingContext commitViewController:(UIViewController *)viewControllerToCommit
预览模式上拉实现 :
我们预览模式下上拉 出现一个视图 该视图类 apple提供了 UIPreviewAction 该类来实现,调用
UIPreviewAction *action1 = [UIPreviewAction actionWithTitle:@"Action 1" style:UIPreviewActionStyleDefault handler:^(UIPreviewAction * _Nonnull action, UIViewController * _Nonnull previewViewController) {
NSLog(@"Action 1 triggered");
}];
回调中实现你要操作的行为
这个方法在 - (NSArray> *)previewActionItems {} 中返回action 的数组


 941
941


 被折叠的 条评论
为什么被折叠?
被折叠的 条评论
为什么被折叠?
 到【灌水乐园】发言


