


昨晚代码写完后太晚,博客写了一半,今天补上。。
其实已经过去不知道多少天了。。只不过今天重新拾起。因为五一假期的原因,项目搁置了几天。要不是突然看到,项目今天又要搁置了。凡事还是要靠自己的自治和自律啊。开始写博客时已经十点半了,为了明天的工作状态(嗯,这特么全是借口)只能尽量完成目标啦。
今日目标:基本框架(Spring+SpringMVC+Mybatis)搭建。
1、Spring + SpringMVC 框架搭建
1.引入各种Spring相关的Jar包,依赖包等。
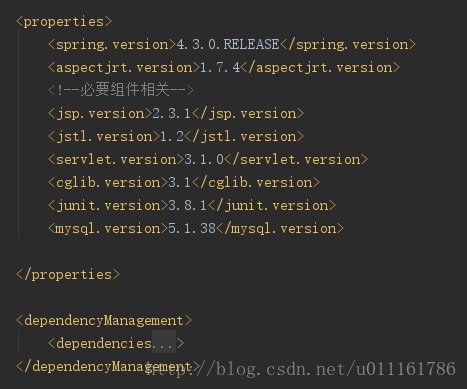
步骤1:先在总pom.xml中写好 dependencyManagement,并在properties中配置相应version。如下图所示详见博客内《雏鹰开发附件1 – Spring相关Maven配置》
步骤2:在build标签下添加关于编译的相关插件和配置,代码如下:
<build>
        <finalName>eagleBlog</finalName>
        <resources>
            <resource>
                <directory>src/main/resources</directory>
                <filtering>true</filtering>
            </resource>
        </resources>
        <pluginManagement>
            <plugins>
                <plugin>
                    <groupId>org.apache.maven.plugins</groupId>
                    <artifactId>maven-compiler-plugin</artifactId>
                    <version>3.5.1</version>
                    <configuration>
                        <encoding>UTF-8</encoding>
                        <source>1.8</source>
                        <target>1.8</target>
                    </configuration>
                </plugin>
                <plugin>
                    <groupId>org.apache.maven.plugins</groupId>
                    <artifactId>maven-resources-plugin</artifactId>
                    <version>3.0.1</version>
                    <configuration>
                        <encoding>UTF-8</encoding>
                    </configuration>
                </plugin>
            </plugins>
        </pluginManagement>
    </build>
2.创建Spring 相关配置xml:
步骤1:在eagle-web模块的resources下创建文件夹spring。
步骤2:创建两个Spring的配置文件,一个作为Spring的contextConfig(spring-config.xml),另一个作为DispatcherServlet的配置文件(spring-mvc.xml)。具体如下:
spring-config.xml(空):
<?xml version="1.0" encoding="UTF-8"?>
<beans xmlns="http://www.springframework.org/schema/beans"
       xmlns:xsi="http://www.w3.org/2001/XMLSchema-instance"
       xmlns:context="http://www.springframework.org/schema/context"
       xsi:schemaLocation="http://www.springframework.org/schema/beans http://www.springframework.org/schema/beans/spring-beans.xsd http://www.springframework.org/schema/context http://www.springframework.org/schema/context/spring-context.xsd">
</beans>

spring-mvc.xml():
<?xml version="1.0" encoding="UTF-8"?>
<beans xmlns="http://www.springframework.org/schema/beans"
       xmlns:xsi="http://www.w3.org/2001/XMLSchema-instance"
       xmlns:context="http://www.springframework.org/schema/context"
       xsi:schemaLocation="http://www.springframework.org/schema/beans
       http://www.springframework.org/schema/beans/spring-beans.xsd
       http://www.springframework.org/schema/context
        http://www.springframework.org/schema/context/spring-context.xsd">
    <!-- 设置使用注解的类所在的包 -->
    <context:component-scan base-package="com.simon.controller"/>
</beans>
3.修改Web.xml
话不多说,先上代码,上完再说:
 <!--Spring MVC 配置 开始-->
    <!--BEGIN Context ConfigLocation -->
    <context-param>
        <param-name>contextConfigLocation</param-name>
        <param-value>classpath*:spring/spring-config*.xml</param-value>
    </context-param>
    <listener>
        <listener-class>org.springframework.web.context.ContextLoaderListener</listener-class>
    </listener>
    <!-- 防止Spring内存溢出监听器 -->
    <listener>
        <listener-class>org.springframework.web.util.IntrospectorCleanupListener</listener-class>
    </listener>
    <!--END Context ConfigLocation -->

    <!-- MVC start -->
    <servlet>
        <servlet-name>springMVC</servlet-name>
        <servlet-class>org.springframework.web.servlet.DispatcherServlet</servlet-class>
        <init-param>
            <param-name>contextConfigLocation</param-name>
            <param-value>classpath*:spring/spring-mvc*.xml</param-value>
        </init-param>
        <load-on-startup>1</load-on-startup>
        <!--支持@Async 异步-->
        <async-supported>true</async-supported>
    </servlet>
    <servlet-mapping>
        <servlet-name>springMVC</servlet-name>
        <url-pattern>/</url-pattern>
    </servlet-mapping>
    <!-- MVC end-->

    <!-- 字符集过滤器 start-->
    <filter>
        <filter-name>encodingFilter</filter-name>
        <filter-class>org.springframework.web.filter.CharacterEncodingFilter</filter-class>
        <init-param>
            <param-name>encoding</param-name>
            <param-value>UTF-8</param-value>
        </init-param>
        <init-param>
            <param-name>forceEncoding</param-name>
            <param-value>true</param-value>
        </init-param>
    </filter>
    <filter-mapping>
        <filter-name>encodingFilter</filter-name>
        <url-pattern>/*</url-pattern>
    </filter-mapping>
    <!-- 字符集过滤器 end-->
<!--Spring MVC 配置 结束-->
一个个来,先说context-param,这就是spring具体的初始化文件,默认为applicationContext.xml,为了规范我们的配置文件命名,特配置param-value为其指定xml而不是使用默认。
两个listener自然是spring mvc的核心,ContextLoaderListener这个不多说,因为我也没深入研究,只知道是指定了IOC容器初始化的方法。IntrospectorCleanupListener这个是为了防止Spring不停的运行的计划任务和OpenSessionInViewFilter,使得Tomcat反复加载对象而产生框架并用时可能产生的内存泄漏,此处引用网络解释:
spring中的提供了一个名为org.springframework.web.util.IntrospectorCleanupListener的监听器。它主要负责处理由 JavaBeans Introspector的使用而引起的缓冲泄露。spring中对它的描述如下:它是一个在web应用关闭的时候,清除JavaBeans Introspector的监听器.web.xml中注册这个listener.可以保证在web 应用关闭的时候释放与掉这个web 应用相关的class loader 和由它管理的类如果你使用了JavaBeans Introspector来分析应用中的类,Introspector 缓冲中会保留这些类的引用.结果在你的应用关闭的时候,这些类以及web 应用相关的class loader没有被垃圾回收.不幸的是,清除Introspector的唯一方式是刷新整个缓冲.这是因为我们没法判断哪些是属于你的应用的引用.所以删除被缓冲的introspection会导致把这台电脑上的所有应用的introspection都删掉.需要注意的是,spring 托管的bean不需要使用这个监听器.因为spring它自己的introspection所使用的缓冲在分析完一个类之后会被马上从javaBeans Introspector缓冲中清除掉.应用程序中的类从来不直接使用JavaBeans Introspector.所以他们一般不会导致内部查看资源泄露.但是一些类库和框架往往会产生这个问题.例如:Struts 和Quartz.单个的内部查看泄漏会导致整个的web应用的类加载器不能进行垃圾回收.在web应用关闭之后,你会看到此应用的所有静态类资源(例如单例).这个错误当然不是由这个类自 身引起的.
再来说servelet,这也是Spring的核心,他定义了mvc的相关内容,并配置拦截的url,如上面所示,所有/开头的请求,都会通过SpringMVC这个servlet进行处理。其中的init-param是我们之前提过的spring-mvc.xml。具体Spring ContextLoaderListener与DispatcherServlet所加载的applicationContext的区别详看下面的连接:
戳我戳我快戳我!!
最后再说这个filter,这个filter的作用是将所有经过spring过滤的网页、数据、请求、响应强行解析为UTF-8编码格式。
所有东西写完,在system中写了个测试的Controller如下:
package com.simon.controller;

import org.springframework.stereotype.Controller;
import org.springframework.web.bind.annotation.RequestMapping;
import org.springframework.web.bind.annotation.ResponseBody;

/**
 * @Author 陈辰强
 * @Date 2017/5/3 0:22
 */
@Controller(value = "testController")
@RequestMapping("Test")
public class TestController {
    @RequestMapping("/hello")
    public @ResponseBody String hello(){
        return "hello Spring MVC!";
    }
}
运行后输入http://localhost:8080/eagleBlog/Test/hello,得到结果截图如下:
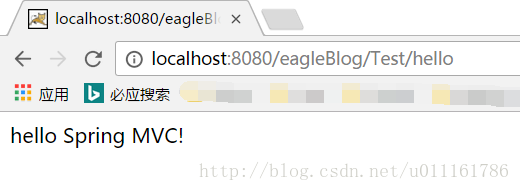
宣告spring+springmvc成功搭建
附:spring 和 SpringMVC 区别与联系:spring只是一个IOC容器,并不是框架,而SpringMVC是Spring的子项目,是真正的框架。此处引用网友的比喻
上帝是如何创造万物的呢?上帝如果要创造人,那就是把先人的骨架给创建出来,然后就可以补上所有器官与血管,然后才是肉,皮等等。那么spring相当于(web应用的)上帝,springMVC框架相当于人的骨架,而且我的应用框架当然相当于是器官与血管,最后我们的应用就相当于是肉啊,皮啊,其它的等等。这么一看就很好理解了吧。如果上帝想创建能飞的动物会是怎么样呢?那就需要先弄个能飞的骨架出来。也就是如果我们觉得springMVC框架不好,要来个新的,你也可以自己定义一个新的框架基于struts2框架即可。
今日目标:基本框架(Spring+SpringMVC+Mybatis)搭建,只完成了spring+springmvc搭建,Mybatis还要仰仗明天了。
明日目标:Mybatis搭建,最大限度完成登录页面设计


 625
625

 被折叠的 条评论
为什么被折叠?
被折叠的 条评论
为什么被折叠?
 到【灌水乐园】发言


