


 本文介绍了MongoDB集群的分片和副本模式操作,包括设置分片、哈希分片、副本集选举等,并详细讲解了Java端如何调用。在副本集中,强调了保持大部分成员在线的重要性,以及数据压力大时MongoDB的自动扩展能力。同时,通过实例展示了如何搭建高可用的MongoDB集群,包括mongos、config server、shard和replica set的配置和启动。
mongodb集群分片+副本模式操作
百度云:jarOrzip项目/mongodb/mongodb分片+副本集Java端调用
本人规划的三个节点分别为192.168.46.133(mongo1) 192.168.46.134(mongo2) 192.168.46.135(mongo3)
下载mongodb3.4.3.tgz,并解压到指定目录下(安装参考前面的单机部署)
下载链接: http://www.mongodb.org/downloads
单机部署:http://blog.csdn.net/u011191463/article/details/68484263
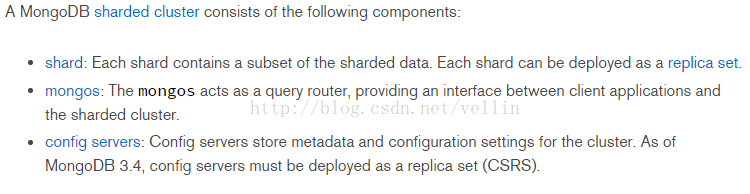
规划5个组件对应的端口号,由于一个机器需要同时部署 mongos、config server 、shard1、shard2、shard3,所以需要用端口进行区分。
这个端口可以自由定义,在本文 mongos为 20000, config server 为 21000, shard1为 22001 , shard2为22002, shard3为22003.

首先修改主机名分别为mongo1 mongo2 mongo3 并在/etc/hosts文件中添加

192.168.46.133  mongo1
192.168.46.134  mongo2
192.168.46.135  mongo3

关闭每台服务器的防火墙 service iptables stop


#分别在每个服务器上创建目录日志目录和分片目录


mkdir -p /data/mongodbtest/mongos/log;mkdir -p /data/mongodbtest/config/data;mkdir -p /data/mongodbtest/config/log;mkdir -p /data/mongodbtest/shard1/data;mkdir -p /data/mongodbtest/shard1/log


mkdir -p /data/mongodbtest/shard2/data;mkdir -p /data/mongodbtest/shard2/log;mkdir -p /data/mongodbtest/shard3/data;mkdir -p /data/mongodbtest/shard3/log


第一次启动时需要初始化

//在三台机器上都执行这条命令
bin/mongod --configsvr --replSet cfgReplSet --dbpath /data/mongodbtest/config/data --port 21000 --logpath /data/mongodbtest/config/log/config.log --fork


bin/mongo --host 192.168.46.133 --port 21000

//创建配置服务器副本集
rs.initiate({_id:"cfgReplSet",configsvr:true,members:[{_id:0,host:"192.168.46.133:21000"},{_id:1,host:"192.168.46.134:21000"},{_id:2,host:"192.168.46.135:21000"}]})


//三台机器分别执行
//分片一 在三台机器上都执行这条命令
bin/mongod --shardsvr --replSet shard1ReplSet --port 22001 --dbpath /data/mongodbtest/shard1/data  --logpath /data/mongodbtest/shard1/log/shard1.log --fork --nojournal
//任选一台机器运行
bin/mongo --host 192.168.46.133 --port 22001

//初始化分片一
rs.initiate({_id:"shard1ReplSet",members:[{_id:0,host:"192.168.46.133:22001"},{_id:1,host:"192.168.46.134:22001"},{_id:2,host:"192.168.46.135:22001"}]})


//分片二 在三台机器上都执行这条命令
bin/mongod --shardsvr --replSet shard2ReplSet --port 22002 --dbpath /data/mongodbtest/shard2/data  --logpath /data/mongodbtest/shard2/log/shard2.log --fork --nojournal
//任选一台机器运行
bin/mongo --host 192.168.46.133 --port 22002

//初始化分片二
rs.initiate({_id:"shard2ReplSet",members:[{_id:0,host:"192.168.46.133:22002"},{_id:1,host:"192.168.46.134:22002"},{_id:2,host:"192.168.46.135:22002"}]})
//分片三 在三台机器上都执行这条命令
bin/mongod --shardsvr --replSet shard3ReplSet --port 22003 --dbpath /data/mongodbtest/shard3/data  --logpath /data/mongodbtest/shard3/log/shard3.log --fork --nojournal
//任选一台机器运行
bin/mongo --host 192.168.46.133 --port 22003

//初始化分片三
rs.initiate({_id:"shard3ReplSet",members:[{_id:0,host:"192.168.46.133:22003"},{_id:1,host:"192.168.46.134:22003"},{_id:2,host:"192.168.46.135:22003"}]})


//mongos服务启动
bin/mongos  --configdb cfgReplSet/192.168.46.133:21000,192.168.46.134:21000,192.168.46.135:21000 --port  20000  --logpath  /data/mongodbtest/mongos/log/mongos.log --fork


//mongos调用
bin/mongo --host 192.168.46.133 --port 20000


//添加分片
sh.addShard("shard1ReplSet/192.168.46.133:22001,192.168.46.134:22001,192.168.46.135:22001")
sh.addShard("shard2ReplSet/192.168.46.133:22002,192.168.46.134:22002,192.168.46.135:22002")
sh.addShard("shard3ReplSet/192.168.46.133:22003,192.168.46.134:22003,192.168.46.135:22003")


非第一次启动时,执行以下命令即可


//在三台机器上都执行这条命令
bin/mongod --configsvr --replSet cfgReplSet --dbpath /data/mongodbtest/config/data --port 21000 --logpath /data/mongodbtest/config/log/config.log --fork


/三台机器分别执行
//分片一 在三台机器上都执行这条命令
bin/mongod --shardsvr --replSet shard1ReplSet --port 22001 --dbpath /data/mongodbtest/shard1/data  --logpath /data/mongodbtest/shard1/log/shard1.log --fork --nojournal


//分片二 在三台机器上都执行这条命令
bin/mongod --shardsvr --replSet shard2ReplSet --port 22002 --dbpath /data/mongodbtest/shard2/data  --logpath /data/mongodbtest/shard2/log/shard2.log --fork --nojournal


//分片三 在三台机器上都执行这条命令
bin/mongod --shardsvr --replSet shard3ReplSet --port 22003 --dbpath /data/mongodbtest/shard3/data  --logpath /data/mongodbtest/shard3/log/shard3.log --fork --nojournal

//mongos服务启动
bin/mongos  --configdb cfgReplSet/192.168.46.133:21000,192.168.46.134:21000,192.168.46.135:21000 --port  20000  --logpath  /data/mongodbtest/mongos/log/mongos.log --fork


bin/mongo --host 192.168.46.133 --port 20000


//执行完成后测试

//保证数据库为分片模式
sh.enableSharding("mytest")


//创建mytest数据库下的log集合,并按升序或者hash进行分片
sh.shardCollection("mytest.log", { id: 1})
或
sh.shardCollection("mytest.log", { id: "hashed"})

哈希方式每个分片的上的数量比较均匀,而升序方式造成某个分片数据量大,另外的分片上没有数据

此处分片可以根据需要按照id或者其他字段进行分片

8、测试
use test
for(var i = 1; i <= 100000; i++){
  db.log.save({id:i,"message":"message"+i});
}


//用户创建授权

db.createUser(
...   {
...     user: "mongo",
...     pwd: "mongo",
...     roles: [ { role: "readWrite", db: "mytest" } ]
...   }
... )
//切换到当前数据库验证
db.auth('mongo','mongo')
常见操作指令
show collections 查看当前数据库下的所有集合
db.dropDataBase() 删除当前数据库
db.blog.drop() 删除blog集合
db.blog.remove({}) 清空blog集合的所有数据
db.blog.stats() 查看当前集合的所有分片数据
show dbs 查看所有的数据库
rs.status() 在primary节点上查看节点健康信息等
sh.enableSharding("mytest") 设置mytest数据库支持分片
sh.shardCollection("mytest.blog",{userId:1}) 集合blog支持按照userId升序分片
sh.shardCollection("mytest.blog",{userId:"hashed"}) 集合blog支持哈希方式分片
sh.status() 查看所有数据库的所有信息
sh.getBalancerstate() 平衡状态
sh.isBalancerRunning() 是否正在均衡过程中
sh.setBalancerState(true/false) 是否开启均衡
Java端调用
package Test;

import com.google.gson.Gson;
import com.mongodb.*;
import com.mongodb.client.FindIterable;
import com.mongodb.client.MongoCollection;
import com.mongodb.client.MongoDatabase;
import com.mongodb.client.model.Filters;
import com.mongodb.client.model.Projections;
import org.bson.BsonType;
import org.bson.Document;

import java.text.ParseException;
import java.util.ArrayList;
import java.util.Arrays;
import java.util.List;

import static com.mongodb.client.model.Filters.*;
import static com.mongodb.client.model.Projections.*;
import static com.mongodb.client.model.Sorts.ascending;
import static com.mongodb.client.model.Sorts.descending;

public class MongodbExample {

    public static void main(String[] args) throws ParseException {

        //20000端口为分片后集群的mongos端口,不添加验证直接执行下面一句创建连接
//        MongoClient mongoClient = new MongoClient("192.168.46.133", 20000);

        //添加验证模式
        List


     seeds = new ArrayList


     ();
        ServerAddress address1 = new ServerAddress("192.168.46.133" , 20000);
        seeds.add(address1);
        //给mongodb增加验证
        MongoCredential credentials = MongoCredential.createScramSha1Credential("mongo", "mytest", "mongo".toCharArray());
        List


       credentialsList = new ArrayList


       ();
        credentialsList.add(credentials);
        MongoClient mongoClient = new MongoClient(seeds,credentialsList);

        MongoDatabase database = mongoClient.getDatabase("mytest");
        MongodbExample client = new MongodbExample(database);
        client.show();
        mongoClient.close();
    }

    private MongoDatabase database;

    public MongodbExample(MongoDatabase database) {
        this.database = database;
    }
    private static Gson gson = new Gson();
    public void show() {
        MongoCollection


         mc = database.getCollection("blog"); /* Foo foo; for(int i=1;i<=10000;i++) { foo = new Foo(); foo.setId(i); foo.setName("name"+i); mc.insertOne(Document.parse(gson.toJson(foo))); }*/ //每次执行前清空集合以方便重复运行 // mc.drop(); for(int i=0;i<10000;i++) { //插入用于测试的文档 /* Document doc1 = new Document("title", "good day"+i).append("owner", "tom" + i).append("words", 300+i) .append("comments", Arrays.asList(new Document("author", "joe" + i).append("score", 3).append("comment", "good" + i), new Document("author", "white" + i).append("score", 1).append("comment", "oh no" + i))); Document doc2 = new Document("title", "good"+i).append("owner", "john"+i).append("words", 400) .append("comments", Arrays.asList(new Document("author", "william"+i).append("score", 4).append("comment", "good"+i), new Document("author", "white"+i).append("score", 6).append("comment", "very good"+i))); Document doc3 = new Document("title", "good night"+i).append("owner", "mike"+i).append("words", 200) .append("tag", Arrays.asList(1, 2, 3, 4)); Document doc4 = new Document("title", "happiness"+i).append("owner", "tom"+i).append("words", 1480) .append("tag", Arrays.asList(2, 3, 4)); Document doc5 = new Document("title", "a good thing"+i).append("owner", "tom"+i).append("words", 180) .append("tag", Arrays.asList(1, 2, 3, 4, 5)); mc.insertMany(Arrays.asList(doc1, doc2, doc3, doc4, doc5));*/ Document doc = new Document("userId",i).append("name","lihua").append("age",12+i); mc.insertOne(doc); } //测试: 查询全部 FindIterable

          iterable = mc.find(); printResult("find all", iterable); // toShow(mc); //TODO: 将在这里填充更多查询示例 } //打印查询的结果集 public void printResult(String doing, FindIterable

           iterable) { System.out.println(doing); iterable.forEach(new Block

            () { public void apply(final Document document) { System.out.println(document); // System.out.println(document.get("userId")); } }); System.out.println("------------------------------------------------------"); System.out.println(); } public void toShow(MongoCollection

             mc) { //创建单字段索引 mc.createIndex(new Document("words", 1)); //创建组合索引(同样遵循最左前缀原则) mc.createIndex(new Document("title", 1).append("owner", -1)); //创建全文索引 mc.createIndex(new Document("title", "text")); //查询全部 FindIterable

              iterable = mc.find(); printResult("find all", iterable); //查询title=good iterable = mc.find(new Document("title", "good")); printResult("find title=good", iterable); //查询title=good and owner=tom iterable = mc.find(new Document("title", "good").append("owner", "tom")); printResult("find title=good and owner=tom", iterable); //查询title like %good% and owner=tom iterable = mc.find(and(regex("title", "good"), eq("owner", "tom"))); printResult("find title like %good% and owner=tom", iterable); //查询全部按title排序 iterable = mc.find().sort(ascending("title")); printResult("find all and ascending title", iterable); //查询全部按owner,title排序 iterable = mc.find().sort(ascending("owner", "title")); printResult("find all and ascending owner,title", iterable); //查询全部按words倒序排序 iterable = mc.find().sort(descending("words")); printResult("find all and descending words", iterable); //查询owner=tom or words>350 iterable = mc.find(new Document("$or", Arrays.asList(new Document("owner", "tom"), new Document("words", new Document("$gt", 350))))); printResult("find owner=tom or words>350", iterable); //返回title和owner字段 iterable = mc.find().projection(include("title", "owner")); printResult("find all include (title,owner)", iterable); //返回除title外的其他字段 iterable = mc.find().projection(exclude("title")); printResult("find all exclude title", iterable); //不返回_id字段 iterable = mc.find().projection(excludeId()); printResult("find all excludeId", iterable); //返回title和owner字段且不返回_id字段 iterable = mc.find().projection(fields(include("title", "owner"), excludeId())); printResult("find all include (title,owner) and excludeId", iterable); //内嵌文档匹配 iterable = mc.find(new Document("comments.author", "joe")); printResult("find comments.author=joe", iterable); //一个错误的示例, 想查询评论中包含作者是white且分值>2的, 返回结果不符合预期 iterable = mc.find(new Document("comments.author", "white").append("comments.score", new Document("$gt", 2))); printResult("find comments.author=white and comments.score>2 (wrong)", iterable); //上面的需求正确的写法 iterable = mc.find(Projections.elemMatch("comments", Filters.and(Filters.eq("author", "white"), Filters.gt("score", 2)))); printResult("find comments.author=white and comments.score>2 using elemMatch", iterable); //查找title以good开头的, 并且comments只保留一个元素 iterable = mc.find(Filters.regex("title", "^good")).projection(slice("comments", 1)); printResult("find regex ^good and slice comments 1", iterable); //全文索引查找 iterable = mc.find(text("good")); printResult("text good", iterable); //用Filters构建的title=good iterable = mc.find(eq("title", "good")); printResult("Filters: title eq good", iterable); //$in 等同于sql的in iterable = mc.find(in("owner", "joe", "john", "william")); printResult("Filters: owner in joe,john,william", iterable); //$nin 等同于sql的not in iterable = mc.find(nin("owner", "joe", "john", "tom")); printResult("Filters: owner nin joe,john,tom", iterable); //查询内嵌文档 iterable = mc.find(in("comments.author", "joe", "tom")); printResult("Filters: comments.author in joe,tom", iterable); //$ne 不等于 iterable = mc.find(ne("words", 300)); printResult("Filters: words ne 300", iterable); //$and 组合条件 iterable = mc.find(and(eq("owner", "tom"), gt("words", 300))); printResult("Filters: owner eq tom and words gt 300", iterable); //较复杂的组合 iterable = mc.find(and(or(eq("words", 300), eq("words", 400)), or(eq("owner", "joe"), size("comments", 2)))); printResult("Filters: (words=300 or words=400) and (owner=joe or size(comments)=2)", iterable); //查询第2个元素值为2的数组 iterable = mc.find(eq("tag.1", 2)); printResult("Filters: tag.1 eq 2", iterable); //查询匹配全部值的数组 iterable = mc.find(all("tag", Arrays.asList(1, 2, 3, 4))); printResult("Filters: tag match all (1, 2, 3, 4)", iterable); //$exists iterable = mc.find(exists("tag")); printResult("Filters: exists tag", iterable); iterable = mc.find(type("words", BsonType.INT32)); printResult("Filters: type words is int32", iterable); } }
注:服务器端对集合进行如:
sh.enableSharding("mytest");'
sh.shardCollection("mytest.blog",{userId:"hashed"})
分片设置后,java端执行数据存储才有效
副本集选举最重要的一个特性是: 集合中的成员一定要有大部分成员(即超过一半数量)是保持正常在线状态,3个成员的副本集,需要至少2个从属节点是正常状态(如果一个从属节点挂掉,那么当主节点down掉产生故障切换时,由于副本集中只有一个节点是正常的,少于一半,则选举失败),4个成员的副本集,则需要3个成员是正常状态,(先关闭一个从属节点,然后再关闭主节点,产生故障切换,此时副本集中只有2个节点正常,则无法成功选举出新主节点)
环境搭建参考实现:http://blog.csdn.net/vellin/article/details/53994014
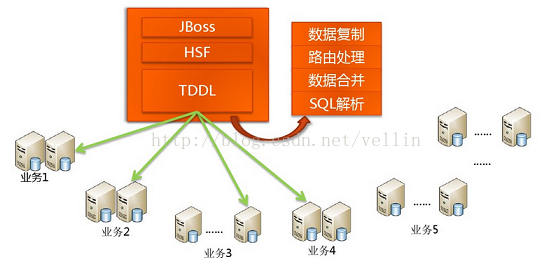
数据压力大到机器支撑不了的时候能否做到自动扩展?
在系统早期,数据量还小的时候不会引起太大的问题,但是随着数据量持续增多,后续迟早会出现一台机器硬件瓶颈问题的。而MongoDB主打的就是海量数据架构,他不能解决海量数据怎么行!不行!“分片”就用这个来解决这个问题。
传统数据库怎么做海量数据读写?其实一句话概括:分而治之。上图看看就清楚了,如下 taobao岳旭强在infoq中提到的 架构图:
 最低0.47元/天 解锁文章


 被折叠的 条评论
为什么被折叠?
被折叠的 条评论
为什么被折叠?
 到【灌水乐园】发言


