


1. 配置信息
1.1 AndroidManifest.xml 修改应用样式
  <!--设置无导航栏,自定义导航栏-->
  <application android:theme="@style/Theme.AppCompat.NoActionBar">
1.2 build.gradle 中添加 ViewBingding, navigation 导航库
   buildFeatures{
       viewBinding = true
   }

dependencies {
    def nav_version = "2.5.2"
    // Kotlin
    implementation "androidx.navigation:navigation-fragment-ktx:$nav_version"
    implementation "androidx.navigation:navigation-ui-ktx:$nav_version"
}
2. 创建资源文件
2.1 创建系统自带矢量图
右击 res -> New -> Vector Asset -> Configure Vector Asset 对话框 点击 Clip Art -> 选择需要的图标,例如 ic_baseline_looks_one.xml,其他系统矢量图自行创建
<vector xmlns:android="http://schemas.android.com/apk/res/android"
    android:width="24dp"
    android:height="24dp"
    android:tint="#FFFFFF"
    android:viewportWidth="24"
    android:viewportHeight="24">
    <path
        android:fillColor="@android:color/white"
        android:pathData="M19,3L5,3c-1.1,0 -2,0.9 -2,2v14c0,1.1 0.9,2 2,2h14c1.1,0 2,-0.9 2,-2L21,5c0,-1.1 -0.9,-2 -2,-2zM14,17h-2L12,9h-2L10,7h4v10z" />
</vector>
2.2 创建 color 点击效果文件,navigation_item_background_color.xml
<?xml version="1.0" encoding="utf-8"?>
<selector xmlns:android="http://schemas.android.com/apk/res/android">
    <item android:color="#FF0" android:state_checked="true" />
    <item android:color="#FFF"/>
</selector>
2.3 String.xml 文件添加文字资源
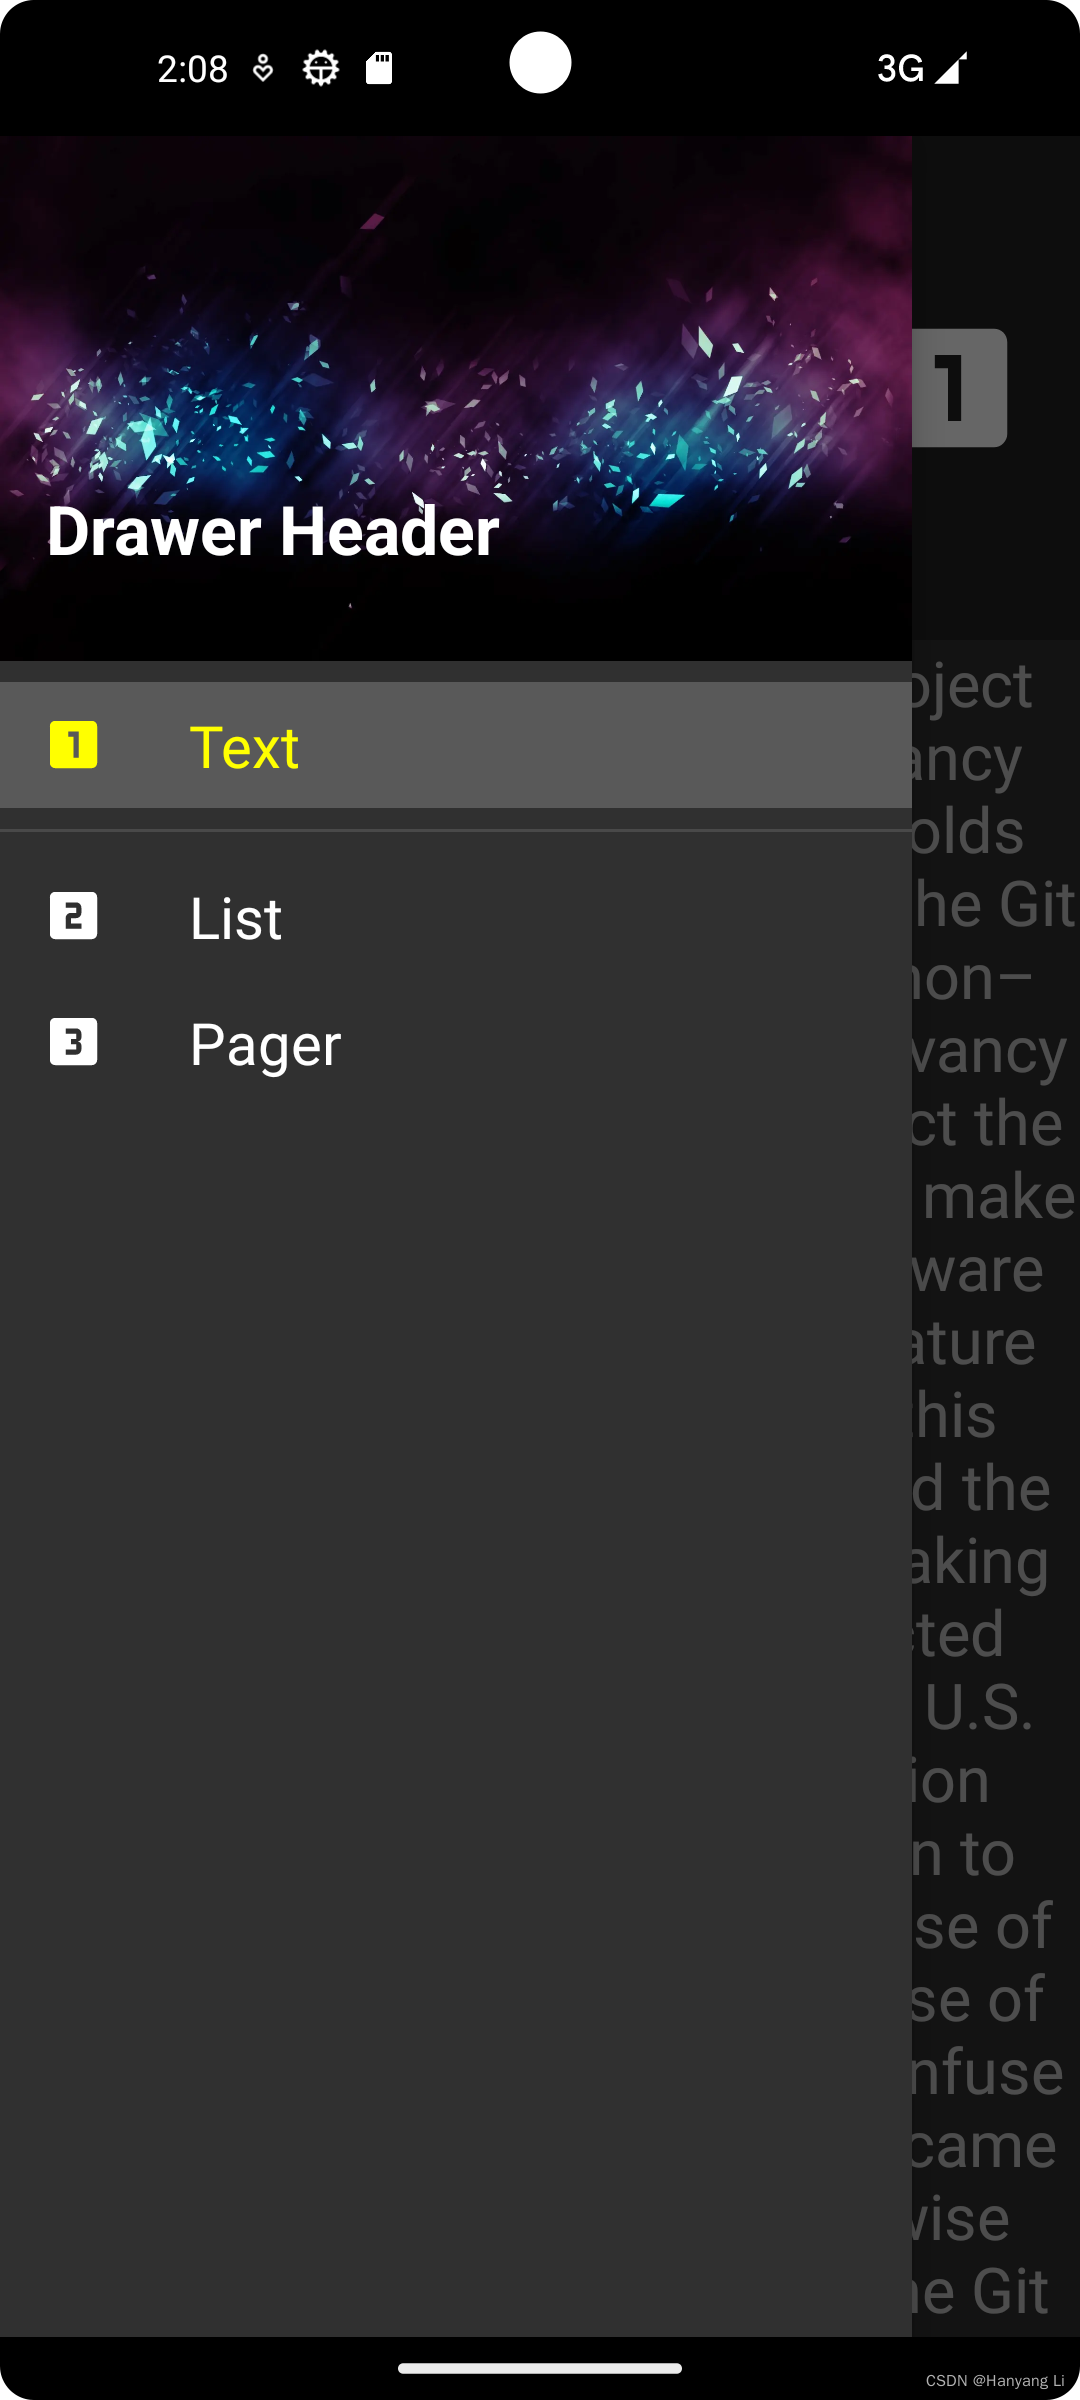
<string name="text_fragment_title">Text</string>
<string name="list_fragment_title">List</string>
<string name="pager_fragment_title">Pager</string>
<string name="navigation_view_header_text">Drawer Header</string>
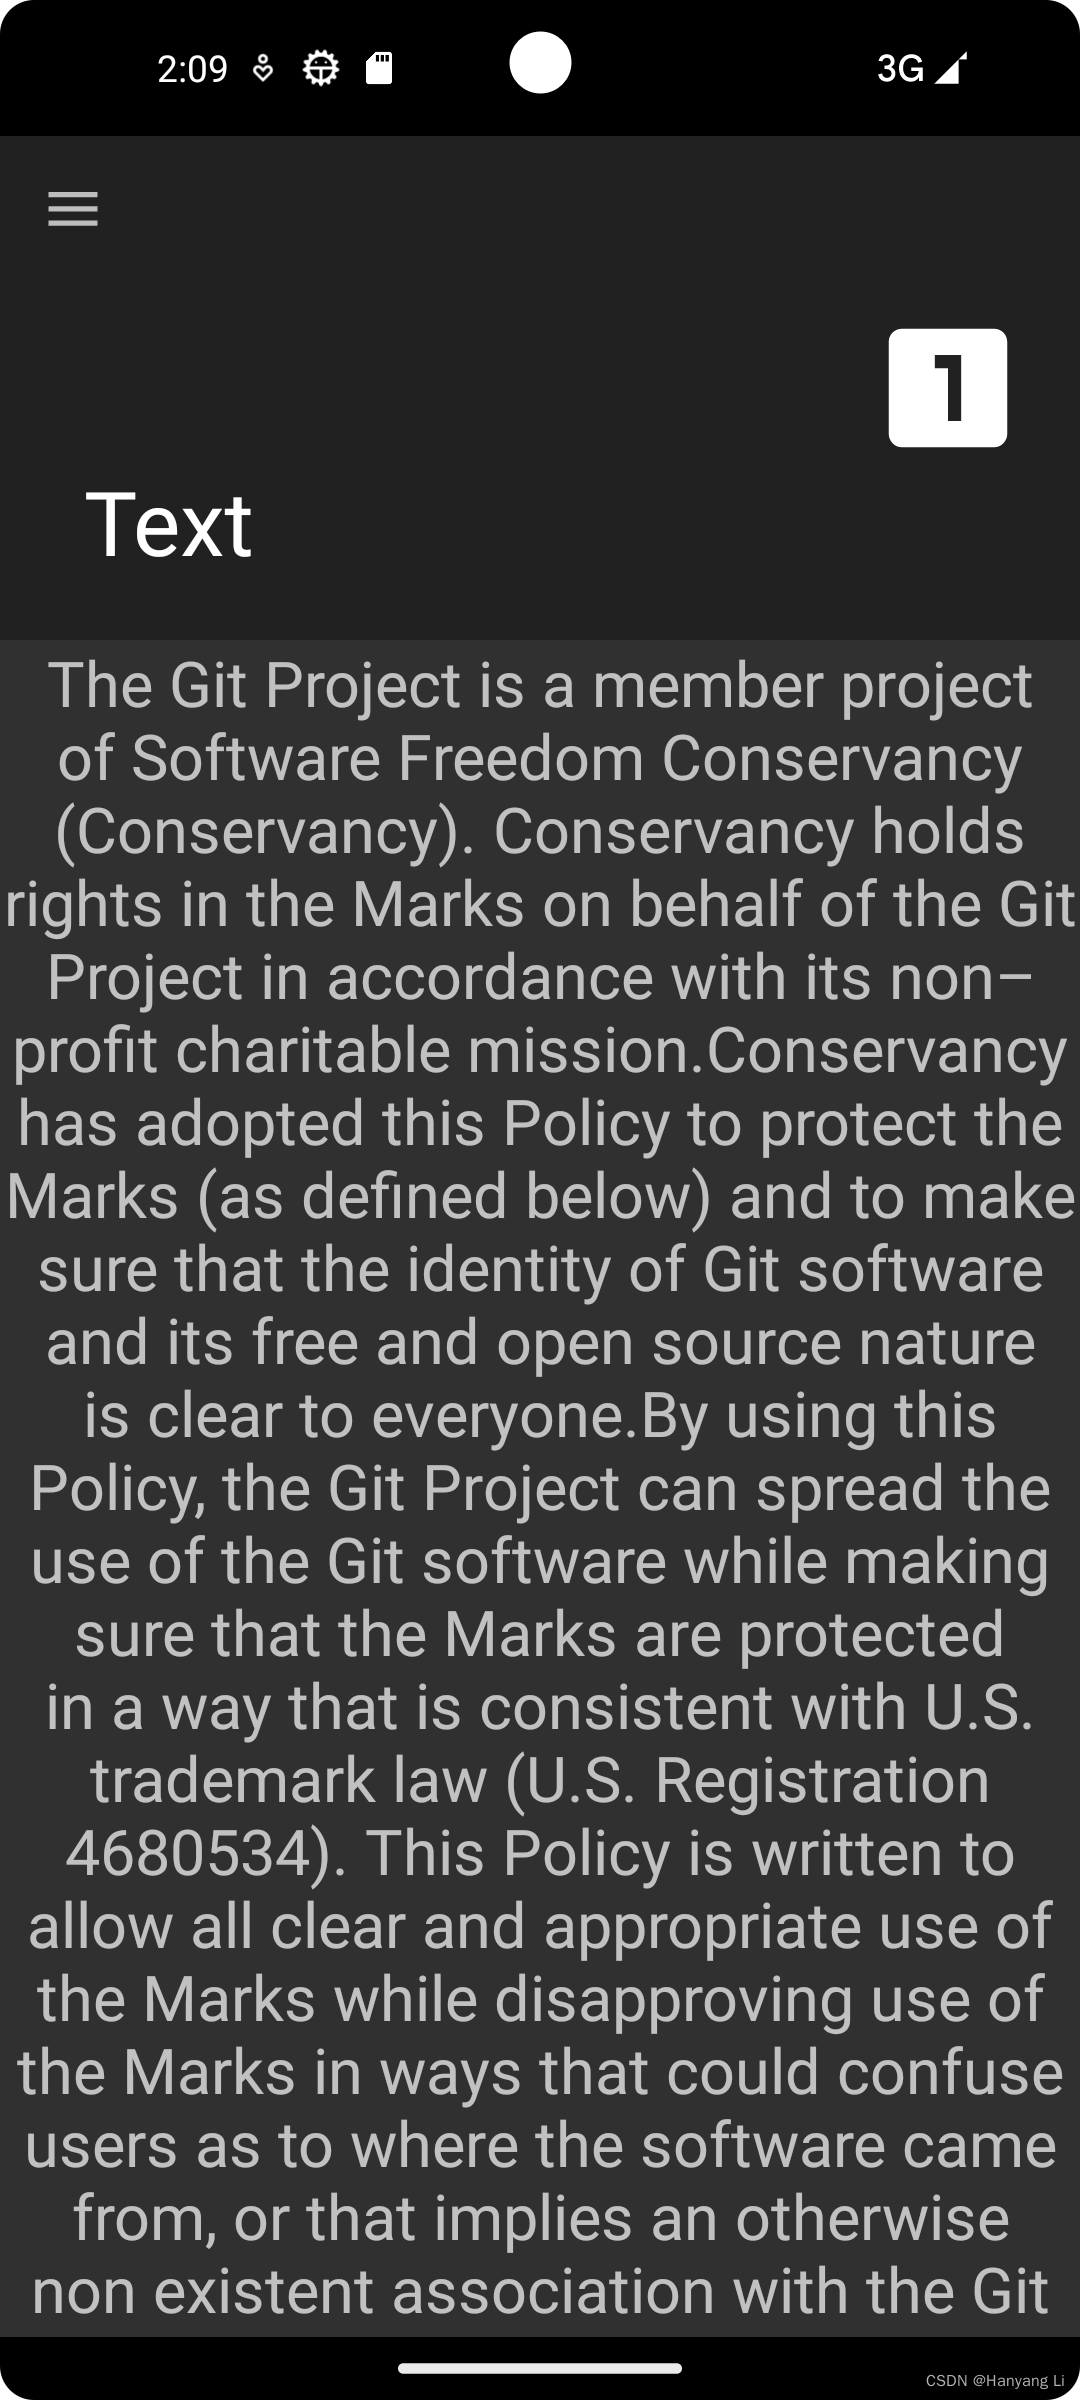
<string name="place_holder_text">The Git Project is a member project of Software Freedom Conservancy ("Conservancy"). Conservancy holds rights in the Marks on behalf of the Git Project in accordance with its non– profit charitable mission.Conservancy has adopted this Policy to protect the Marks (as defined below) and to make sure that the identity of Git software and its free and open source nature is clear to everyone.By using this Policy, the Git Project can spread the use of the Git software while making sure that the Marks are protected in a way that is consistent with U.S. trademark law (U.S. Registration 4680534). This Policy is written to allow all clear and appropriate use of the Marks while disapproving use of the Marks in ways that could confuse users as to where the software came from, or that implies an otherwise non existent association with the Git Project. By adhering to this Policy, you help to promote to the public the freedom to use and develop the Git software.This requirement is waived in all contexts where such marks are not required to protect the intellectual property rights associated with the Marks, such as email, online discussion, and academic papers.</string>
2.4 创建 menu.xml,用于切换 item 导航,group 用于分栏显示,必须填写 group 的id
<?xml version="1.0" encoding="utf-8"?>
<menu xmlns:android="http://schemas.android.com/apk/res/android">
    <group
        android:id="@+id/group1"
        android:checkableBehavior="single">
        <item
            android:id="@+id/textFragment"
            android:icon="@drawable/ic_baseline_looks_one"
            android:title="@string/text_fragment_title" />
    </group>
    <group
        android:id="@+id/group2"
        android:checkableBehavior="single">
        <item
            android:id="@+id/listFragment"
            android:icon="@drawable/ic_baseline_looks_two"
            android:title="@string/list_fragment_title" />
        <item
            android:id="@+id/pagerFragment"
            android:icon="@drawable/ic_baseline_looks_three"
            android:title="@string/pager_fragment_title" />
    </group>
</menu>
2.5 先创建 Fragment 类,在创建 navigation.xml 用于 Fragment 导航
<?xml version="1.0" encoding="utf-8"?>
<navigation xmlns:android="http://schemas.android.com/apk/res/android"
    xmlns:app="http://schemas.android.com/apk/res-auto"
    xmlns:tools="http://schemas.android.com/tools"
    android:id="@+id/navigation"
    app:startDestination="@id/textFragment">

    <fragment
        android:id="@+id/textFragment"
        android:name="com.example.drawerdemo.TextFragment"
        android:label="@string/text_fragment_title"
        tools:layout="@layout/fragment_text" />
    <fragment
        android:id="@+id/listFragment"
        android:name="com.example.drawerdemo.ListFragment"
        android:label="@string/list_fragment_title"
        tools:layout="@layout/fragment_list" />
    <fragment
        android:id="@+id/pagerFragment"
        android:name="com.example.drawerdemo.PagerFragment"
        android:label="@string/pager_fragment_title"
        tools:layout="@layout/fragment_pager" />
</navigation>
3. 创建 TextFragment 页
3.1 布局文件 fragment_text.xml
<?xml version="1.0" encoding="utf-8"?>
<FrameLayout xmlns:android="http://schemas.android.com/apk/res/android"
    xmlns:tools="http://schemas.android.com/tools"
    android:layout_width="match_parent"
    android:layout_height="match_parent"
    tools:context=".TextFragment">
    <TextView
        android:layout_width="match_parent"
        android:layout_height="match_parent"
        android:gravity="center"
        android:text="@string/place_holder_text"
        android:textSize="24sp" />
</FrameLayout>
3.2 TextFragment.kt
class TextFragment : Fragment() {
    override fun onCreateView(
        inflater: LayoutInflater, container: ViewGroup?, savedInstanceState: Bundle?
    ): View? {
        requireActivity().findViewById<CollapsingToolbarLayout>(R.id.collapsingToolbarLayout).title =
            getString(R.string.text_fragment_title)
        requireActivity().findViewById<ImageView>(R.id.toolbarIconImageView)
            .setImageResource(R.drawable.ic_baseline_looks_one)
        return inflater.inflate(R.layout.fragment_text, container, false)
    }
}
4. 创建 ListFragment 页
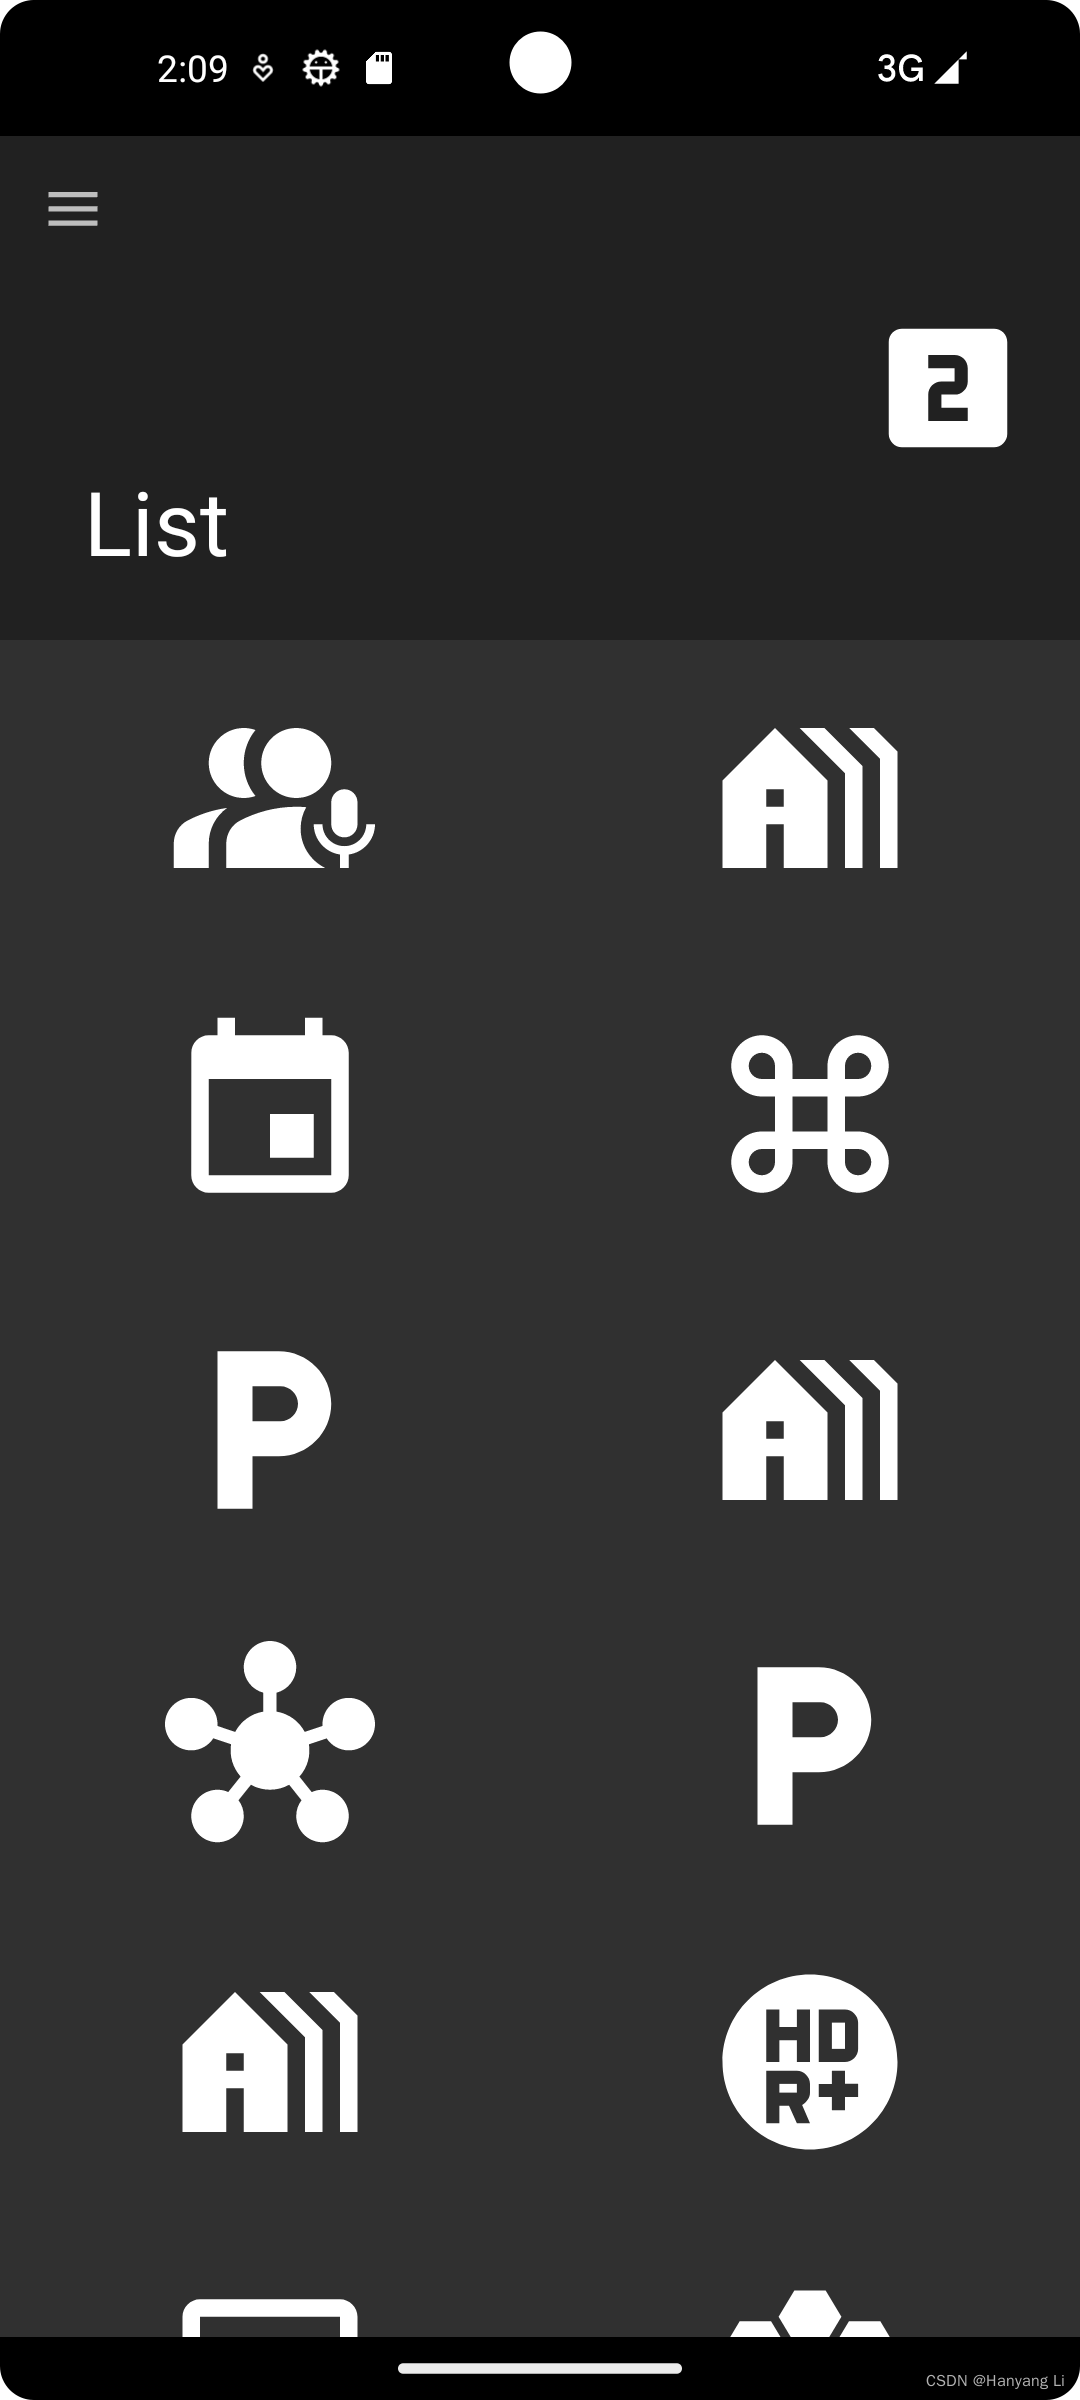
4.1 布局文件 fragment_list.xml
<?xml version="1.0" encoding="utf-8"?>
<FrameLayout xmlns:android="http://schemas.android.com/apk/res/android"
    xmlns:tools="http://schemas.android.com/tools"
    android:layout_width="match_parent"
    android:layout_height="match_parent"
    tools:context=".ListFragment">
    <androidx.recyclerview.widget.RecyclerView
        android:id="@+id/recyclerView"
        android:layout_width="match_parent"
        android:layout_height="match_parent" />
</FrameLayout>
4.2 ViewHolder 布局文件 view_holder.xml
<?xml version="1.0" encoding="utf-8"?>
<androidx.constraintlayout.widget.ConstraintLayout xmlns:android="http://schemas.android.com/apk/res/android"
    xmlns:app="http://schemas.android.com/apk/res-auto"
    xmlns:tools="http://schemas.android.com/tools"
    android:layout_width="match_parent"
    android:layout_height="wrap_content">

    <ImageView
        android:id="@+id/cellImageView"
        android:layout_width="80dp"
        android:layout_height="80dp"
        android:layout_margin="20dp"
        app:layout_constraintBottom_toBottomOf="parent"
        app:layout_constraintEnd_toEndOf="parent"
        app:layout_constraintStart_toStartOf="parent"
        app:layout_constraintTop_toTopOf="parent"
        tools:srcCompat="@tools:sample/avatars" />
</androidx.constraintlayout.widget.ConstraintLayout>
4.3 继承 ListAdapter 类,MyListAdapter.kt
class MyListAdapter(val isPager: Boolean) : ListAdapter<Int, RecyclerView.ViewHolder>(callback) {

    object callback : DiffUtil.ItemCallback<Int>() {
        override fun areItemsTheSame(oldItem: Int, newItem: Int): Boolean {
            return oldItem == newItem
        }

        override fun areContentsTheSame(oldItem: Int, newItem: Int): Boolean {
            return oldItem == newItem
        }
    }

    override fun onCreateViewHolder(parent: ViewGroup, viewType: Int): RecyclerView.ViewHolder {
        var bing = ViewHolderBinding.inflate(LayoutInflater.from(parent.context), parent, false)
        //val view = LayoutInflater.from(parent.context).inflate(R.layout.view_holder, parent, false)
        with(bing) {
            if (isPager) {
                //在ViewPage中 item 布局必须为 MATCH_PARENT
                root.layoutParams.height = ViewGroup.LayoutParams.MATCH_PARENT
                //填满布局
                cellImageView.layoutParams.height = 0
                cellImageView.layoutParams.width = 0
            }
        }
        return object : RecyclerView.ViewHolder(bing.root) {}
    }

    override fun onBindViewHolder(holder: RecyclerView.ViewHolder, position: Int) {
        holder.itemView.findViewById<ImageView>(R.id.cellImageView)
            .setImageResource(getItem(position))
    }
}
4.4 ListFragment.kt
class ListFragment : Fragment() {
    lateinit var binding: FragmentListBinding

    override fun onCreateView(
        inflater: LayoutInflater, container: ViewGroup?, savedInstanceState: Bundle?
    ): View? {
        requireActivity().findViewById<CollapsingToolbarLayout>(R.id.collapsingToolbarLayout).title =
            getString(R.string.list_fragment_title)
        requireActivity().findViewById<ImageView>(R.id.toolbarIconImageView)
            .setImageResource(R.drawable.ic_baseline_looks_two)
        binding = FragmentListBinding.inflate(layoutInflater)
        return binding.root
    }

    override fun onViewCreated(view: View, savedInstanceState: Bundle?) {
        super.onViewCreated(view, savedInstanceState)
        val layoutManager = GridLayoutManager(requireContext(), 2)
        val adapter = MyListAdapter(false)
        binding.recyclerView.layoutManager = layoutManager
        binding.recyclerView.adapter = adapter
        adapter.submitList(iconsList())
    }
}

//创建 List 数据
fun iconsList(): List<Int> {
    val array = intArrayOf(
        R.drawable.ic_baseline_1,
        R.drawable.ic_baseline_2,
        R.drawable.ic_baseline_3,
        R.drawable.ic_baseline_4,
        R.drawable.ic_baseline_5,
        R.drawable.ic_baseline_6,
        R.drawable.ic_baseline_7,
        R.drawable.ic_baseline_8,
        R.drawable.ic_baseline_9,
        R.drawable.ic_baseline_10
    )
    return Array(50) {
        array.random()
    }.toList()
}
5. 创建 PagerFragment 页
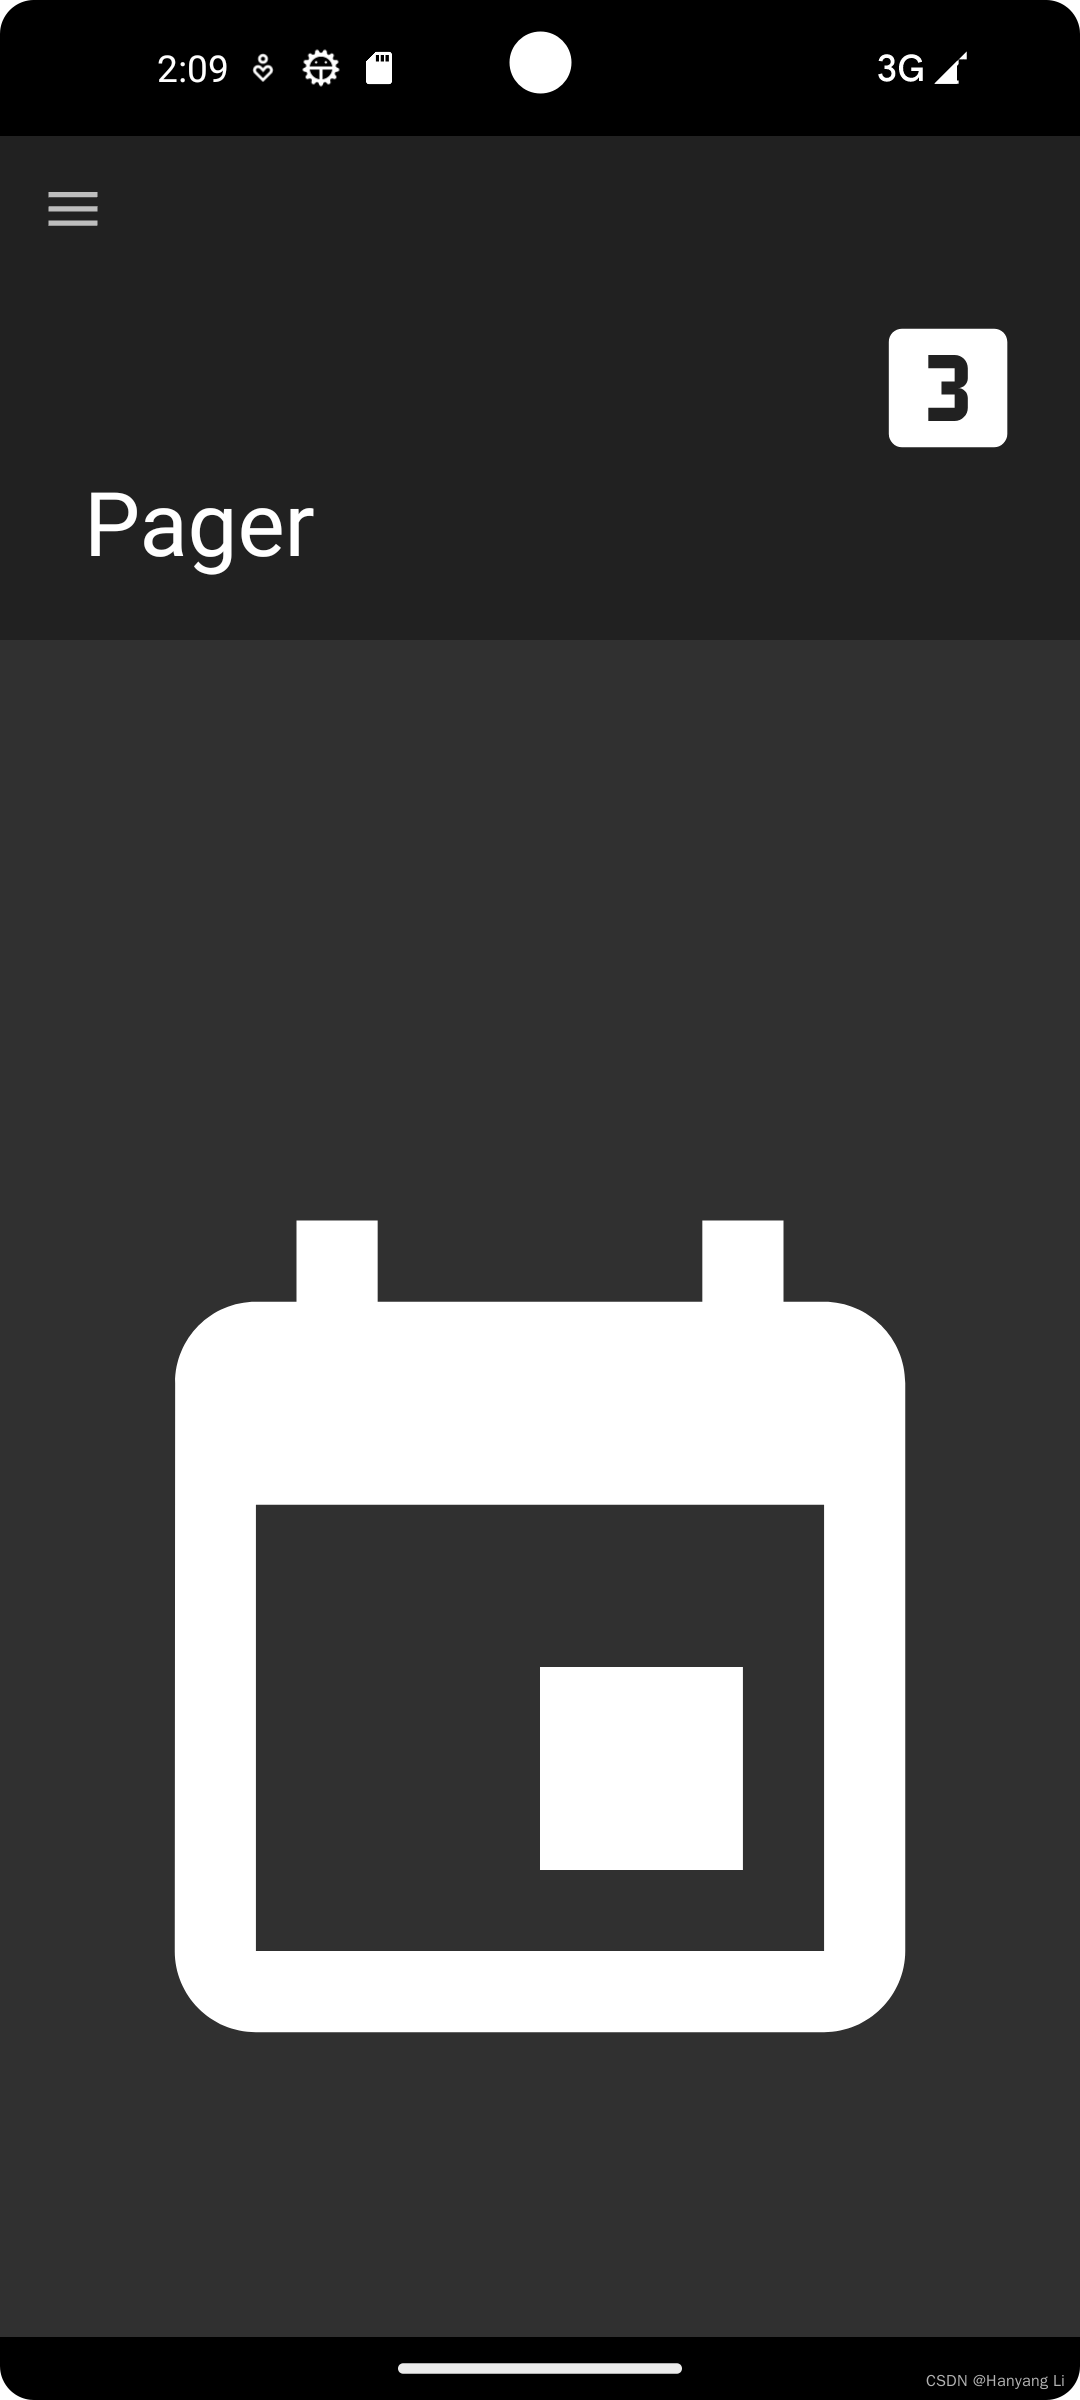
5.1 布局文件 fragment_pager.xml
<?xml version="1.0" encoding="utf-8"?>
<FrameLayout xmlns:android="http://schemas.android.com/apk/res/android"
    xmlns:tools="http://schemas.android.com/tools"
    android:layout_width="match_parent"
    android:layout_height="match_parent"
    tools:context=".PagerFragment">
    <androidx.viewpager2.widget.ViewPager2
        android:id="@+id/viewPager"
        android:layout_width="match_parent"
        android:layout_height="match_parent" />
</FrameLayout>
5.2 PagerFragment.kt
class PagerFragment : Fragment() {
    private lateinit var binding: FragmentPagerBinding
    override fun onCreateView(
        inflater: LayoutInflater, container: ViewGroup?, savedInstanceState: Bundle?
    ): View? {
        requireActivity().findViewById<CollapsingToolbarLayout>(R.id.collapsingToolbarLayout).title =
            getString(R.string.pager_fragment_title)
        requireActivity().findViewById<ImageView>(R.id.toolbarIconImageView)
            .setImageResource(R.drawable.ic_baseline_looks_three)
        binding = FragmentPagerBinding.inflate(layoutInflater)
        return binding.root
    }
    override fun onViewCreated(view: View, savedInstanceState: Bundle?) {
        super.onViewCreated(view, savedInstanceState)
        val adapter = MyListAdapter(true)
        binding.viewPager.adapter = adapter
        adapter.submitList(iconsList())
    }
}
6. Main 主页使用
6.1 NavigationView 头布局: navigation_view_header_layout.xml
<?xml version="1.0" encoding="utf-8"?>
<androidx.constraintlayout.widget.ConstraintLayout xmlns:android="http://schemas.android.com/apk/res/android"
    xmlns:app="http://schemas.android.com/apk/res-auto"
    xmlns:tools="http://schemas.android.com/tools"
    android:layout_width="match_parent"
    android:layout_height="200dp"
    android:background="@drawable/bg2">

    <TextView
        android:id="@+id/textView"
        android:layout_width="wrap_content"
        android:layout_height="wrap_content"
        android:text="@string/navigation_view_header_text"
        android:textColor="#FFFFFF"
        android:textSize="26sp"
        android:textStyle="bold"
        app:layout_constraintBottom_toBottomOf="parent"
        app:layout_constraintEnd_toEndOf="parent"
        app:layout_constraintHorizontal_bias="0.1"
        app:layout_constraintStart_toStartOf="parent"
        app:layout_constraintTop_toTopOf="parent"
        app:layout_constraintVertical_bias="0.8" />
</androidx.constraintlayout.widget.ConstraintLayout>
6.2 抽取 content_layout.xml
<?xml version="1.0" encoding="utf-8"?>
<androidx.coordinatorlayout.widget.CoordinatorLayout xmlns:android="http://schemas.android.com/apk/res/android"
    xmlns:app="http://schemas.android.com/apk/res-auto"
    xmlns:tools="http://schemas.android.com/tools"
    android:layout_width="match_parent"
    android:layout_height="match_parent">
    <com.google.android.material.appbar.AppBarLayout
        android:id="@+id/appbar"
        android:layout_width="match_parent"
        android:layout_height="192dp">
        <com.google.android.material.appbar.CollapsingToolbarLayout
            android:id="@+id/collapsingToolbarLayout"
            android:layout_width="match_parent"
            android:layout_height="match_parent"
            app:contentScrim="?attr/colorPrimary"
            app:layout_scrollFlags="scroll|exitUntilCollapsed"
            app:scrimAnimationDuration="200"
            app:toolbarId="@+id/toolbar">

            <ImageView
                android:id="@+id/toolbarIconImageView"
                android:layout_width="60dp"
                android:layout_height="60dp"
                android:layout_gravity="center_vertical|end"
                android:layout_marginEnd="20dp"
                app:layout_collapseMode="parallax"
                app:layout_collapseParallaxMultiplier="0.5"
                tools:srcCompat="@tools:sample/avatars" />

            <androidx.appcompat.widget.Toolbar
                android:id="@+id/toolbar"
                android:layout_width="match_parent"
                android:layout_height="?attr/actionBarSize"
                app:layout_collapseMode="pin" />
        </com.google.android.material.appbar.CollapsingToolbarLayout>
    </com.google.android.material.appbar.AppBarLayout>

    <androidx.core.widget.NestedScrollView
        android:layout_width="match_parent"
        android:layout_height="match_parent"
        android:fillViewport="true"
        app:layout_behavior="com.google.android.material.appbar.AppBarLayout$ScrollingViewBehavior">

    <androidx.constraintlayout.widget.ConstraintLayout
            android:layout_width="match_parent"
            android:layout_height="match_parent"
            tools:showIn="@layout/activity_main">
            <androidx.fragment.app.FragmentContainerView
                android:id="@+id/fragmentContainerView"
                android:name="androidx.navigation.fragment.NavHostFragment"
                android:layout_width="match_parent"
                android:layout_height="match_parent"
                app:defaultNavHost="true"
                app:layout_constraintBottom_toBottomOf="parent"
                app:layout_constraintEnd_toEndOf="parent"
                app:layout_constraintStart_toStartOf="parent"
                app:layout_constraintTop_toTopOf="parent"
                app:navGraph="@navigation/navigation" />
        </androidx.constraintlayout.widget.ConstraintLayout>
    </androidx.core.widget.NestedScrollView>
</androidx.coordinatorlayout.widget.CoordinatorLayout>
6.3 布局文件 activity_main.xml
<?xml version="1.0" encoding="utf-8"?>
<androidx.drawerlayout.widget.DrawerLayout xmlns:android="http://schemas.android.com/apk/res/android"
    xmlns:app="http://schemas.android.com/apk/res-auto"
    xmlns:tools="http://schemas.android.com/tools"
    android:id="@+id/drawerLayout"
    android:layout_width="match_parent"
    android:layout_height="match_parent"
    tools:context=".MainActivity"
    tools:openDrawer="start">

    <include
        android:id="@+id/include_content_layout"
        layout="@layout/content_layout" />

    <com.google.android.material.navigation.NavigationView
        android:id="@+id/navigationView"
        android:layout_width="match_parent"
        android:layout_height="match_parent"
        android:layout_gravity="start"
        app:headerLayout="@layout/navigation_view_header_layout"
        app:itemIconTint="@color/navigation_item_background_color"
        app:itemTextAppearance="@style/TextAppearance.AppCompat.Large"
        app:itemTextColor="@color/navigation_item_background_color"
        app:menu="@menu/menu" />
</androidx.drawerlayout.widget.DrawerLayout>
6.4 主页 MainActivity.kt
class MainActivity : AppCompatActivity() {
    private lateinit var appBarConfiguration: AppBarConfiguration
    private lateinit var navController: NavController
    private lateinit var binding: ActivityMainBinding

    override fun onCreate(savedInstanceState: Bundle?) {
        super.onCreate(savedInstanceState)
        binding = ActivityMainBinding.inflate(layoutInflater)
        setContentView(binding.root)
        setSupportActionBar(binding.includeContentLayout.toolbar)

        //val navHostFragment = supportFragmentManager.findFragmentById(R.id.fragmentContainerView) as NavHostFragment
        //val drawerLayout = findViewById<DrawerLayout>(R.id.drawerLayout)
        // val navigationView = findViewById<NavigationView>(R.id.navigationView)
        //appBarConfiguration = AppBarConfiguration(navController.graph, drawerLayout)
        val navHostFragment = binding.includeContentLayout.fragmentContainerView.getFragment() as NavHostFragment
        navController = navHostFragment.navController
        val set = setOf(R.id.textFragment, R.id.listFragment, R.id.pagerFragment)
        appBarConfiguration = AppBarConfiguration(set, binding.drawerLayout)
        setupActionBarWithNavController(navController, appBarConfiguration)
        binding.navigationView.setupWithNavController(navController)
    }

    override fun onSupportNavigateUp(): Boolean {
        return navController.navigateUp(appBarConfiguration) || super.onSupportNavigateUp()
    }
}
7. 效果图


 1万+
1万+


 被折叠的 条评论
为什么被折叠?
被折叠的 条评论
为什么被折叠?
 到【灌水乐园】发言


