【写在前面】
这几天突然想起来,之前公司有个需求,是类似于搜索引擎的那种关键字排序。
当然了,并不是做搜索,而是对历史输入记录的一个匹配 + 排序。
然鹅因为疫情,工作已经辞了,但想着这个东西挺有意思的,还是决定实现一下。
【正文开始】
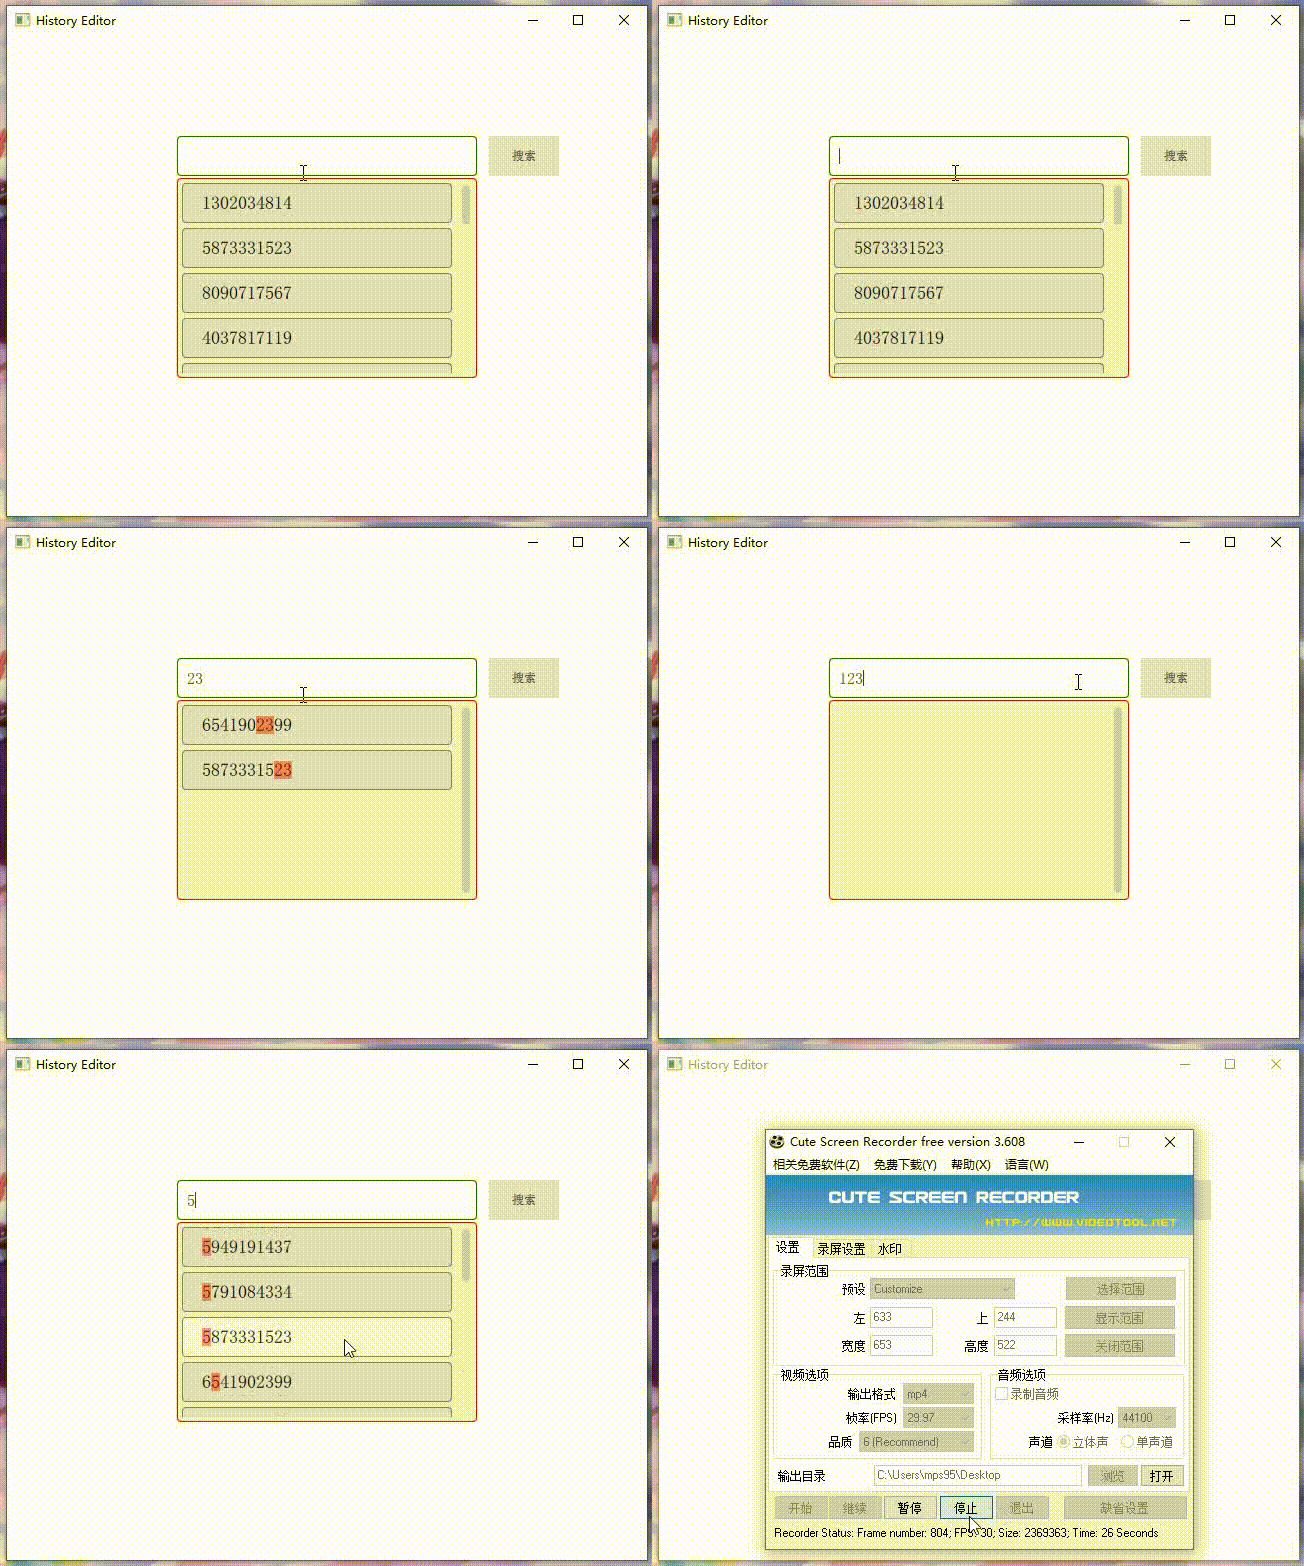
老样子,先展示一下效果图:

一开始我以为很难,实际上,实现起来非常容易,其核心不过二十来行代码。
关键代码 ( C++ 部分 ) :
void HistoryModel::sortByKey(const QString &key)
{
    if (key.isEmpty()) {
        beginResetModel();
        m_data = m_historyData;
        endResetModel();
    } else {
        QMultiMap<int, QString> temp;
        for (auto str : m_historyData) {
            int ret = str.indexOf(key);
            if (ret == -1) continue;
            else temp.insert(ret, str);
        }

        beginResetModel();
        m_data.clear();
        if (!temp.isEmpty()) {
            //也可 for range-based
            for (auto it = temp.begin(); it != temp.end(); it++) {
                m_data.push_back(it.value());
            }
        }
        endResetModel();
    }
}
1、因为每次改变关键字后,匹配到的数据就会完全改变,所以应当重置模型,这里使用 beginResetModel() 和 endResetModel() 。
2、使用 QMultiMap 进行排序 ( 自排序 ),其匹配索引 ( index ) 作为权值。
3、遍历匹配结果集 ( temp ),依次填充 model 即可。
而界面就很简单了:
Qml 部分:
import QtQuick 2.12
import QtQuick.Window 2.12
import QtQuick.Controls 2.12

Window {
    visible: true
    width: 640
    height: 480
    title: qsTr("History Editor")

    TextField {
        id: inputField
        width: 300
        height: 40
        selectByMouse: true
        font.pointSize: 12
        anchors.horizontalCenter: parent.horizontalCenter
        anchors.top: parent.top
        anchors.topMargin: 100
        background: Rectangle {
           radius: 4
           border.color: "green"
        }

        property bool editing: false

        onTextEdited: editing = true;
        onEditingFinished: editing = false;
        onTextChanged: {
            myModel.sortByKey(inputField.text);
        }
    }

    Button {
        text: qsTr("搜索")
        width: 70
        height: 40
        anchors.top: inputField.top
        anchors.left: inputField.right
        anchors.leftMargin: 12
    }

    Rectangle {
        id: historyList
        radius: 4
        width: 300
        height: 200
        visible: inputField.editing || inputField.activeFocus
        anchors.horizontalCenter: parent.horizontalCenter
        anchors.top: inputField.bottom
        anchors.topMargin: 2
        border.color: "red"
        color: "#eee"

        ListView {
            id: listView
            anchors.fill: parent
            anchors.margins: 5
            clip: true
            spacing: 5
            delegate: Component {
                Rectangle {
                    radius: 4
                    width: listView.width - 20
                    height: 40
                    color: hovered ? "#f4f4f4" : "#ddd"
                    border.color: "gray"

                    property bool hovered: false

                    Text {
                        id: displayText
                        text: display
                        anchors.verticalCenter: parent.verticalCenter
                        anchors.left: parent.left
                        anchors.leftMargin: 20
                        font.pixelSize: 18
                        font.wordSpacing: 3

                        Rectangle {
                            color: "red"
                            opacity: 0.4
                            x: display.indexOf(inputField.text) * displayText.font.pixelSize / 2
                            width: displayText.font.pixelSize / 2 * inputField.text.length
                            height: parent.height
                        }
                    }

                    MouseArea {
                        anchors.fill: parent
                        hoverEnabled: true
                        onEntered: parent.hovered = true;
                        onExited: parent.hovered = false;
                    }
                }
            }
            model: myModel
            ScrollBar.vertical: ScrollBar {
                width: 12
                policy: ScrollBar.AlwaysOn
            }
        }
    }
}
【结语】
最后,从效果来看还是很满意的。
不过,如果数据过多性能就一般般了,应该要考虑更好的算法。
附上项目链接(多多star呀..⭐_⭐):


 被折叠的 条评论
为什么被折叠?


