


1、设计模式简介
1.1 目标
- 理解松耦合设计思想
- 掌握面向对象设计原则
- 掌握重构技法改善设计
- 掌握GOF 核心设计模式
1.2 什么是设计模式
每一个模式描述了一个在我们周围不断重复发生的问题,以及该问题的解决方案的核心。这样,你就能一次又一次地使用该方案而不必做重复劳动。
——Christopher Alexander
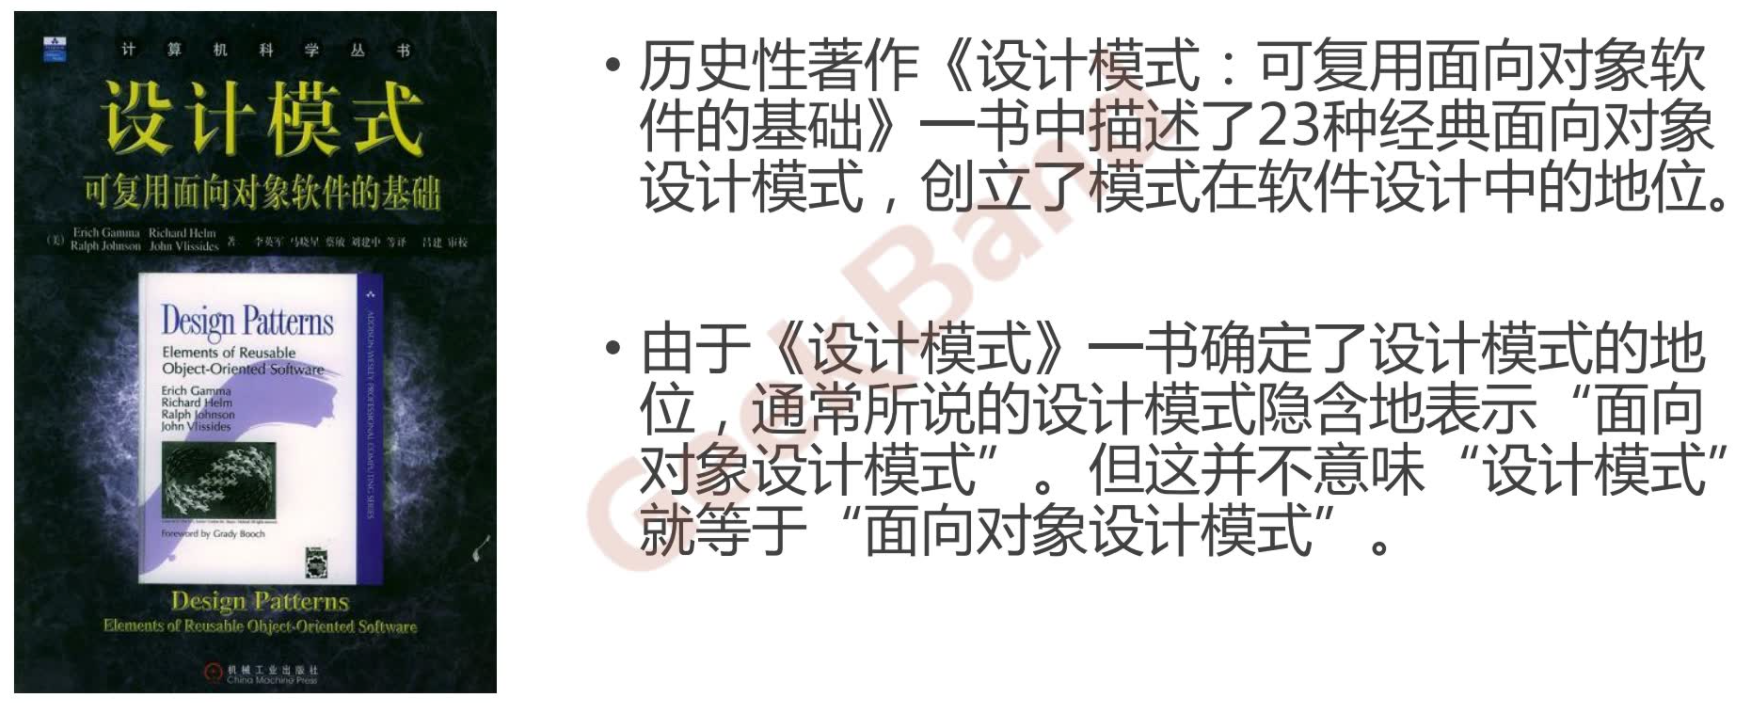
1.3 GOF设计模式
1.4 从面向对象谈起
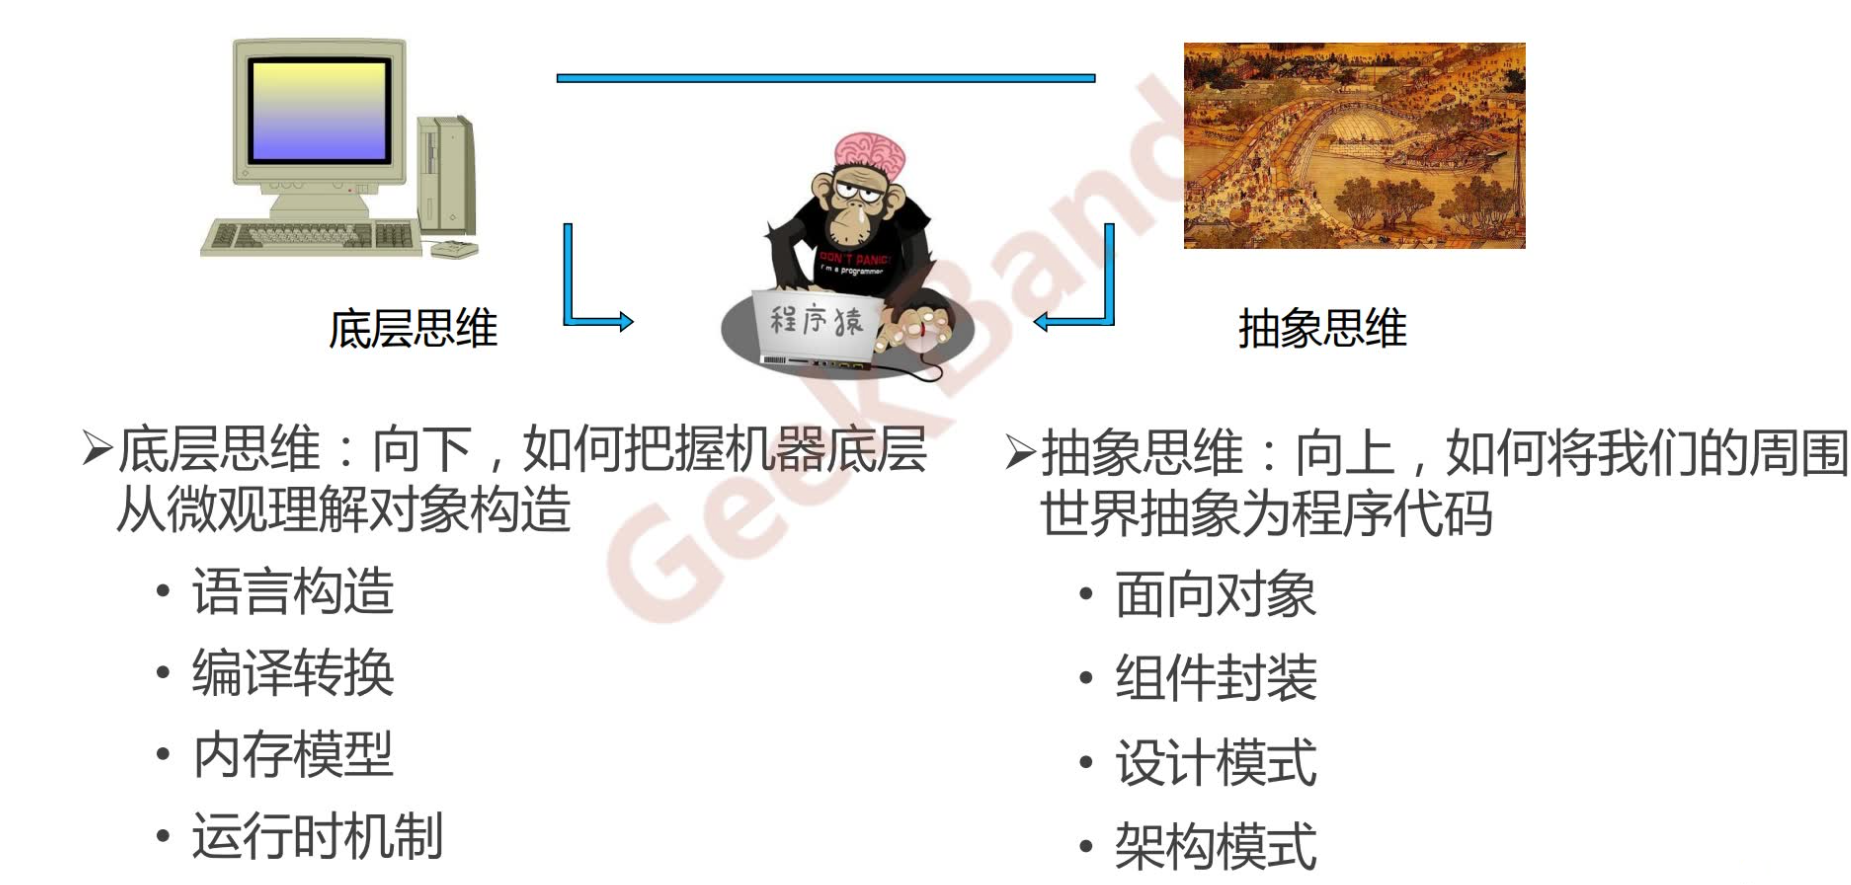
1.5 深入理解面向对象
- 向下:深入理解三大面向对象机制
- 封装,隐藏内部实现
- 继承,复用现有代码
- 多态,改写对象行为
- 向上:深刻把握面向对象机制所带来的抽象意义,理解如何使用这些机制来表达现实世界,掌握什么是“好的面向对象设计”
1.6 软件设计固有的复杂性
建筑商从来不会去想给一栋已建好100层高的楼房底下再新修一个小地下室——这样做花费极大而且注定要失败。然而令人惊奇的是,软件系统的用户在要求做出类似改变时却不会仔细考虑,而且他们认为这只是需要简单编程的事。
—— Object-Oriented Analysis and Design with Applications
1.7 软件设计复杂的根本原因
- 变化
- 客户需求的变化
- 技术平台的变化
- 开发团队的变化
- 市场环境的变化
- …
1.8 如何解决复杂性?
- 分解
- 人们面对复杂性有一个常见的做法:即分而治之,将大问题分解为多个小问题,将复杂问题分解为多个简单问题。
- 抽象
- 更高层次来讲,人们处理复杂性有一个通用的技术,即抽象。由于不能掌握全部的复杂对象,我们选择忽视它的非本质细节,而去处理泛化和理想化了的对象模型。
1.9 结构化 VS. 面向对象
分解:伪码
//Shape1.h
class Point {
public:
    int x;
    int y;
};

class Line {
public:
    Point start;
    Point end;

    Line(const Point& start, const Point& end) {
        this->start = start;
        this->end = end;
    }
};

class Rect {
public:
    Point leftUp;
    int width;
    int height;

    Rect(const Point& leftUp, int width, int height) {
        this->leftUp = leftUp;
        this->width = width;
        this->height = height;
    }
};

//增加
class Circle{


};
//MainForm1.cpp
class MainForm : public Form {
private:
    Point p1;
    Point p2;

    vector<Line> lineVector;
    vector<Rect> rectVector;
    //改变
    vector<Circle> circleVector;

public:
    MainForm(){
        //...
    }
protected:

    virtual void OnMouseDown(const MouseEventArgs& e);
    virtual void OnMouseUp(const MouseEventArgs& e);
    virtual void OnPaint(const PaintEventArgs& e);
};


void MainForm::OnMouseDown(const MouseEventArgs& e){
    p1.x = e.X;
    p1.y = e.Y;

    //...
    Form::OnMouseDown(e);
}

void MainForm::OnMouseUp(const MouseEventArgs& e){
    p2.x = e.X;
    p2.y = e.Y;

    if (rdoLine.Checked){
        Line line(p1, p2);
        lineVector.push_back(line);
    }
    else if (rdoRect.Checked){
        int width = abs(p2.x - p1.x);
        int height = abs(p2.y - p1.y);
        Rect rect(p1, width, height);
        rectVector.push_back(rect);
    }
    //改变
    else if (...){
        //...
        circleVector.push_back(circle);
    }

    //...
    this->Refresh();

    Form::OnMouseUp(e);
}

void MainForm::OnPaint(const PaintEventArgs& e){

    //针对直线
    for (int i = 0; i < lineVector.size(); i++){
        e.Graphics.DrawLine(Pens.Red,
            lineVector[i].start.x,
            lineVector[i].start.y,
            lineVector[i].end.x,
            lineVector[i].end.y);
    }

    //针对矩形
    for (int i = 0; i < rectVector.size(); i++){
        e.Graphics.DrawRectangle(Pens.Red,
            rectVector[i].leftUp,
            rectVector[i].width,
            rectVector[i].height);
    }

    //改变
    //针对圆形
    for (int i = 0; i < circleVector.size(); i++){
        e.Graphics.DrawCircle(Pens.Red,
            circleVector[i]);
    }

    //...
    Form::OnPaint(e);
}
抽象:伪码
//Shape2.h
class Shape{
public:
    virtual void Draw(const Graphics& g)=0;
    virtual ~Shape() { }
};


class Point{
public:
    int x;
    int y;
};

class Line: public Shape{
public:
    Point start;
    Point end;

    Line(const Point& start, const Point& end){
        this->start = start;
        this->end = end;
    }

    //实现自己的Draw,负责画自己
    virtual void Draw(const Graphics& g){
        g.DrawLine(Pens.Red, start.x, start.y,end.x, end.y);
    }

};

class Rect: public Shape{
public:
    Point leftUp;
    int width;
    int height;

    Rect(const Point& leftUp, int width, int height){
        this->leftUp = leftUp;
        this->width = width;
        this->height = height;
    }

    //实现自己的Draw,负责画自己
    virtual void Draw(const Graphics& g){
        g.DrawRectangle(Pens.Red, leftUp, width, height);
    }

};

//增加
class Circle : public Shape{
public:
    //实现自己的Draw,负责画自己
    virtual void Draw(const Graphics& g){
        g.DrawCircle(Pens.Red, ...);
    }

};
//MainForm2.cpp
class MainForm : public Form {
private:
    Point p1;
    Point p2;

    //针对所有形状
    vector<Shape*> shapeVector; //此处必须要放Shape*指针,保证多态性

public:
    MainForm(){
        //...
    }
protected:

    virtual void OnMouseDown(const MouseEventArgs& e);
    virtual void OnMouseUp(const MouseEventArgs& e);
    virtual void OnPaint(const PaintEventArgs& e);
};


void MainForm::OnMouseDown(const MouseEventArgs& e){
    p1.x = e.X;
    p1.y = e.Y;

    //...
    Form::OnMouseDown(e);
}

void MainForm::OnMouseUp(const MouseEventArgs& e){
    p2.x = e.X;
    p2.y = e.Y;

    if (rdoLine.Checked){
        shapeVector.push_back(new Line(p1,p2));
    }
    else if (rdoRect.Checked){
        int width = abs(p2.x - p1.x);
        int height = abs(p2.y - p1.y);
        shapeVector.push_back(new Rect(p1, width, height));
    }
    //改变
    else if (...){
        //...
        shapeVector.push_back(circle);
    }

    //...
    this->Refresh();

    Form::OnMouseUp(e);
}

void MainForm::OnPaint(const PaintEventArgs& e){

    //针对所有形状
    for (int i = 0; i < shapeVector.size(); i++){

        shapeVector[i]->Draw(e.Graphics); //多态调用,各负其责
    }

    //...
    Form::OnPaint(e);
}
代码中注释了“改变/增加”的是有新需求的情况设计到要修改的代码。
分解的做法不容易复用,而抽象的设计方法的代码复用非常高,能够使用通用的方法统一处理。
1.10 软件设计的目标
什么是好的软件设计?软件设计的金科玉律:复用!
2、面向对象设计原则
2.1 面向对象设计,为什么?
变化是复用的天敌!
面向对象设计最大的优势在于:抵御变化!
2.2 重新认识面向对象
- 理解隔离变化
- 从宏观层面来看,面向对象的构建方式更能适应软件的变化,能将变化所带来的影响减为最小
- 各司其职
- 从微观层面来看,面向对象的方式更强调各个类的“责任”
- 由于需求变化导致的新增类型不应该影响原来类型的实现——是所谓各负其责
- 对象是什么?
- 从语言实现层面来看,对象封装了代码和数据。
- 从规格层面讲,对象是一系列可被使用的公共接口。
- 从概念层面讲,对象是某种拥有责任的抽象。
2.3 面向对象设计原则
2.3.1 依赖倒置原则(DIP)
- 高层模块(稳定)不依赖于低层模块(变化),二者都应该依赖于抽象(稳定)
- 抽象(稳定)不应该依赖于实现细节(变化),实现细节应该依赖于抽象(稳定)
举例说明:第1章中的demo里,MainForm是高层模块,Line 和 Rect是底层模块,Shape是抽象。
”分解“的方案里,MainForm依赖了Line和Rect,Line和Rect是容易变化的,就会导致MainForm也跟着变化;而在"抽象"的方案里,MainForm依赖于Shape,Line和Rect也依赖于Shape,只有Line和Rect变化,Shape和MainForm基本稳定,这就遵循了DIP原则。
2.3.2 开放封闭原则(OCP)
- 对扩展开放,对更改封闭
- 类模块应该是可扩展的,但是不可修改
2.3.3 单一职责原则(SRP)
- 一个类应该仅有一个引起它变化的原因
- 变化的方向隐含着类的责任
2.3.4 Liskov 替换原则(LSP)
- 子类必须能够替换它们的基类(IS-A)
- 继承表达类型抽象
2.3.5 接口隔离原则(ISP)
- 不应该强迫客户程序依赖它们不用的方法
- 接口应该小而完备
2.3.6 优先使用对象组合,而不是类继承
- 类继承通常为“白箱复用”,对象组合通常为“黑箱复用”
- 继承在某种程度上破坏了封装性,子类父类耦合度高
- 而对象组合则只要求被组合的对象具有良好定义的接口,耦合度低
2.3.7 封装变化点
- 使用封装来创建对象之间的分界层,让设计者可以在分界层的一侧进行修改,而不会对另一层产生不良的影响,从而实现层次间的松耦合
2.3.8 针对接口编程,而不是针对实现编程
- 不将变量类型声明为某个特定的具体类,而是声明为某个接口
- 客户程序无需获知对象的具体类型,只需要知道对象所具有的接口
- 减少系统中各部分的依赖关系,从而实现“高内聚、松耦合”的类型设计方案
2.4 面向接口设计
产业强盛的标志:接口标准化
2.5 以史为鉴
-
秦为什么能够统一六国?
据史书记载和考古发现,秦的兵器不论东西南北,出土地点都有统一的标准,包括剑、戈、弩,甚至弩机、弩体、箭头都是一样的,而其他六国则不是。 -
毕升的活字印刷为什么成为四大发明,推动了人类文明的前进?
毕升之前的雕版印刷将字刻死在木板或石板上,每次印刷不同文章,要刻不同的版。而毕升发明的活字印刷首先在板上刻好字格,然后再刻单独的字模。印刷时,将活的字模“按需索取”放在字格中,不同的排列方法产生不同的文章,而不必重新刻版。
2.6 将设计原则提升为设计经验
-
设计习语 Design Idioms
Design Idioms 描述与特定编程语言相关的低层模式,技巧,惯用法。 -
设计模式 Design Patterns
Design Patterns主要描述的是“类与相互通信的对象之间的组织关系“,包括它们的角色、职责、协作方式等方面 -
架构模式 Architectural Patterns
Architectural Patterns描述系统中与基本结构组织关系密切的高层模式,包括子系统划分,职责,以及如何组织它们之间关系的规则
3、模式的分类
3.1 GOF-23 模式分类
- 从目的来看:
- 创建型(Creational)模式:将对象的部分创建工作延迟到子类或者其他对象,从而应对需求变化为对象创建时具体类型实现引来的冲击。
- 结构型(Structural)模式:通过类继承或者对象组合获得更灵活的结构,从而应对需求变化为对象的结构带来的冲击。
- 行为型(Behavioral)模式:通过类继承或者对象组合来划分类与对象间的职责,从而应对需求变化为多个交互的对象带来的冲击。
- 从范围来看:
- 类模式处理类与子类的静态关系。【注:偏重于继承方案】
- 对象模式处理对象间的动态关系。【注:偏重于组合方案】
3.2 从封装变化角度对模式分类
- 组件协作:
- Template Method
- Observer / Event
- Strategy
- 单一职责:
- Decorator
- Bridge
- 对象创建:
- Factory Method
- Abstract Factory
- Prototype
- Builder
- 对象性能:
- Singleton
- Flyweight
- 接口隔离:
- Façade
- Proxy
- Mediator
- Adapter
- 状态变化:
- Memento
- State
- 数据结构:
- Composite
- Iterator
- Chain of Resposibility
- 行为变化:
- Command
- Visitor
- 领域问题:
- Interpreter
3.3 重构获得模式 Refactoring to Patterns
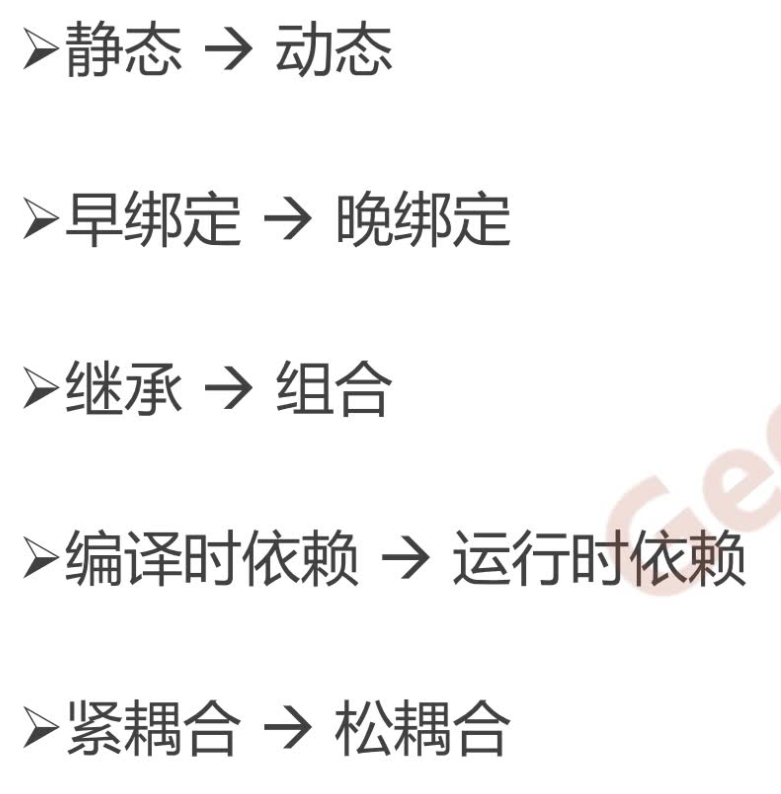
- 面向对象设计模式是“好的面向对象设计”,所谓“好的面向对象设计”指是那些可以满足“应对变化,提高复用”的设计。
- 现代软件设计的特征是“需求的频繁变化”。设计模式的要点是“寻找变化点,然后在变化点处应用设计模式,从而来更好地应对需求的变化”。”什么时候、什么地点应用设计模式”比“理解设计模式结构本身”更为重要。
- 设计模式的应用不宜先入为主,一上来就使用设计模式是对设计模式的最大误用。没有一步到位的设计模式。敏捷软件开发实践提倡的“Refactoring to Patterns”是目前普遍公认的最好的使用设计模式的方法。
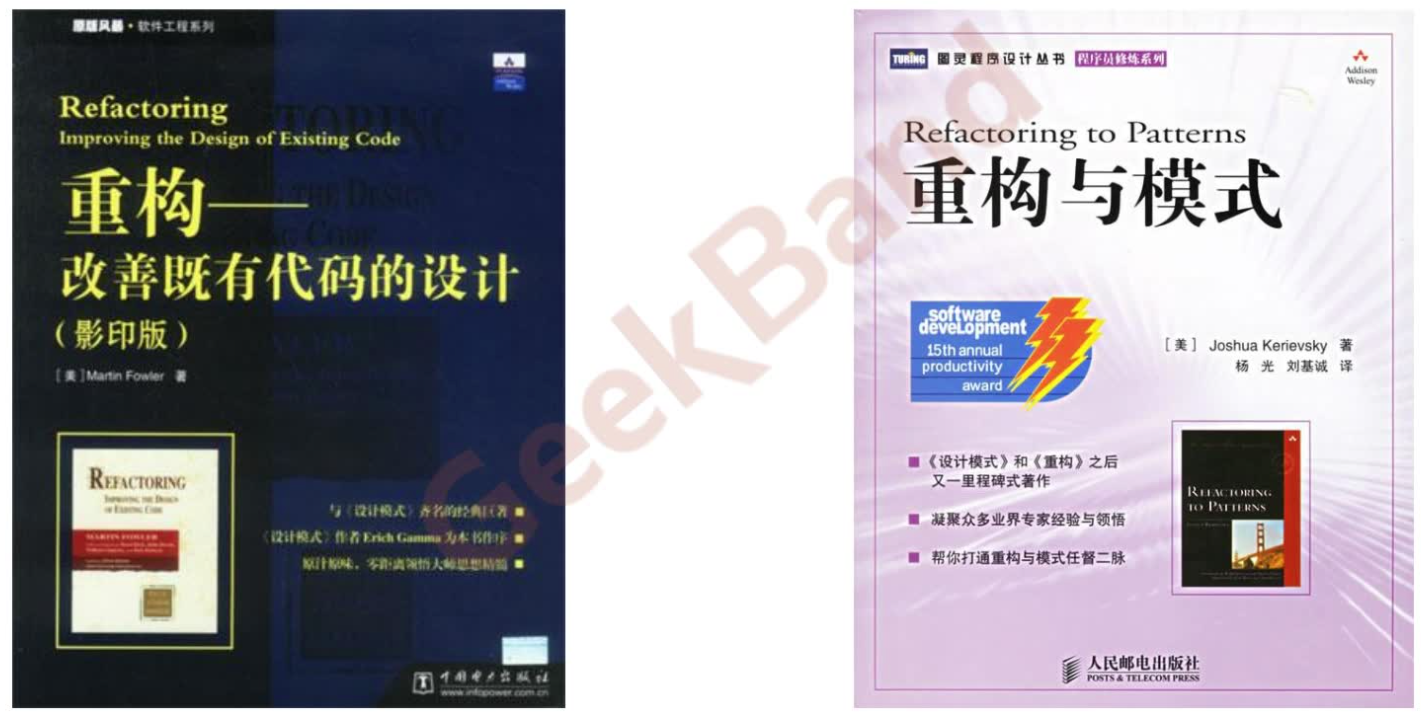
3.4 推荐图书
3.5 重构关键技法
4、"组件协作"模式
- 现代软件专业分工之后的第一个结果是“框架与应用程序的划分”,“组件协作”模式通过晚期绑定,来实现框架与应用程序之间的松耦合,是二者之间协作时常用的模式。
- 典型模式
- Template Method
- Strategy
- Observer / Event
4.1 Template Method模式
4.1.1 动机(Motivation)
- 在软件构建过程中,对于某一项任务,它常常有稳定的整体操作结构,但各个子步骤却有很多改变的需求,或者由于固有的原因(比如框架与应用之间的关系)而无法和任务的整体结构同时实现。
- 如何在确定稳定操作结构的前提下,来灵活应对各个子步骤的变化或者晚期实现需求?
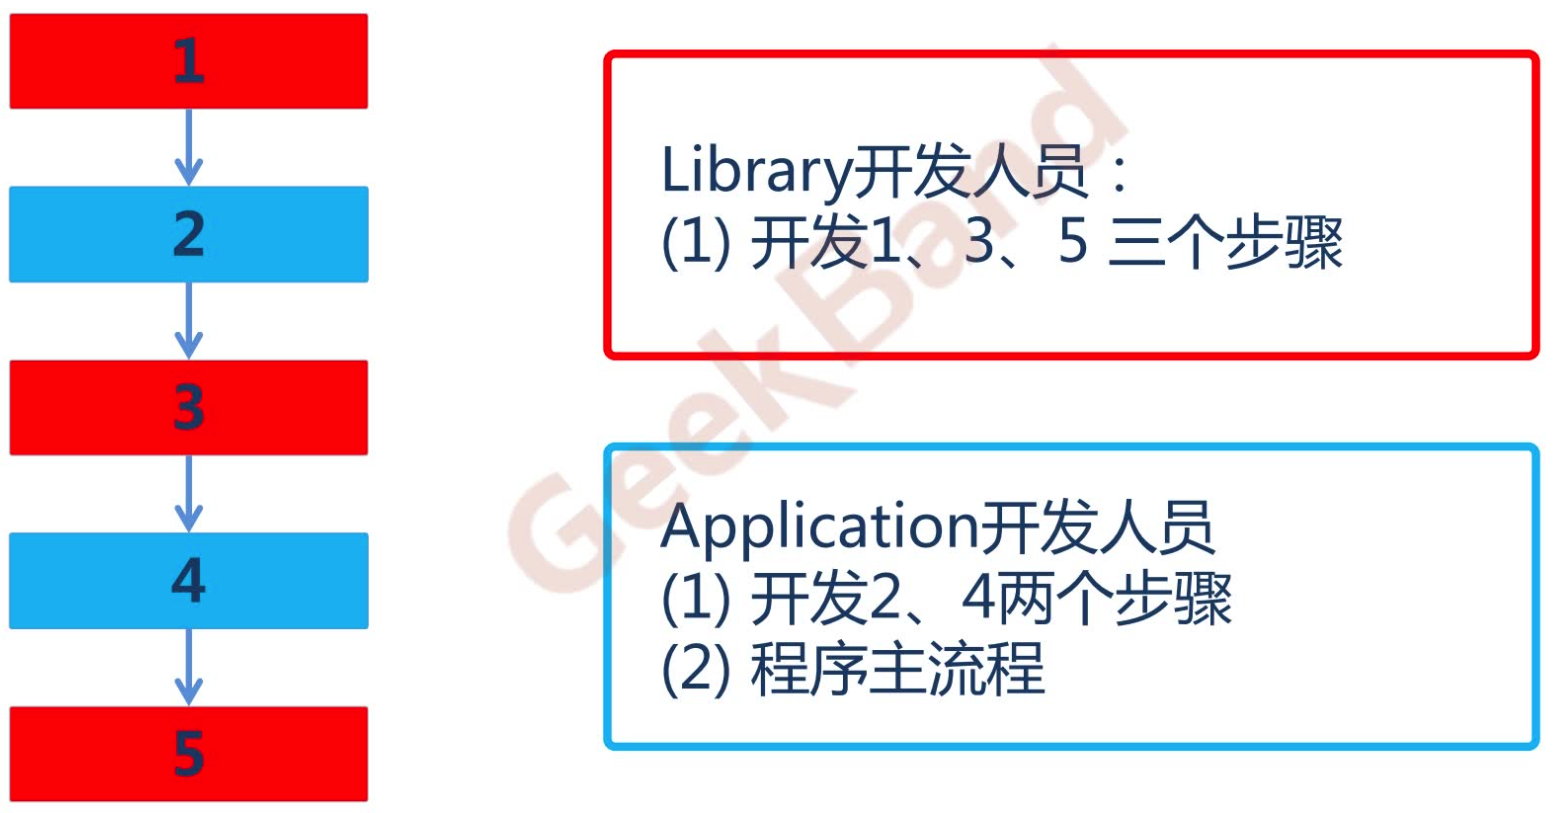
4.1.2 结构化软件设计流程
//template1_lib.cpp
//程序库开发人员
class Library{
public:
    void Step1() {
        //...
    }

    void Step3() {
        //...
    }

    void Step5() {
        //...
    }
};
//template1_app.cpp
//应用程序开发人员
class Application {
public:
    bool Step2() {
        //...
    }

    void Step4() {
        //...
    }
};

int main() {
    Library lib();
    Application app();

    lib.Step1();

    if (app.Step2()) {
        lib.Step3();
    }

    for (int i = 0; i < 4; i++) {
        app.Step4();
    }

    lib.Step5();

    return 0;
}
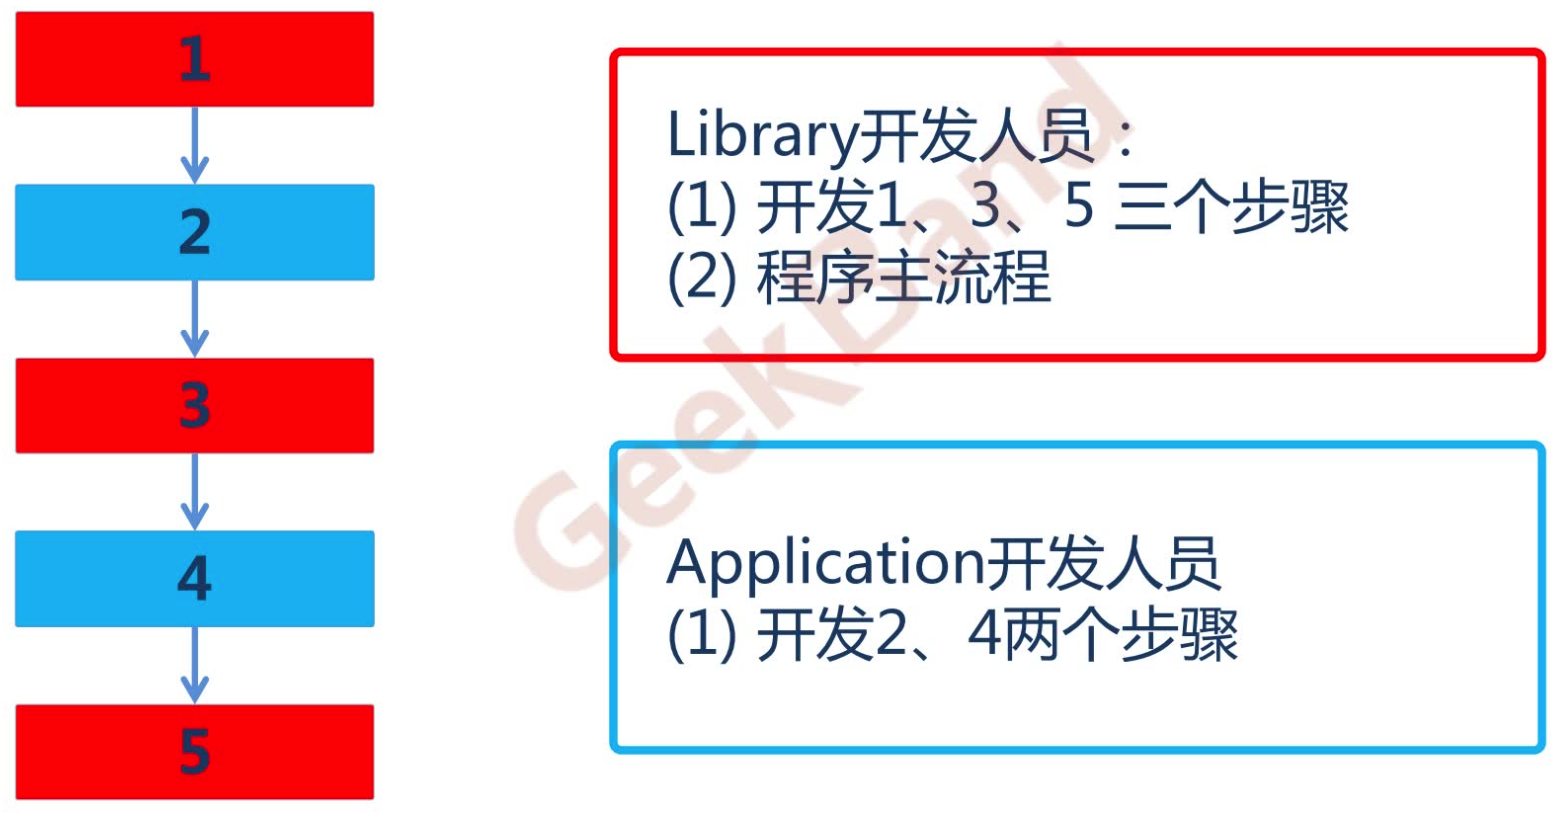
4.1.3 面向对象软件设计流程
//template2_lib.cpp
//程序库开发人员
class Library {
public:
    //稳定 template method
    void Run() {
        Step1();

        if (Step2()) { //支持变化==> 虚函数的多态调用
            Step3();
        }

        for (int i = 0; i < 4; i++) {
            Step4(); //支持变化==> 虚函数的多态调用
        }

        Step5();
    }
    //基类中的析构函数要写成虚函数,否则delete的时候的调用不到子类的析构函数
    virtual ~Library() { }

protected:
    void Step1() { //稳定
        //...
    }

    void Step3() { //稳定
        //...
    }

    void Step5() { //稳定
        //...
    }

    virtual bool Step2() = 0; //变化
    virtual bool Step4() = 0; //变化
};
//template2_app.cpp
//应用开发人员
class Application : public Library {
protected:
    virtual bool Step2() {
        //... 子类重写实现
    }

    virtual bool Step4() {
        //... 子类重写实现
    }
};

//规范的
int main() {
    Library* pLib = new Application(); //pLib是个多态指针
    pLib->Run();

    delete pLib;
}
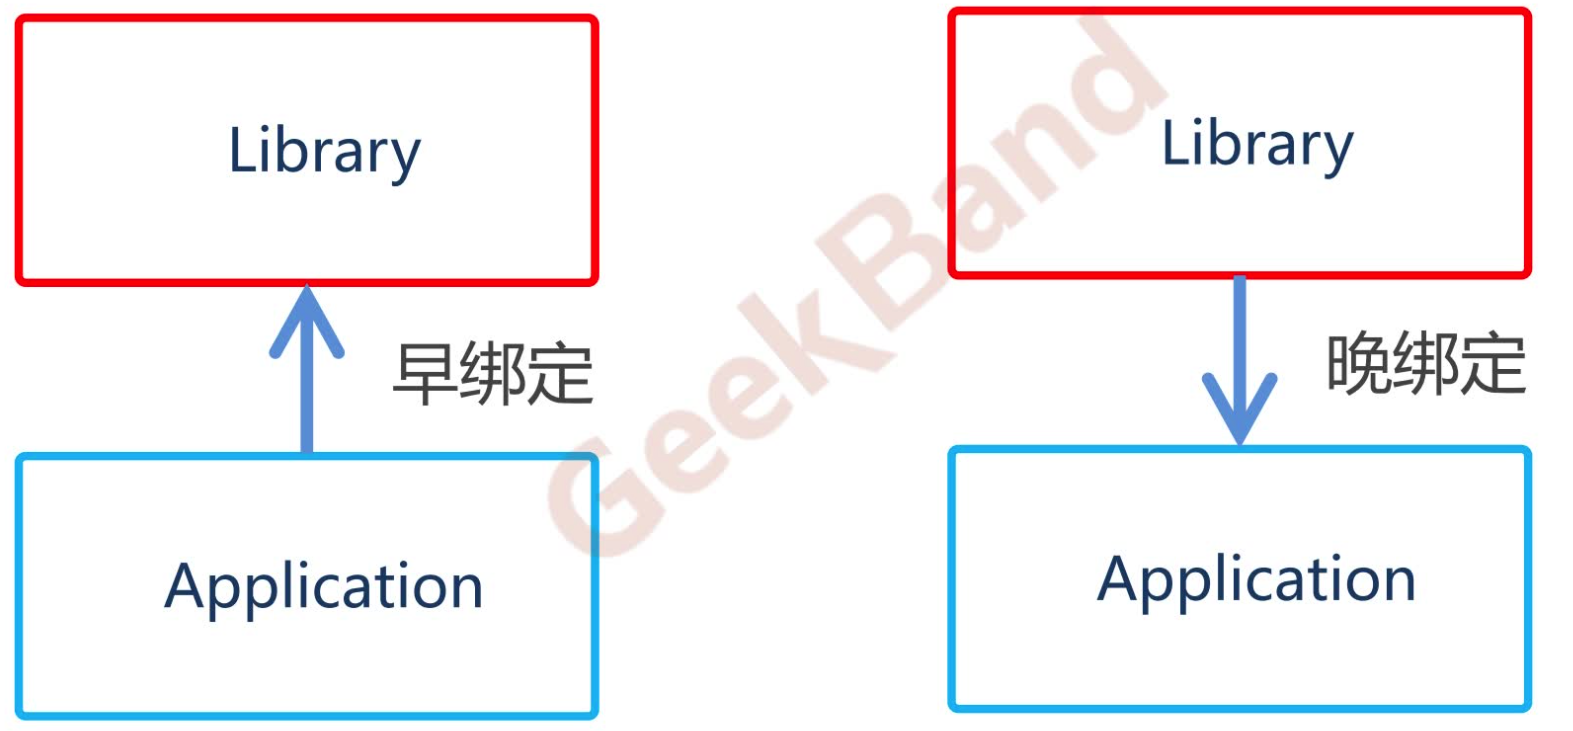
4.1.4 早绑定与晚绑定
【注:结构化软件设计的流程是一种早绑定的写法,Library写的比Application早,写得比较晚的调用实现比较早的程序就叫做早绑定;面向对象软件设计的流程是一种晚绑定的写法,Library反过来调用Application,实现的比较早的调用实现比较晚的就叫做晚绑定;】
4.1.5 模式定义
定义一个操作中的算法的骨架(稳定),而将一些步骤延迟(变化)到子类中。Template Method使得子类可以不改变(复用)一个算法的结构即可重定义(override 重写)该算法的某些特定步骤。
——《设计模式》GoF
【注:此处的“骨架”对应于上面的第二种写法中的Run,“延迟到子类”的意思就是定义虚函数让子类去实现或重写,就是支持子类来变化。
第二种写法中的模板方法就是Run,它是相对稳定的,但是它其中又包含了变化(Step2和Step4)。如果极端地讨论,全部是稳定的或者全部是变化的都不适合使用设计模式。
模式应用的核心就是分辨出变化和稳定。】
4.1.6 结构
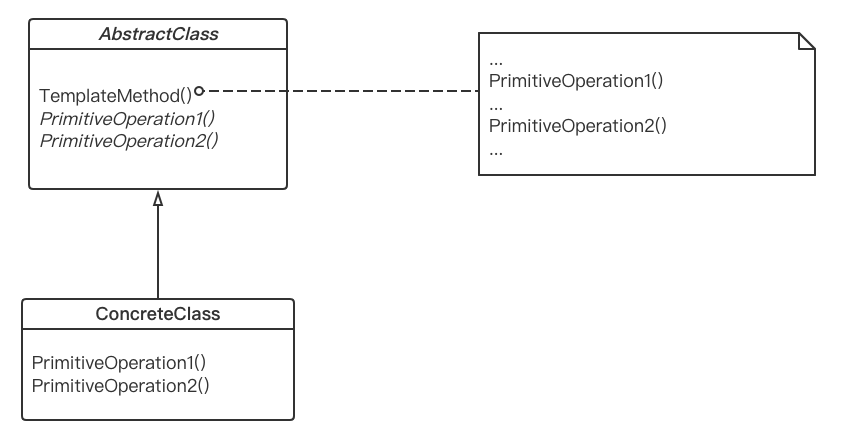
AbstractClass中的TemplateMethod()是稳定的,*PrimitiveOperationX()*是变化的。设计模式的学习重点就是区分开“稳定”和“变化”的部分。
对应到之前的代码实现:AbstractClass就是Library类;TemplateMethod()就是Run()方法;PrimitiveOperation1() 对应于 Step2()方法; PrimitiveOperation2() 对应于 Step4() 方法;ConcreteClass就是Application类;
4.1.7 要点总结
- Template Method模式是一种非常基础性的设计模式,在面向对象系统中有着大量的应用。它用最简洁的机制(虚函数的多态性)为很多应用程序框架提供了灵活的扩展点【注:扩展点就是继承+虚函数】,是代码复用方面的基本实现结构。
- 除了可以灵活应对子步骤的变化外,==“不要调用我,让我来调用你”==的反向控制结构 是Template Method的典型应用。
- 在具体实现方面,被Template Method 调用的虚方法可以具有实现,也可以没有任何实现(抽象方法、纯虚方法),但一般推荐将它们设置为 protected 方法。
4.2 Strategy 策略模式
4.2.1 动机(Motivation)
- 在软件构建过程中,某些对象使用的算法可能多种多样,经常改变,如果将这些算法都编码到对象中,将会使对象变得异常复杂;而且有时候支持不使用的算法也是一个性能负担。
- 如何在运行时根据需要透明地更改对象的算法?将算法与对象本身解耦,从而避免上述问题?
4.2.2 模式定义
定义一系列算法,把它们一个个封装起来,并且使它们可互相替换(变化)。该模式使得算法可独立于使用它的客户程序(稳定)而变化(扩展,子类化)。
——《设计模式》GoF
4.2.3 代码示例
//strategy1.cpp
enum TaxBase {
	CN_Tax,
	US_Tax,
	DE_Tax,
	FR_Tax       //更改
};

class SalesOrder{
    TaxBase tax;
public:
    double CalculateTax(){
        //...

        if (tax == CN_Tax){
            //CN***********
        }
        else if (tax == US_Tax){
            //US***********
        }
        else if (tax == DE_Tax){
            //DE***********
        }
		else if (tax == FR_Tax){  //更改
			//...
		}

        //....
     }

};
//说明:这种方式更改的时候违反了开放封闭原则
//strategy2.cpp
class TaxStrategy{
public:
    virtual double Calculate(const Context& context)=0;
    virtual ~TaxStrategy(){}
};

//规范的写法是每个类放在不同的文件中

class CNTax : public TaxStrategy{
public:
    virtual double Calculate(const Context& context){
        //***********
    }
};

class USTax : public TaxStrategy{
public:
    virtual double Calculate(const Context& context){
        //***********
    }
};

class DETax : public TaxStrategy{
public:
    virtual double Calculate(const Context& context){
        //***********
    }
};


//扩展:正常应该是在一个新的文件中写,此处只是为了方便演示
//*********************************
class FRTax : public TaxStrategy{
public:
	virtual double Calculate(const Context& context){
		//.........
	}
};


class SalesOrder{
private:
    TaxStrategy* strategy; //抽象类,必须放一个指针,而且具有多态性

public:
    SalesOrder(StrategyFactory* strategyFactory){
        this->strategy = strategyFactory->NewStrategy();
    }
    ~SalesOrder(){
        delete this->strategy;
    }

    public double CalculateTax(){
        //...
        Context context();

        double val =
            strategy->Calculate(context); //多态调用
        //...
    }

};

//说明:这种方式扩展的时候遵循了开放封闭原则
复用指的是编译后二进制意义的复用,而不是简单的代码片段的复用。SalesOrder是稳定的,各种XXTax 是变化的。
4.2.4 结构
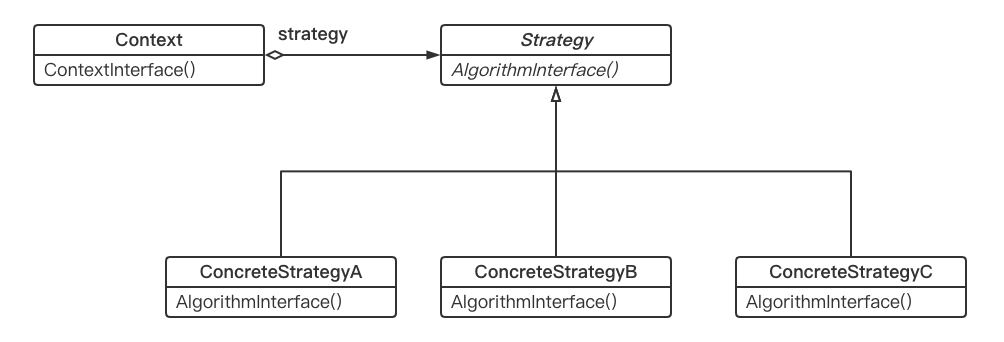
【注:Context和Strategy 是稳定的,ConcreteStrategyX 是变化的】
4.2.5 要点总结
- Strategy及其子类为组件提供了一系列可重用的算法,从而可以使得类型在运行时方便地根据需要在各个算法之间进行切换。
- Strategy模式提供了用条件判断语句以外的另一种选择,消除条件判断语句,就是在解耦合。含有许多条件判断语句的代码通常都需要Strategy模式。【注:绝对稳定不变的情况可以用if-else,如一周七天,而其他的可能变化条件判断的情况就要用Strategy模式。代码示例中的第一种写法的很多条件判断代码可能根本不会执行,但是却被迫装载到了CPU高级缓存中,占用了缓存位置,其他代码可能被挤出高级缓存,不得不装载到硬盘;而第二种写法则不会有这个问题,减轻了性能负担,但这不是Strategy模式的最大优势,Strategy模式的最大优势是用扩展应对变化。看到条件判断的情况,都要考虑能不能使用
Strategy模式。】 - 如果Strategy对象没有实例变量,那么各个上下文可以共享同一个Strategy对象,从而节省对象开销。【注:一般可以使用单例模式】
4.3 Observer 观察者模式
4.3.1 动机(Motivation)
- 在软件构建过程中,我们需要为某些对象建立一种“通知依赖关系”——一个对象(目标对象)的状态发生改变,所有的依赖对象(观察者对象)都将得到通知。如果这样的依赖关系过于紧密,将使软件不能很好地抵御变化。
- 使用面向对象技术,可以将这种依赖关系弱化,并形成一种稳定的依赖关系。从而实现软件体系结构的松耦合。
4.3.2 模式定义
定义对象间的一种一对多(变化)的依赖关系,以便当一个对象(Subject)的状态发生改变时,所有依赖于它的对象都得到通知并自动更新。
——《设计模式》GoF
4.3.3 代码示例
实现一个文件分割器
第一种方案:
//FileSplitter1.cpp
class FileSplitter
{
	string m_filePath;
	int m_fileNumber;
	ProgressBar* m_progressBar; //注:ProgressBar是实现细节,容易变化。 是个通知控件

public:
	FileSplitter(const string& filePath, int fileNumber, ProgressBar* progressBar) :
		m_filePath(filePath),
		m_fileNumber(fileNumber),
		m_progressBar(progressBar){

	}

	void split(){

		//1.读取大文件

		//2.分批次向小文件中写入
		for (int i = 0; i < m_fileNumber; i++){
			//...
			float progressValue = m_fileNumber;
			progressValue = (i + 1) / progressValue;
			m_progressBar->setValue(progressValue); //更新进度条
		}

	}
};
//MainForm1.cpp
class MainForm : public Form
{
	TextBox* txtFilePath;
	TextBox* txtFileNumber;
	ProgressBar* progressBar;

public:
	void Button1_Click(){

		string filePath = txtFilePath->getText();
		int number = atoi(txtFileNumber->getText().c_str());

		FileSplitter splitter(filePath, number, progressBar);

		splitter.split();

	}
};
存在的问题:违背了DIP原则,如果A依赖于B——编译时“依赖”,即A编译的时候B要存在。
重构使得遵循DIP原则:
//FileSplitter1.cpp
class IProgress{
public:
	virtual void DoProgress(float value)=0;
	virtual ~IProgress(){}
};

class FileSplitter
{
	string m_filePath;
	int m_fileNumber;
	//ProgressBar* m_progressBar; //注:ProgressBar是实现细节,容易变化。 是个通知控件
	IProgress* m_iprogress;
public:
	FileSplitter(const string& filePath, int fileNumber, IProgress* iprogress;) :
		m_filePath(filePath),
		m_fileNumber(fileNumber),
		m_iprogress(iprogress){

	}

	void split(){

		//1.读取大文件

		//2.分批次向小文件中写入
		for (int i = 0; i < m_fileNumber; i++){
			//...
			float progressValue = m_fileNumber;
			progressValue = (i + 1) / progressValue;
			m_iprogress->DoProgress(progressValue); //更新进度条
		}
	}
};
//MainForm2.cpp
class MainForm : public Form, public IProgress
{
	TextBox* txtFilePath;
	TextBox* txtFileNumber;
	ProgressBar* progressBar;

public:
	void Button1_Click(){
		string filePath = txtFilePath->getText();
		int number = atoi(txtFileNumber->getText().c_str());
		FileSplitter splitter(filePath, number, this);
		splitter.split();
	}

    virtual void DoProgress(float value) {
        progressBar->setValue(value);
    }
};
进一步的小优化:
//FileSplitter1.cpp
class IProgress{
public:
	virtual void DoProgress(float value)=0;
	virtual ~IProgress(){}
};

class FileSplitter
{
	string m_filePath;
	int m_fileNumber;
	//ProgressBar* m_progressBar; //注:ProgressBar是实现细节,容易变化。 是个通知控件
	IProgress* m_iprogress;
public:
	FileSplitter(const string& filePath, int fileNumber, IProgress* iprogress;) :
		m_filePath(filePath),
		m_fileNumber(fileNumber),
		m_iprogress(iprogress){

	}

	void split(){

		//1.读取大文件

		//2.分批次向小文件中写入
		for (int i = 0; i < m_fileNumber; i++){
			//...
			float progressValue = m_fileNumber;
			progressValue = (i + 1) / progressValue;
			onProgress(progressValue);
		}
	}
protected:
    virtual void onProgress(float value) {
        if (m_iprogress != nullptr) {
            m_iprogress->DoProgress(value);//更新进度条
        }
    }
};
目前的实现只能支持一个观察者,此处就是MainForm。
修改使得支持多个观察者:
//FileSplitter2.cpp
class IProgress{
public:
	virtual void DoProgress(float value)=0;
	virtual ~IProgress(){}
};


class FileSplitter
{
	string m_filePath;
	int m_fileNumber;

	List<IProgress*>  m_iprogressList; // 抽象通知机制,支持多个观察者

public:
	FileSplitter(const string& filePath, int fileNumber) :
		m_filePath(filePath),
		m_fileNumber(fileNumber){

	}


	void split(){

		//1.读取大文件

		//2.分批次向小文件中写入
		for (int i = 0; i < m_fileNumber; i++){
			//...

			float progressValue = m_fileNumber;
			progressValue = (i + 1) / progressValue;
			onProgress(progressValue);//发送通知
		}
	}

	void addIProgress(IProgress* iprogress){
		m_iprogressList.add(iprogress);
	}

	void removeIProgress(IProgress* iprogress){
		m_iprogressList.remove(iprogress);
	}


protected:
	virtual void onProgress(float value){
		List<IProgress*>::iterator itor = m_iprogressList.begin();
		while (itor != m_iprogressList.end() )
			(*itor)->DoProgress(value); //更新进度条
			itor++;
		}
	}
};
//MainForm2.cpp
class MainForm : public Form, public IProgress
{
	TextBox* txtFilePath;
	TextBox* txtFileNumber;

	ProgressBar* progressBar;

public:
	void Button1_Click(){

		string filePath = txtFilePath->getText();
		int number = atoi(txtFileNumber->getText().c_str());

		ConsoleNotifier cn;

		FileSplitter splitter(filePath, number);

		splitter.addIProgress(this); //订阅通知
		splitter.addIProgress(&cn); //订阅通知

		splitter.split();

		splitter.removeIProgress(this);

	}

	virtual void DoProgress(float value){
		progressBar->setValue(value);
	}
};

class ConsoleNotifier : public IProgress {
public:
	virtual void DoProgress(float value){
		cout << ".";
	}
};
4.3.3 结构
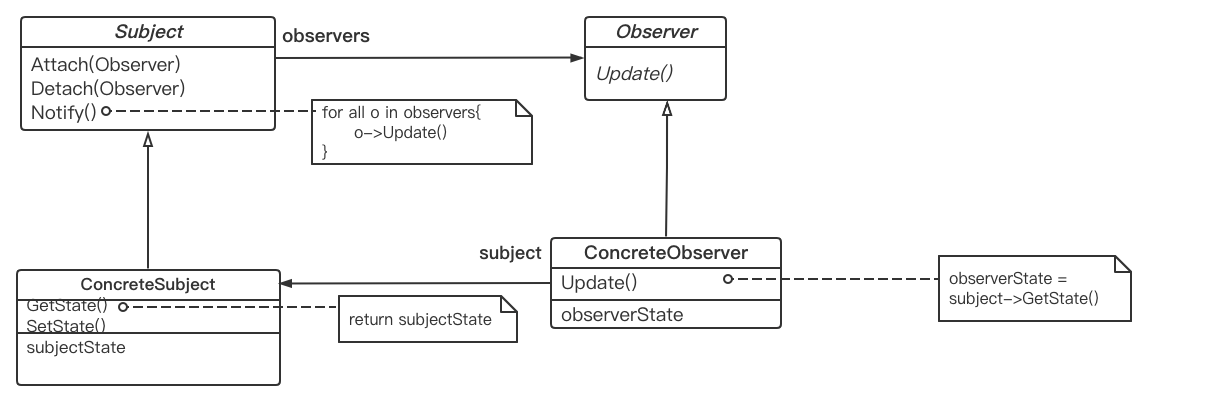
【注:Observer对应于IProgress,Update()对应于DoProgress(),Attach对应于addIProgress,Detach对应于removeIProgress,Notify对应于onProgress, GOF中建议将这三个方法提出来放到一个父类中,其他的Subject继承它,但是此处我们没有将它提出来,ConcreteSubject就是FileSplitter,ConcreteObserver对应于MainForm和ConsoleNotifier,具体的观察者。
稳定的:Subject、Observer
变化的:ConcreteSubject、ConcreteObserver
】
4.3.5 要点总结
- 使用面向对象的抽象,Observer模式使得我们可以独立地改变目标与观察者,从而使二者之间的依赖关系达致松耦合。
- 目标发送通知时,无需指定观察者,通知(可以携带通知信息作为参数)会自动传播。
- 观察者自己决定是否需要订阅通知,目标对象对此一无所知。
- Observer模式是基于事件的UI框架中非常常用的设计模式,也是MVC模式的一个重要组成部分。
5、"单一职责"模式
- 在软件组件的设计中,如果责任划分的不清晰,使用继承得到的结果往往是随着需求的变化,子类急剧膨胀,同时充斥着重复代码,这时候的关键是划清责任。
- 典型模式
- Decorator
- Bridge
5.1 Decorator 装饰模式
5.1.1 动机(Motivation)
- 在某些情况下我们可能会“过度地使用继承来扩展对象的功能”,由于继承为类型引入的静态特质,使得这种扩展方式缺乏灵活性;并且随着子类的增多(扩展功能的增多),各种子类的组合(扩展功能的组合)会导致更多子类的膨胀。
- 如何使“对象功能的扩展”能够根据需要来动态地实现?同时避免“扩展功能的增多”带来的子类膨胀问题?从而使得任何“功能扩展变化”所导致的影响将为最低?
5.1.2 模式定义
动态(组合)地给一个对象增加一些额外的职责。就增加功能而言,Decorator模式比生成子类(继承)更为灵活(消除重复代码 & 减少子类个数)。
——《设计模式》GoF
5.1.3 代码示例
//decorator1.cpp
//业务操作
class Stream{
public:
    virtual char Read(int number)=0;
    virtual void Seek(int position)=0;
    virtual void Write(char data)=0;

    virtual ~Stream(){}
};

//主体类
class FileStream: public Stream{
public:
    virtual char Read(int number){
        //读文件流
    }
    virtual void Seek(int position){
        //定位文件流
    }
    virtual void Write(char data){
        //写文件流
    }

};

class NetworkStream :public Stream{
public:
    virtual char Read(int number){
        //读网络流
    }
    virtual void Seek(int position){
        //定位网络流
    }
    virtual void Write(char data){
        //写网络流
    }

};

class MemoryStream :public Stream{
public:
    virtual char Read(int number){
        //读内存流
    }
    virtual void Seek(int position){
        //定位内存流
    }
    virtual void Write(char data){
        //写内存流
    }

};

//扩展操作
class CryptoFileStream :public FileStream{
public:
    virtual char Read(int number){

        //额外的加密操作...
        FileStream::Read(number);//读文件流  静态特质,确定了只能调FileStream

    }
    virtual void Seek(int position){
        //额外的加密操作...
        FileStream::Seek(position);//定位文件流
        //额外的加密操作...
    }
    virtual void Write(byte data){
        //额外的加密操作...
        FileStream::Write(data);//写文件流
        //额外的加密操作...
    }
};

class CryptoNetworkStream : :public NetworkStream{
public:
    virtual char Read(int number){

        //额外的加密操作...
        NetworkStream::Read(number);//读网络流 静态特质,确定了只能调NetworkStream
    }
    virtual void Seek(int position){
        //额外的加密操作...
        NetworkStream::Seek(position);//定位网络流
        //额外的加密操作...
    }
    virtual void Write(byte data){
        //额外的加密操作...
        NetworkStream::Write(data);//写网络流
        //额外的加密操作...
    }
};

class CryptoMemoryStream : public MemoryStream{
public:
    virtual char Read(int number){

        //额外的加密操作...
        MemoryStream::Read(number);//读内存流
    }
    virtual void Seek(int position){
        //额外的加密操作...
        MemoryStream::Seek(position);//定位内存流
        //额外的加密操作...
    }
    virtual void Write(byte data){
        //额外的加密操作...
        MemoryStream::Write(data);//写内存流
        //额外的加密操作...
    }
};

class BufferedFileStream : public FileStream{
    //...
};

class BufferedNetworkStream : public NetworkStream{
    //...
};

class BufferedMemoryStream : public MemoryStream{
    //...
}


class CryptoBufferedFileStream :public FileStream{
public:
    virtual char Read(int number){

        //额外的加密操作...
        //额外的缓冲操作...
        FileStream::Read(number);//读文件流
    }
    virtual void Seek(int position){
        //额外的加密操作...
        //额外的缓冲操作...
        FileStream::Seek(position);//定位文件流
        //额外的加密操作...
        //额外的缓冲操作...
    }
    virtual void Write(byte data){
        //额外的加密操作...
        //额外的缓冲操作...
        FileStream::Write(data);//写文件流
        //额外的加密操作...
        //额外的缓冲操作...
    }
};


void Process(){
    //编译时装配
    CryptoFileStream *fs1 = new CryptoFileStream();
    BufferedFileStream *fs2 = new BufferedFileStream();
    CryptoBufferedFileStream *fs3 =new CryptoBufferedFileStream();
}
涉及到的结构:

类的规模为: 1 + n + n × m ! / 2 1 + n + n \times m! \ / \ 2 1+n+n×m! / 2
这份代码存在冗余,加密操作都是相同的,代码大量的重复。
重构:
//decorator2.cpp
//业务操作
class Stream{

public:
    virtual char Read(int number)=0;
    virtual void Seek(int position)=0;
    virtual void Write(char data)=0;

    virtual ~Stream(){}
};

//主体类
class FileStream: public Stream{
public:
    virtual char Read(int number){
        //读文件流
    }
    virtual void Seek(int position){
        //定位文件流
    }
    virtual void Write(char data){
        //写文件流
    }

};

class NetworkStream :public Stream{
public:
    virtual char Read(int number){
        //读网络流
    }
    virtual void Seek(int position){
        //定位网络流
    }
    virtual void Write(char data){
        //写网络流
    }

};

class MemoryStream :public Stream{
public:
    virtual char Read(int number){
        //读内存流
    }
    virtual void Seek(int position){
        //定位内存流
    }
    virtual void Write(char data){
        //写内存流
    }

};

//扩展操作,继承自Stream,是为了符合虚函数的接口规范

class CryptoStream: public Stream {

    Stream* stream;//...new FileStream() / new NetworkStream() /...

public:
    CryptoStream(Stream* stm) : stream(stm){

    }

    virtual char Read(int number){

        //额外的加密操作...
        stream->Read(number);//读文件流   动态特质,在运行时确定stream的具体类型
    }
    virtual void Seek(int position){
        //额外的加密操作...
        stream::Seek(position);//定位文件流
        //额外的加密操作...
    }
    virtual void Write(byte data){
        //额外的加密操作...
        stream::Write(data);//写文件流
        //额外的加密操作...
    }
};


class BufferedStream : public Stream{

    Stream* stream;//...

public:
    BufferedStream(Stream* stm) : stream(stm){

    }
    //...
};


void Process(){
    //运行时装配
    FileStream* s1=new FileStream();
    CryptoStream* s2=new CryptoStream(s1);
    BufferedStream* s3=new BufferedStream(s1);
    BufferedStream* s4=new BufferedStream(s2);
}
修改后的优点:将“继承”改成“对象组合",使用多态,在运行时确定具体类型,“编译时装配"变成了"运行时装配”。
将相同字段提到一个新的基类DecoratorStream 中:
//decorator3.cpp
//业务操作
class Stream{
public:
    virtual char Read(int number)=0;
    virtual void Seek(int position)=0;
    virtual void Write(char data)=0;

    virtual ~Stream(){}
};

//主体类
class FileStream: public Stream{
public:
    virtual char Read(int number){
        //读文件流
    }
    virtual void Seek(int position){
        //定位文件流
    }
    virtual void Write(char data){
        //写文件流
    }

};

class NetworkStream :public Stream{
public:
    virtual char Read(int number){
        //读网络流
    }
    virtual void Seek(int position){
        //定位网络流
    }
    virtual void Write(char data){
        //写网络流
    }

};

class MemoryStream :public Stream{
public:
    virtual char Read(int number){
        //读内存流
    }
    virtual void Seek(int position){
        //定位内存流
    }
    virtual void Write(char data){
        //写内存流
    }

};

//扩展操作
class DecoratorStream: public Stream{
protected:
    Stream* stream;//...

    DecoratorStream(Stream* stm) : stream(stm){

    }
};

class CryptoStream: public DecoratorStream {
public:
    CryptoStream(Stream* stm): DecoratorStream(stm) {

    }

    virtual char Read(int number){

        //额外的加密操作...
        stream->Read(number);//读文件流
    }

    virtual void Seek(int position){
        //额外的加密操作...
        stream::Seek(position);//定位文件流
        //额外的加密操作...
    }

    virtual void Write(byte data){
        //额外的加密操作...
        stream::Write(data);//写文件流
        //额外的加密操作...
    }
};


class BufferedStream : public DecoratorStream{
public:
    BufferedStream(Stream* stm):DecoratorStream(stm){

    }
    //...
};


void Process(){
    //运行时装配
    FileStream* s1=new FileStream();

    CryptoStream* s2=new CryptoStream(s1);

    BufferedStream* s3=new BufferedStream(s1);

    BufferedStream* s4=new BufferedStream(s2);
}
此时类关系:
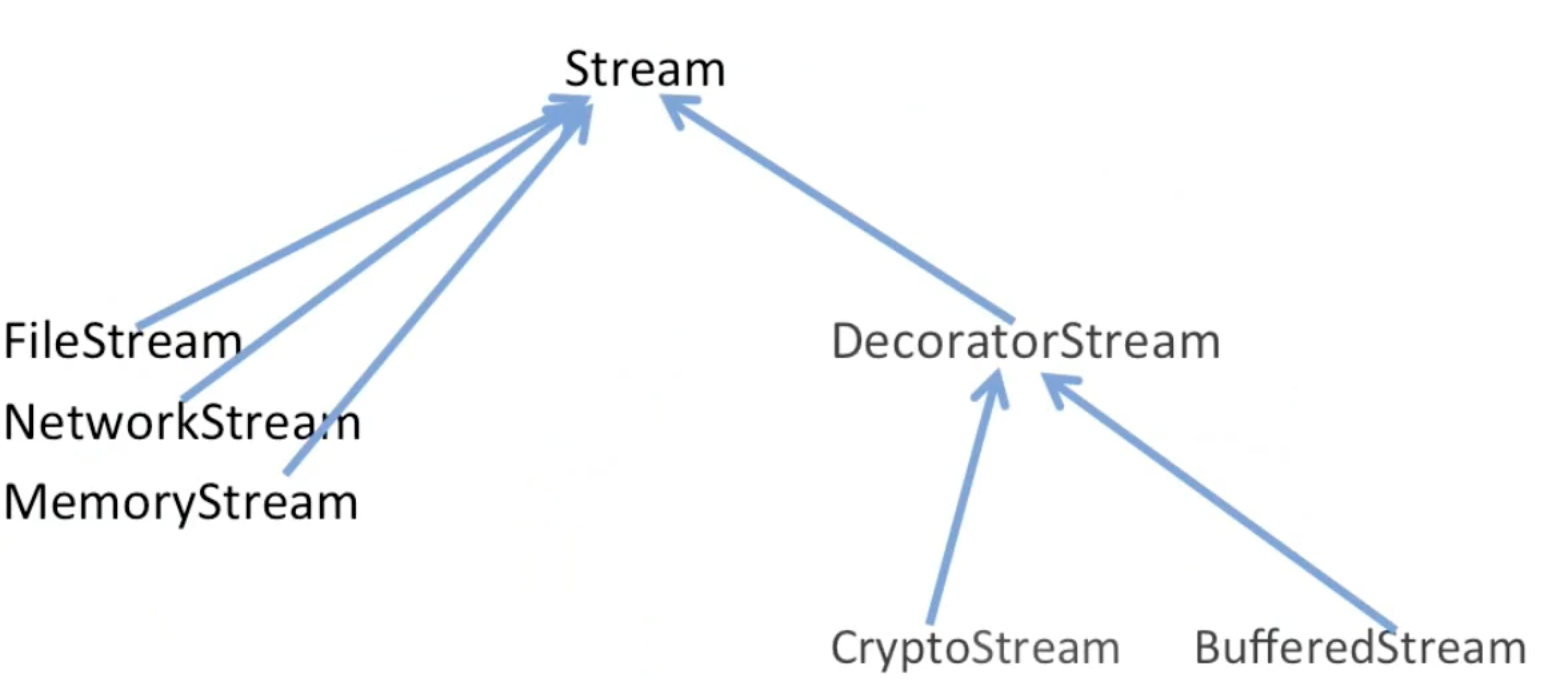
类的规模: 1 + n + 1 + m 1 + n + 1 + m 1+n+1+m
5.1.4 结构(Structure)
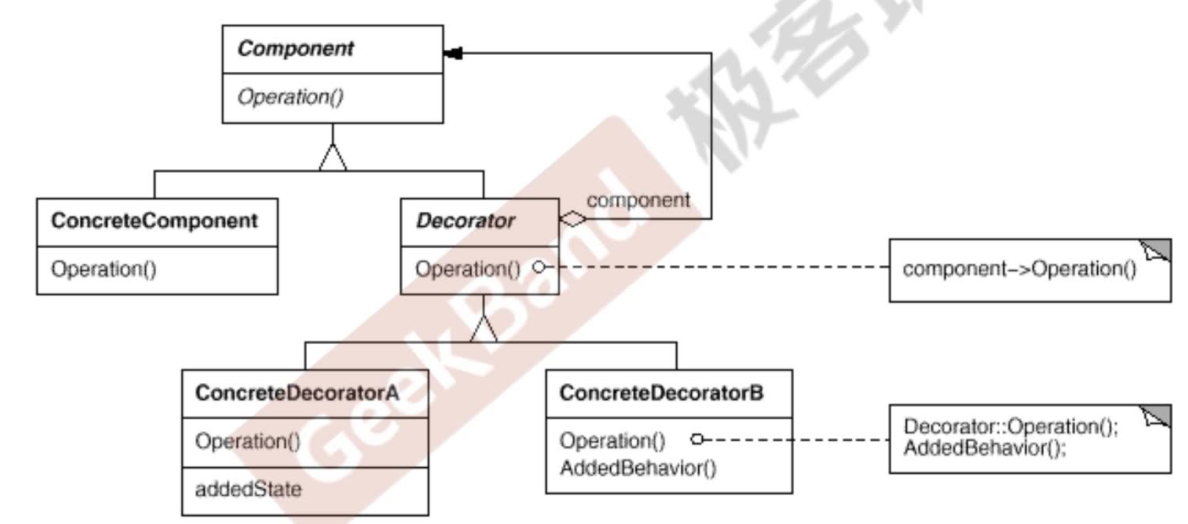
【注:】
Component->Stream(稳定)Decorator->DecoratorStream(稳定)ConcreteComponent->FileStream/NetworkStream/… (变化)ConcreteDecoratorX->CryptoStream/BufferedStream(变化)
5.1.5 要点总结
- 通过采用组合而非继承的手法,Decorator模式实现了在运行时动态扩展对象功能的能力,而且可以根据需要扩展多个功能。避免了使用继承带来的“灵活性差”和“多子类衍生问题”。
- Decorator类在接口上表现为is-a Component的继承关系,即Decorator类继承了Component类所具有的接口。但在实现上又表现为has-a Component的组合关系,即Decorator类又使用了另外一个Component类。【注:
DecoratorStream类继承自Stream,同时又有一个Stream类型的字段,一般这种既继承又组合的方式通常都是装饰模式。例子中的继承是为了完善接口的规范,组合是为了支持实现具体的类】 - Decorator模式的目的并非解决“多子类衍生的多继承”问题,Decorator模式应用的要点在于解决“主体类在多个方向上的扩展功能”——是为“装饰”的含义。
5.2 Bridge 桥模式
5.2.1 动机(Motivation)
- 由于某些类型的固有的实现逻辑,使得它们具有两个变化的维度,乃至多个纬度的变化。
- 如何应对这种“多维度的变化”?如何利用面向对象技术来使得类型可以轻松地沿着两个乃至多个方向变化,而不引入额外的复杂度?
5.2.2 代码示例
//bridge1.cpp
class Messager{
public:
    virtual void Login(string username, string password)=0;
    virtual void SendMessage(string message)=0;
    virtual void SendPicture(Image image)=0;

    virtual void PlaySound()=0;
    virtual void DrawShape()=0;
    virtual void WriteText()=0;
    virtual void Connect()=0;

    virtual ~Messager(){}
};


//平台实现 n
//类的数目:1 + n + m * n
class PCMessagerBase : public Messager{
public:
    virtual void PlaySound(){
        //**********
    }

    virtual void DrawShape(){
        //**********
    }

    virtual void WriteText(){
        //**********
    }

    virtual void Connect(){
        //**********
    }
};

class MobileMessagerBase : public Messager{
public:
    virtual void PlaySound(){
        //==========
    }

    virtual void DrawShape(){
        //==========
    }

    virtual void WriteText(){
        //==========
    }

    virtual void Connect(){
        //==========
    }
};


//业务抽象
class PCMessagerLite : public PCMessagerBase {
public:
    virtual void Login(string username, string password){

        PCMessagerBase::Connect();
        //........
    }
    virtual void SendMessage(string message){

        PCMessagerBase::WriteText();
        //........
    }
    virtual void SendPicture(Image image){

        PCMessagerBase::DrawShape();
        //........
    }
};


class PCMessagerPerfect : public PCMessagerBase {
public:

    virtual void Login(string username, string password){

        PCMessagerBase::PlaySound();
        //********
        PCMessagerBase::Connect();
        //........
    }
    virtual void SendMessage(string message){

        PCMessagerBase::PlaySound();
        //********
        PCMessagerBase::WriteText();
        //........
    }
    virtual void SendPicture(Image image){

        PCMessagerBase::PlaySound();
        //********
        PCMessagerBase::DrawShape();
        //........
    }
};


class MobileMessagerLite : public MobileMessagerBase {
public:

    virtual void Login(string username, string password){

        MobileMessagerBase::Connect();
        //........
    }

    virtual void SendMessage(string message){

        MobileMessagerBase::WriteText();
        //........
    }

    virtual void SendPicture(Image image){

        MobileMessagerBase::DrawShape();
        //........
    }
};


class MobileMessagerPerfect : public MobileMessagerBase {
public:

    virtual void Login(string username, string password){

        MobileMessagerBase::PlaySound();
        //********
        MobileMessagerBase::Connect();
        //........
    }
    virtual void SendMessage(string message){

        MobileMessagerBase::PlaySound();
        //********
        MobileMessagerBase::WriteText();
        //........
    }
    virtual void SendPicture(Image image){

        MobileMessagerBase::PlaySound();
        //********
        MobileMessagerBase::DrawShape();
        //........
    }
};

void Process(){
    //编译时装配
    Messager *m = new MobileMessagerPerfect();
}
基于装饰模式的经验,将业务的继承修改为组合,进行如下的修改:
class Messager{
public:
    //存在着多个变化的维度:平台实现 + 业务抽象
    virtual void Login(string username, string password)=0;
    virtual void SendMessage(string message)=0;
    virtual void SendPicture(Image image)=0;

    virtual void PlaySound()=0;
    virtual void DrawShape()=0;
    virtual void WriteText()=0;
    virtual void Connect()=0;

    virtual ~Messager(){}
};

//平台实现 n
//类的数目:1 + n + m * n
//主要到这个类里只实现了Messager这个类的部分接口
class PCMessagerBase : public Messager{
public:
    virtual void PlaySound(){
        //**********
    }

    virtual void DrawShape(){
        //**********
    }

    virtual void WriteText(){
        //**********
    }

    virtual void Connect(){
        //**********
    }
};

class MobileMessagerBase : public Messager{
public:
    virtual void PlaySound(){
        //==========
    }

    virtual void DrawShape(){
        //==========
    }

    virtual void WriteText(){
        //==========
    }

    virtual void Connect(){
        //==========
    }
};


//业务抽象
//主要到这个类里只需要实现了Messager这个类的部分接口,如果继承Messager是不合适的
class MessagerLite {
    Messager* messager; //指针才具有多态性
public:
    virtual void Login(string username, string password){

        messager->Connect();
        //........
    }
    virtual void SendMessage(string message){

        messager->WriteText();
        //........
    }
    virtual void SendPicture(Image image){

        messager->DrawShape();
        //........
    }
};


class MessagerPerfect {
    Messager* messager;
public:

    virtual void Login(string username, string password){
        messager->PlaySound();
        //********
        messager->Connect();
        //........
    }

    virtual void SendMessage(string message){

        messager->PlaySound();
        //********
        messager->WriteText();
        //........
    }

    virtual void SendPicture(Image image){

        messager->PlaySound();
        //********
        messager->DrawShape();
        //........
    }
};

void Process(){
    //编译时装配
    Messager *m = new MobileMessagerPerfect();
}
因为PCMessageBase类和MessagerLite、MessagerPerfect类都各自只实现了Messager的部分接口,说明Messager中的两部分的接口不应该放到一起,应该进行拆分:
//bridge2.cpp
class Messager{
protected:
     MessagerImp* messagerImp;//...
public:
    Messager(MessagerImpl* mimp) : messagerImpl(mimp) { }
    virtual void Login(string username, string password)=0;
    virtual void SendMessage(string message)=0;
    virtual void SendPicture(Image image)=0;

    virtual ~Messager(){}
};

class MessagerImp{
public:
    virtual void PlaySound()=0;
    virtual void DrawShape()=0;
    virtual void WriteText()=0;
    virtual void Connect()=0;

    virtual ~MessagerImp(){}
};


//平台实现 n
class PCMessagerImp : public MessagerImp{
public:

    virtual void PlaySound(){
        //**********
    }
    virtual void DrawShape(){
        //**********
    }
    virtual void WriteText(){
        //**********
    }
    virtual void Connect(){
        //**********
    }
};

class MobileMessagerImp : public MessagerImp{
public:

    virtual void PlaySound(){
        //==========
    }
    virtual void DrawShape(){
        //==========
    }
    virtual void WriteText(){
        //==========
    }
    virtual void Connect(){
        //==========
    }
};

//业务抽象 m
//类的数目:1+n+m
class MessagerLite : public Messager {
public:
    MessagerLite(MessagerImp* mimp) : Messager(mimp) {

    }
    virtual void Login(string username, string password){

        messagerImp->Connect(); //messagerImpl字段在父类中声明了
        //........
    }
    virtual void SendMessage(string message){

        messagerImp->WriteText();
        //........
    }
    virtual void SendPicture(Image image){

        messagerImp->DrawShape();
        //........
    }
};


class MessagerPerfect  :public Messager {
public:
    MessagerPerfect(MessagerImp* mimp) : Messager(mimp) {

    }
    virtual void Login(string username, string password){

        messagerImp->PlaySound();
        //********
        messagerImp->Connect();
        //........
    }
    virtual void SendMessage(string message){

        messagerImp->PlaySound();
        //********
        messagerImp->WriteText();
        //........
    }
    virtual void SendPicture(Image image){

        messagerImp->PlaySound();
        //********
        messagerImp->DrawShape();
        //........
    }
};

void Process(){
    //运行时装配
    MessagerImp* mImp = new PCMessagerImp();
    Messager *m = new Messager(mImp);
}
5.2.3 模式定义
将抽象部分(业务功能)与实现部分(平台实现)分离,使它们都可以独立地变化。——《设计模式》GoF
5.2.4 结构(Structure)
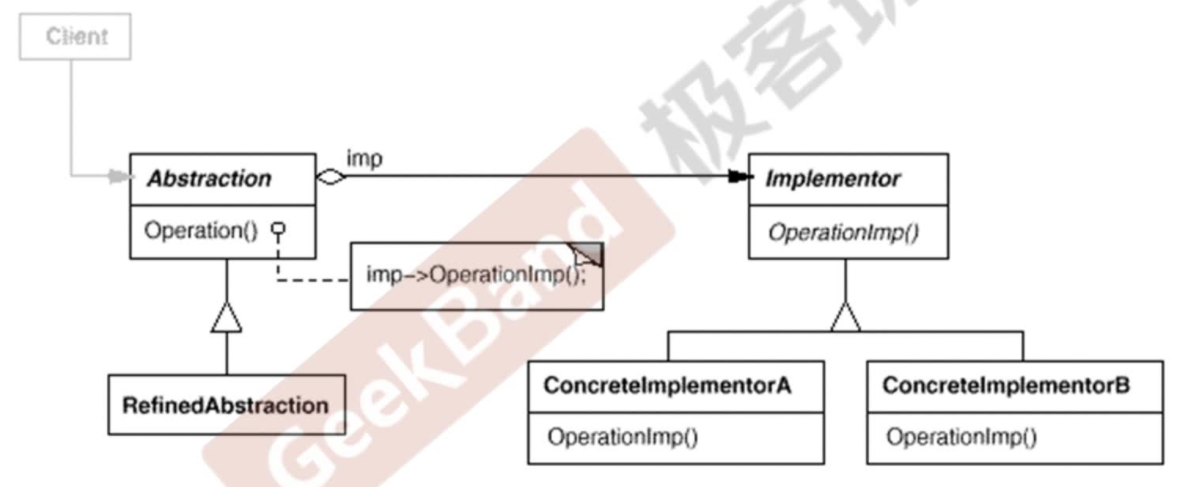
-
Abstraction->Messgaer(稳定) 【imp对应到代码中就是Messager中有一个MessagerImpl类型的指针变量】 -
Implementor->MessagerImpl(稳定) -
RefinedAbstraction->MessagerLite/MessagerPerfect(变化) -
ConcreteImplementorX->XXMessagerImpl(变化)
两个方向独立变化,而不是杂糅在一起。
5.2.5 要点总结
- Bridge模式使用“对象间的组合关系”解耦了抽象和实现之间固有的绑定关系,使得抽象和实现可以沿着各自的维度来变化。所谓抽象和实现沿着各自纬度的变化,即“子类化”它们。
- Bridge模式有时候类似于多继承方案,但是多继承方案往往违背单一职责原则(即一个类只有一个变化的原因),复用性比较差。Bridge模式是比多继承方案更好的解决方法。
- Bridge模式的应用一般在“两个非常强的变化维度”,有时一个类也有多于两个的变化维度,这时可以使用Bridge的扩展模式。
6、"对象创建"模式
- 通过“对象创建”模式绕开
new,来避免对象创建(new)过程中所导致的紧耦合(依赖具体类),从而支持对象创建的稳定。它是接口抽象之后的第一步工作。 - 典型模式
- Factory Method
- Abstract Factory
- Prototype
- Builder
6.1 Factory Method 工厂方法
6.1.1 动机(Motivation)
- 在软件系统中,经常面临着创建对象的工作;由于需求的变化,需要创建的对象的具体类型经常变化。
- 如何应对这种变化?如何绕过常规的对象创建方法(new),提供一种“封装机制”来避免客户程序和这种“具体对象创建工作”的紧耦合?
6.1.2 代码示例
class BinarySplitter
{
public:
    void split() {
        //...
    }
};
//MainForm.cpp
class MainForm : public Form
{
	TextBox* txtFilePath;
	TextBox* txtFileNumber;
	ProgressBar* progressBar;

public:
	void Button1_Click(){
		string filePath = txtFilePath->getText();
		int number = atoi(txtFileNumber->getText().c_str());
		FileSplitter splitter(filePath, number, progressBar);
		splitter.split();
	}
};
未来可能的需求:文本分割,图片分割,那就要新增:
class ISplitter {
public:
    virtual void split() = 0;
    virtual ~ISplitter() { }
}

class BinarySplitter : public ISplitter
{
    virtual void split() {
        //...
    }
};

//新增
class TxtSplitter : public ISplitter
{
    virtual void split() {
        //...
    }
};

class PictureSplitter : public ISplitter
{
    virtual void split() {
        //...
    }
};

class VideoSplitter : public ISplitter
{
    virtual void split() {
        //...
    }
};
面向接口编程最简单的表现就是变量是接口类型,
//MainForm1.cpp
class MainForm : public Form
{
	TextBox* txtFilePath;
	TextBox* txtFileNumber;

public:
	void Button1_Click(){
		string filePath = txtFilePath->getText();
		int number = atoi(txtFileNumber->getText().c_str());
        //ISplitter* splitter 是抽象依赖
        //new BinarySplitter(filePath, number) 是细节依赖,编译时细节依赖, 违背了依赖倒置原则,如何解决呢?
		ISplitter* splitter = new BinarySplitter(filePath, number); //依赖具体类
		splitter.split();
	}
};
”对象创建“ 模式就是要绕开这个new 带来的问题,这是面向接口编程必然要面临的需求,上述代码中的第13行等号左右两边都变成依赖抽象。可以考虑通过一个方法返回对象。
//SplitterFactory1.cpp
//抽象类
class ISplitter {
public:
    virtual void split() = 0;
    virtual ~ISplitter() { }
}

//工厂基类
class SplitterFactory {
public:
    ISplitter* createSplitter() {
        return new BinaryFiltter();
    }
};
//MainForm2.cpp
class MainForm : public Form
{
	TextBox* txtFilePath;
	TextBox* txtFileNumber;

public:
	void Button1_Click(){
		string filePath = txtFilePath->getText();
		int number = atoi(txtFileNumber->getText().c_str());
        SplitterFactory factory;
		ISplitter* splitter = factory.createSplitter();
		splitter.split();
	}
};
因为SplitterFactory编译时依赖了BinarySplitter,而MainForm编译时依赖了SplitterFactory,所以相当于MainForm编译时依赖了BinarySplitter,所以还是没有解决问题。那应该怎么办呢?
虚函数是运行时依赖,所以修改SplitterFactory.cpp:
//SplitterFactory.cpp
class SplitterFactory {
public:
    virtual ISplitter* createSplitter() = 0;
    virtual ~SplitterFactory() { }
};

class ISplitter {
public:
    virtual void split() = 0;
    virtual ~ISplitter() { }
}
//MainForm3.cpp
class MainForm : public Form
{
	TextBox* txtFilePath;
	TextBox* txtFileNumber;

public:
	void Button1_Click(){
		string filePath = txtFilePath->getText();
		int number = atoi(txtFileNumber->getText().c_str());

        SplitterFactory* factory;
		ISplitter* splitter = factory->createSplitter();  //多态

		splitter.split();
	}
};
未来的对象实际是什么类型依赖于factory,那么factory的实际类型是什么呢:
//FileSplitter2.cpp
//具体类
class BinarySplitter : public ISplitter
{
    virtual void split() {
        //...
    }
};

class TxtSplitter : public ISplitter
{
    virtual void split() {
        //...
    }
};

class PictureSplitter : public ISplitter
{
    virtual void split() {
        //...
    }
};

class VideoSplitter : public ISplitter
{
    virtual void split() {
        //...
    }
};

//具体工厂
class BinarySplitterFactory : public SplitterFactory {
public:
    virtual ISplitter* createSplitter() {
        return new BinarySplitter();
    }
};

class TxtSplitterFactory : public SplitterFactory {
public:
    virtual ISplitter* createSplitter() {
        return new TxtSplitter();
    }
};

class PictureSplitterFactory : public SplitterFactory {
public:
    virtual ISplitter* createSplitter() {
        return new PictureSplitter();
    }
};

class VideoSplitterFactory : public SplitterFactory {
public:
    virtual ISplitter* createSplitter() {
        return new VideoSplitter();
    }
};
//MainForm3.cpp
class MainForm : public Form
{
	SplitterFactory* factory; //工厂
public:
    MainForm(SplitterFactory* factory) {
        this->factory = factory;
    }

	void Button1_Click(){
		ISplitter* splitter = factory->createSplitter();  //多态new
		splitter.split();
	}
};
可以发现,通过这种改善,MainForm 只依赖 SplitterFactory 和 ISplitter 这两个抽象,而没有依赖具体类。不是消灭变化,而是将变化赶到一个局部的地方。
6.1.3 模式定义
定义一个用于创建对象的接口,让子类决定实例化哪一个类。Factory Method使得一个类的实例化延迟(目的:解耦,手段:虚函数)到子类。——《设计模式》GoF
注:"解耦"是解new和后面具体的类的耦合。
6.1.4 结构

注:
Product->ISplitter(稳定)ConcreteProduct->XXSplitter(稳定)Creator->SplitterFactory(变化)ConcreteCreator->XXSplitterFactory(变化)
6.1.5 要点总结
- Factory Method模式用于隔离类对象的使用者和具体类型之间的耦合关系。面对一个经常变化的具体类型,紧耦合关系(new)会导致软件的脆弱。
- Factory Method模式通过面向对象【注:多态】的手法,将所要创建的具体对象工作延迟到子类,从而实现一种扩展(而非更改)的策略,较好地解决了这种紧耦合关系。【注:“延迟” 对应到代码中就是
MainForm类中,一开始只要有需求变化,就要修改对应的代码,而改善后MainForm中不会因为需求的变化而进行更改,只需要加子类和子类的工厂即可,然后将具体的类传给MainForm。】 - Factory Method模式解决“单个对象”的需求变化。缺点在于要求创建方法/参数相同。
6.2 Abstract Factory 抽象工厂
6.2.1 动机(Motivation)
- 在软件系统中,经常面临着“一系列相互依赖的对象”的创建工作;同时,由于需求的变化,往往存在更多系列对象的创建工作。
- 如何应对这种变化?如何绕过常规的对象创建方法(new),提供一种“封装机制”来避免客户程序和这种“多系列具体对象创建工作”的紧耦合?
6.2.2 代码示例
//EmployeeDAO1.cpp
class EmployeeDAO {
public:
    vector<EmployeeDO> GetEmployees() {
        SqlConnection* connection = new SqlConnection();
        connection->ConnectionString = "...";

        SqlCommand* command = new SqlCommand();
        command->CommandText = "...";
        command->SetConnection(connection);

        SqlDataReader* reader = command->ExecuteReader();
        while (reader->Read()) {

        }
    }
};
//缺点: 类与SqlServer绑定了
修改为面向接口编程,如果使用工厂方法:
//EmployeeDAO2.cpp
//数据库访问有关的基类
class IDBConnection {};
class IDBConnectionFactory {
public:
    virtual IDBConnection* createDBConnection() = 0;
};

class IDBCommand {};
class IDBCommandFactory {
public:
    virtual IDBCommand* createDBCommand() = 0;
};

class IDataReader {};
class IDataReaderFactory {
public:
    virtual IDataReader* createDataReader() = 0;
};

//支持SQL Server
class SqlConnection: public IDBConnection {};
class SqlConnectionFactory: public IDBConnectionFactory {};

class SqlCommand: public IDBCommand {};
class SqlCommandFactory: public IDBCommandFactory {};

class SqlDataReader: public IDataReader {};
class SqlDataReaderFactory: public IDataReaderFactory {};

//支持 Oracle
class OracleConnection: public IDBConnection {};
class OracleConnectionFactory: public IDBConnectionFactory {};

class OracleCommand: public IDBCommand {};
class OracleCommandFactory: public IDBCommandFactory {};

class OracleDataReader: public IDataReader {};
class OracleDataReadeFactory: public IDataReaderFactory {};

class EmployeeDAO {
    //在构造器中初始化 这三个必须是一个系列的,如果是sql的就是sql系列的
    IDBConnectionFactory* dbConnectionFactory;
    IDBCommandFactory* dbCommandFactory;
    IDataReaderFactory* dataReaderFactory;
public:
    vector<EmployeeDO> GetEmployees() {
        IDBConnection* connection = dbConnectionFactory->createDBConnection();
        connection->ConnectionString("...");

        IDBCommand* command = dbCommandFactory->createDBCommand();
        command->CommandText("...");
        command->SetConnection(connection); //关联性

        IDataReader* reader = command->ExecuteReader();
        while (reader->Read()) {

        }
    }
};
三个工厂指针变量必须是一个系列的,因为 command 和 connection 是有关联性的。如果传了一个 Sql 的 connection,而传了一个 Oracle 的 Command 就乱套了。所以这时候,使用抽象工厂:
//EmployeeDAO3.cpp
//数据库访问有关的基类
class IDBConnection {};
class IDBCommand {};
class IDataReader {};

class IDBFactory {
public:
    //因为三个有相关性,所以考虑把它们放到一个工厂里
    virtual IDBConnection* createDBConnection() = 0;
    virtual IDBCommand* createDBCommand() = 0;
    virtual IDataReader* createDataReader() = 0;
};

//支持SQL Server
class SqlConnection: public IDBConnection {};
class SqlCommand: public IDBCommand {};
class SqlDataReader: public IDataReader {};

class SqlDBFactory: public IDBFactory {
    virtual IDBConnection* createDBConnection() {}
    virtual IDBCommand* createDBCommand() {}
    virtual IDataReader* createDataReader() {}
};

//支持 Oracle
class OracleConnection: public IDBConnection {};
class OracleCommand: public IDBCommand {};
class OracleDataReader: public IDataReader {};

class OracleDBFactory: public IDBFactory {
    virtual IDBConnection* createDBConnection() {}
    virtual IDBCommand* createDBCommand() {}
    virtual IDataReader* createDataReader() {}
};

class EmployeeDAO {
    IDBFactory* dbFactory;
public:
    vector<EmployeeDO> GetEmployees() {
        IDBConnection* connection = dbFactory->createDBConnection();
        connection->ConnectionString("...");

        IDBCommand* command = dbFactory->createDBCommand();
        command->CommandText("...");
        command->SetConnection(connection); //关联性

        IDataReader* reader = command->ExecuteReader(); //关联性
        while (reader->Read()) {

        }
    }
};
6.2.3 模式定义
提供一个接口,让该接口负责创建一系列“相关或者相互依赖的对象”,无需指定它们具体的类。——《设计模式》GoF
6.2.4 结构

注:
AbstractFactory->IDBFactory(稳定)AbstractProductA->IDBConnection(稳定)AbstractProductB->IDBCommand/IDataReader(稳定)ConcreteFactoryX->SqlDBFactory/OracleDBFactory(变化)
6.2.5 要点总结
- 如果没有应对“多系列对象构建”的需求变化,则没有必要使用Abstract Factory模式,这时候使用简单的工厂完全可以。
- “系列对象”指的是在某一特定系列下的对象之间有相互依赖、或作用的关系。不同系列的对象之间不能相互依赖。
- Abstract Factory模式主要在于应对“新系列”的需求变动。其缺点在于难以应对“新对象”的需求变动。
6.3 Prototype 原型模式
6.3.1 动机(Motivation)
- 在软件系统中,经常面临着“某些结构复杂的对象”的创建工作;由于需求的变化,这些对象经常面临着剧烈的变化,但是它们却拥有比较稳定一致的接口。
- 如何应对这种变化?如何向“客户程序(使用这些对象的程序)” 隔离出 “这些易变对象” ,从而使得 “依赖这些易变对象的客户程序” 不随着需求改变而改变?
6.3.2 代码示例
工厂方法中的ISplitterFactory.cpp:
//ISplitterFactory.cpp
//抽象类
class ISplitter {
public:
    virtual void split() = 0;
    virtual ~ISplitter() { }
};

//工厂基类
class SplitterFactory {
public:
    ISplitter* createSplitter() {
        return new BinaryFiltter();
    }

    virtual ~SplitterFactory() {}
};
原型模式将这两个类进行了合并:
//ISplitterFactory.cpp
class ISplitter {
public:
    virtual void split() = 0;
    virtual ISplitter* clone() = 0; //通过克隆自己来创建指针
    virtual ~ISplitter() { }
};
//FileSplitter.cpp
//具体类
class BinarySplitter : public ISplitter
{
     virtual ISplitter* clone() {
         return new BinarySplitter(*this); //克隆自己,通过拷贝构造
     }
};

class TxtSplitter : public ISplitter
{
    virtual ISplitter* clone() {
         return new TxtSplitter(*this); //克隆自己,通过拷贝构造
     }
};

class PictureSplitter : public ISplitter
{
    virtual ISplitter* clone() {
         return new PictureSplitter(*this); //克隆自己,通过拷贝构造
     }
};

class VideoSplitter : public ISplitter
{
    virtual ISplitter* clone() {
         return new VideoSplitter(*this); //克隆自己,通过拷贝构造进行深克隆
     }
};
//MainForm.cpp
class MainForm : public Form
{
	ISplitter* prototype; //原型对象
public:
    MainForm(ISplitter* prototype) {
        this->prototype = prototype;
    }

	void Button1_Click(){
		ISplitter* splitter = prototype->clone(); //克隆原型
		splitter->split();
	}
};
6.3.3 模式定义
使用原型实例指定创建对象的种类,然后通过拷贝这些原型来创建新的对象。 ——《设计模式》 GoF
6.3.4 结构

Prototype->ISplitterConcretePrototypeX->XXSplitterClient->MainForm
6.3.5 要点总结
- Prototype模式同样用于隔离类对象的使用者和具体类型(易变类)之间的耦合关系,它同样要求这些“易变类”拥有“稳定的接口”。
- Prototype模式对于“如何创建易变类的实体对象”采用“原型克隆”的方法来做,它使得我们可以非常灵活地动态创建“拥有某些稳定接口”的新对象——所需工作仅仅是注册一个新类的对象(即原型),然后在任何需要的地方Clone。
- Prototype模式中的Clone方法可以利用某些框架中的序列化来实现深拷贝。
6.4 Builder 构建器
6.4.1 动机 (Motivation)
- 在软件系统中,有时候面临着“一个复杂对象”的创建工作,其通常由各个部分的子对象用一定的算法构成;由于需求的变化,这个复杂对象的各个部分经常面临着剧烈的变化,但是将它们组合在一起的算法却相对稳定。
- 如何应对这种变化?如何提供一种“封装机制”来隔离出“复杂对象的各个部分”的变化,从而保持系统中的“稳定构建算法”不随着需求改变而改变?
6.4.2 模式定义
将一个复杂对象的构建与其表示相分离,使得同样的构建过程(稳定)可以创建不同的表示(变化)。——《设计模式》GoF
6.4.3 代码示例
//builder.cpp
class House {
public:
    void Init() {
        this->BuilderPart1();

        for (int i = 0; i < 4; i++) {
            this->BuildPart2();
        }

        bool flag = this->BuildPart3();

        if (flag) { this->BuildPart4(); }

        this->BuildPart5();
    }
protected:
    virtual void BuildPart1() = 0;
    virtual void BuildPart2() = 0;
    virtual void BuildPart3() = 0;
    virtual void BuildPart4() = 0;
    virtual void BuildPart5() = 0;
};
说明:构造房子的流程不变,但是每个子步骤是变化的。此处不能将构造的流程直接放到构造函数里面:
//builder.cpp
class House {
public:
   //这种方式不可!!!不能放在构造函数里面
   House() {
        this->BuilderPart1(); //静态绑定

        for (int i = 0; i < 4; i++) {
            this->BuildPart2();
        }

        bool flag = this->BuildPart3();

        if (flag) { this->BuildPart4(); }

        this->BuildPart5();
    }
protected:
    virtual void BuildPart1() = 0;
    virtual void BuildPart2() = 0;
    virtual void BuildPart3() = 0;
    virtual void BuildPart4() = 0;
    virtual void BuildPart5() = 0;
};
因为C++中在构造函数里不可以调用子类的虚函数,因为是静态绑定。原因是子类的构造函数是先调用父类的构造函数,如果在父类的构造函数里调用子类的虚函数的override版本,就会导致子类的构造函数还没完成,但是子类的虚函数被调用了。
//builder.cpp
class House {
public:
    void Init() {
        this->BuilderPart1();

        for (int i = 0; i < 4; i++) {
            this->BuildPart2();
        }

        bool flag = this->BuildPart3();

        if (flag) { this->BuildPart4(); }

        this->BuildPart5();
    }
    virtual ~House() { }
protected:
    virtual void BuildPart1() = 0;
    virtual void BuildPart2() = 0;
    virtual void BuildPart3() = 0;
    virtual void BuildPart4() = 0;
    virtual void BuildPart5() = 0;
};

class StoneHouse : public House {
protected:
    virtual void BuildPart1() {}
    virtual void BuildPart2() {}
    virtual void BuildPart3() {}
    virtual void BuildPart4() {}
    virtual void BuildPart5() {}
};

int main() {
    House* pHouse = new StoneHouse();
    pHouse->Init();

    return 0;
}
一个类中的东西太多不太好,就要进行分离,需要将House构建过程进行提取单独封装为一个类:
class House {
    //...
};

class HouseBuilder {
public:
    void Init() {
        this->BuilderPart1();

        for (int i = 0; i < 4; i++) {
            this->BuildPart2();
        }

        bool flag = this->BuildPart3();

        if (flag) { this->BuildPart4(); }

        this->BuildPart5();
    }

    House* GetResult() {
        return pHouse;
    }

    virtual ~HouseBuilder() { }
protected:
    House* pHouse;
    virtual void BuildPart1() = 0;
    virtual void BuildPart2() = 0;
    virtual void BuildPart3() = 0;
    virtual void BuildPart4() = 0;
    virtual void BuildPart5() = 0;
};

class StoneHouse : public House {
protected:
    virtual void BuildPart1() {
        //pHouse->Part1 = ...;
    }
    virtual void BuildPart2() {}
    virtual void BuildPart3() {}
    virtual void BuildPart4() {}
    virtual void BuildPart5() {}
};

int main() {
    House* pHouse = new StoneHouse();
    pHouse->Init();

    return 0;
}
再将构建流程进行拆分:
//对象的表示
class House {
    //...
};

//对象的构建
class HouseBuilder {
public:
    House* GetResult() {
        return pHouse;
    }

    virtual ~HouseBuilder() { }
protected:
    House* pHouse;
    virtual void BuildPart1() = 0;
    virtual void BuildPart2() = 0;
    virtual void BuildPart3() = 0;
    virtual void BuildPart4() = 0;
    virtual void BuildPart5() = 0;
};

class StoneHouse : public House {
protected:
    virtual void BuildPart1() {
        //pHouse->Part1 = ...;
    }
    virtual void BuildPart2() {}
    virtual void BuildPart3() {}
    virtual void BuildPart4() {}
    virtual void BuildPart5() {}
};

class StoneHouseBuilder : public HouseBuilder {

};

class HouseDirector {
public:
    HouseBuilder* pHouseBuilder;

    HouseDirector(HouseBuilder* pHouseBuilder) {
    	this->pHouseBuilder = pHouseBuilder;
    }

    House* Construct() {
        pHouseBuilder->BuilderPart1();

        for (int i = 0; i < 4; i++) {
            pHouseBuilder->BuildPart2();
        }

        bool flag = pHouseBuilder->BuildPart3();

        if (flag) { pHouseBuilder->BuildPart4(); }

        pHouseBuilder->BuildPart5();

        return pHouseBuilder->GetResult();
    }
};
6.4.4 结构

Director->HouseDirector(稳定)Builder->HouseBuilder(稳定)ConcreteBuilder->StoneHouseBuilder(变化)
6.4.5 要点总结
- Builder 模式主要用于“分步骤构建一个复杂的对象”。在这其中“分步骤”是一个稳定的算法,而复杂对象的各个部分则经常变化。
- 变化点在哪里,封装哪里—— Builder模式主要在于应对“复杂对象各个部分”的频繁需求变动。其缺点在于难以应对“分步骤构建算法”的需求变动。
- 在Builder模式中,要注意不同语言中构造器内调用虚函数的差别(C++ vs. C#) 。
7、“对象性能”模式
- 面向对象很好地解决了“抽象”的问题,但是必不可免地要付出一定的代价。对于通常情况来讲,面向对象的成本大都可以忽略不计。但是某些情况,面向对象所带来的成本必须谨慎处理。
- 典型模式
- Singleton
- Flyweight
7.1 Singleton 单例模式
7.1.1 动机(Motivation)
- 在软件系统中,经常有这样一些特殊的类,必须保证它们在系统中只存在一个实例,才能确保它们的逻辑正确性、以及良好的效率。
- 如何绕过常规的构造器,提供一种机制来保证一个类只有一个实例?
- 这应该是类设计者的责任,而不是使用者的责任。
7.1.2 代码示例
//Singleton.cpp
class Singleton {
private:
  	//必须将类的构造函数设为私有
  	Singleton();
  	Singleton(const Singleton& other);
public:
    static Singleton* getInstance();
    static Singleton* m_instance;
};

Singleton* Singleton::m_instance = nullptr;

//线程非安全版本
Singleton* Singleton::getInstance() {
    if (m_instance == nullptr) {
        m_instance = new Singleton();
    }
    return m_instance;
}


//线程安全版本,但锁的代价太高:m_instance不为空的时候,对于都是读操作的时候加锁是浪费
Singleton* Singleton::getInstance() {
    Lock lock; //函数结束的时候释放锁
    if (m_instace == nullptr) {
        m_instance = new Singleton();
    }
    return m_instance;
}


//双检查锁,但由于内存读写reorder不安全
//所有的编译器都可能会出现reorder
Singleton* Singleton::getInstance() {
    if (m_instance == nullptr) { //减小了m_instance不为空时都是读取操作时候的加锁代价
        Lock lock;
        if (m_instance == nullptr) { //避免两个线程同时在m_instance为空时进来
            //常见顺序:1. 分配内存 2.调用构造器 3.内存地址返回
            //如果编译器reorder:1.分配内存 2.返回内存地址给m_instance 3.调用构造器。
            //如果threadA在还没有调用构造器的时候,threadB进来了,发现m_instance不为空,直接返回对象,此时的m_instance是不可用的,只是分配了一个原生内存,并没有执行构造器,对象的状态不对。double-check lock欺骗了threadB,threadB拿到的指针所指向的对象只有对象地址,而没有执行构造器,这就是双检查锁可能出现的问题。
            m_instance = new Singleton();
        }
    }
    return m_instance;
}


//C++ 11版本之后的跨平台实现 (volatile)
std::atomic<Singleton*> Singleton::m_instance;
std::mutex Singleton::m_mutex;

Singleton* Singleton::getInstance() {
    Singleton* tmp = m_instance.load(std::memory_order_relaxed);
    std::atomic_thread_fence(std::memory_order_acquire);//获取内存fence
    if (tmp == nullptr) {
        std::lock_guard<std::mutex> lock(m_mutex);
        tmp = m_instance.load(std::memory_order_relaxed);
        if (tmp == nullptr) {
            tmp = new Singleton; //保证了tmp不会出现reorder
            std::atomic_thread_fence(std::memory_order_release);//释放内存fence
            m_instance.store(tmp, std::memory_order_relaxed);
        }
    }
    return tmp;
}
7.1.3 模式定义
保证一个类仅有一个实例,并提供一个该实例的全局访问点。 ——《设计模式》GoF
7.1.4 结构

7.1.5 要点总结
- Singleton模式中的实例构造器可以设置为protected以允许子类派生。
- Singleton模式一般不要支持拷贝构造函数和Clone接口,因为这有可能导致多个对象实例,与Singleton模式的初衷违背。
- 如何实现多线程环境下安全的Singleton?注意对双检查锁的正确实现。
7.2 Flyweight 享元模式
7.2.1 动机(Motivation)
- 在软件系统采用纯粹对象方案的问题在于大量细粒度的对象会很快充斥在系统中,从而带来很高的运行时代价——主要指内存需求方面的代价。
- 如何在避免大量细粒度对象问题的同时,让外部客户程序依然能够透明地使用面向对象的方式来进行操作?
7.2.2 代码示例
//flyweight.cpp
class Font {
private:
    //unique object key
    string key;

    //object state
    //...
public:
    Font(const string& key) {
        //...
    }
};

class FontFactory {
private:
    map<string, Font*> fontPool;
public:
    Font* GetFont(const string& key) {
        map<string, Font*>::iterator item = fontPool.find(key);

        if (item != fontPool.end()) {
            return fontPool[key];
        } else {
            Font* font = new Font(key);
            fontPool[key] = font;
            return font;
        }
    }

    void clear() {
        //...
    }
};
共享的方式:有就使用,没有就添加。
7.2.3 模式定义
运用共享技术有效地支持大量细粒度的对象。 ——《设计模式》GoF
7.2.4 结构

7.1.5 要点总结
- 面向对象很好地解决了抽象性的问题,但是作为一个运行在机器中的程序实体,我们需要考虑对象的代价问题。Flyweight主要解决面向对象的代价问题,一般不触及面向对象的抽象性问题。
- Flyweight采用对象共享的做法来降低系统中对象的个数,从而降低细粒度对象给系统带来的内存压力。在具体实现方面,要注意对象状态的处理。
- 对象的数量太大从而导致对象内存开销加大——什么样的数量才算大?这需要我们仔细地根据具体应用情况进行评估,而不能凭空臆断。
8、“接口隔离”模式
- 在组件构建过程中,某些接口之间直接的依赖常常会带来很多问题、甚至根本无法实现。采用添加一层间接(稳定)接口,来隔离本来互相紧密关联的接口是一种常见的解决方案。
- 典型模式
- Facade 【注:解决系统内和系统外】
- Proxy 【注:两个对象,由于安全/分布式/性能的原因不能直接依赖,必须隔离】
- Adapter 【注:解决老接口和新接口的不匹配问题】
- Mediator 【注:解耦系统内对象间的关联关系】
8.1 Facede 门面模式
8.1.1 系统间耦合的复杂度

8.1.2 动机(Motivation)
- 上述 A 方案的问题在于组件的客户和组件中各种复杂的子系统有了过多的耦合,随着外部客户程序和各子系统的演化,这种过多的耦合面临很多变化的挑战。
- 如何简化外部客户系统和系统间的交互接口?如何将外部客户程序的演化和内部子系统的变化之间的依赖相互解耦?
8.1.3 模式定义
为子系统中的一组接口提供一个一致(稳定)的界面,Facade 模式定义了一个高层接口,这个接口使得这一子系统更加容易使用(复用)。——《设计模式》 GoF
8.1.4 结构

注:
Facade(稳定)- 其他的可能会变化
8.1.5 要点总结
- 从客户程序的角度来看,Facade模式简化了整个组件系统的接口,对于组件内部与外部客户程序来说,达到了一种“解耦”的效果——内部子系统的任何变化不会影响到Facade接口的变化。
- Facade设计模式更注重从架构的层次去看整个系统,而不是单个类的层次。Facade很多时候更是一种架构设计模式。
- Facade设计模式并非一个集装箱,可以任意地放进任何多个对象。Facade模式中组件的内部应该是“相互耦合关系比较大的一系列组件”,而不是一个简单的功能集合。
8.2 Proxy 代理模式
8.2.1 动机(Motivation)
- 在面向对象系统中,有些对象由于某种原因(比如对象创建的开销很大,或者某些操作需要安全控制,或者需要进程外的访问等),直接访问会给使用者、或者系统结构带来很多麻烦。
- 如何在不失去透明操作(一致性)对象的同时来管理/控制这些对象特有的复杂性?增加一层间接层是软件开发中常见的解决方式。
8.2.2 模式定义
为其他对象提供一种代理以控制(隔离,使用接口)对这个对象的访问。 ——《设计模式》GoF
8.2.3 结构

8.2.4 代码示例
//client.cpp
class ISubject{
public:
    virtual void process();
};

class RealSubject: public ISubject{
public:
    virtual void process(){
        //....
    }
};

class ClientApp{

    ISubject* subject;

public:

    ClientApp(){
        subject=new RealSubject();
    }

    void DoTask(){
        //...
        subject->process();

        //....
    }
};
//proxy.cpp
class ISubject{
public:
    virtual void process();
};


//Proxy的设计
class SubjectProxy: public ISubject{
public:
    virtual void process(){
        //对RealSubject的一种间接访问
        //....
    }
};

class ClientApp{

    ISubject* subject;

public:

    ClientApp(){
        subject = new SubjectProxy(); //可以通过某种工厂模式进行创建
    }

    void DoTask(){
        //...
        subject->process();

        //....
    }
};
8.2.5 要点总结
- “增加一层间接层” 是软件系统中对许多复杂问题的一种常见解决方法。在面向对象系统中,直接使用某些对象会带来很多问题,作为间接层的proxy对象便是解决这一问题的常用手段。
- 具体proxy设计模式的实现方法、实现粒度都相差很大,有些可能对单个对象做细粒度的控制,如copy-on-write技术,有些可能对组件模块提供抽象代理层,在架构层次对对象做proxy。
- Proxy 并不一定要求保持接口完整的一致性,只要能够实现间接控制,有时候损及一些透明性是可以接受的。
8.3 Adapter 适配器模式
8.3.1 动机
- 在软件系统中,由于应用环境的变化,常常需要将“一些现存的对象” 放在新的环境中应用,但是新环境要求的接口时这些现存对象所不满足的。
- 如何应对这种“迁移的变化”?如何既能利用现有对象的良好实现,同时又能满足新的应用环境所要求的接口?
8.3.2 我们身边的Adapter

8.3.3 模式定义
将一个类的接口转换成客户希望的另一个接口。Adapter模式使得原本由于接口不兼容而不能一起工作的那些类可以一起工作。 ——《设计模式》GoF
8.3.4 结构

Target是希望的接口 (稳定)Adaptee是以前的接口 (稳定)Adapter具有和父类一样的接口规范,实现了Adapter向Target的转换 (变化)
8.3.5 代码示例
//Adapter.cpp
//目标接口(新接口)
class ITarget{
public:
    virtual void process() = 0;
};

//遗留接口(老接口)
class IAdaptee{
public:
    virtual void foo(int data) = 0;
    virtual int bar() = 0;
};

//遗留类型
class OldClass: public IAdaptee{
    //....
};

//GoF中适配器有两种:对象适配器和类适配器
//对象适配器:组合了一个对象
class Adapter: public ITarget{ //继承
protected:
    IAdaptee* pAdaptee;//组合

public:
    Adapter(IAdaptee* pAdaptee){
        this->pAdaptee = pAdaptee;
    }

    virtual void process(){
        int data = pAdaptee->bar();
        pAdaptee->foo(data);

    }
};


//类适配器
class Adapter: public ITarget, protected OldClass{ //多继承

};

int main(){
    IAdaptee* pAdaptee = new OldClass();

    ITarget* pTarget=new Adapter(pAdaptee);
    pTarget->process();

    return 0;
}
//STL中的Adapter模式的应用:将dequeue转换成stack/queue
class stack{
    deqeue container;

};

class queue{
    deqeue container;

};
8.3.6 要点总结
- Adapter模式主要应用于“希望复用一些现存的类,但是接口又与复用环境要求不一致的情况”,在遗留代码复用、类库迁移等方面非常有用。
- GoF 23 定义了两种 Adapter 模式的实现结构:对象适配器和类适配器。但类适配器采用“多继承”的实现方式,一般不推荐使用。对象适配器采用“对象组合”的方式,更符合松耦合精神。
- Adapter模式可以实现得非常灵活,不必拘泥于 GoF 23 中定义的两种结构。例如,完全可以将Adapter模式中的“现存现象”作为新的接口方法参数,来达到适配的目的。
8.4 Mediator 中介者模式
8.4.1 动机
- 在软件构建过程中,经常会出现多个对象互相关联交互的情况,对象之间常常会维持一种复杂的引用关系,如果遇到一些需求的更改,这种直接的引用关系将面临不断的变化。
- 在这种情况下,我们可使用一个“中介对象”来管理对象间的关联关系,避免相互交互的对象之间的紧耦合引用关系,从而更好地抵御变化。
8.4.2 模式定义
用一个中介对象来封装(封装变化)一系列的对象交互。中介者使各对象不需要显式地相互引用(编译时依赖->运行时依赖),从而使其耦合松散(管理变化),而且可以独立地改变它们之间的交互。 ——《设计模式》GoF
8.4.3 结构

Mediator和Colleague之间是双向依赖,而ConcreteColleague之间没有依赖关系,通过这种方式达到了依赖的解耦
梳理结构中的关系:

需要定义消息通知的规范/协议,比如1要和3通信,如何通过Mediator找到3,这就要通过消息通知的规范。
上图是将直接依赖关系 转化为 间接依赖关系,和Facade模式异曲同工,但是Facade解决的是系统内和系统外的耦合,而中介者模式解决的系统内各个组件之间的耦合。
8.4.4 要点总结
- 将多个对象间复杂的关联关系解耦,Mediator模式将多个对象间的控制逻辑进行集中管理【注:定义一套调用机制的协议】,变“多个对象互相关联”为“多个对象和一个中介者关联”,简化了系统的维护,抵御了可能的变化。
- 随着控制逻辑的复杂化,Mediator具体对象的实现可能相当复杂。这时候可以对Mediator对象进行分解处理。
- Facade模式是解耦系统间(单向)的对象关联关系;Mediator模式是解耦系统内各个对象之间(双向)的关联关系。
9、“状态变化”模式
- 在组件构建过程中,某些对象的状态经常面临变化,如何对这些变化进行有效的管理?同时又维持高层模块的稳定?“状态变化”模式为这一问题提供了一种解决方案。
- 典型模式
- State
- Memento
9.1 State状态模式
9.1.1 动机(Motivation)
- 在软件构建过程中,某些对象的状态如果改变,其行为也会随之而发生变化,比如文档处于只读状态,其支持的行为和读写状态支持的行为就可能完全不同。
- 如何在运行时根据对象的状态来透明地更改对象的行为?而不会为对象操作和状态转化之间引入紧耦合?
9.1.2 代码示例
//state1.cpp
enum NetworkState
{
    Network_Open,
    Network_Close,
    Network_Connect,
};

class NetworkProcessor{

    NetworkState state;
public:

    void Operation1(){ //根据state不同而操作不同
        if (state == Network_Open){

            //**********
            state = Network_Close;
        } else if (state == Network_Close){

            //..........
            state = Network_Connect;
        } else if (state == Network_Connect){

            //$$$$$$$$$$
            state = Network_Open;
        }
    }

    public void Operation2(){

        if (state == Network_Open){

            //**********
            state = Network_Connect;
        } else if (state == Network_Close){

            //.....
            state = Network_Open;
        } else if (state == Network_Connect){

            //$$$$$$$$$$
            state = Network_Close;
        }

    }

    public void Operation3(){

    }
};
枚举类型中如何添加了一种的状态,那么操作里面都要进行改变,违反了开闭原则。
将枚举类型转换为抽象基类,操作变成状态对象的行为:
//state2.cpp
class NetworkState{

public:
    NetworkState* pNext;
    virtual void Operation1()=0;
    virtual void Operation2()=0;
    virtual void Operation3()=0;

    virtual ~NetworkState(){}
};


class OpenState :public NetworkState{

    static NetworkState* m_instance;
public:
    static NetworkState* getInstance(){
        if (m_instance == nullptr) {
            m_instance = new OpenState();
        }
        return m_instance;
    }

    void Operation1(){

        //**********
        pNext = CloseState::getInstance();
    }

    void Operation2(){

        //..........
        pNext = ConnectState::getInstance();
    }

    void Operation3(){

        //$$$$$$$$$$
        pNext = OpenState::getInstance();
    }
};

class CloseState:public NetworkState{ };
//...
//扩展
class WaitState: public NetworkState { };

class NetworkProcessor{

    NetworkState* pState;

public:

    NetworkProcessor(NetworkState* pState){

        this->pState = pState;
    }

    void Operation1(){
        //...
        pState->Operation1();
        pState = pState->pNext;
        //...
    }

    void Operation2(){
        //...
        pState->Operation2();
        pState = pState->pNext;
        //...
    }

    void Operation3(){
        //...
        pState->Operation3();
        pState = pState->pNext;
        //...
    }

};
当状态增加的时候,NetworkProcesser中不必发生改变,达到了稳定。
9.1.3 模式定义
允许一个对象在其内部状态改变时改变它的行为。从而使对象看起来似乎修改了其行为。 ——《设计模式》GoF
9.1.4 结构
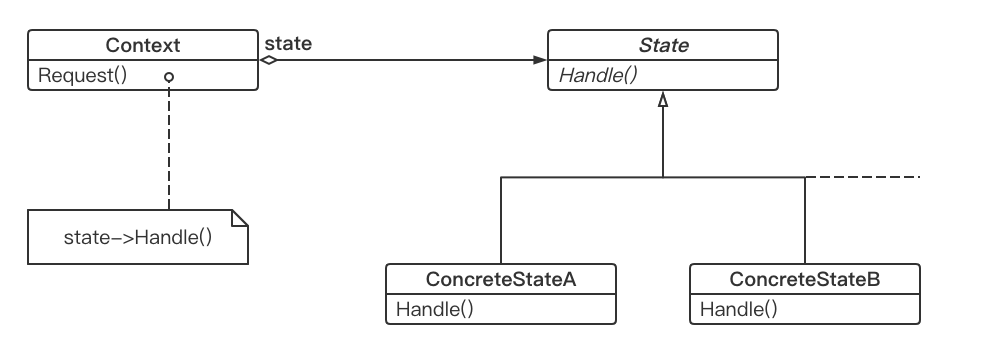
Context->NetworkProcesser(稳定)State->NetworkState(稳定)ConcreteStateX->xxState(变化)
9.1.5 要点总结
- State模式将所有与一个特定状态相关的行为都放入一个 State 的子类对象中,在对象状态切换时,切换相应的对象;但同时维持 State 的接口,这样实现了具体操作与状态转换之间的解耦。
- 为不同的状态引入不同的对象使得状态转换变得更加明确,而且可以保证不会出现状态不一致的情况,因为转换是原子性的——即要么彻底转换过来,要么不转换。
- 如果State对象没有实例变量,那么各个上下文可以共享同一个 State 对象【注:使用了Singleton模式】,从而节省对象开销。
9.2 Memento 备忘录
9.2.1 动机(Motivation)
- 在软件构建过程中,某些对象的状态在转换过程中,可能由于某种需要,要求程序能够回溯到对象之前处于某个点时的状态。如果使用一些公有接口来让其他对象得到对象的状态,便会暴露对象的细节实现。
- 如何实现对象状态的良好保存与恢复?但同时又不会因此而破坏对象本身的封装性。
9.2.2 模式定义
在不破坏封装性的前提下,捕获一个对象的内部状态,并在该对象之外保存这个状态。这样以后就可以将该对象恢复到原先保存的状态。 ——《设计模式》GoF
9.2.3 代码示例
//memento.cpp
class Memento
{
    string state;
    //..
public:
    Memento(const string & s) : state(s) {}
    string getState() const { return state; }
    void setState(const string & s) { state = s; }
};

class Originator
{
    string state;
    //....
public:
    Originator() {}
    Memento createMomento() {
        Memento m(state);
        return m;
    }
    void setMomento(const Memento & m) {
        state = m.getState();
    }
};

int main()
{
    Originator orginator;

    //捕获对象状态,存储到备忘录
    Memento mem = orginator.createMomento();

    //... 改变orginator状态

    //从备忘录中恢复
    orginator.setMomento(memento);
}
9.2.4 结构
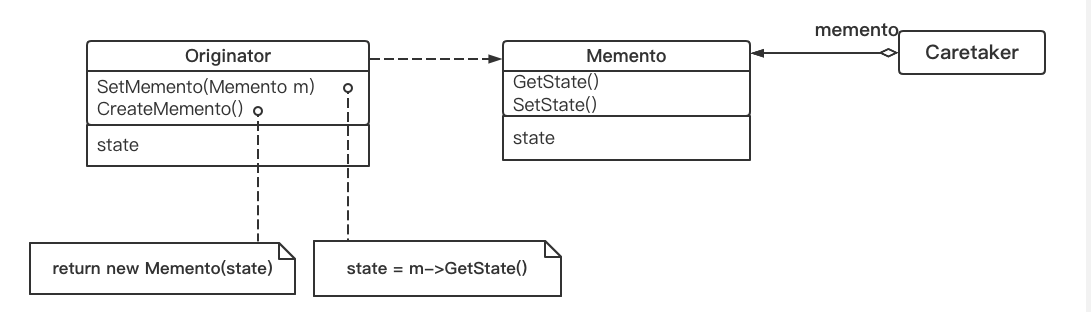
9.2.5 要点总结
- 备忘录(Memento)存储原发器(Originator)对象的内部状态,在需要时恢复原发器状态。
- Memento模式的核心是信息隐藏,即Originator需要向外界隐藏信息,保持其封装性。但同时又需要将状态保存到外界(Memento)。
- 由于现代语言运行时(如C#、Java等)都具有相当的对象序列化支持,因此往往采用效率较高、又较容易正确实现的序列化方案来实现Memento模式。
10、“数据结构”模式
- 常常有一些组件在内部具有特定的数据结构,如果让客户程序依赖这些特定的数据结构,将极大地破坏组件的复用。这时候,将这些特定数据结构封装在内部,在外部提供统一的接口,来实现与特定数据结构无关的访问,是一种行之有效的解决方案。
- 典型模式
- Composite 【注:树形结构】
- Iterator 【注:遍历需求】
- Chain of Responsibility 【注:单链表】
10.1 Composite模式
10.1.1 动机
- 软件在某些情况下,客户代码过多地依赖于对象容器复杂的内部实现结构,对象容器内部实现结构(而非抽象接口)的变化将引起客户代码的频繁变化,带来了代码的维护性、扩展性等弊端。
- 如何将“客户代码与复杂的对象容器结构”解耦?让对象容器自己来实现自身的复杂结构,从而使得客户代码就像处理简单对象一样来处理复杂的对象容器?
10.1.2 模式定义
将对象组合成树形结构以表示“部分-整体”的层次结构。Composite使得用户对单个对象和组合对象的使用具有一致性(稳定)。 ——《设计模式》GoF
10.1.3 代码示例
//composite.cpp
#include <iostream>
#include <list>
#include <string>
#include <algorithm>

using namespace std;

class Component
{
public:
    virtual void process() = 0;
    virtual ~Component(){}
};

//树节点
class Composite : public Component{

    string name;
    list<Component*> elements;
public:
    Composite(const string & s) : name(s) {}

    void add(Component* element) {
        elements.push_back(element);
    }
    void remove(Component* element){
        elements.remove(element);
    }

    void process(){

        //1. process current node

        //2. process leaf nodes
        for (auto &e : elements)
            e->process(); //多态调用

    }
};

//叶子节点
class Leaf : public Component{
    string name;
public:
    Leaf(string s) : name(s) {}

    void process(){
        //process current node
    }
};

void Invoke(Component & c){
    //...
    c.process();
    //...
}


int main()
{
    Composite root("root");
    Composite treeNode1("treeNode1");
    Composite treeNode2("treeNode2");
    Composite treeNode3("treeNode3");
    Composite treeNode4("treeNode4");
    Leaf leaf1("leaf1");
    Leaf leaf2("leaf2");

    root.add(&treeNode1);
    treeNode1.add(&treeNode2);
    treeNode2.add(&leaf1);

    root.add(&treeNode3);
    treeNode3.add(&treeNode4);
    treeNode4.add(&leaf2);

    //对单个对象和组合对象的一致性
    process(root);
    process(leaf2);
    process(treeNode3);

}
10.1.3 结构
10.1.4 要点总结
- Composite模式采用树形结构来实现普遍存在的对象容器,从而将“一对多”的关系转化为“一对一”的关系,使得客户代码可以一致地(复用)处理对象和对象容器,无需关心处理的是单个的对象,还是组合的对象容器。
- 将“客户代码与复杂的对象容器结构”解耦是 Composite 的核心思想,解耦之后,客户代码将与纯粹的抽象接口——而非对象容器的内部实现结构——发生依赖,从而更能“应对变化”。
- Composite模式在具体实现中,可以让父对象中的子对象反向追溯;如果父对象有频繁的遍历需求,可使用缓存技巧来改善效率。
10.2 Iterator迭代器
10.2.1 动机(Motivation)
- 在软件构建过程中,集合对象内部结构常常变化各异。但对于这些集合对象,我们希望在不暴露其内部结构的同时,可以让外部客户代码透明地访问其中包含的元素;同时这种"透明遍历" 也为 “同一种算法在多种集合对象上进行操作”提供了可能。【注:通过迭代器隔离算法和容器】
- 使用面向对象技术将这种遍历机制抽象为“迭代器对象”为“应对变化中的集合对象”提供了而一种优雅的方式。
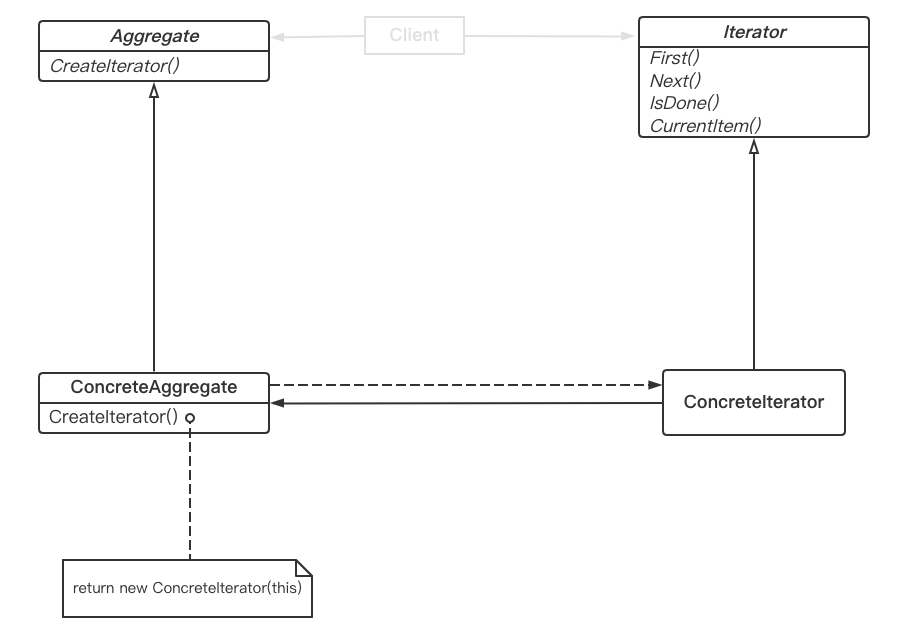
10.2.2 模式定义
提供一种方法顺序访问一个聚合对象中的各个元素,而又不暴露(稳定)该对象的内部表示。——《设计模式》GoF
10.2.3 代码示例
GoF中使用面向对象的方法实现迭代器,这种方法在C++语言中已经过时,因为这种模式里的虚函数调用是有成本的,间接调用,运行时多态;而C++中的泛型编程使用的是基于模板的多态性,是编译时多态,性能高于基于虚函数面向对象的方式的迭代器。
//Iterator.cpp
template<typename T>
class Iterator
{
public:
    virtual void first() = 0;
    virtual void next() = 0;
    virtual bool isDone() const = 0;
    virtual T& current() = 0;
};


template<typename T>
class MyCollection{ //Aggregate

public:

    Iterator<T> GetIterator(){
        //...
    }

};

template<typename T>
class CollectionIterator : public Iterator<T>{
    MyCollection<T> mc;
public:

    CollectionIterator(const MyCollection<T> & c): mc(c){ }

    void first() override {

    }
    void next() override {

    }
    bool isDone() const override{

    }
    T& current() override{

    }
};

void MyAlgorithm()
{
    MyCollection<int> mc;

    Iterator<int> iter= mc.GetIterator();

    for (iter.first(); !iter.isDone(); iter.next()){
        cout << iter.current() << endl;
    }

}
10.2.4 结构
10.2.4 要点总结
- 迭代抽象:访问一个聚合对象的内容而无需暴露它的内部表示。
- 迭代多态:为遍历不同的集合结构提供一个统一的接口,从而支持同样的算法在不同的集合结构上进行操作。
- 迭代器的健壮性考虑:遍历的同时更改迭代器所在的集合结构,会导致问题。
10.3 Chain of Responsibility职责链
10.3.1 动机
- 在软件构建过程中,一个请求可能被多个对象处理,但是每个请求在运行时只能有一个接受者,如果显式指定,将必不可少地带来请求发送者与接受者的紧耦合。
- 如何使请求的发送者不需要指定具体的接受者?让请求的接受者自己在运行时决定来处理请求,从而使两者解耦。
10.3.2 模式定义
使多个对象都有机会处理请求,从而避免请求的发送者和接受者之间的耦合关系。将这些对象连成一条链【注:单向链表】,并沿着这条链传递请求,直到有一个对象处理它为止。 ——《设计模式》GoF
10.3.3 代码示例
//ChainofResponsibility.cpp
#include <iostream>
#include <string>

using namespace std;

enum class RequestType
{
    REQ_HANDLER1,
    REQ_HANDLER2,
    REQ_HANDLER3
};

class Reqest
{
    string description;
    RequestType reqType;
public:
    Reqest(const string & desc, RequestType type) : description(desc), reqType(type) {}
    RequestType getReqType() const { return reqType; }
    const string& getDescription() const { return description; }
};

class ChainHandler{

    ChainHandler *nextChain; //形成多态链表
    void sendReqestToNextHandler(const Reqest & req)
    {
        if (nextChain != nullptr)
            nextChain->handle(req);
    }
protected:
    virtual bool canHandleRequest(const Reqest & req) = 0;
    virtual void processRequest(const Reqest & req) = 0;
public:
    ChainHandler() { nextChain = nullptr; }

    void setNextChain(ChainHandler *next) { nextChain = next; }

    void handle(const Reqest & req)
    {
        if (canHandleRequest(req))
            processRequest(req);
        else
            sendReqestToNextHandler(req);
    }
};


class Handler1 : public ChainHandler{
protected:
    bool canHandleRequest(const Reqest & req) override
    {
        return req.getReqType() == RequestType::REQ_HANDLER1;
    }
    void processRequest(const Reqest & req) override
    {
        cout << "Handler1 is handle reqest: " << req.getDescription() << endl;
    }
};

class Handler2 : public ChainHandler{
protected:
    bool canHandleRequest(const Reqest & req) override
    {
        return req.getReqType() == RequestType::REQ_HANDLER2;
    }
    void processRequest(const Reqest & req) override
    {
        cout << "Handler2 is handle reqest: " << req.getDescription() << endl;
    }
};

class Handler3 : public ChainHandler{
protected:
    bool canHandleRequest(const Reqest & req) override
    {
        return req.getReqType() == RequestType::REQ_HANDLER3;
    }
    void processRequest(const Reqest & req) override
    {
        cout << "Handler3 is handle reqest: " << req.getDescription() << endl;
    }
};

int main(){
    Handler1 h1;
    Handler2 h2;
    Handler3 h3;
    h1.setNextChain(&h2);
    h2.setNextChain(&h3);

    Reqest req("process task ... ", RequestType::REQ_HANDLER3);
    h1.handle(req);
    return 0;
}
10.3.4 结构
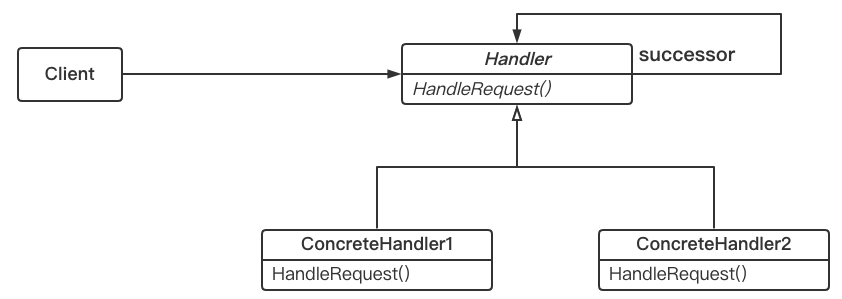
Client和Handler稳定的ConcreteHandlerX是变化的
10.3.4 要点总结
- Chain of Responsibility 模式的应用场合在于“一个请求可能有多个接受者,但是最后真正的接受者只有一个”,这时候请求发送者与接受者的耦合有可能出现“变化脆弱”的症状,职责链的目的就是将二者解耦,从而更好地应对变化。
- 应用了Chain of Responsibility 模式后,对象的职责分配将更具灵活性。我们可以在运行时动态添加/修改请求的处理职责。
- 如果请求传递到职责链的末尾仍得不到处理,应该有一个合理的缺省机制。这也是每一个接受对象的责任,而不是发出请求的对象的责任。
11、“行为变化”模式
- 在组件的构建过程中,组件行为的变化经常导致组件本身剧烈的变化。“行为变化”模式将组件的行为和组件本身进行解耦,从而支持组件行为的变化,实现两者之间的松耦合。
- 典型模式
- Command
- Visitor
11.1 Command 命令模式
11.1.1 动机
- 在软件构建过程中,“行为请求者”与“行为实现者”通常呈现一种“紧耦合”。但在某些场合——比如需要对行为进行“记录、撤销/重(undo/redo)、事务”等处理,这种无法抵御变化的紧耦合是不合适的。
- 在这种情况下,如何将“行为请求者”与“行为实现者”解耦?将一组行为抽象为对象,可以实现二者之间的松耦合。
11.1.2 模式定义
将一个请求(行为)封装为一个对象,从而使你可用不同的请求对客户进行参数化;对请求排队或记录请求日志,以及支持可撤销的操作。——《设计模式》GoF
11.1.3 代码示例
//Command.cpp
#include <iostream>
#include <vector>
#include <string>
using namespace std;


class Command
{
public:
    virtual void execute() = 0;
};

class ConcreteCommand1 : public Command
{
    string arg;
public:
    ConcreteCommand1(const string & a) : arg(a) {}
    void execute() override
    {
        cout<< "#1 process..."<<arg<<endl;
    }
};

class ConcreteCommand2 : public Command
{
    string arg;
public:
    ConcreteCommand2(const string & a) : arg(a) {}
    void execute() override
    {
        cout<< "#2 process..."<<arg<<endl;
    }
};


class MacroCommand : public Command
{
    vector<Command*> commands;
public:
    void addCommand(Command *c) { commands.push_back(c); }
    void execute() override
    {
        for (auto &c : commands)
        {
            c->execute();
        }
    }
};


int main()
{

    ConcreteCommand1 command1(receiver, "Arg ###");
    ConcreteCommand2 command2(receiver, "Arg $$$");

    MacroCommand macro;
    macro.addCommand(&command1);
    macro.addCommand(&command2);

    macro.execute();

}
11.1.4 结构

Command稳定ConcreteCommand变化
11.1.5 要点总结
- Command模式的根本目的在于将“行为请求者”与“行为实现者”解耦,在面向对象语言中,常见的实现手段是“将行为抽象为对象”。
- 实现Command接口的具体命令对象ConcreteCommand有时候根据需要可能会保存一些额外的状态信息。通过使用Composite模式,可以将多个“命令”封装为一个“复合命令”MacroCommand。
- Command模式与C++中的函数对象有些类似。但两者定义行为接口的规范有所区别:Command以面向对象中的“接口-实现”来定义行为接口规范,更严格,但有性能损失;C++函数对象以函数签名来定义行为接口规范,更灵活,性能更高。
11.2 Visitor访问器
11.2.1 动机
- 在软件构建过程中,由于需求的改变,某些类层次结构【注:从基类到子类】中常常需要增加新的行为(方法),如果直接在基类中做这样的更改,将会给子类带来很繁重的变更负担,甚至破坏原有设计。
- 如何在不更改类层次结构的前提下,在运行时根据需要透明地为类层次结构上的各个类动态添加新的操作,从而避免上述问题?
11.2.2 模式定义
表示一个作用于某对象结构中的各元素的操作。使得可以在不改变(稳定)各元素的类的前提下定义(扩展)作用于这些元素的新操作(变化)。 ——《设计模式》GoF
11.2.3 代码示例
//visitor1.cpp
#include <iostream>
using namespace std;

class Visitor;


class Element
{
public:
    virtual void Func1() = 0;

    virtual void Func2(int data)=0; //若有新需求时,更改基类,则子类也会随着改变,负担很重
    virtual void Func3(int data)=0;
    //...

    virtual ~Element(){}
};

class ElementA : public Element
{
public:
    void Func1() override{
        //...
    }

    void Func2(int data) override{
        //...
    }

};

class ElementB : public Element
{
public:
    void Func1() override{
        //***
    }

    void Func2(int data) override {
        //***
    }
};
使用Visitor模式:
//visitor2.cpp
#include <iostream>
using namespace std;

class Visitor;

class Element
{
public:
    virtual void accept(Visitor& visitor) = 0; //第一次多态辨析

    virtual ~Element(){}
};

class ElementA : public Element
{
public:
    void accept(Visitor &visitor) override {
        visitor.visitElementA(*this);
    }
};

class ElementB : public Element
{
public:
    void accept(Visitor &visitor) override {
        visitor.visitElementB(*this); //第二次多态辨析
    }

};


class Visitor{
public:
    virtual void visitElementA(ElementA& element) = 0;
    virtual void visitElementB(ElementB& element) = 0;

    virtual ~Visitor(){}
};

//上面是已经设计好的,不更改
//==================================

//扩展1
class Visitor1 : public Visitor{
public:
    void visitElementA(ElementA& element) override{
        cout << "Visitor1 is processing ElementA" << endl;
    }

    void visitElementB(ElementB& element) override{
        cout << "Visitor1 is processing ElementB" << endl;
    }
};

//扩展2
class Visitor2 : public Visitor{
public:
    void visitElementA(ElementA& element) override{
        cout << "Visitor2 is processing ElementA" << endl;
    }

    void visitElementB(ElementB& element) override{
        cout << "Visitor2 is processing ElementB" << endl;
    }
};


int main()
{
    Visitor2 visitor;
    ElementB elementB;
    elementB.accept(visitor);// double dispatch

    ElementA elementA;
    elementA.accept(visitor);

    return 0;
}
11.2.4 结构

Visitor、Element、ConcreteElementA和ConcreteElementB必须是稳定的,使用Visitor模式的前提是必须知道Element有几个子类,对应的设计几个访问函数,Vistor稳定的前提是Element的所有子类都确定,这是这个模式非常大的缺点;如果Element类层次结构无法稳定,则Visitor模式不适用了;ConcreteVisito1和ConcreteVisitor2是可以变化的。
11.2.5 要点总结
- Visitor模式通过所谓双重分发(double dispatch)来是按在不更改(不添加新的操作-编译时)Element类层次结构的前提下,在运行时透明地为类层次结构上的各个类动态添加新的操作(支持变化)。
- 所谓双重分发即Visitor模式中间包括了两个多态分发(注意其中的多态机制):第一个为accept方法的多态辨析;第二个为VisitElementX方法的多态辨析。
- Visitor模式的最大缺点在于扩展类层次结构(增添新的Element子类),会导致Visitor类的改变。因此Visitor模式适用于“Element类层次结构稳定,而其中的操作却经常面临频繁改动”。
12、“领域规则”模式
- 在特定领域中,某些变化虽然频繁,但可以抽象为某种规则。这时候,结合特定领域,将问题抽象为语法规则,从而给出在该领域下的一般性解决方案。
- 典型模式
- Interpreter
12.1 Interpreter解析器
12.1.1 动机
- 在软件构建过程中,如果某一特定领域的问题比较复杂,类似的结构不断重复出现,如果使用普通的编程方式来实现将面临非常频繁的变化。
- 在这种情况下,将特定领域的问题表达为某种语法规则下的橘子,然后构建一个解释器来解释这样的句子,从而达到解决问题的目的。
12.1.2 模式定义
给定一个语言,定义它的文法的一种表示,并定义一种解释器,这个解释器使用该表示来解释语言中的句子。 ——《设计模式》GoF
12.1.3 代码示例
#include <iostream>
#include <map>
#include <stack>

using namespace std;

class Expression {
public:
    virtual int interpreter(map<char, int> var)=0;
    virtual ~Expression(){}
};

//变量表达式
class VarExpression: public Expression {

    char key;

public:
    VarExpression(const char& key)
    {
        this->key = key;
    }

    int interpreter(map<char, int> var) override {
        return var[key];
    }

};

//符号表达式
class SymbolExpression : public Expression {

    // 运算符左右两个参数
protected:
    Expression* left;
    Expression* right;

public:
    SymbolExpression( Expression* left,  Expression* right):
        left(left),right(right){

    }

};

//加法运算
class AddExpression : public SymbolExpression {

public:
    AddExpression(Expression* left, Expression* right):
        SymbolExpression(left,right){

    }
    int interpreter(map<char, int> var) override {
        return left->interpreter(var) + right->interpreter(var);
    }

};

//减法运算
class SubExpression : public SymbolExpression {

public:
    SubExpression(Expression* left, Expression* right):
        SymbolExpression(left,right){

    }
    int interpreter(map<char, int> var) override {
        return left->interpreter(var) - right->interpreter(var);
    }

};

Expression*  analyse(string expStr) {

    stack<Expression*> expStack;
    Expression* left = nullptr;
    Expression* right = nullptr;
    for(int i=0; i<expStr.size(); i++)
    {
        switch(expStr[i])
        {
            case '+':
                // 加法运算
                left = expStack.top();
                right = new VarExpression(expStr[++i]);
                expStack.push(new AddExpression(left, right));
                break;
            case '-':
                // 减法运算
                left = expStack.top();
                right = new VarExpression(expStr[++i]);
                expStack.push(new SubExpression(left, right));
                break;
            default:
                // 变量表达式
                expStack.push(new VarExpression(expStr[i]));
        }
    }

    Expression* expression = expStack.top();

    return expression;
}

void release(Expression* expression){

    //释放表达式树的节点内存...
}

int main(int argc, const char * argv[]) {

    string expStr = "a+b-c+d-e";
    map<char, int> var;
    var.insert(make_pair('a',5));
    var.insert(make_pair('b',2));
    var.insert(make_pair('c',1));
    var.insert(make_pair('d',6));
    var.insert(make_pair('e',10));


    Expression* expression= analyse(expStr);

    int result=expression->interpreter(var);

    cout<<result<<endl;

    release(expression);

    return 0;
}
12.1.4 结构
12.1.5 要点总结
- Interpreter模式的应用场合是Interpreter模式应用中的难点,只有满足“业务规则频繁变化,且类似的结构不断重复出现,并且容易抽象为语法规则的问题”才适合使用Interpreter模式.
- 使用Interpreter模式来表示文法规则,从而可以使用面向对象技巧来方便地“扩展”文法。
- Interpreter模式比较适合简单的文法表示,对于复杂的文法表示,Interpreter模式会产生比较大的类层次结构,需要求助于语法分析器这样的标准工具。
13、设计模式总结
13.1 一个目标
管理变化,提高复用!
13.2 两种手段
分解 vs. 抽象
13.3 八大原则
- 依赖倒置原则(DIP)
- 开放封闭原则(OCP)
- 单一职责原则(SRP)
- Liskov 替换原则(LSP)
- 接口隔离原则(ISP)
- 对象组合由于类继承
- 封装变化点
- 面向接口编程
13.4 重构技法
- 静态 -> 动态
- 早绑定 -> 晚绑定
- 继承 -> 组合
- 编译时依赖 -> 运行时依赖
- 紧耦合 -> 松耦合
13.5 从封装变化角度对模式分类
- 组件协作:
- Template Method
- Observer / Event
- Strategy
- 单一职责:
- Decorator
- Bridge
- 对象创建:
- Factory Method
- Abstract Factory
- Prototype
- Builder 【注:不是很常用】
- 对象性能:
- Singleton
- Flyweight
- 接口隔离:
- Façade
- Proxy
- Mediator 【注:不是很常用】
- Adapter
- 状态变化:
- Memento 【注:不是很常用】
- State
- 数据结构:
- Composite
- Iterator 【注:不是很常用】
- Chain of Resposibility 【注:不是很常用】
- 行为变化:
- Command 【注:不是很常用】
- Visitor 【注:不是很常用】
- 领域问题:
- Interpreter 【注:不是很常用】
13.6 C++ 对象模型
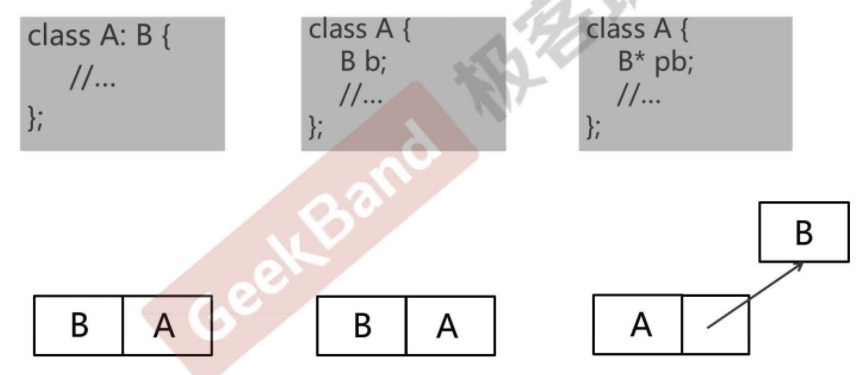
继承和组合对象在C++对象模型上来说,都是B嵌入到A的内存中,且在A的内存的前面部分,A和B紧耦合,且B对象不具有灵活性,是不可变的;而第三种的组合一个指针就具有灵活性,指针指向的对象是可变的。
所有的模式最终都是通过指针指向多态对象来表达灵活性。
指针指向多态对象变成了松耦合对象模型的基础。
13.7 关注变化点和稳定点
13.8 什么时候不用模式
- 代码可读性很差时
- 需求理解还很浅时
- 变化没有显现时
- 不是系统的关键依赖点
- 项目没有复用价值时
- 项目将要发布时
13.9 经验之谈
- 不要为模式而模式
- 关注抽象类 & 接口
- 理清变化点和稳定点
- 审视依赖关系
- 要有Framework 和 Application 的区隔思维
- 良好的设计是演化的结果
13.10 设计模式成长之路
- “手中无剑,心中无剑”:见模式而不知
- “手中有剑,心中无剑”:可以识别模式,作为应用开发人员使用模式
- “手中有剑,心中有剑”:作为框架开发人员为应用设计某些模式
- “手中无剑,心中有剑”:忘掉模式,只有原则


 被折叠的 条评论
为什么被折叠?
被折叠的 条评论
为什么被折叠?
 到【灌水乐园】发言


