


Cloudflare Tunnel 创建与配置
Cloudflare Tunnel 能够保护 web 服务器或应用免受直接攻击,不管它运行在哪里:共有云、私有云、kubernetes 集群或者你电视下的 Mac Mini。
Ensure your server is safe, no matter where it’s running: public cloud, private cloud, Kubernetes cluster, or even a Mac mini under your TV.
为了使用 Cloudflare Tunnal,需要先安装客户端程序 cloudflared[1],它负责把你的服务器连接到 Cloudflare 的全球网络中。有两种创建方式:
管理界面 (dashboard)[2]:官方推荐此方案
命令行[3]:使用 cloudflared
这 2 种方案都需要一个域名,并且域名的 nameserver 转到 cloudflare 管理。
本文使用 dashboard 方案,跟着 管理界面 (dashboard) 创建 tunnel 文档[4] 操作即可。
最后启动 cloudflared 的时候,一直报错,内容如下:
7 月 21 20:34:53 aibox cloudflared[4282]: 2024-07-21T12:34:53Z ERR edge discovery: error looking up Cloudflare edge IPs: the DNS query failed error="lookup _v2-origin>
7 月 21 20:34:53 aibox cloudflared[4282]: 2024-07-21T12:34:53Z ERR Please try the following things to diagnose this issue: event=0
7 月 21 20:34:53 aibox cloudflared[4282]: 2024-07-21T12:34:53Z ERR   1. ensure that argotunnel.com is returning "origintunneld" service records. event=0
7 月 21 20:34:53 aibox cloudflared[4282]: 2024-07-21T12:34:53Z ERR      Run your system's equivalent of: dig srv _origintunneld._tcp.argotunnel.com event=0
7 月 21 20:34:53 aibox cloudflared[4282]: 2024-07-21T12:34:53Z ERR   2. ensure that your DNS resolver is not returning compressed SRV records. event=0
7 月 21 20:34:53 aibox cloudflared[4282]: 2024-07-21T12:34:53Z ERR      See GitHub issue https://github.com/golang/go/issues/27546 event=0
7 月 21 20:34:53 aibox cloudflared[4282]: 2024-07-21T12:34:53Z ERR      For example, you could use Cloudflare's 1.1.1.1 as your resolver: event=0
7 月 21 20:34:53 aibox cloudflared[4282]: 2024-07-21T12:34:53Z ERR      https://developers.cloudflare.com/1.1.1.1/setting-up-1.1.1.1/ event=0
7 月 21 20:34:53 aibox cloudflared[4282]: 2024-07-21T12:34:53Z INF Tunnel server stopped
由于自己是网络小白,也不知道问题在哪,最后各种搜索,找到一篇文章 关于部署 Cloudflare Zero Trust 遇到的问题浅记录[5] ,报错和我的一样,猜测到软路由配置的问题,于是按照文章的内容修改:
OpenWRT 网络 -> DHCP/DNS -> 高级设置 关掉 过滤无用包
服务 -> passwall -> 基本设置 -> DNS -> 过滤模式 把
通过 TCP 请求 DNS改成通过 UDP 请求 DNS
改完配置重启后,能够启动 cloudfalred 并且在 dashboard 中看到了新建的 tunnel 了。
后来重启一次机器,发现 cloudflared 启动失败, 报同样的错误,可是我已经按照文章中的内容改了呀,看来是懵对了。我又是一通操作,最后发现改动软路由 passwall 中 通过 TCP 请求 DNS 改成 通过 UDP 请求 DNS,改回来,重启就好了。
看来问题不是用 tcp 或者 udp 请求 dns,而是重启 passwall 服务。
暴露 lobechat 到公网
首先暴露的就是 LobeChat 这款大模型 web 前端。
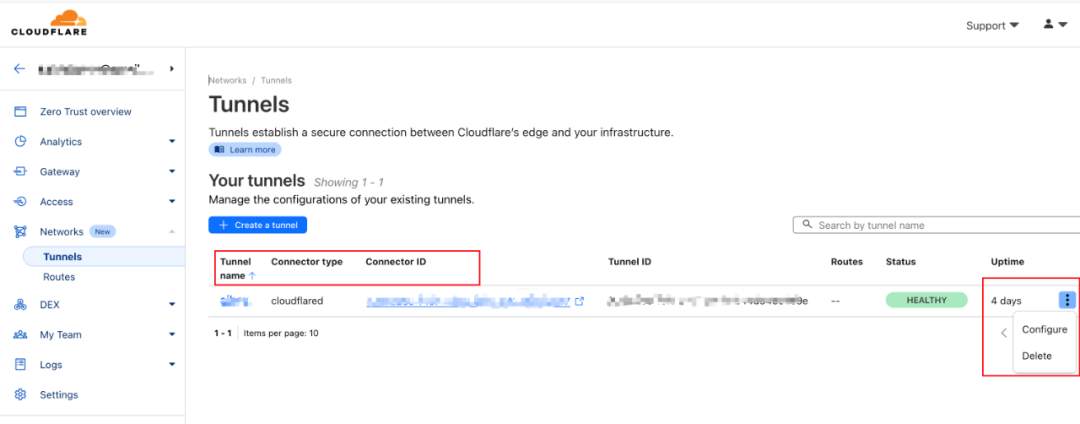
创建好 tunnel 后,dashboard 上就能看到连接的 tunal 名称和 id。
点击 tunnel 最右侧的 3 个点,点击Configure 进入 tunnel 详情页。在详情页进入Public Hostname。点击Add a public hostname进入 Public Hostname Page配置页面。
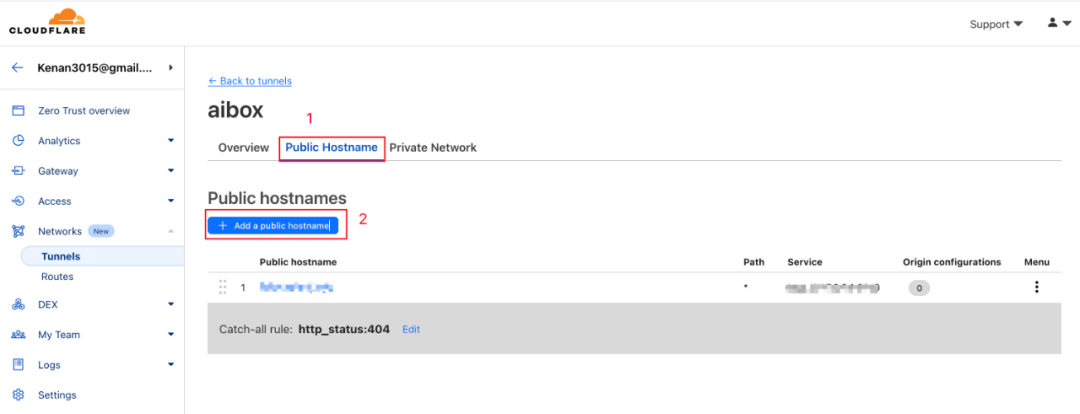
配置页面列出了要填写的内容,根据自己的需要暴露相关服务到二级域名即可。假设域名是 example.xyz,lobechat 运行在 homelab 的 8080 端口,我想暴露到 demo.example.xyz 二级域名下。那么在公网访问 demo.example.xyz 域名就转发到 homelab 中的 127.0.0.1:8080 下的 lobechat 服务了。

最后配置 lobechat 使用 homelab 上的 ollama 时,要注意 lobechat 有个小 bug,就是在模型服务商配置中,ollama 项“关闭客户端直连”选项关闭后不生效,但是保存配置退出设置页来到对话页后,这时对话用的就是服务端访问 ollama 的了。
Application 访问限制
把 homelab 上的服务暴露在公网是有风险的,可能导致安全问题被黑客渗透拿到 homelab 权限,也可能被恶意 ddos 导致服务不可用,所以这里最好给暴露在公网的 lobechat 加访问限制。cloudflare 早就想到了这点,提供了 Application 功能。

具体如何配置这里不细讲了,参考 Application 文档[6] 即可。强调下 Application 是配置在域名下的,这个域名要和 lobechat 的公网域名一致,在本文中都是 demo.example.xyz。
参考资料
[1]
cloudflared: https://github.com/cloudflare/cloudflared
[2]管理界面 (dashboard): https://developers.cloudflare.com/cloudflare-one/connections/connect-networks/get-started/create-remote-tunnel/
[3]命令行: https://developers.cloudflare.com/cloudflare-one/connections/connect-networks/get-started/create-local-tunnel/
[4]管理界面 (dashboard) 创建 tunnel 文档: https://developers.cloudflare.com/cloudflare-one/connections/connect-networks/get-started/create-remote-tunnel/
[5]关于部署 Cloudflare Zero Trust 遇到的问题浅记录: https://lanyundev.com/posts/506bd0fe
[6]Application 文档: https://developers.cloudflare.com/cloudflare-one/applications/


 4055
4055

 被折叠的 条评论
为什么被折叠?
被折叠的 条评论
为什么被折叠?
 到【灌水乐园】发言


