


今天要实现的效果如下,支持数据直接写入或者在 XML 中布局
一、自定义 ViewGroup
从上面的效果看,自定义有挺多种选择,比如继承 LinearLayout 或者 HorizontalScrollView … ,但其实直接继承ViewGroup去动态测量更香;
首先,步骤也很简单:
- 继承 ViewGroup
- 重写 onMeasure,计算子控件的大小从而确定父控件的大小
- 重写 onLayout ,确定子控件的布局
直接看第二部,由于是横向,那么如果控件是wrap_content ,则需要拿到子控件的大小,然后给父控件,如下:
@Override
protected void onMeasure(int widthMeasureSpec, int heightMeasureSpec) {
super.onMeasure(widthMeasureSpec, heightMeasureSpec);
int widthMode = MeasureSpec.getMode(widthMeasureSpec);
int widthSize = MeasureSpec.getSize(widthMeasureSpec);
int heightMode = MeasureSpec.getMode(heightMeasureSpec);
int heightSize = MeasureSpec.getSize(heightMeasureSpec);
int childCount = getChildCount();
int width = 0;
int height = 0;
/**
* 计算宽高,由于是横向 width 应该是所有子控件的累加,不用管模式了
*/
for (int i = 0; i < childCount; i++) {
View child = getChildAt(i);
if (child.getVisibility() == View.GONE){
continue;
}
measureChild(child, widthMeasureSpec, heightMeasureSpec);
MarginLayoutParams params = (MarginLayoutParams) child.getLayoutParams();
//拿到 子控件宽度
int cw = child.getMeasuredWidth() + params.leftMargin + params.rightMargin;
int ch = child.getMeasuredHeight() + params.topMargin + params.bottomMargin;
width += cw;
//拿到 子控件高度,拿到最大的那个高度
height = Math.max(height, ch);
}
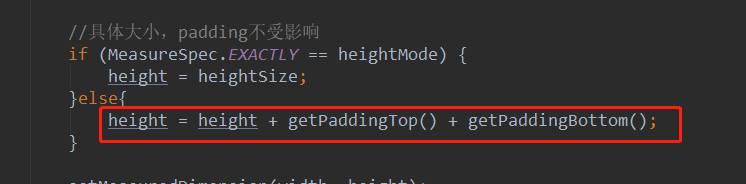
if (MeasureSpec.EXACTLY == heightMode) {
height = heightSize;
}
setMeasuredDimension(width, height);
}
看到上面有同学会问了,你怎么可以把控件的 LayoutParams 转成 MarginLayoutParams 呢?不怕报错吗?
是的,会报错,但是为什么可以强转呢?其实跟下面4个方法有关(可以参考LinearLayout 的源码):
    @Override
    protected LayoutParams generateDefaultLayoutParams() {
        return new MarginLayoutParams(LayoutParams.WRAP_CONTENT, LayoutParams.WRAP_CONTENT);
    }

    @Override
    protected LayoutParams generateLayoutParams(LayoutParams p) {
        return new MarginLayoutParams(p);
    }

    @Override
    public LayoutParams generateLayoutParams(AttributeSet attrs) {
        return new MarginLayoutParams(getContext(), attrs);
    }

    @Override
    protected boolean checkLayoutParams(LayoutParams p) {
        return p instanceof MarginLayoutParams;
    }
}
接着在 onLayout 中,摆放子控件的位置:
  @Override
   protected void onLayout(boolean changed, int l, int t, int r, int b) {
       int count = getChildCount();
       int left = 0;
       int top = 0;
       for (int i = 0; i < count; i++) {
           View child = getChildAt(i);
           MarginLayoutParams params = (MarginLayoutParams) child.getLayoutParams();
           int cl = left + params.leftMargin;
           int ct = top + params.topMargin;
           int cr = cl + child.getMeasuredWidth() ;
           int cb = ct + child.getMeasuredHeight();
           //下个控件的起始位置
           left += child.getMeasuredWidth() + params.leftMargin + params.rightMargin;
           child.layout(cl, ct, cr, cb);
       }
   }
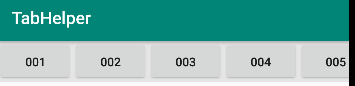
这样,我们的测量和摆放就已经弄好了,接着就是我们在 xml 中添加一些数据:
    <com.zhengsr.tablib.FlowLayout
        android:layout_width="wrap_content"
        android:layout_height="wrap_content"
        android:background="#15000000"
        >

        <Button
            android:layout_width="wrap_content"
            android:layout_height="wrap_content"
            android:text="001"/>
		....
    </com.zhengsr.tablib.FlowLayout>
运行看一下,发现子控件按照我们的方式,摆放好了:
二、完善代码
看上去已经实现了我们的效果,但是给FlowLayout加上padding呢?
    <com.zhengsr.tablib.FlowLayout
        android:layout_width="wrap_content"
        android:layout_height="wrap_content"
        android:padding="10dp"
        android:background="#15000000"
        >
        ....
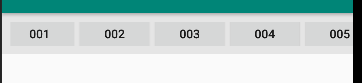
咦,有点不对;所以还得修改;
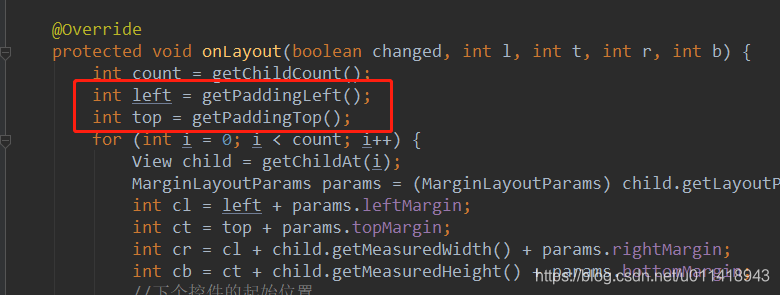
想一下,padding 会影响哪些部分呢?
FlowLayout 的宽度肯定不会受影响,但是高度是会的;然后onLayout 中,子控件的初始位置,应该要加上 padding,所以,修改后的代码,应该是这样:
重新运行一下;发现已经ok了:

为方便大家交流,创建了一个qq群


 被折叠的 条评论
为什么被折叠?
被折叠的 条评论
为什么被折叠?
 到【灌水乐园】发言


