


1. 每次启动电脑都不能启动swap分区,都要用swapon /dev/sdb3来激活交换分区。再去看gentoo的安装手册,原来是/etc/fstab没有编辑好,使用其自动生成的有问题。现在将自己修改的贴上,以后用的着。
# NOTE: If your BOOT partition is ReiserFS, add the notail option to opts.
/dev/sdb2               /boot           ext2            noauto,noatime  1 2
/dev/sdb4               /               ext4            noatime         0 1
/dev/sdb3               none            swap            sw              0 0
#/dev/cdrom             /mnt/cdrom      auto            noauto,ro       0 0
#/dev/fd0               /mnt/floppy     auto            noauto          0 0
2. 开机启动不了 iNodeAuthService 服务,现在终于解决了!现在贴出来:
安装的时候会自动生成/etc/init.d/iNodeAuthService:
#!/sbin/runscript

#
# Startup script for iNodeAuthService
#
# chkconfig: - 80 20
# description: iNodeAuthService
# processname: iNodeAuthService
# pidfile: /var/run/AuthenMngService.pid
# config: /etc/iNode/iNode.conf

# Get fake config
INODE_CFG="/etc/iNode/inodesys.conf"

[ -r "$INODE_CFG" ] && . "${INODE_CFG}"

# if INSTALL_DIR is not set, exit
if [ -z "$INSTALL_DIR" ]; then
    echo INSTALL_DIR not set yet
    exit 1
fi

LD_LIBRARY_PATH="$LD_LIBRARY_PATH;$INSTALL_DIR/libs";export LD_LIBRARY_PATH

RETVAL=0

# See how we were called.
start() {
    echo -n "Starting AuthenMngService: "
    $INSTALL_DIR/AuthenMngService
}

stop() {
    echo -n "Stopping AuthenMngService: "
    $INSTALL_DIR/AuthenMngService -k
}

# See how we were called.
case "$1" in
  start)
        start
        ;;
  stop)
        stop
        ;;
  restart)
        stop
        sleep 5
        start
        ;;
  *)
        echo "Usage: iNodeAuthService {start|stop|restart}"
        exit 1
esac

exit $RETVAL
#!/sbin/runscript
#
# Startup script for iNodeAuthService
#
# chkconfig: - 80 20
# description: iNodeAuthService
# processname: iNodeAuthService
# pidfile: /var/run/AuthenMngService.pid
# config: /etc/iNode/iNode.conf

# Get fake config
INODE_CFG="/etc/iNode/inodesys.conf"

[ -r "$INODE_CFG" ] && . "${INODE_CFG}"

# if INSTALL_DIR is not set, exit
if [ -z "$INSTALL_DIR" ]; then
    echo INSTALL_DIR not set yet
    exit 1
fi

LD_LIBRARY_PATH="$LD_LIBRARY_PATH;$INSTALL_DIR/libs";export LD_LIBRARY_PATH

RETVAL=0

# See how we were called.
start() {
	ebegin Starting AuthenMngService
	$INSTALL_DIR/AuthenMngService
	eend $?
}
stop() {
	ebegin Stopping AuthenMngService
	$INSTALL_DIR/AuthenMngService -k
	eend $?
}
3. 安装wine的时候打开时中文乱码,解决方法如下:
新建zh.reg,内容如下:
REGEDIT4

[HKEY_LOCAL_MACHINE\Software\Microsoft\Windows NT\CurrentVersion\FontLink\SystemLink]
"Lucida Sans Unicode"="wqy-microhei.ttc"
"Microsoft Sans Serif"="wqy-microhei.ttc"
"MS Sans Serif"="wqy-microhei.ttc"
"Tahoma"="wqy-microhei.ttc"
"Tahoma Bold"="wqy-microhei.ttc"
"SimSun"="wqy-microhei.ttc"
"Arial"="wqy-microhei.ttc"
"Arial Black"="wqy-microhei.ttc"
再用wine regedit,打开后直接导入上面的文件,重启wine就可以了。上面的字体还可以修改。
4. 用kchmviewer的时候打开文件乱码,网上百度都是说:
在kchmviewer中的“settiings”选单中的“Appication Settings...” 再选择“版本指定设置页面” 再选“基于KHTMLPart的组件”后按确定后,再重开就好了于是就照着上面做了,如下图:
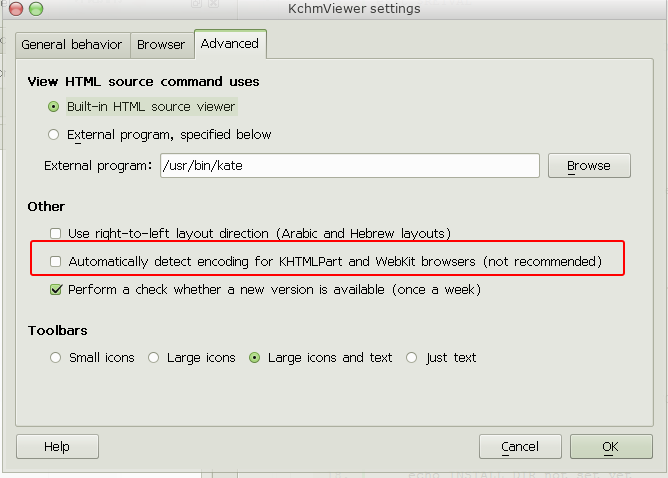
Automatically detect encoding for KHTMLPart and Webkit browsers (not recommended) 这个不能选
点上那个后,后面就全乱码了。然后用sudo kchmviewer qwe.chm,可又没出错。又以为是权限问题。后来才知道sudo 的时候那个没有选择这个选项,两个用户的配置不同才会有不同,不是权限问题。最后一定不要点击那个。
5. gentoo 安装metasploit的时候连不上postresql.不知道为什么,后来卸装再重装的时候看到重装的时候给出下面的信息:
 * Messages for package net-analyzer/metasploit-9999:

 * You need to prepare the database by running:
 * emerge --config postgresql-server
 * /etc/init.d/postgresql-<version> start
 * emerge --config =metasploit-9999
* Adjust /usr/lib/metasploit9999/config/database.yml if necessary6. 安装java后,要打开jar后缀的文件,应用程序里面没有这个命令。每次都要自己输入java -jar xxx.jar。这样打开图形界面的程序就有点麻烦了,于是写了个桌面快捷程序,会自动添加到鼠标右键,然后选择默认程序就可以了。在.local/share/applications中新建java-jar.desktop,内容如下:
[Desktop Entry]
Encoding=UTF-8
Version=1.0
Type=Application
NoDisplay=true   #不显示在应用程序菜单中
Exec=java -jar %f
Name=java-jar
Comment=java 打开jar文件
Icon=/opt/oracle-jdk-bin-1.7.0.45/jre/lib/desktop/icons/hicolor/48x48/apps/sun-java.png
7. 用goagent的时候遇到这样的问题:
WARNING - [Jan 24 17:44:24] Load Crypto.Cipher.ARC4 Failed, Use Pure Python Instead.
WARNING - [Jan 24 17:44:24] please install *libnss3-tools* package to import GoAgent root ca
(1) goagent会尝试调用python内置的Crypto.Cipher.ARC4进行RC4加密/解密,它属于pycrypto软件包。如果缺少这个软件包,则会产生一个调用失败的错误,这时goagent会使用自带的RC4加解密模块代替。后者在功能上与前者完全一致,在性能上略有损失,但在网速不是很快的时候几乎不会感觉到有差别。如果你的网速超过10Mbps或1MB/s,那么可能会体现为CPU占用率有所上升。直接安装 sudo emerge dev-python/pycrypto
(2) 这个包主要是用来自动导入证书的,使用:USE=utils emerge -av dev-libs/nss就可以解决libnss3-tools问题。
8. 下载了新的版本的goagent的时候出现了下面的错误:
beyond@beyond ~/桌面/goagent-3.1.4/local $ python proxy.py
Traceback (most recent call last):
  File "proxy.py", line 2915, in <module>
    main()
  File "proxy.py", line 2891, in main
    CertUtil.check_ca()
  File "proxy.py", line 391, in check_ca
    if CertUtil.import_ca(capath) != 0:
  File "proxy.py", line 362, in import_ca
    return os.system('certutil -L -d sql:$HOME/.pki/nssdb | grep "%s" || certutil -d sql:$HOME/.pki/nssdb -A -t "C,," -n "%s" -i "%s"' % (commonname, commonname, certfile))
UnicodeDecodeError: 'ascii' codec can't decode byte 0xe6 in position 13: ordinal not in range(128)
上面的错误主要是路径中含有中文,直接放到全英文的目录下就可以了。
9. 安装layman,提示如下:
 * Running layman-updater...
 *   Creating layman's make.conf file
 *   You are now ready to add overlays into your system.
 *
 *     layman -L  #这一步相当慢,耐心等待下
 *
 *   will display a list of available overlays.
 *
 *   Select an overlay and add it using
 *
 *     layman -a overlay-name
 *
 *   If this is the very first overlay you add with layman,
 *   you need to append the following statement to your
 *   /etc/portage/make.conf file:
 *
 *     source /var/lib/layman/make.conf
 *
 *   If you modify the 'storage' parameter in the layman
 *   configuration file (/etc/layman/layman.cfg) you will
 *   need to adapt the path given above to the new storage
 *   directory.
 *
 *
还有一个gentoo-zh的说明:
由 Gentoo-China 和 Gentoo-Taiwan 合并而来。

用户手册:

使用方法 gentoo-zh 已经加入 layman 列表,只需要

layman -L
layman -a gentoo-zh
如果你是第一次使用 layman , 需要按照如下的办法配置

USE=git emerge layman

layman -f
layman -a gentoo-zh

echo "source /var/lib/layman/make.conf" >> /etc/portage/make.conf
其实就是最后一步 echo "source /var/lib/layman/make.conf" >> /etc/portage/make.conf 将 layman 的配置包含进来, 这样 layman 管理的 overlay 就暴露给 portage 了.

用户通知页面:

http://microcai.github.com/gentoo-zh

开发者手册: Developer's Guide 项目仓库: http://github.com/microcai/gentoo-zh

加入我们

这个 git repo 保留了2个项目的全部历史。

http://repo.or.cz/w/gentoo-zh.git 这里还有一个 mirror. 供 github 抽风的时候使用。


 6926
6926

 被折叠的 条评论
为什么被折叠?
被折叠的 条评论
为什么被折叠?
 到【灌水乐园】发言


