


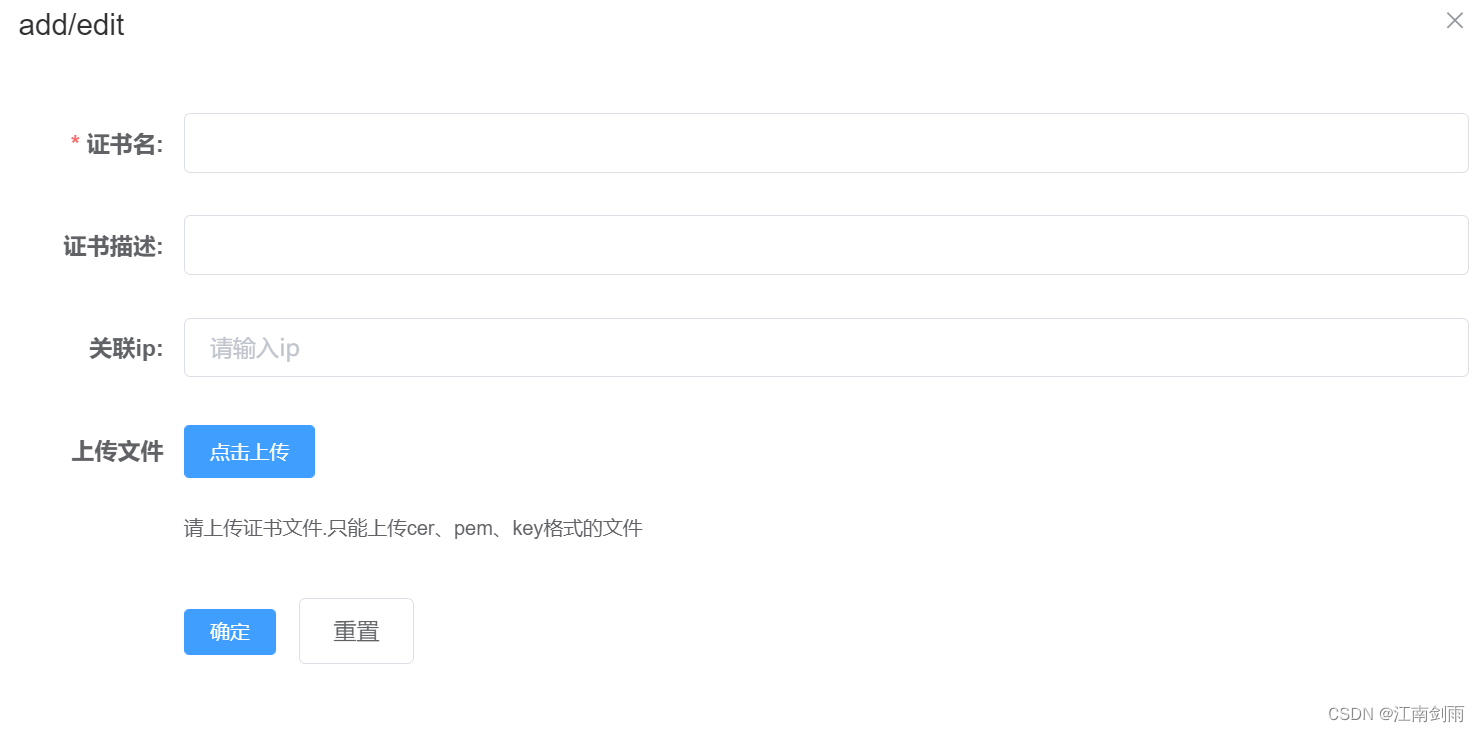
elementui 官方文档只介绍了上传文件。但是实际场景是想上传得文件和表单一起上传怎么实现呢。最终目的是一个接口搞定上传文件和其他form 对象一起提交。话不多说。先上效果
  <el-form :model="certform" :rules="certrules" ref="certform">
          <el-form-item label="证书名:" :label-width="formLabelWidth" prop="cert_name">
            <el-input size="medium"   v-model="certform.cert_name"  autocomplete="off"></el-input>
          </el-form-item>
          <el-form-item label="证书描述:" :label-width="formLabelWidth" prop="desc">
            <el-input size="medium"   v-model="certform.desc"  autocomplete="off"></el-input>
          </el-form-item>
           <el-form-item label="关联ip:"  :label-width="formLabelWidth"  prop="iplist" >
         <el-select   size="medium"   @focus="getip"     style="width:100%"  :remote-method="remoteMethod" :loading="loading" value-key="id"   v-model="certform.iplist" multiple  clearable  filterable remote  placeholder="请输入ip">
         <el-option v-for="item in options" :key="item.id" :label="item.ip" :value="item.ip">
       </el-option>
       </el-select>
        </el-form-item>
            <el-form-item label="上传文件" prop="apk" :label-width="formLabelWidth">
           <el-upload ref="upload" class="upload-demo" action="certmanage" accept=".cer,.pem,.key"
          :http-request="httpRequest"  :on-exceed="handleExceed"  :on-success="uploadSuccess"  :before-remove="beforeRemove"
          multiple :limit="2" :auto-upload="false" :on-change="getFile" :data="certform" :file-list="fileList" name="annexFile"
          style="width: 300px;">
          <el-button size="small" type="primary">点击上传</el-button>
          <div slot="tip" class="el-upload__tip">{{message}}</div>
        </el-upload>
      </el-form-item>
      <el-form-item label="" :label-width="formLabelWidth">
            <el-button size="mini" type="primary" v-if="this.dialogStatus==='update'"  :disabled="isDisable" @click="updatesubmitForm('certform')">确定</el-button>
             <el-button size="mini" type="primary" v-if="this.dialogStatus==='create'"  :disabled="isDisable" @click="submitForm('certform')">确定</el-button>
            <el-button @click="resetForm('certform')">重置</el-button>
          </el-form-item>
由于auto-upload=“false" before-upload方法不生效。使用on-change方法来实现文件扩展名校验。校验不通过不允许提交
getFile(file, fileList) {
        this.fileList = fileList;
        console.log(this.fileList)
        let extName = file.name.substring(file.name.lastIndexOf('.') + 1);
        var AllUpExt = '.cer|.key|.pem|'
        if (AllUpExt.indexOf(extName) === -1) {
          this.$message.error('文件格式不正确!')
          this.isDisable = true;//校验不正确不允许表单提交
          return false;
        }
        console.log('tt12')
        console.log(this.fileList)
        const fd = new FormData() // FormData 对象
        this.fd = fd
      },

 handleExceed(files, fileList) {
        this.$message.warning("目前只能上传二个包")
 },
//删除文件前得方法
 beforeRemove(file, fileList) {
      this.isDisable = false;
      //return this.$confirm(`确定移除 ${file.name}?`);
      return this.$confirm(`确定移除 ${file.name}?`, '提示', {
        confirmButtonText: '确定',
        cancelButtonText: '取消',
        type: 'warning'
      }).then(() => {
        this.$message({
          type: 'success',
          message: '删除成功!'
        });
      }).catch(() => {
        this.isDisable = true
        this.$message({
          type: 'info',
          message: '已取消删除'
        });
      });
}
//覆盖默认得上传方法
httpRequest(param) {
      console.log(param)
      console.log(this.fd)
      console.log(this.fileList)
      const fileObj = param.file // 相当于input里取得的files
      console.log(fileObj)
      this.fd.append('file', fileObj)
}
//提交上传得文件及其表单方法
  submitForm(formName) {
        this.$refs[formName].validate((valid) => {
          if (valid) {
            console.log(this.fileList)
            if (this.fileList.length <= 0) {
              this.$message.error("至少上传一个包!");
              return;
            }
            this.$refs.upload.submit();
            //将表单内其他内容添加进fd
            this.fd.append('cert_name', this.certform.cert_name)
            this.fd.append('desc', this.certform.desc)
            this.fd.append('iplist',this.certform.iplist)
            this.fd.append('type', "0")
            this.fullscreenLoading = true;
            //调用后端接口,提交即可
            axios.post('/certmanage/',this.fd).then(data => {
              console.log(data)
              console.log(data.data.code)
              if (data.data.code == 20000) {
                //this.fullscreenLoading = false;
                this.$message({
                  message: '上传成功',
                  type: 'success'
                });
                this.fd = {}
                this.fileList = []
              }
            }).catch( err => {
              this.$message.error('上传失败');
              }
            )
          } else {
            // console.log('error submit!!');
            return false;
          }
        });
      }
我这边使用得后端是flask。看下后端这边怎么取文件呢
filelist = request.files.getlist('file') ###读取多个文件。这样就可以读取多个文件了


 2787
2787


 被折叠的 条评论
为什么被折叠?
被折叠的 条评论
为什么被折叠?
 到【灌水乐园】发言


