


引言
之前安装redis,只实现了单机版:如何安装单机版redis。这里介绍如何搭建redis集群版。
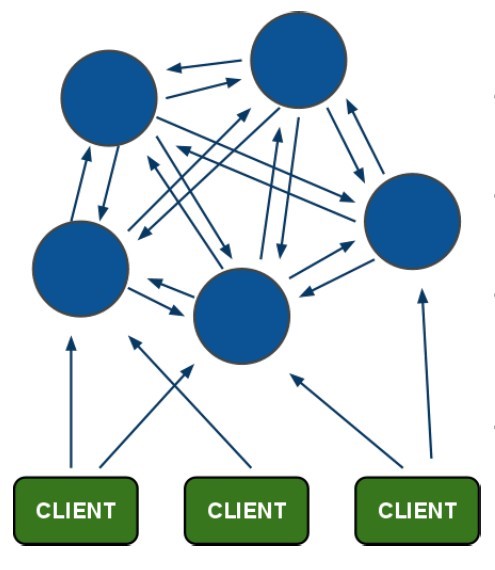
redis集群架构图
架构内容解释:
-
所有的redis节点彼此互联(PING-PONG机制),内部使用二进制协议优化传输速度和带宽.
-
节点的fail是通过集群中超过半数的节点检测失效时才生效。
-
客户端与redis节点直连,不需要中间proxy层.客户端不需要连接集群所有节点,连接集群中任何一个可用节点即可。
-
redis-cluster把所有的物理节点映射到[0-16383]slot上,cluster负责维护node<->slot<->value。
-
Redis集群中内置了 16384个哈希槽,当需要在 Redis集群中放置一个 key-value时,redis先对 key 使用 crc16算法算出一个结果,然后把结果对 16384求余数,这样每个 key都会对应一个编号在 0-16383之间的哈希槽,redis会根据节点数量大致均等的将哈希槽映射到不同的节点。
集群搭建步骤
集群中应该至少有三个节点,每个节点有一备份节点。需要6台服务器。这才因为条件关系,所以搭建伪集群。
-
创建6个redis实例指定端口从7001到7006
-
修改redis.conf 打开Cluster-enable yes前面的注释。
-
需要一个ruby脚本。在redis源码文件夹下的src目录下。redis-trib.rb
-
把redis-trib.rb文件复制到到redis-cluster目录下。
-
执行ruby脚本之前,需要安装ruby环境。
a、yum installruby
b、yum installrubygems
c、安装redis-trib.rb运行依赖的ruby的包。
-
启动所有的redis实例。使用redis-trib.rb创建集群。
./redis-trib.rb create --replicas 1 192.168.144.239:7001 192.168.144.239:7002 192.168.144.239:7003 192.168.144.239:7004 192.168.144.239:7005 192.168.144.239:7006-
使用客户端连接集群:redis01/redis-cli -p 7001 -c
redis应用
单机版applicationContext-service:
<!--配置redis客户端单机版-->
<bean id = "jedisPool" class="redis.clients.jedis.JedisPool">
    <constructor-arg name="host" value="192.168.144.239"></constructor-arg>
    <constructor-arg name="port" value="6379"></constructor-arg>
</bean>

<!--配置redis客户端实现类-->
<bean id = "jedisClientSingle" class="com.taotao.rest.component.Impl.JedisClientSingle"/>
集群版applicationContext-service:
<!--配置redis客户端集群版-->
    <bean id="jedisCluster" class="redis.clients.jedis.JedisCluster">
        <constructor-arg>
            <set>
                <bean class="redis.clients.jedis.HostAndPort">
                    <constructor-arg name="host" value="192.168.144.239"/>
                    <constructor-arg name="port" value="7001"/>
                </bean>
                <bean class="redis.clients.jedis.HostAndPort">
                    <constructor-arg name="host" value="192.168.144.239"/>
                    <constructor-arg name="port" value="7002"/>
                </bean>
                <bean class="redis.clients.jedis.HostAndPort">
                    <constructor-arg name="host" value="192.168.144.239"/>
                    <constructor-arg name="port" value="7003"/>
                </bean>
                <bean class="redis.clients.jedis.HostAndPort">
                    <constructor-arg name="host" value="192.168.144.239"/>
                    <constructor-arg name="port" value="7004"/>
                </bean>
                <bean class="redis.clients.jedis.HostAndPort">
                    <constructor-arg name="host" value="192.168.144.239"/>
                    <constructor-arg name="port" value="7005"/>
                </bean>
                <bean class="redis.clients.jedis.HostAndPort">
                    <constructor-arg name="host" value="192.168.144.239"/>
                    <constructor-arg name="port" value="7006"/>
                </bean>
            </set>
        </constructor-arg>
    </bean>

    <bean id="jedisClientCluster" class="com.taotao.rest.component.Impl.JedisClientCluster"/>
service:
    @Autowired
    private TbContentMapper contentMapper;
    @Autowired
    private JedisClient jedisClient;
    @Value("${REDIS_CONTENT_KEY}")
    private String REDIS_CONTENT_KEY;

    @Override
    public List<TbContent> getContentList(Long cid) {
        //添加缓存
        //查询数据库之前先查询缓存,如果有直接返回
        try {
            //从redis中去缓存数据
            String json = jedisClient.hget(REDIS_CONTENT_KEY,cid + "");
            if(!StringUtils.isEmpty(json)){
                //把json转换成List
                return JsonUtils.jsonToList(json,TbContent.class);
            }
        } catch (Exception e){
            throw new RuntimeException(e);
        }

        //根据cid查询内容列表
        TbContentExample example = new TbContentExample();
        TbContentExample.Criteria criteria = example.createCriteria();
        criteria.andCategoryIdEqualTo(cid);

        List<TbContent> list = contentMapper.selectByExampleWithBLOBs(example);

        //返回结果之前,向缓存中添加数据
        try {
            //为了规范key,可以使用hash
            //定义一个保存内容的key,hash中每个项就是cid
            //value是list,需要把list转换成json数据。
            jedisClient.hset(REDIS_CONTENT_KEY,cid + "", JsonUtils.objectToJson(list));
        } catch (Exception e){
            throw new RuntimeException(e);
        }
        return list;
    }


 4581
4581

 被折叠的 条评论
为什么被折叠?
被折叠的 条评论
为什么被折叠?
 到【灌水乐园】发言


