简介
本篇为学习yuv图片格式转化笔记。
原理讲解
参考资料
  YUV格式哟很多种,本篇记录的格式为YUV420。
有关YUV420的详细介绍,可以参考资料:1、图文详解YUV420数据格式 http://blog.csdn.net/jefry_xdz/article/details/7931018
大致讲解
首先yuv420的存储大小为:width * height * 3 / 2。
它的分布根据前面推荐文档提到的,是又有两种方式:紧缩格式和平面格式。这里只讲解本篇使用到的平面格式。
其数据分布可以如下图所示:
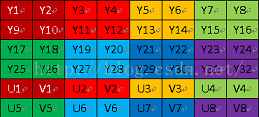
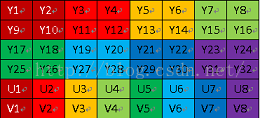 (图一) (图二)
  从图片中我们可以看到,这种格式下的yuv数据存放,yuv之间的数据比例为4:1:1。同时最先是存储完所有的Y数据之后,接着才存储UV数据。
uv数据的存放,有两种情况,u和v交替存放,以及先把所有的u存放之后,再继续存放y数据。
  其中Y数据的数据量为:图片Width * height;u和v的数据量都为图片图片Width * height / 4;
  所以在解析和转换yuv数据的时候,根据格式分离出YUV数据,在根据公式进入后续转换。
代码实现
具体代码
#include <stdio.h>
#include <opencv2/core/core.hpp>
#include <opencv/cv.h>
#include <opencv/highgui.h>
#include <string>
#include <vector>
#include <opencv2/features2d/features2d.hpp>
#include <opencv2/highgui/highgui.hpp>
#include <opencv2/imgproc/imgproc.hpp>
#include <opencv2/calib3d/calib3d.hpp>
#include <opencv2/imgproc/imgproc_c.h>
#include <stdio.h>

using namespace cv;
using namespace std;

#define nWidth 1280
#define nHeight 960
#define FrameSize nWidth*nHeight*3/2
#define YSize nWidth*nHeight
#define USize nWidth*nHeight / 4
#define VSize nWidth*nHeight / 4

int main(int argc, char* argv[]){
	int i, k;
	Mat tmp, tmpY;

	FILE *f ;
	if(!(f = fopen("1.yuv","rb"))){
		printf("file open error!");
	}

	Mat yMat = Mat(cvSize(nWidth, nHeight), CV_8UC1, cv::Scalar(0, 0, 0));
	Mat uMat = Mat(cvSize(nWidth/2, nHeight/2), CV_8UC1, cv::Scalar(0, 0, 0));
	Mat vMat = Mat(cvSize(nWidth/2, nHeight/2), CV_8UC1, cv::Scalar(0, 0, 0));
	Mat rgbMat = Mat(cvSize(nWidth/2, nHeight/2), CV_8UC3, cv::Scalar(0, 0, 0));

	uchar* yPtr = yMat.ptr(0);
	uchar* uPtr = uMat.ptr(0);
	uchar* vPtr = vMat.ptr(0);
	uchar* rgbPtr = rgbMat.ptr(0);

	unsigned char *pBuf = new unsigned char[FrameSize];
	fread(pBuf, 1, FrameSize, f);

	for(i=0; i<YSize; i++){
		yPtr[i] = pBuf[i];
	}

	k=0;
	for(i=YSize; i< FrameSize;){
		uPtr[k] = pBuf[i];
		vPtr[k] = pBuf[i+1];
		i += 2;
		k += 1;
	}
	resize(yMat, tmpY, cvSize(nWidth/2, nHeight/2));
	yPtr = tmpY.ptr(0);

	for(i=0; i<YSize / 4; i++){
		rgbPtr[i*3 + 2] = yPtr[i] + 1.772 * (uPtr[i] - 128); //R
		rgbPtr[i*3 + 1] = yPtr[i] - 0.34413 * (uPtr[i] - 128) - 0.71414 * (vPtr[i] - 128); //G
		rgbPtr[i*3 + 0] = yPtr[i] + 1.402 * (vPtr[i] - 128); //G
	}
	imshow("new.jpg", rgbMat);
	imshow("U", uMat);
	imshow("v", vMat);
	imshow("Y", tmpY);
	cvWaitKey( 0 );
	return 0;
}
代码讲解
1、首先是打开对应图片,然后进行一些对应初始化设置
    FILE *f ;
    if(!(f = fopen("1.yuv","rb"))){
        printf("file open error!");
    }

    Mat yMat = Mat(cvSize(nWidth, nHeight), CV_8UC1, cv::Scalar(0, 0, 0));
    Mat uMat = Mat(cvSize(nWidth/2, nHeight/2), CV_8UC1, cv::Scalar(0, 0, 0));
    Mat vMat = Mat(cvSize(nWidth/2, nHeight/2), CV_8UC1, cv::Scalar(0, 0, 0));
    Mat rgbMat = Mat(cvSize(nWidth/2, nHeight/2), CV_8UC3, cv::Scalar(0, 0, 0));

    uchar* yPtr = yMat.ptr(0);
    uchar* uPtr = uMat.ptr(0);
    uchar* vPtr = vMat.ptr(0);
    uchar* rgbPtr = rgbMat.ptr(0);
打开图片到f中,接着创建了yMat,uMat, vMat, rgbMat,分别用来保存y,u,v分量数据,以及最后合成出来的rgb图像数据。
2、取出Y的数据到yMat。
   #define FrameSize nWidth*nHeight*3/2
   #define YSize nWidth*nHeight

    unsigned char *pBuf = new unsigned char[FrameSize];
    fread(pBuf, 1, FrameSize, f);

    for(i=0; i<YSize; i++){
        yPtr[i] = pBuf[i];
    }
前面讲解时候已经说过,图像的所有数据大小为Width*Height*3/2, Y的数据大小为:Width*Height。这里首先将大小的图像文件f中,所有的数据读取到pBuf中,接着从pBuf中,取出最开始的Width*Height数据,也就对应为Y的数据。
3、取出U、V的数据
k=0;
for(i=YSize; i< FrameSize;){
    uPtr[k] = pBuf[i];
    vPtr[k] = pBuf[i+1];
    i += 2;
    k += 1;
}
这里使用的范例图片为u、v交替存储格式,所有是u、v数据交替读取。最后u、v数据保存到uMat和vMat中。
4、转换为RGB图像
resize(yMat, tmpY, cvSize(nWidth/2, nHeight/2));
yPtr = tmpY.ptr(0);

for(i=0; i<YSize / 4; i++){
    rgbPtr[i*3 + 2] = yPtr[i] + 1.772 * (uPtr[i] - 128);
    rgbPtr[i*3 + 1] = yPtr[i] - 0.34413 * (uPtr[i] - 128) - 0.71414 * (vPtr[i] - 128);
    rgbPtr[i*3 + 0] = yPtr[i] + 1.402 * (vPtr[i] - 128);
}
也就是根据yuv到RGB的转换公式,来讲图像数据转换为RGB,分别存放到rgbMat图像对应的三个通道中。需要注意下:之前已经有提到yuv420的像素比例为4:1:1,所有,在合成到RGB图像之前需要首先将u、v的数据分别扩展放大4倍,让YUV之前比值为4:4:4。 我这里为了方便测试显示图像,所以是将Y的数据,缩放为原来图像的1/4,这会导致,最后出来的图像width和height都只有原图像1/4。
  常用的yuv转换为RGB的公式有:
          R= Y +  +1.402(V-128)
          G= Y - 0.34413(U-128) - 0.71414(V-128)
          B= Y + 1.772(U-128)+0
效果演示
 (Y) (U)

 (Y) (RGB)


 285
285

 被折叠的 条评论
为什么被折叠?
被折叠的 条评论
为什么被折叠?
 到【灌水乐园】发言


