出处 :http://blog.csdn.net/androidxiaogang/article/details/47058821
Android中listview是最常用的控件,因此listview的学习和使用就变得非常重要。listview比较重要的两点是一个是适配器的使用,另一个是对listview的优化问题。
1适配器的使用问题。listview的适配器是将我们的数据映射到视图上的就是把数据展示到页面上。常用的适配器有SimpleAdapter,BaseAdapter和CursorAdapter.Android这样设计让我们使用适配器非常灵活。但是我们如何选择合适的适配器呢?
(1).我们的数据是数组或者集合,那么可以选用SimpleAdapter和BaseAdapter
(2).数据是从数据库中获得可以使用CursorAdapter
2ListView的优化问题
(1)listview的复用convertView;
(2)ViewHolder的使用;
以下通过示例对上面的进行理解。
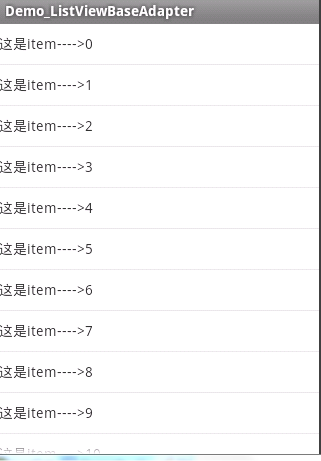
示例1使用BaseAdapter显示0-30个item
布局文件:
<span class="hljs-tag" style="color: rgb(0, 102, 102); box-sizing: border-box; font-family: 'Source Code Pro', monospace; font-size: 14px; line-height: 20.3px; white-space: pre; background-color: rgba(128, 128, 128, 0.0470588);"><<span class="hljs-title" style="box-sizing: border-box; color: rgb(0, 0, 136);">RelativeLayout</span> <span class="hljs-attribute" style="box-sizing: border-box; color: rgb(102, 0, 102);">xmlns:android</span>=<span class="hljs-value" style="box-sizing: border-box; color: rgb(0, 136, 0);">"http://schemas.android.com/apk/res/android"</span> </span><span class="hljs-tag" style="line-height: 20.3px; color: rgb(0, 102, 102); box-sizing: border-box; white-space: pre;"> </span>
<span class="hljs-tag" style="line-height: 20.3px; color: rgb(0, 102, 102); box-sizing: border-box; white-space: pre;"><span class="hljs-attribute" style="box-sizing: border-box; color: rgb(102, 0, 102);">xmlns:tools</span>=<span class="hljs-value" style="box-sizing: border-box; color: rgb(0, 136, 0);">"http://schemas.android.com/tools"</span> </span>
<span class="hljs-tag" style="line-height: 20.3px; color: rgb(0, 102, 102); box-sizing: border-box; white-space: pre;"><span class="hljs-attribute" style="box-sizing: border-box; color: rgb(102, 0, 102);">android:layout_width</span>=<span class="hljs-value" style="box-sizing: border-box; color: rgb(0, 136, 0);">"match_parent"</span> </span>
<span class="hljs-tag" style="line-height: 20.3px; color: rgb(0, 102, 102); box-sizing: border-box; white-space: pre;"><span class="hljs-attribute" style="box-sizing: border-box; color: rgb(102, 0, 102);">android:layout_height</span>=<span class="hljs-value" style="box-sizing: border-box; color: rgb(0, 136, 0);">"match_parent"</span> </span>
<span class="hljs-tag" style="line-height: 20.3px; color: rgb(0, 102, 102); box-sizing: border-box; white-space: pre;"> <span class="hljs-attribute" style="box-sizing: border-box; color: rgb(102, 0, 102);">tools:context</span>=<span class="hljs-value" style="box-sizing: border-box; color: rgb(0, 136, 0);">".MainActivity"</span> ></span><span style="line-height: 20.3px; white-space: pre;"> </span>
<span style="line-height: 20.3px; white-space: pre;"> </span><span class="hljs-tag" style="line-height: 20.3px; color: rgb(0, 102, 102); box-sizing: border-box; white-space: pre;"><<span class="hljs-title" style="box-sizing: border-box; color: rgb(0, 0, 136);">ListView</span> </span>
<span class="hljs-tag" style="line-height: 20.3px; color: rgb(0, 102, 102); box-sizing: border-box; white-space: pre;"> <span class="hljs-attribute" style="box-sizing: border-box; color: rgb(102, 0, 102);">android:id</span>=<span class="hljs-value" style="box-sizing: border-box; color: rgb(0, 136, 0);">"@+id/listview"</span> </span>
<span class="hljs-tag" style="line-height: 20.3px; color: rgb(0, 102, 102); box-sizing: border-box; white-space: pre;"> <span class="hljs-attribute" style="box-sizing: border-box; color: rgb(102, 0, 102);">android:layout_width</span>=<span class="hljs-value" style="box-sizing: border-box; color: rgb(0, 136, 0);">"fill_parent"</span> </span>
<span class="hljs-tag" style="line-height: 20.3px; color: rgb(0, 102, 102); box-sizing: border-box; white-space: pre;"><span class="hljs-attribute" style="box-sizing: border-box; color: rgb(102, 0, 102);">android:layout_height</span>=<span class="hljs-value" style="box-sizing: border-box; color: rgb(0, 136, 0);">"fill_parent"</span> ></span><span style="line-height: 20.3px; white-space: pre;"> </span>
<span class="hljs-tag" style="line-height: 20.3px; color: rgb(0, 102, 102); box-sizing: border-box; white-space: pre;"></<span class="hljs-title" style="box-sizing: border-box; color: rgb(0, 0, 136);">ListView</span>></span>
<span class="hljs-tag" style="line-height: 20.3px; color: rgb(0, 102, 102); box-sizing: border-box; white-space: pre;"></<span class="hljs-title" style="box-sizing: border-box; color: rgb(0, 0, 136);">RelativeLayout</span>></span>
<span style="font-family: 'microsoft yahei'; line-height: 26px;">item布局文件:</span>
<pre name="code" class="java"><?xml version="1.0" encoding="utf-8"?>
<LinearLayout xmlns:android="http://schemas.android.com/apk/res/android"
    android:layout_width="match_parent"
    android:layout_height="match_parent"
    android:orientation="vertical" >

    <TextView
        android:id="@+id/textview"
        android:layout_width="fill_parent"
        android:layout_height="40dp"
        android:gravity="center_vertical" />

</LinearLayout>
package com.example.demo_listviewbaseadapter;
import java.util.ArrayList;
import java.util.List;
import javax.crypto.spec.PSource;
import android.app.Activity;
import android.os.Bundle;
import android.view.View;
import android.view.ViewGroup;
import android.widget.BaseAdapter;
import android.widget.ListView;
import android.widget.TextView;
public class MainActivity extends Activity {
private ListView listview;
private List list;
private MyAdapter adapter;
@Override
protected void onCreate(Bundle savedInstanceState) {
    super.onCreate(savedInstanceState);
    setContentView(R.layout.activity_main);
    listview = (ListView) findViewById(R.id.listview);
    list = new ArrayList();
    // 得到一个集合;
    for (int i = 0; i <= 30; i++) {
        list.add(i);
    }
    // 给listview设置适配器;
    adapter = new MyAdapter();
    listview.setAdapter(adapter);
}

private class MyAdapter extends BaseAdapter {

    @Override
    public int getCount() {
        // TODO Auto-generated method stub
        return list.size();
    }

    @Override
    public Object getItem(int position) {
        // TODO Auto-generated method stub
        return position;
    }

    @Override
    public long getItemId(int position) {
        // TODO Auto-generated method stub
        return position;
    }

    @Override
    public View getView(int position, View convertView, ViewGroup parent) {
        View view = getLayoutInflater().inflate(R.layout.item, null);
        TextView textview = (TextView) view.findViewById(R.id.textview);
        textview.setText("这是item---->" + list.get(position));
        System.out.println("这是new出来的listview" + view.hashCode());
        return view;

    }
}
}
在控件台打印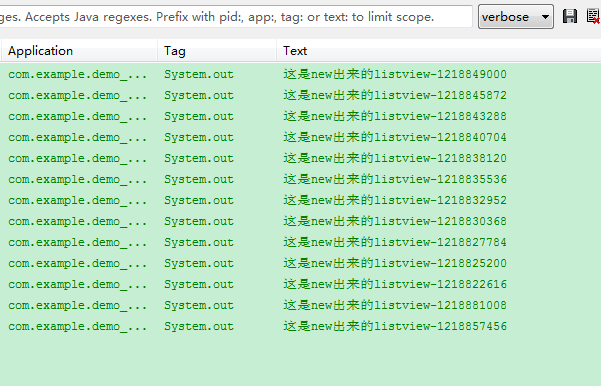
可以看到我们在后台打印的结果,从0-30的hashCode值都打印出来了,并且没有相同的,也就是说在内存中new了31个view,这是相当耗费内存了,当前我们的item还是比较简,你一般的还要有图片,时间,或者及评论什么的,在一个item中的内容相当多。因此就要考虑listview的复用问题
下面优化一下代码首先添加ViewHolder类:
<pre name="code" class="java">public final class ViewHolder {
        TextView textview;
    }
修改getView
<pre name="code" class="java">@Override
        public View getView(int position, View convertView, ViewGroup parent) {
            ViewHolder holder;
            if (convertView == null) {
                holder = new ViewHolder();
                convertView = getLayoutInflater().inflate(R.layout.item, null);
                holder.textview = (TextView) convertView
                        .findViewById(R.id.textview);
                holder.textview.setText("这是item---->" + list.get(position));
                System.out.println("这是new出来的listview" + convertView.hashCode());
                convertView.setTag(holder);
            } else {
                holder = (ViewHolder) convertView.getTag();
                System.out
                        .println("这是copy出来的listview" + convertView.hashCode());
            }
            return convertView;

        }
再看打印结果
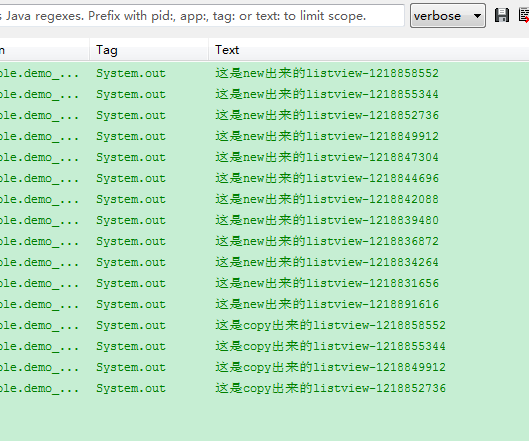
从打印结果上面我们copy出来的listview的hashCode值与上面new出来的值一样,这说明listview是复用上面的
现在分析一下修改的代码:首先我们判断convertView是否为空,如果为空的话我们就创建出一个Item.如果不为空的话就复用。这样不管我们有多少个item,在内存中只加载我们手机屏幕显示个数+1个item。这样很节省内存,我们划到listview的时候都会显示的流畅。
再来看我们新加了一个ViewHolder类,这个是我们对item里的控件进行缓存用的,在convertView如果不为空的时候我们new出ViewHolder,并且设置一个Tag(就是一个标记),当convertView不为空的时候我们调用getTag()的方法取出ViewHolder.这样listview就达到复用的效果了
由于篇幅太长,下一篇介绍一通过实例介绍CursorAdapte的使用


 236
236

 被折叠的 条评论
为什么被折叠?
被折叠的 条评论
为什么被折叠?
 到【灌水乐园】发言


