


一 . Struts2的工作流程小记
写在前面的小尾巴
因为最近在整一个struts1的项目 然后扯到struts2的一些东西吧啦啦啦 以下省略1000字 然后 网上找了些资料 自己整理了下 恩 以上
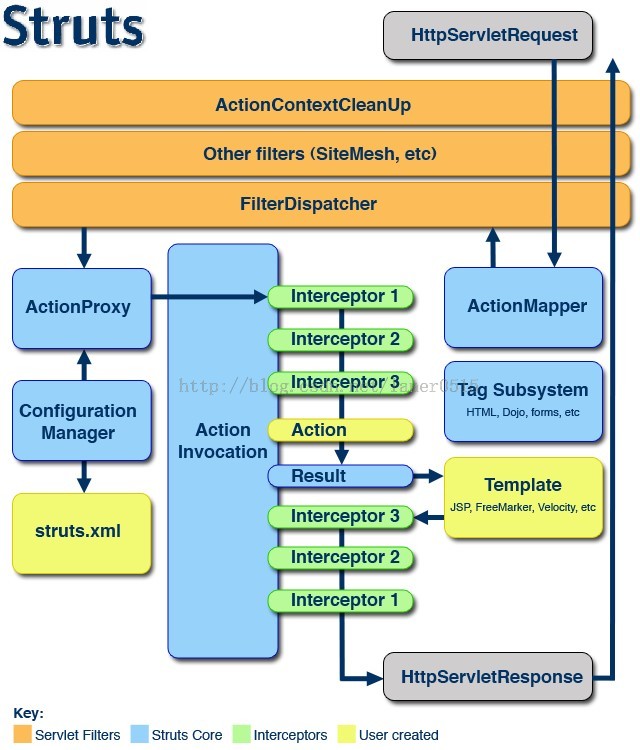
1、客户端初始化一个指向Servlet容器(例如Tomcat)的请求
2、这个请求经过一系列的过滤器(Filter)(这些过滤器中有一个叫做 ActionContextCleanUp的可选过滤器,这个过滤器对于Struts2和其 他框架的集成很有帮助,例如:SiteMesh Plugin)
3、接着FilterDispatcher被调用,FilterDispatcher询问ActionMapper来决定这个请是否需要调用某个Action FilterDispatcher是控制器的核心,就是mvc中c控制层的核心。
FilterDispatcher工作流程和原理:
FilterDispatcher进行初始化并启用核心doFilter
不过在此之前 首先这里需要明确几个概念
1>. 获取HttpServletRequest通常最好的方式是FilterConfig 即如下方式
ServletContext servletContext = filterConfig.getServletContext(); 这是因为当用户快速多次请求,并从HttpServletRequest对象中获取
ServletContext时有可能会抛出一个NullPointerException异常 所以上述方法最好
2>. ServletContext 的意思就是当容器(Tomcat 或者Apache)启动的时候 会为部署在其项目目录下的每个web工程建造一个ServletContext 对象 ServletContext 也就代表了当前的工程对象 自然一个工程中的所有Servlet自然共享同一个ServletContext 对象 并可以借此来进行相互之间的通讯 其生命周期从创建之时开始到服务器关闭结束 同时ServletContext当中会保持在服务器很久 所以应该不宜保存过大的文件数据
(在此当中有一个小tips forward方法是把请求的内容转发到另外的一个servlet 而include是把另一个servlet处理过后的内容拿过来 forward方法调用后在响应中的没有提交的内容被自动消除 将请求转发给其他的Servlet后 由 被调用的Servlet负责对请求做出响应 而原先Servlet的执行则终止 include方法使原先的Servlet和转发到的Servlet都可以输出响应信息 即原先的Servlet还可以继续输出响应信息 )
3>.FilterConfig可以获取部署描述符文件(web.xml)中分配的过滤器初始化参数
定义:
FilterConfig对象提供对servlet环境及web.xml文件中指派的过滤器名的访问。
FilterConfig对象具有一个getInitParameter方法,它能够访问部署描述符文件(web.xml)中分配的过滤器初始化参数。
4>.在初始化的文件中(web.xml) 有个两个参数
<context-param>//初始化类似于系统的参数之后交给ServletContext对象
<init-param> //初始化自定义的参数
具体的描述会写一个专门的文章来解释 这里只讨论过滤器
5>.其实Request请求首先通过Filter chain Filter主要包括ActionContextCleanUp 它主要清理当前线程的ActionContext和Dispatcher FilterDispatcher主要通过AcionMapper来决定需要调用哪个Action ActionMapper取得了ActionMapping后 在Dispatcher的serviceAction方法里创建ActionProxy ActionProxy创建ActionInvocation然后ActionInvocation调用Interceptors 执行Action本身 创建Result并返回
上述tips了解之后来看整个过滤器的底层文件
public void doFilter(ServletRequest req, ServletResponse res, FilterChain chain) throws IOException, ServletException ...{
        HttpServletRequest request = (HttpServletRequest) req;
        HttpServletResponse response = (HttpServletResponse) res;
        ServletContext servletContext = filterConfig.getServletContext();
        // 在这里处理了HttpServletRequest和HttpServletResponse。
        DispatcherUtils du = DispatcherUtils.getInstance();
        du.prepare(request, response);//正如这个方法名字一样进行locale、encoding以及特殊request parameters设置
        try ...{
            request = du.wrapRequest(request, servletContext);//对request进行包装
        } catch (IOException e) ...{
            String message = "Could not wrap servlet request with MultipartRequestWrapper!";
            LOG.error(message, e);
            throw new ServletException(message, e);
        }
                ActionMapperIF mapper = ActionMapperFactory.getMapper();//得到action的mapper
        ActionMapping mapping = mapper.getMapping(request);// 得到action 的 mapping
        if (mapping == null) ...{
            // there is no action in this request, should we look for a static resource?
            String resourcePath = RequestUtils.getServletPath(request);
            if ("".equals(resourcePath) && null != request.getPathInfo()) ...{
                resourcePath = request.getPathInfo();
            }
            if ("true".equals(Configuration.get(WebWorkConstants.WEBWORK_SERVE_STATIC_CONTENT))
                    && resourcePath.startsWith("/webwork")) ...{
                String name = resourcePath.substring("/webwork".length());
                findStaticResource(name, response);
            } else ...{
                // this is a normal request, let it pass through
                chain.doFilter(request, response);
            }
            // WW did its job here
            return;
        }
        Object o = null;
        try ...{
            //setupContainer(request);
            o = beforeActionInvocation(request, servletContext);
//整个框架最最核心的方法,下面分析
            du.serviceAction(request, response, servletContext, mapping);
        } finally ...{
            afterActionInvocation(request, servletContext, o);
            ActionContext.setContext(null);
        }
    }
du.serviceAction(request, response, servletContext, mapping);
//这个方法询问ActionMapper是否需要调用某个Action来处理这个(request)请求,如果ActionMapper决定需要调用某个Action,FilterDispatcher把请求的处理交给ActionProxy

public void serviceAction(HttpServletRequest request, HttpServletResponse response, String namespace, String actionName, Map requestMap, Map parameterMap, Map sessionMap, Map applicationMap) ...{
        HashMap extraContext = createContextMap(requestMap, parameterMap, sessionMap, applicationMap, request, response, getServletConfig());  //实例化Map请求 ,询问ActionMapper是否需要调用某个Action来处理这个(request)请求
        extraContext.put(SERVLET_DISPATCHER, this);
        OgnlValueStack stack = (OgnlValueStack) request.getAttribute(ServletActionContext.WEBWORK_VALUESTACK_KEY);
        if (stack != null) ...{
            extraContext.put(ActionContext.VALUE_STACK,new OgnlValueStack(stack));
        }
        try ...{
            ActionProxy proxy = ActionProxyFactory.getFactory().createActionProxy(namespace, actionName, extraContext);
//这里actionName是通过两道getActionName解析出来的, FilterDispatcher把请求的处理交给ActionProxy,下面是ServletDispatcher的 TODO:
            request.setAttribute(ServletActionContext.WEBWORK_VALUESTACK_KEY, proxy.getInvocation().getStack());
            proxy.execute();
         //通过代理模式执行ActionProxy
            if (stack != null)...{
                request.setAttribute(ServletActionContext.WEBWORK_VALUESTACK_KEY,stack);
            }
        } catch (ConfigurationException e) ...{
            log.error("Could not find action", e);
            sendError(request, response, HttpServletResponse.SC_NOT_FOUND, e);
        } catch (Exception e) ...{
            log.error("Could not execute action", e);
            sendError(request, response, HttpServletResponse.SC_INTERNAL_SERVER_ERROR, e);
        }
} 


 811
811

 被折叠的 条评论
为什么被折叠?
被折叠的 条评论
为什么被折叠?
 到【灌水乐园】发言


