


一、简介
(A)、介绍
Swagger 是一个规范和完整的框架,用于生成、描述、调用和可视化 RESTful 风格的 Web 服务。Swagger的目标是对REST API定义一个标准的和语言无关的接口,可让人和计算机无需访问源码、文档或网络流量监测就可以发现和理解服务的能力。当通过Swagger进行正确定义,用户可以理解远程服务并使用最少实现逻辑与远程服务进行交互。与为底层编程所实现的接口类似,Swagger消除了调用服务时可能会有的猜测。
Swagger是一组开源项目,其中主要要项目如下:
Swagger-tools:提供各种与Swagger进行集成和交互的工具。例如模式检验、Swagger 1.2文档转换成Swagger 2.0文档等功能。
Swagger-core: 用于、Servlets和Play框架进行集成。
Swagger-js: 用于JavaScript的Swagger实现。
Swagger-node-express: Swagger模块,用于node.js的Express web应用框架。
Swagger-ui:一个无依赖的HTML、JS和CSS集合,可以为Swagger兼容API动态生成优雅文档。
Swagger-codegen:一个模板驱动引擎,通过分析用户Swagger资源声明以各种语言生成客户端代码。
Swagger-editor:可让使用者在浏览器里以YAML格式编辑Swagger API规范并实时预览文档。可以生成有效的Swagger JSON描述,并用于所有Swagger工具(代码生成、文档等等)中。
除了Swagger项目自身支持的Java、Scala和JavaScript语言,Swagger社区中还提供了很多支持其他语言的第三方工具,覆盖了Clojure、ColdFusion / CFML、Eiffel、Go、Groovy、.Net、Perl、PHP、Python、Ruby等各种编程语言。
SwaggerAPI文档工具可以满足下列需求:
●支持API自动生成同步的在线文档
●这些文档可用于项目内部API审核
●方便测试人员了解API
●这些文档可作为客户产品文档的一部分进行发布
●支持API规范生成代码,生成的客户端和服务器端骨架代码可以加速开发和测试速度
(B)、swagger-ui 和 springfox-swagger-ui 的关系是?
Swagger Spec 是一个规范。
Swagger Api 是 Swagger Spec 规范 的一个实现,它支持 jax-rs, restlet, jersey 等等。
Springfox libraries 是 Swagger Spec 规范 的另一个实现,专注于 spring 生态系统。
Swagger.js and Swagger-ui 是 javascript 的客户端库,能消费该规范。
springfox-swagger-ui 仅仅是以一种方便的方式封装了 swagger-ui ,使得 Spring 服务可以提供服务。
总结为:
Swagger 是一种规范。
Springfox-swagger 是基于 Spring 生态系统的该规范的实现。
Springfox-swagger-ui 是对 swagger-ui 的封装,使得其可以使用 Spring 的服务。
Swagger地址为:https://github.com/swagger-api/swagger-ui
Springfox地址为:https://github.com/springfox/springfox
二、使用
首先引入Maven依赖,这里用的是最新的2.8版本:
<!--Swagger UI-->
<dependency>
	<groupId>io.springfox</groupId>
	<artifactId>springfox-swagger2</artifactId>
	<version>2.8.0</version>
</dependency>
<dependency>
	<groupId>io.springfox</groupId>
	<artifactId>springfox-swagger-ui</artifactId>
	<version>2.8.0</version>
</dependency>
<dependency>
	<groupId>io.springfox</groupId>
	<artifactId>springfox-bean-validators</artifactId>
	<version>2.8.0</version>
</dependency>
然后创建Swagger配置类:
/**
 * projectName: xxxx
 * fileName: SwaggerConfig.java
 * packageName: com.xxx.common.config
 * date: 2018-02-01 1:14
 * copyright(c) 2017-2020 xxx公司
 */
package com.fendo.mybatis.plus.config;

import springfox.documentation.service.Contact;
import org.springframework.context.annotation.Bean;
import org.springframework.context.annotation.Configuration;
import springfox.documentation.annotations.ApiIgnore;
import springfox.documentation.builders.ApiInfoBuilder;
import springfox.documentation.builders.PathSelectors;
import springfox.documentation.builders.RequestHandlerSelectors;
import springfox.documentation.service.ApiInfo;
import springfox.documentation.spi.DocumentationType;
import springfox.documentation.spring.web.plugins.Docket;
import springfox.documentation.swagger2.annotations.EnableSwagger2;

/**
 * @version: V1.0
 * @author: fendo
 * @className: SwaggerConfig
 * @packageName: com.fendo.mybatis.plus.config
 * @description: Swagger配置文件
 * @data: 2018-02-01 1:14
 **/
@Configuration
@EnableSwagger2
public class SwaggerConfig {

    public static final String VERSION = "1.0.0";
    public static final String AUTHOR = "fendo";

    @Bean
    public Docket createRestApi() {
        return new Docket(DocumentationType.SWAGGER_2)
                .apiInfo(apiInfo())
                //.groupName("基础模块")
                .select()
                //加了ApiOperation注解的方法,生成接口文档
                .apis(RequestHandlerSelectors.basePackage("com.fendo.mybatis.plus"))
                //可以根据url路径设置哪些请求加入文档,忽略哪些请求
                .paths(PathSelectors.any())
                .build()
                .ignoredParameterTypes(ApiIgnore.class)
                .enableUrlTemplating(true);
    }

    @Bean
    public Docket createMonitorRestApi() {
        return new Docket(DocumentationType.SWAGGER_2)
                .apiInfo(apiInfo())
                .groupName("权限模块")
                .select()
                .apis(RequestHandlerSelectors.basePackage("com.fendo.mybatis.plus"))
                .paths(PathSelectors.any())
                .build();
    }

    private ApiInfo apiInfo() {
        return new ApiInfoBuilder()
                //设置文档的标题
                .title("API文档")
                //设置文档的描述
                .description("mybatis-plus项目API文档")
                .termsOfServiceUrl("http://blog.csdn.net/u011781521?viewmode=contents")
                //设置文档的版本信息
                .version(VERSION)
                //作者信息
                .contact(new Contact(AUTHOR, "http://blog.csdn.net/u011781521", "2312892206@qq.com"))
                //设置文档的License信息
                .termsOfServiceUrl("http://blog.csdn.net/u011781521?viewmode=contents")
                .license("The Apache License, Version 2.0")
                .licenseUrl("http://www.apache.org/licenses/LICENSE-2.0.html")
                .build();
    }

}
然后创建实体类,并添加注解:
/**
 * projectName: mybatis-plus
 * fileName: UserEntity.java
 * packageName: com.fendo.mybatis.plus.entity.enums
 * date: 2018-03-24 18:11
 * copyright(c) 2017-2020 xxx公司
 */
package com.fendo.mybatis.plus.entity;

import com.baomidou.mybatisplus.annotations.TableName;
import com.fendo.mybatis.plus.common.persistent.BaseEntity;
import com.fendo.mybatis.plus.entity.enums.AgeEnum;
import com.fendo.mybatis.plus.entity.enums.GenderEnum;
import io.swagger.annotations.ApiModel;
import io.swagger.annotations.ApiModelProperty;

import javax.validation.constraints.Max;
import javax.validation.constraints.Min;

/**
 * @version: V1.0
 * @author: fendo
 * @className: UserEntity
 * @packageName: com.fendo.mybatis.plus.entity.enums
 * @description: 用户类
 * @data: 2018-03-24 18:11
 **/
@TableName("user")
@ApiModel(value="User对象",description="用户信息")
public class UserEntity extends BaseEntity<UserEntity> {

    /**
     * 名称
     */
    @ApiModelProperty(value = "用户姓名",name="name",example="fendo")
    private String name;
    /**
     * 年龄
     */
    @ApiModelProperty(value = "用户年龄",name="age",example="2")
    @Max(150)
    @Min(1)
    private AgeEnum age;

    /**
     * 性别
     */
    @ApiModelProperty(value = "用户性别",name="sex",example="1")
    private GenderEnum sex;


    public String getName() {
        return name;
    }

    public void setName(String name) {
        this.name = name;
    }

    public AgeEnum getAge() {
        return age;
    }

    public void setAge(AgeEnum age) {
        this.age = age;
    }

    public GenderEnum getSex() {
        return sex;
    }

    public void setSex(GenderEnum sex) {
        this.sex = sex;
    }

    public UserEntity() {
    }

    public UserEntity(String name, AgeEnum age, GenderEnum sex) {
        this.name = name;
        this.age = age;
        this.sex = sex;
    }

    public UserEntity(String id, String name, AgeEnum age, GenderEnum sex) {
        this.setId(id);
        this.name = name;
        this.age = age;
        this.sex = sex;
    }


}
然后创建分页封装类:
package com.fendo.mybatis.plus.common.utils;

import com.baomidou.mybatisplus.plugins.Page;
import io.swagger.annotations.ApiModel;
import io.swagger.annotations.ApiModelProperty;

import java.util.List;

/**
 * @version: V1.0
 * @author: fendo
 * @className: CustomPage
 * @packageName: com.fendo.mybatis.plus.common.utils
 * @description: 自定义分页数据
 * @data: 2018-03-27 9:23
 **/
@ApiModel
public class CustomPage<T> {

	//当前页数
	@ApiModelProperty(value = "当前页数")
    private int pageNo;

    //每页显示数量
	@ApiModelProperty(value = "每页显示数量")
    private int pageSize;

    @ApiModelProperty(value = "总条数")
    private int totalRecord;

    //数据列表
    @ApiModelProperty(value = "数据列表")
    private List<T> parameterType;

    //总页数
    @ApiModelProperty(value = "总页数")
    private int totalPage;

    //排序字段
    @ApiModelProperty(value = "排序字段")
    private String orderByField;

    //是否升序
    @ApiModelProperty(value = "是否升序")
    private boolean isAsc;

	public int getPageNo() {
		return pageNo;
	}

	public void setPageNo(int pageNo) {
		this.pageNo = pageNo;
	}

	public int getPageSize() {
		return pageSize;
	}

	public void setPageSize(int pageSize) {
		this.pageSize = pageSize;
	}

	public int getTotalRecord() {
		return totalRecord;
	}

	public void setTotalRecord(int totalRecord) {
		this.totalRecord = totalRecord;
	}

	public List<T> getParameterType() {
		return parameterType;
	}

	public void setParameterType(List<T> parameterType) {
		this.parameterType = parameterType;
	}

	public int getTotalPage() {
		return totalPage;
	}

	public void setTotalPage(int totalPage) {
		this.totalPage = totalPage;
	}

	public String getOrderByField() {
		return orderByField;
	}

	public void setOrderByField(String orderByField) {
		this.orderByField = orderByField;
	}

	public boolean isAsc() {
		return isAsc;
	}

	public void setAsc(boolean isAsc) {
		this.isAsc = isAsc;
	}

	public CustomPage(){}

    @SuppressWarnings("deprecation")
	public CustomPage(Page<T> page){
        this.pageNo = page.getCurrent();
        this.pageSize = page.getSize();
        this.totalRecord = (int) page.getTotal();
        this.parameterType = page.getRecords();
        this.totalPage = (int) page.getPages();
        this.orderByField = page.getOrderByField();
        this.isAsc = page.isAsc();
    }

}
统一返回数据类:
/**
 * projectName: mybatis-plus
 * fileName: ResultData.java
 * packageName: com.fendo.mybatis.plus.common.utils
 * date: 2018-03-27 10:38
 * copyright(c) 2017-2020 xxx公司
 */
package com.fendo.mybatis.plus.common.utils;

import com.fendo.mybatis.plus.entity.UserEntity;
import io.swagger.annotations.ApiModel;
import io.swagger.annotations.ApiModelProperty;

import java.io.Serializable;

/**
 * @version: V1.0
 * @author: fendo
 * @className: ResultData
 * @packageName: com.fendo.mybatis.plus.common.utils
 * @description: 返回数据
 * @data: 2018-03-27 10:38
 **/
@ApiModel
public class ResultData <T> implements Serializable {

    private static final long serialVersionUID = -7424426799887924229L;

    @ApiModelProperty(value = "错误码")
    private String code;

    @ApiModelProperty(value = "数据对象")
    private T data;

    @ApiModelProperty(value = "错误码描述")
    private String message;

    public ResultData(CustomPage<UserEntity> customPage) {
    }

    public ResultData(String code, String message) {
        this.code = code;
        this.message = message;
    }

    public ResultData(SimpleCode simpleCode) {
        this.code = simpleCode.getCode();
        this.message = simpleCode.getMessage();
    }


    public ResultData(String code, String message, T data) {
        this.code = code;
        this.message = message;
        this.data = data;
    }

    public ResultData(SimpleCode simpleCode, T data) {
        this.code = simpleCode.getCode();
        this.message = simpleCode.getMessage();
        this.data = data;
    }

    public ResultData(Boolean falg, T data) {
        if(falg){
            this.code = SimpleCode.SUCCESS.getCode();
            this.message = SimpleCode.SUCCESS.getMessage();
            this.data =  data;
        }else {
            this.code = SimpleCode.ERROR.getCode();
            this.message = SimpleCode.ERROR.getMessage();
            this.data =  data;
        }
    }


    public String getCode() {
        return code;
    }

    public void setCode(String code) {
        this.code = code;
    }

    public T getData() {
        return data;
    }

    public void setData(T data) {
        this.data = data;
    }

    public String getMessage() {
        return message;
    }

    public void setMessage(String message) {
        this.message = message;
    }

    @Override
    public String toString() {
        return "JSONResult [code=" + code + ", data=" + data + ", message="
                + message + "]";
    }
}/**
* projectName: mybatis-plus
* fileName: UserController.java
* packageName: com.fendo.mybatis.plus.controller
* date: 2018-03-27 10:26
* copyright(c) 2017-2020 xxx公司
*/
package com.fendo.mybatis.plus.controller;
import com.baomidou.mybatisplus.plugins.Page;
import com.fendo.mybatis.plus.common.utils.*;
import com.fendo.mybatis.plus.common.web.BaseController;
import com.fendo.mybatis.plus.entity.UserEntity;
import com.fendo.mybatis.plus.entity.enums.AgeEnum;
import com.fendo.mybatis.plus.entity.enums.GenderEnum;
import com.fendo.mybatis.plus.request.UserRequest;
import com.fendo.mybatis.plus.service.UserService;
import io.swagger.annotations.*;
import org.apache.commons.lang3.StringUtils;
import org.springframework.beans.BeanUtils;
import org.springframework.beans.factory.annotation.Autowired;
import org.springframework.http.MediaType;
import org.springframework.stereotype.Controller;
import org.springframework.validation.annotation.Validated;
import org.springframework.web.bind.annotation.*;
import javax.validation.constraints.NotEmpty;
import javax.validation.constraints.NotNull;
import java.util.List;
import java.util.Map;
/**
* @version: V1.0
* @author: fendo
* @className: UserController
* @packageName: com.fendo.mybatis.plus.controller
* @description: 用户Controller
* @data: 2018-03-27 10:26
**/
@Controller
@RequestMapping("/user")
@Api(value = "/user", description = "用户操作接口")
@Validated
public class UserController extends BaseController{
@Autowired
protected UserService userService;
/**
* 用户新增与更新
* @param data
* @return
*/
@PostMapping("/save")
@ResponseBody
@ApiOperation(value = "更新用户信息", notes = "更新或者保存用户信息")
@ApiResponses(value = {@ApiResponse(code = 405, message = "invalid input")})
public ResultData<CustomPage<UserEntity>> save(@RequestBody @ApiParam(name="用户对象",value="传入JSON格式",required=true) UserRequest data) {
ResultData<CustomPage<UserEntity>> result = null;
CustomPage<UserEntity> customPage = null;
if(validates(validator, data)!=null){
result = new ResultData<CustomPage<UserEntity>>(SimpleCode.ERROR.getCode(), validates(validator, data));
}
UserEntity userEntity = new UserEntity();
BeanUtils.copyProperties(data,userEntity);
if(StringUtils.isNotEmpty(userEntity.getId())){
userEntity.updateById();
}else {
userEntity.insert();
}
Page<UserEntity> userEntityPage = userEntity.selectPage(new Page<UserEntity>(0, 12), null);
customPage = new CustomPage<UserEntity>(userEntityPage);
result = new ResultData<CustomPage<UserEntity>>(SimpleCode.SUCCESS, customPage);
return result;
}
/**
* 删除用户
* @param id
* @return
*/
@ApiOperation(value = "删除用户", notes = "通过用户id删除用户", httpMethod = "GET")
@ApiResponses({ @ApiResponse(code = 200, message = "操作成功"),
@ApiResponse(code = 500, message = "服务器内部异常"),
@ApiResponse(code = 405, message = "权限不足") })
@GetMapping("/delete")
@ResponseBody
public ResultData<String> delete(@NotEmpty(message = "用户ID不能为空") @ApiParam(value = "用户ID)", required = true) @RequestParam String id){
ResultData<String> result;
UserEntity userEntity = new UserEntity();
userEntity.setId(id);
result = new ResultData(userEntity.deleteById(),"用户删除");
return result;
}
/**
* 根据用户ID获取用户
* @param id
* @return
*/
@GetMapping("/get")
@ResponseBody
@ApiOperation(value = "获取用户信息", notes = "更新ID获取用户信息")
public ResultData<UserEntity> get(@NotEmpty(message = "用户ID不能为空") @ApiParam(value = "用户ID)", required = true) @RequestParam String id){
UserEntity userEntity = userService.selectById(id);
return new ResultData<UserEntity>(SimpleCode.SUCCESS,userEntity);
}
/**
* 参数模式分页
* @param page
* @return
*/
@GetMapping("/list")
@ResponseBody
@ApiImplicitParams({
@ApiImplicitParam(name = "size", value = "一页大小", required = false, dataType = "String", paramType = "query"),
@ApiImplicitParam(name = "current", value = "当前页码", required = false, dataType = "String", paramType = "query"),
})
@ApiOperation(value = "自带分页", notes = "分页获取数据")
public ResultData<CustomPage<UserEntity>> lis(Page page) {
CustomPage<UserEntity> customPage = new CustomPage<UserEntity>(userService.selectPage(page));
return new ResultData<CustomPage<UserEntity>>(SimpleCode.SUCCESS, customPage);
}
/**
* 分页
* @param frontPage
* @return
*/
@PostMapping("/page")
@ResponseBody
@ApiOperation(value = "自定义分页", notes = "分页获取数据")
public ResultData<CustomPage<Map<String,Object>>> page(@ApiParam(required = false, value = "分页参数") @RequestBody(required=false) FrontPage<UserRequest> frontPage) {
CustomPage<Map<String,Object>> customPage = new CustomPage<Map<String,Object>>(userService.getPage(frontPage.getPagePlus(),frontPage.getParam()));
return new ResultData<CustomPage<Map<String,Object>>>(SimpleCode.SUCCESS, customPage);
}
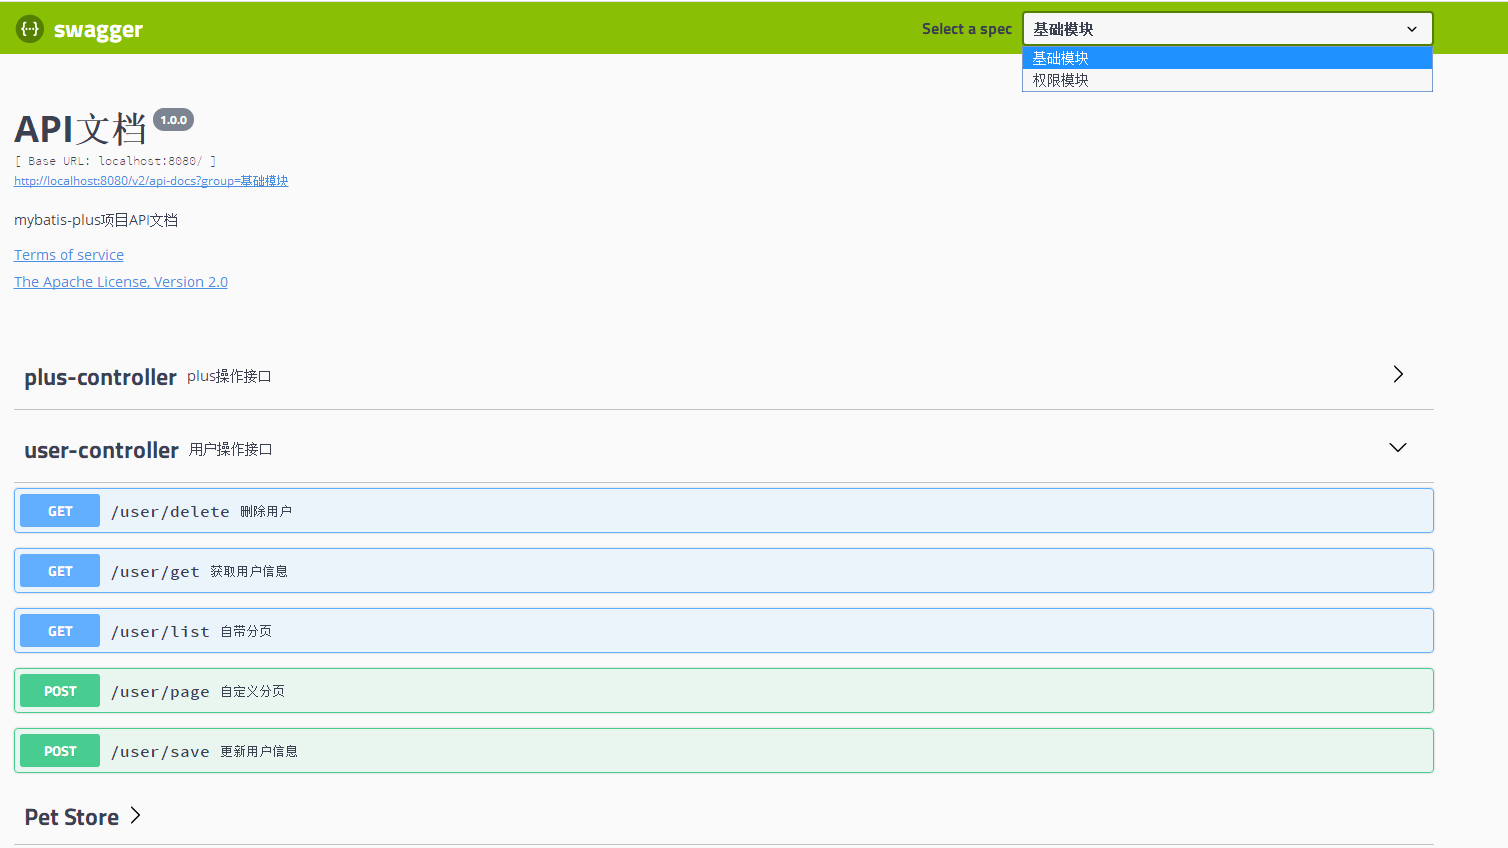
}运行效果如下:
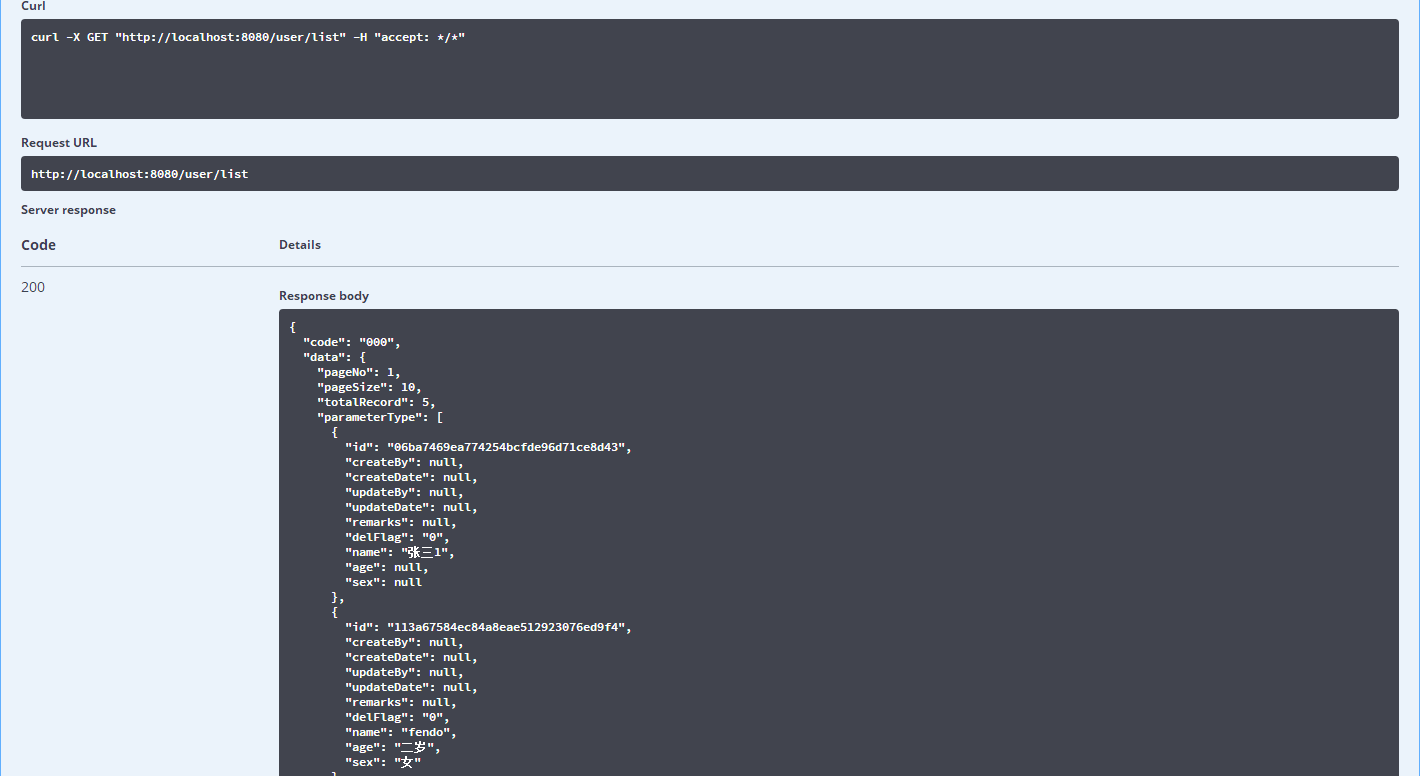
测试分页返回数据如下:
三、Swagger常用注解
API详细说明
| 作用范围 | API | 使用位置 |
|---|---|---|
| 对象属性 | @ApiModelProperty | 用在出入参数对象的字段上 |
| 协议集描述 | @Api | 用于controller类上 |
| 协议描述 | @ApiOperation | 用在controller的方法上 |
| Response集 | @ApiResponses | 用在controller的方法上 |
| Response | @ApiResponse | 用在 @ApiResponses里边 |
| 非对象参数集 | @ApiImplicitParams | 用在controller的方法上 |
| 非对象参数描述 | @ApiImplicitParam | 用在@ApiImplicitParams的方法里边 |
| 描述返回对象的意义 | @ApiModel | 用在返回对象类上 |
忽略某类/方法/参数的文档 @ApiIgnore 用在类/方法/参数上
1. api标记
Api 用在类上,说明该类的作用。可以标记一个Controller类做为swagger 文档资源,使用方式
@Api(value = "/user", description = "Operations about user")与Controller注解并列使用。 属性配置:
| 属性名称 | 备注 |
|---|---|
| value | url的路径值 |
| tags | 如果设置这个值、value的值会被覆盖 |
| description | 对api资源的描述 |
| basePath | 基本路径可以不配置 |
| position | 如果配置多个Api 想改变显示的顺序位置 |
| produces | For example, "application/json, application/xml" |
| consumes | For example, "application/json, application/xml" |
| protocols | Possible values: http, https, ws, wss. |
| authorizations | 高级特性认证时配置 |
| hidden | 配置为true 将在文档中隐藏 |
在SpringMvc中的配置如下:
@Controller
@RequestMapping(value = "/api/pet", produces = {APPLICATION_JSON_VALUE, APPLICATION_XML_VALUE})
@Api(value = "/pet", description = "Operations about pets")
public class PetController {

}
2. ApiOperation标记
ApiOperation:用在方法上,说明方法的作用,每一个url资源的定义,使用方式:
@ApiOperation(
          value = "Find purchase order by ID",
          notes = "For valid response try integer IDs with value <= 5 or > 10. Other values will generated exceptions",
          response = Order,
          tags = {"Pet Store"})
与Controller中的方法并列使用。
| 属性名称 | 备注 |
|---|---|
| value | url的路径值 |
| tags | 如果设置这个值、value的值会被覆盖 |
| description | 对api资源的描述 |
| basePath | 基本路径可以不配置 |
| position | 如果配置多个Api 想改变显示的顺序位置 |
| produces | For example, "application/json, application/xml" |
| consumes | For example, "application/json, application/xml" |
| protocols | Possible values: http, https, ws, wss. |
| authorizations | 高级特性认证时配置 |
| hidden | 配置为true 将在文档中隐藏 |
| response | 返回的对象 |
| responseContainer | 这些对象是有效的 "List", "Set" or "Map".,其他无效 |
| httpMethod | "GET", "HEAD", "POST", "PUT", "DELETE", "OPTIONS" and "PATCH" |
| code | http的状态码 默认 200 |
| extensions | 扩展属性 |
在SpringMvc中的配置如下:
@RequestMapping(value = "/order/{orderId}", method = GET)
  @ApiOperation(
      value = "Find purchase order by ID",
      notes = "For valid response try integer IDs with value <= 5 or > 10. Other values will generated exceptions",
      response = Order.class,
      tags = { "Pet Store" })
   public ResponseEntity<Order> getOrderById(@PathVariable("orderId") String orderId)
      throws NotFoundException {
    Order order = storeData.get(Long.valueOf(orderId));
    if (null != order) {
      return ok(order);
    } else {
      throw new NotFoundException(404, "Order not found");
    }
  }
3. ApiParam标记
ApiParam请求属性,使用方式:
public ResponseEntity<User> createUser(@RequestBody @ApiParam(value = "Created user object", required = true) User user)属性配置:
| 属性名称 | 备注 |
|---|---|
| name | 属性名称 |
| value | 属性值 |
| defaultValue | 默认属性值 |
| allowableValues | 可以不配置 |
| required | 是否属性必填 |
| access | 不过多描述 |
| allowMultiple | 默认为false |
| hidden | 隐藏该属性 |
| example | 举例子 |
public ResponseEntity<Order> getOrderById(
      @ApiParam(value = "ID of pet that needs to be fetched", allowableValues = "range[1,5]", required = true)
      @PathVariable("orderId") String orderId)
4. ApiResponse
ApiResponse:响应配置,使用方式:
@ApiResponse(code = 400, message = "Invalid user supplied")与Controller中的方法并列使用。 属性配置:
| 属性名称 | 备注 |
|---|---|
| code | http的状态码 |
| message | 描述 |
| response | 默认响应类 Void |
| reference | 参考ApiOperation中配置 |
| responseHeaders | 参考 ResponseHeader 属性配置说明 |
| responseContainer | 参考ApiOperation中配置 |
在SpringMvc中的配置如下:
@RequestMapping(value = "/order", method = POST)
  @ApiOperation(value = "Place an order for a pet", response = Order.class)
  @ApiResponses({ @ApiResponse(code = 400, message = "Invalid Order") })
  public ResponseEntity<String> placeOrder(
      @ApiParam(value = "order placed for purchasing the pet", required = true) Order order) {
    storeData.add(order);
    return ok("");
  }
5. ApiResponses
ApiResponses:响应集配置,使用方式:
@ApiResponses({ @ApiResponse(code = 400, message = "Invalid Order") })与Controller中的方法并列使用。 属性配置:
| 属性名称 | 备注 |
|---|---|
| value | 多个ApiResponse配置 |
@RequestMapping(value = "/order", method = POST)
  @ApiOperation(value = "Place an order for a pet", response = Order.class)
  @ApiResponses({ @ApiResponse(code = 400, message = "Invalid Order") })
  public ResponseEntity<String> placeOrder(
      @ApiParam(value = "order placed for purchasing the pet", required = true) Order order) {
    storeData.add(order);
    return ok("");
  }
6. ResponseHeader
@ResponseHeader(name="head1",description="response head conf")与Controller中的方法并列使用。 属性配置:
| 属性名称 | 备注 |
|---|---|
| name | 响应头名称 |
| description | 头描述 |
| response | 默认响应类 Void |
| responseContainer | 参考ApiOperation中配置 |
@ApiModel(description = "群组")| 属性 | 取值 | 作用 |
|---|---|---|
| paramType | 查询参数类型 | |
| path | 以地址的形式提交数据 | |
| query | 直接跟参数完成自动映射赋值 | |
| body | 以流的形式提交 仅支持POST | |
| header | 参数在request headers 里边提交 | |
| form | 以form表单的形式提交 仅支持POST | |
| dataType | 参数的数据类型 只作为标志说明,并没有实际验证 | |
| Long | ||
| String | ||
| name | 接收参数名 | |
| value | 接收参数的意义描述 | |
| required | 参数是否必填 | |
| true | 必填 | |
| false | 非必填 | |
| defaultValue | 默认值 |
@RequestMapping(value = "/findById1/{id}", method = RequestMethod.GET, produces = MediaType.APPLICATION_JSON_UTF8_VALUE)

@PathVariable(name = "id") Long id
2.Body
@ApiImplicitParams({ @ApiImplicitParam(paramType = "body", dataType = "MessageParam", name = "param", value = "信息参数", required = true) })
@RequestMapping(value = "/findById3", method = RequestMethod.POST, produces = MediaType.APPLICATION_JSON_UTF8_VALUE, consumes = MediaType.APPLICATION_JSON_VALUE)

@RequestBody MessageParam param
提交的参数是这个对象的一个json,然后会自动解析到对应的字段上去,也可以通过流的形式接收当前的请求数据,但是这个和上面的接收方式仅能使用一个(用@RequestBody之后流就会关闭了)
3.Header
@ApiImplicitParams({ @ApiImplicitParam(paramType = "header", dataType = "Long", name = "id", value = "信息id", required = true) })

String idstr = request.getHeader("id");
if (StringUtils.isNumeric(idstr)) {
	id = Long.parseLong(idstr);
}@ApiImplicitParams({ @ApiImplicitParam(paramType = "form", dataType = "Long", name = "id", value = "信息id", required = true) })
@RequestMapping(value = "/findById5", method = RequestMethod.POST, produces = MediaType.APPLICATION_JSON_UTF8_VALUE, consumes = MediaType.APPLICATION_FORM_URLENCODED_VALUE)@ApiImplicitParams:用在方法上包含一组参数说明;
@ApiImplicitParam:用在@ApiImplicitParams注解中,指定一个请求参数的各个方面
●paramType:参数放在哪个地方
●name:参数代表的含义
●value:参数名称
●dataType: 参数类型,有String/int,无用
●required : 是否必要
●defaultValue:参数的默认值
@ApiResponses:用于表示一组响应;
@ApiResponse:用在@ApiResponses中,一般用于表达一个错误的响应信息;
●code: 响应码(int型),可自定义
●message:状态码对应的响应信息
@ApiModel:描述一个Model的信息(这种一般用在post创建的时候,使用@RequestBody这样的场景,请求参数无法使用@ApiImplicitParam注解进行描述的时候;
@ApiModelProperty:描述一个model的属性。
Swagger2Markup是Github上的一个开源项目。该项目主要用来将Swagger自动生成的文档转换成几种流行的格式以便于静态部署和使用,比如:AsciiDoc、Markdown、Confluence。
项目主页: https://github.com/Swagger2Markup/swagger2markup
生成AsciiDoc的方式有两种:
4.1.1、通过Java代码来生成
第一步:编辑pom.xml增加需要使用的相关依赖和仓库
<dependency>
        <groupId>io.github.swagger2markup</groupId>
        <artifactId>swagger2markup</artifactId>
        <version>1.3.1</version>
</dependency>
第二步:编写一个单元测试用例来生成执行生成文档的代码
@RunWith(SpringRunner.class)
@SpringBootTest(webEnvironment = SpringBootTest.WebEnvironment.DEFINED_PORT)
public class SwaggerApplicationTests {

    @Test
    public void generateAsciiDocs() throws Exception {
        //    输出Ascii格式
        Swagger2MarkupConfig config = new Swagger2MarkupConfigBuilder()
                .withMarkupLanguage(MarkupLanguage.ASCIIDOC)
                .build();

        Swagger2MarkupConverter.from(new URL("http://localhost:8080/v2/api-docs"))
                .withConfig(config)
                .build()
                .toFolder(Paths.get("src/docs/asciidoc/generated"));
    }

}src
--docs
----asciidoc
------generated
--------definitions.adoc
--------overview.adoc
--------paths.adoc
--------security.adoc生成出了4个不同的静态文件。
<plugin>
    <groupId>io.github.swagger2markup</groupId>
    <artifactId>swagger2markup-maven-plugin</artifactId>
    <version>1.3.1</version>
    <configuration>
        <swaggerInput>http://localhost:8080/v2/api-docs</swaggerInput>
        <outputDir>src/docs/asciidoc/generated</outputDir>
        <config>
            <swagger2markup.markupLanguage>ASCIIDOC</swagger2markup.markupLanguage>
        </config>
    </configuration>
</plugin>
4.2、生成HTML
完成了从Swagger文档配置文件到AsciiDoc的源文件转换之后,就是如何将AsciiDoc转换成可部署的HTML内容了。引入一个Maven插件来完成。
<plugin>
    <groupId>org.asciidoctor</groupId>
    <artifactId>asciidoctor-maven-plugin</artifactId>
    <version>1.5.6</version>
    <configuration>
   	    <sourceDirectory>src/docs/asciidoc/generated</sourceDirectory>
   	    <outputDirectory>src/docs/asciidoc/html</outputDirectory>
   	    <backend>html</backend>
   	    <sourceHighlighter>coderay</sourceHighlighter>
   	    <attributes>
            <toc>left</toc>
  	    </attributes>
  	</configuration>
</plugin>
执行该插件的
mvn asciidoctor:process-asciidoc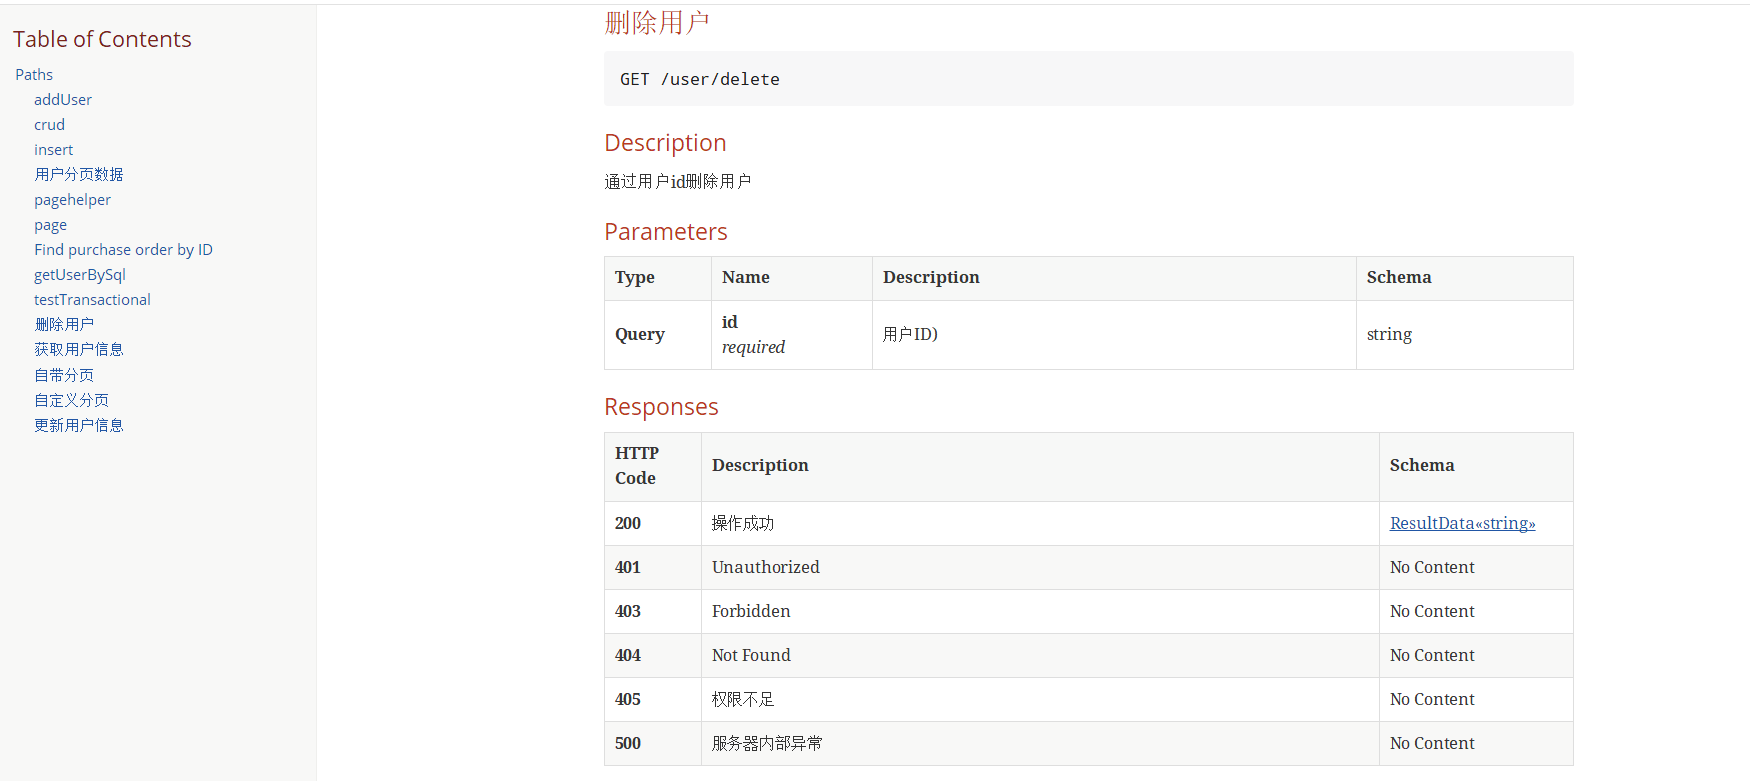
参考文章:
http://blog.didispace.com/swagger2markup-asciidoc/
https://leongfeng.github.io/2017/02/20/springboot-springfox-swagger2markup-spring-restdoc/


 1163
1163

 被折叠的 条评论
为什么被折叠?
被折叠的 条评论
为什么被折叠?
 到【灌水乐园】发言


