


Mysql cluster环境搭建
硬件环境
需要5台服务器
Win1: IP:192.168.2.2 (管理节点)
Win2: IP:192.168.2.3 (数据节点)
Win3: IP:192.168.2.4 (数据节点)
Win4: IP:192.168.2.5 (sql节点)
Win5: IP:192.168.2.13 (sql节点)
软件环境
Window server 2008
搭建步骤
l 管理节点(192.168.2.2)安装:
1、 解压mysql-cluster-gpl-7.2.9-win64.zip包,开始Managementnode的安装配置。注意Management node一定要安装在C盘下。
2、 进入目录新建config.ini,配置内容如下:
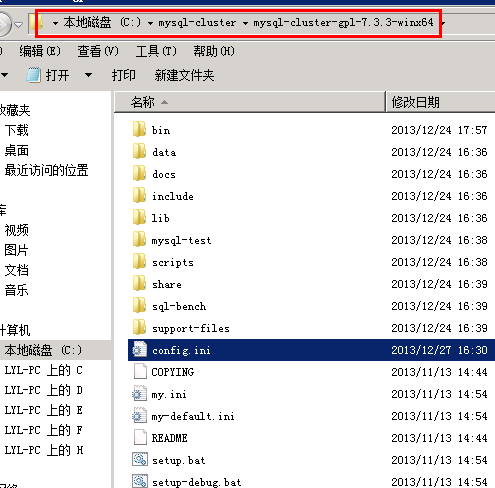
config.ini内容为:
| # Options affecting ndbd processes on all data nodes: [ndbd default] #NoOfReplicas=2 # Number of replicas #DataMemory=3072M # How much memory to allocate for data storage #DataMemory=512M #IndexMemory=256M # How much memory to allocate for index storage # For DataMemory and IndexMemory, we have used the # default values. Since the "world" database takes up # only about 500KB, this should be more than enough for # this example Cluster setup. #StringMemory=25
#ODirect=1 #MaxNoOfLocalScans=64
MaxNoOfTables=3000 #MaxNoOfOrderedIndexes=2048 #MaxNoOfUniqueHashIndexes=512 MaxNoOfAttributes=4000 #MaxNoOfAttributes=24576 #MaxNoOfTriggers=14336 #MaxNoOfConcurrentOperations=5000000
#MaxAllocate=50M
#LockPagesInMainMemory=1
#MaxNoOfConcurrentTransactions=16384
#NoOfFragmentLogFiles=48
[NDB_MGMD] NodeId=1 HostName=192.168.2.2 #管理节点服务器 # Storage Engines # DataDir=C:/mysql/bin/cluster-logs
[NDBD] NodeId=2 HostName=192.168.2.3 #MySQL集群db1的IP地址 #DataDir= D:/Program Files/mysqlcluster/datanode/mysql/bin/cluster-data #如果不存在就创建一个
[NDBD] NodeId=3 HostName=192.168.2.4 #MySQL集群db2的IP地址 #DataDir= D:/Program Files/mysqlcluster/datanode/mysql/bin/cluster-data #如果不存在就创建一个
[MYSQLD] NodeId=4 HostName=192.168.2.5
[MYSQLD] NodeId=5 HostName=192.168.2.13 |
3、 启动管理节点
在cmd命令行下cd 到集群/bin目录下执行:ndb_mgmd –f config.ini,出现以下字样表明成功。

l 数据节点(192.168.2.3、192.168.2.4)安装
1、 解压mysql-cluster-gpl-7.2.9-win64.zip包,开始data node的安装配置。拷贝一份my-default修改名称为my.ini。
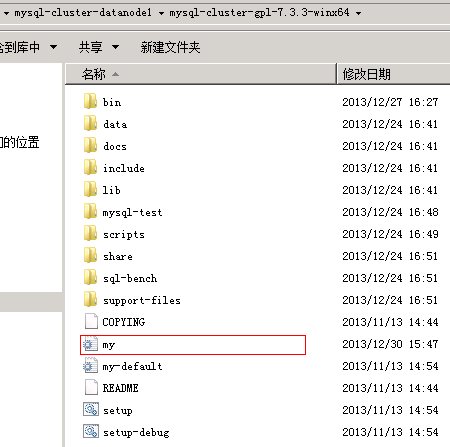
2、 修改my.ini文件,配置内容如下:
| # For advice on how to change settings please see # http://dev.mysql.com/doc/refman/5.6/en/server-configuration-defaults.html # *** DO NOT EDIT THIS FILE. It's a template which will be copied to the # *** default location during install, and will be replaced if you # *** upgrade to a newer version of MySQL. [mysql_cluster] # Options for data node process: ndb-connectstring=192.168.2.2 [mysqld] # Remove leading # and set to the amount of RAM for the most important data # cache in MySQL. Start at 70% of total RAM for dedicated server, else 10%. # innodb_buffer_pool_size = 128M # Remove leading # to turn on a very important data integrity option: logging # changes to the binary log between backups. # log_bin
# These are commonly set, remove the # and set as required. # basedir = ..... # datadir = ..... # port = ..... # server_id = .....
# Remove leading # to set options mainly useful for reporting servers. # The server defaults are faster for transactions and fast SELECTs. # Adjust sizes as needed, experiment to find the optimal values. # join_buffer_size = 128M # sort_buffer_size = 2M # read_rnd_buffer_size = 2M
sql_mode=NO_ENGINE_SUBSTITUTION,STRICT_TRANS_TABLES |
3、 启动数据节点
分别在两台服务器上执行,在cmd命令行下cd 到集群/bin目录下执行:ndbd,出现以下字样表明成功。

l sql节点(192.168.2.5、192.168.2.13)安装
1、 解压mysql-cluster-gpl-7.2.9-win32.zip包,开始sql node的安装配置。拷贝一份my-default修改名称为my.ini。
2、 修改my.ini文件,配置内容如下:
| # For advice on how to change settings please see # http://dev.mysql.com/doc/refman/5.6/en/server-configuration-defaults.html # *** DO NOT EDIT THIS FILE. It's a template which will be copied to the # *** default location during install, and will be replaced if you # *** upgrade to a newer version of MySQL.
[mysqld] ndbcluster ndb-connectstring=192.168.2.2 # Remove leading # and set to the amount of RAM for the most important data # cache in MySQL. Start at 70% of total RAM for dedicated server, else 10%. # innodb_buffer_pool_size = 128M
# Remove leading # to turn on a very important data integrity option: logging # changes to the binary log between backups. # log_bin
# These are commonly set, remove the # and set as required. # basedir = ..... # datadir = ..... # port = ..... # server_id = .....
# Remove leading # to set options mainly useful for reporting servers. # The server defaults are faster for transactions and fast SELECTs. # Adjust sizes as needed, experiment to find the optimal values. # join_buffer_size = 128M # sort_buffer_size = 2M # read_rnd_buffer_size = 2M
sql_mode=NO_ENGINE_SUBSTITUTION,STRICT_TRANS_TABLES |
3、 启动sql节点
分别在两台服务器上执行,在cmd命令行下cd 到集群/bin目录下执行:mysqld --console,出现以下字样表明成功。


测试集群
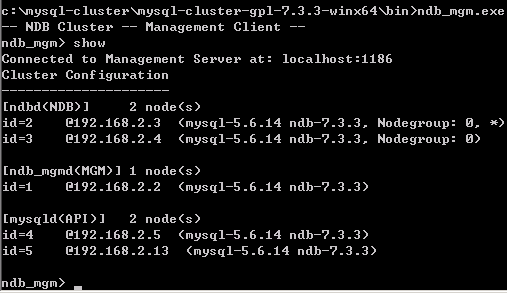
1、调用集群自带的管理工具查看各个节点状态:在cmd命令行下cd 到集群/bin目录下执行:ndb_mgm à show 出现以下内容,表明节点正常启动。
2、 错误提示

3、 使用mysql进行管理工作,在cmd命令行下cd 到集群/bin目录下执行:
mysql –uroot –p (root默认的密码为空)。
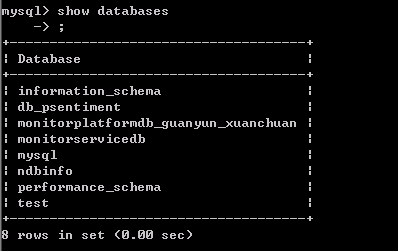
接下来跟操作单机数据库没啥区别。
注意在创建表的时候记得加入engine = ndbcluster,这样的表在数据节点中才能共享。
4、 关闭其中一台sql节点或数据节点,测试是否集群还能使用。


 428
428

 被折叠的 条评论
为什么被折叠?
被折叠的 条评论
为什么被折叠?
 到【灌水乐园】发言


