## 目录 ##
操作环境
- 操作系统: win7-64bit 旗舰版
- android 版本: android-23
- 模拟器:海马玩模拟器 0.9.0 Beta( android 4.2.2 )
导读
默认情况下,ListView 是从上到下逐条显示 item 的;但我们可以根据实际需要,让其按照从下到上的方式显示。
调用方法
ListView.Java
public boolean isStackFromBottom()
- 用于设置 ListView 中 item 顺序的显示方式( 设置后会立刻刷新 ListView 的显示 )
public void setStackFromBottom(boolean stackFromBottom)
布局文件设置
    <ListView android:id="@+id/lv_test"
        android:layout_width="match_parent"
        android:layout_height="300dp"
        <!-- 以下只能选择一项 -->
        android:stackFromBottom="true"
        android:stackFromBottom="false"
        >
    </ListView>
源码分析
分析内容主要为:boolean 值对于 Item 布局顺序的影响
- 设置状态:其中修改了 mStackFromBottom 的值;
/**
     * When stack from bottom is set to true, the list fills its content starting from
     * the bottom of the view.
     *
     * @param stackFromBottom true to pin the view's content to the bottom edge,
     *        false to pin the view's content to the top edge
     */
    public void setStackFromBottom(boolean stackFromBottom) {
        if (mStackFromBottom != stackFromBottom) {
            mStackFromBottom = stackFromBottom;
            requestLayoutIfNecessary();
        }
    }
- adapter 对应的数据集内容有更改的时候会检测 mStackFromBottom 的值,并设置对应的 mLayout 状态
@Override
protected void handleDataChanged() {
    ... 省略 ...
    mLayoutMode = mStackFromBottom ? LAYOUT_FORCE_BOTTOM : LAYOUT_FORCE_TOP;
    ... 省略 ...
}
- ListView 在刷新布局时会根据 mLayoutMode 状态来实现具体的 Item 显示顺序
@Override
protected void layoutChildren() {
    ... 省略 ...
            case LAYOUT_FORCE_BOTTOM:
                sel = fillUp(mItemCount - 1, childrenBottom);
                adjustViewsUpOrDown();
                break;
            case LAYOUT_FORCE_TOP:
                mFirstPosition = 0;
                sel = fillFromTop(childrenTop);
                adjustViewsUpOrDown();
                break;
    ... 省略 ...
}
/**
     * Fills the list from top to bottom, starting with mFirstPosition
     *
     * @param nextTop The location where the top of the first item should be
     *        drawn
     *
     * @return The view that is currently selected
     */
    private View fillFromTop(int nextTop) {
        mFirstPosition = Math.min(mFirstPosition, mSelectedPosition);
        mFirstPosition = Math.min(mFirstPosition, mItemCount - 1);
        if (mFirstPosition < 0) {
            mFirstPosition = 0;
        }
        return fillDown(mFirstPosition, nextTop);
    }
/**
* Fills the list from pos down to the end of the list view.
*
* @param pos The first position to put in the list
*
* @param nextTop The location where the top of the item associated with pos
* should be drawn
*
* @return The view that is currently selected, if it happens to be in the
* range that we draw.
*/
private View fillDown(int pos, int nextTop) {
View selectedView = null;
int end = (mBottom - mTop);
if ((mGroupFlags & CLIP_TO_PADDING_MASK) == CLIP_TO_PADDING_MASK) {
end -= mListPadding.bottom;
}
while (nextTop < end && pos < mItemCount) {
boolean selected = pos == mSelectedPosition;
View child = makeAndAddView(pos, nextTop, true, mListPadding.left, selected);
nextTop = child.getBottom() + mDividerHeight;
if (selected) {
selectedView = child;
}
pos++;
}
setVisibleRangeHint(mFirstPosition, mFirstPosition + getChildCount() - 1);
return selectedView;
}
- 1
- 2
- 3
- 4
- 5
- 6
- 7
- 8
- 9
- 10
- 11
- 12
- 13
- 14
- 15
- 16
- 17
- 18
- 19
- 20
- 21
- 22
- 23
- 24
- 25
- 26
- 27
- 28
- 29
- 30
- 31
- 32
- 33
- 34
- 1
- 2
- 3
- 4
- 5
- 6
- 7
- 8
- 9
- 10
- 11
- 12
- 13
- 14
- 15
- 16
- 17
- 18
- 19
- 20
- 21
- 22
- 23
- 24
- 25
- 26
- 27
- 28
- 29
- 30
- 31
- 32
- 33
- 34
实例
<?xml version="1.0" encoding="utf-8"?>
<LinearLayout xmlns:android="http://schemas.android.com/apk/res/android"
    android:orientation="vertical"
    android:layout_width="match_parent"
    android:layout_height="match_parent">

    <ListView android:id="@+id/lv_test"
        android:layout_width="match_parent"
        android:layout_height="300dp">
    </ListView>
    <Button android:id="@+id/btn_add_item"
        android:layout_width="match_parent"
        android:layout_height="40dp"
        android:text="增加新 item"
        />
    <Button android:id="@+id/btn_set_true"
        android:layout_width="match_parent"
        android:layout_height="40dp"
        android:text="设置为 true"
        />
    <Button android:id="@+id/btn_set_false"
        android:layout_width="match_parent"
        android:layout_height="40dp"
        android:text="设置为 false"
        />

</LinearLayout>
- 1
- 2
- 3
- 4
- 5
- 6
- 7
- 8
- 9
- 10
- 11
- 12
- 13
- 14
- 15
- 16
- 17
- 18
- 19
- 20
- 21
- 22
- 23
- 24
- 25
- 26
- 27
- 1
- 2
- 3
- 4
- 5
- 6
- 7
- 8
- 9
- 10
- 11
- 12
- 13
- 14
- 15
- 16
- 17
- 18
- 19
- 20
- 21
- 22
- 23
- 24
- 25
- 26
- 27
public class MainActivity extends Activity {
ArrayList<String> mItemStrArr = new ArrayList<>();
ArrayAdapter mAdapter;
int i = 0;
@Override
protected void onCreate(Bundle savedInstanceState) {
super.onCreate(savedInstanceState);
setContentView(R.layout.test_list_view);
this.testListViewStackFromBottom();
}
void testListViewStackFromBottom(){
Button btnAddItem = (Button) this.findViewById(R.id.btn_add_item);
Button btnSetTrue = (Button) this.findViewById(R.id.btn_set_true);
Button btnSetFalse = (Button) this.findViewById(R.id.btn_set_false);
ListView lv = (ListView)this.findViewById(R.id.lv_test);
mAdapter = new ArrayAdapter(this, R.layout.test_item, R.id.tv_content, mItemStrArr);
lv.setAdapter(mAdapter);
btnAddItem.setOnClickListener(new View.OnClickListener() {
@Override
public void onClick(View v) {
mItemStrArr.add("item_" + i++);
mAdapter.notifyDataSetChanged();
}
});
btnSetTrue.setOnClickListener(new View.OnClickListener() {
@Override
public void onClick(View v) {
ListView lv = (ListView)MainActivity.this.findViewById(R.id.lv_test);
lv.setStackFromBottom(true);
}
});
btnSetFalse.setOnClickListener(new View.OnClickListener() {
@Override
public void onClick(View v) {
ListView lv = (ListView)MainActivity.this.findViewById(R.id.lv_test);
lv.setStackFromBottom(false);
}
});
}
- 1
- 2
- 3
- 4
- 5
- 6
- 7
- 8
- 9
- 10
- 11
- 12
- 13
- 14
- 15
- 16
- 17
- 18
- 19
- 20
- 21
- 22
- 23
- 24
- 25
- 26
- 27
- 28
- 29
- 30
- 31
- 32
- 33
- 34
- 35
- 36
- 37
- 38
- 39
- 40
- 41
- 42
- 43
- 44
- 45
- 46
- 47
- 1
- 2
- 3
- 4
- 5
- 6
- 7
- 8
- 9
- 10
- 11
- 12
- 13
- 14
- 15
- 16
- 17
- 18
- 19
- 20
- 21
- 22
- 23
- 24
- 25
- 26
- 27
- 28
- 29
- 30
- 31
- 32
- 33
- 34
- 35
- 36
- 37
- 38
- 39
- 40
- 41
- 42
- 43
- 44
- 45
- 46
- 47
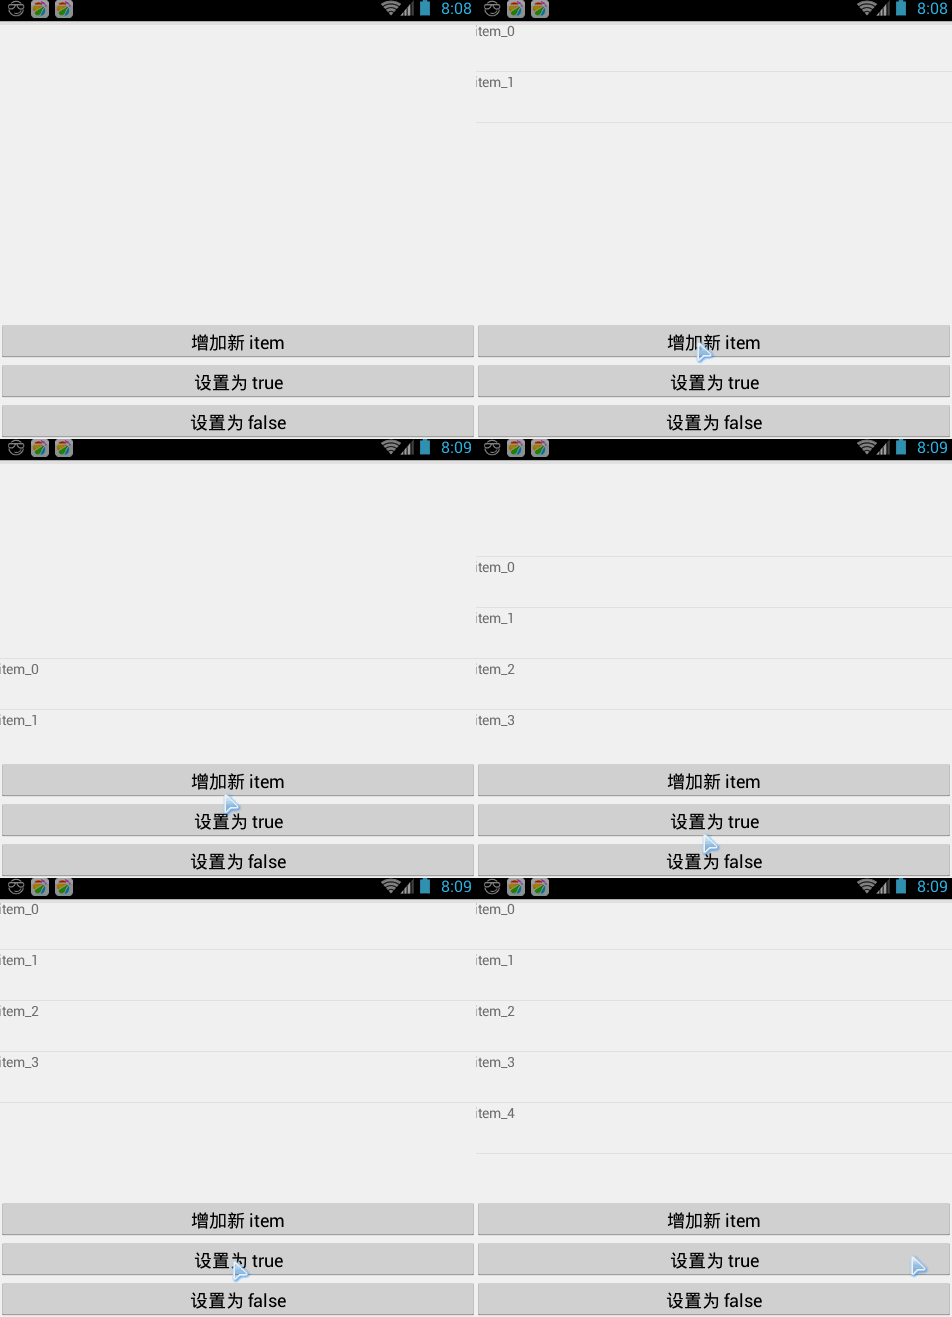
- 效果图:


 7731
7731

 被折叠的 条评论
为什么被折叠?


