


目录
声明:文章内容仅代表个人对源码的理解和观点,可能存在理解错误的地方,欢迎留言探讨、指正。不喜勿喷,谢谢。
个人用的是 v5.2.4.RELEASE 版本的源码,因为几年前阅读时已经写了一些注释,所以没有拉取最新的源码,与最新的源码会存在一定的差异。
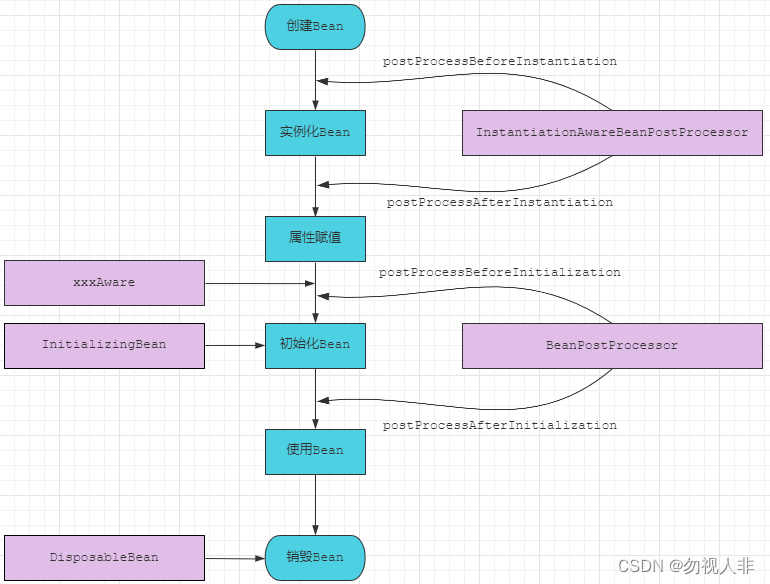
生命周期的四个阶段
Bean的生命周期从Spring容器创建Bean开始,直到Spring容器销毁Bean,整个过程可看做四个阶段:
实例化,创建Bean对象。关于实例化的源码可以参考这篇文章 Spring Bean的实例化源码解析属性赋值,依赖注入,set参数值。关于属性赋值的源码可以参考这篇文章 Spring 属性填充(自动装配)源码解析初始化,回调Bean实现的一些Spring接口(例如 xxxAware,InitializingBean )方法,执行配置的初始化方法。销毁,容器关闭时销毁所有单例Bean,调用 DisposableBean 接口的销毁方法,调用配置的销毁方法。
前三个步骤都在 AbstractAutowireCapableBeanFactory.doCreateBean() 方法中,源码如下:
protected Object doCreateBean(final String beanName, final RootBeanDefinition mbd, final @Nullable Object[] args)
		throws BeanCreationException {
	// Instantiate the bean.
	BeanWrapper instanceWrapper = null;
	if (mbd.isSingleton()) {
		instanceWrapper = this.factoryBeanInstanceCache.remove(beanName);
	}
	// 第一步:实例化Bean
	// 使用合适的实例化策略来创建新的实例:工厂方法、带参的构造函数、无参构造函数。默认调用无参构造函数创建实例。
	if (instanceWrapper == null) {
		instanceWrapper = createBeanInstance(beanName, mbd, args);
	}
    // 这里省去了部分代码,这些代码用于提前暴露Bean,用于后续处理循环依赖
	// Initialize the bean instance.
	Object exposedObject = bean;
	try {
		// 第二部:属性赋值
		populateBean(beanName, mbd, instanceWrapper);
		// 第三步:初始化Bean,调用初始化方法,完成bean的初始化操作(AOP代理发生在这个步骤)
		// 如果指定了 init-method 方法、实现了 InitializingBean 接口 都会在这里被调用
		exposedObject = initializeBean(beanName, exposedObject, mbd);
	}
	catch (Throwable ex) {
		// 异常处理的代码,省略
	}
	// 这里省去了大量的代码,这部分代码可以看做是处理循环依赖
	return exposedObject;
}
与生命周期相关的接口
与Bean生命周期相关的Spring接口可以分为四类:
- Bean实例化前后调用的 InstantiationAwareBeanPostProcessor 接口。
- Bean实例化之后,初始化之前调用的 xxxAware 接口。
- Bean初始化前后调用的 BeanPostProcessor 接口。
- Bean自己实现的初始化接口 InitializingBean 和销毁接口 DisposableBean 。
⑴ InstantiationAwareBeanPostProcessor接口
该接口是 BeanPostProcessor 接口的子接口,Spring不建议扩展这类接口,如果有需要,建议扩展 BeanPostProcessor 接口,如果非要扩展,建议扩展 InstantiationAwareBeanPostProcessorAdapter 抽象类。
postProcessBeforeInstantiation 方法在调用 doCreateBean 方法之前调用,从Spring的注释和源码来看,这里可以让我们自定义Bean的创建和初始化流程,如果这里返回了对象,不会执行后续的 doCreateBean 方法,源码如下:
// AbstractAutowireCapableBeanFactory
@Override
protected Object createBean(String beanName, RootBeanDefinition mbd, @Nullable Object[] args)
		throws BeanCreationException {
	// 省略部分代码
	try {
		// Give BeanPostProcessors a chance to return a proxy instead of the target bean instance.
		// 在这个方法里面调用 InstantiationAwareBeanPostProcessor.postProcessBeforeInstantiation()方法
		// 这里有机会返回代理对象,我们自定义的Bean一般情况下都不会在这里创建代理对象
       // 但是AOP的通知(增强器)却是在这里被创建出来的,第一次创建单例Bean的时候就会被创建出来
		Object bean = resolveBeforeInstantiation(beanName, mbdToUse);
		if (bean != null) {
			return bean; // 直接返回代理的对象实例,不再实例化目标对象
		}
	}
	catch (Throwable ex) {
		throw new BeanCreationException(mbdToUse.getResourceDescription(), beanName, "BeanPostProcessor before instantiation of bean failed", ex);
	}

	try {
		// 完成Bean实例的创建(实例化,属性填充,初始化)
		Object beanInstance = doCreateBean(beanName, mbdToUse, args);
		if (logger.isTraceEnabled()) {
			logger.trace("Finished creating instance of bean '" + beanName + "'");
		}
		return beanInstance;
	}
	catch (BeanCreationException | ImplicitlyAppearedSingletonException ex) {
		throw ex;
	}
	catch (Throwable ex) {
		throw new BeanCreationException(mbdToUse.getResourceDescription(), beanName, "Unexpected exception during bean creation", ex);
	}
}

@Nullable
protected Object resolveBeforeInstantiation(String beanName, RootBeanDefinition mbd) {
	Object bean = null;
	if (!Boolean.FALSE.equals(mbd.beforeInstantiationResolved)) {
		// Make sure bean class is actually resolved at this point.
		if (!mbd.isSynthetic() && hasInstantiationAwareBeanPostProcessors()) {
			Class<?> targetType = determineTargetType(beanName, mbd);
			if (targetType != null) {
				// 调用 InstantiationAwareBeanPostProcessor.postProcessBeforeInstantiation()方法
				// AnnotationAwareAspectJAutoProxyCreator 在这里会被调用,在这里它并不能创建出 AOP 代理对象,但是却是在这里解析切面配置,生成通知对象。
				bean = applyBeanPostProcessorsBeforeInstantiation(targetType, beanName);
				if (bean != null) {
					// 代理对象创建成功了,则调用Bean后置处理器的 postProcessAfterInitialization 方法
					bean = applyBeanPostProcessorsAfterInitialization(bean, beanName);
				}
			}
		}
		mbd.beforeInstantiationResolved = (bean != null);
	}
	return bean;
}

@Nullable
protected Object applyBeanPostProcessorsBeforeInstantiation(Class<?> beanClass, String beanName) {
	for (BeanPostProcessor bp : getBeanPostProcessors()) {
		if (bp instanceof InstantiationAwareBeanPostProcessor) {
			InstantiationAwareBeanPostProcessor ibp = (InstantiationAwareBeanPostProcessor) bp;
			Object result = ibp.postProcessBeforeInstantiation(beanClass, beanName);
			if (result != null) {
				return result;
			}
		}
	}
	return null;
}
postProcessAfterInstantiation 方法在属性赋值的方法中被调用,在赋值操作之前,如果方法返回值为false,会阻断Bean的属性赋值。
// AbstractAutowireCapableBeanFactory
protected void populateBean(String beanName, RootBeanDefinition mbd, @Nullable BeanWrapper bw) {
    // 省略部分代码
	// Give any InstantiationAwareBeanPostProcessors the opportunity to modify the
	// state of the bean before properties are set. This can be used, for example,
	// to support styles of field injection.
	// 官方的解释是可以让用户自定义属性赋值
	if (!mbd.isSynthetic() && hasInstantiationAwareBeanPostProcessors()) { // 是否持有 InstantiationAwareBeanPostProcessor
		for (BeanPostProcessor bp : getBeanPostProcessors()) {
			if (bp instanceof InstantiationAwareBeanPostProcessor) {
				InstantiationAwareBeanPostProcessor ibp = (InstantiationAwareBeanPostProcessor) bp;
				// 在目标对象实例化之后调用,此时对象被实例化,但是对象的属性还未被设置。
				// 如果该方法返回false,表示不需要进行后续的属性赋值;返回true,则进行正常的属性设置。
				if (!ibp.postProcessAfterInstantiation(bw.getWrappedInstance(), beanName)) {
					return;
				}
			}
		}
	}
	// 省略大量代码,主要是进行属性赋值
}
⑵ Aware接口
Aware 接口可以分为两类,一类是在 initializeBean 方法中调用,一类是通过 ApplicationContextAwareProcessor.postProcessBeforeInitialization() 方法调用。所有的 Aware 接口都会在Bean初始化之前被调用。
Aware的意思是意识、感知、对xxx感兴趣,即如果Bean实现了 xxxAware 接口,代表它对xxx资源感知,在Bean中可以直接拿到xxx资源。
按执行顺序排列如下:
第一类Aware接口:
- BeanNameAware ,可以获取到Bean的名称。
- BeanClassLoaderAware ,可以获取到Bean的class加载器。
- BeanFactoryAware ,可以获取到 BeanFactory 对象。
第二类Aware接口:
- EnvironmentAware ,Spring的环境变量,从这个对象中可以获取到Spring管理的所有配置参数。
- EmbeddedValueResolverAware ,这个没用过,好像是可以获取到Spring EL表达式的解析器,可能在我们需要自定义Spring注解的时候能用到。
- ResourceLoaderAware ,资源加载器。
- ApplicationEventPublisherAware ,这个经常用,当我们需要自定义Spring事件发布的时候会到。
- MessageSourceAware
- ApplicationContextAware ,这个是最常用的,可以获取到上下文。
protected Object initializeBean(final String beanName, final Object bean, @Nullable RootBeanDefinition mbd) {
   // 如果 bean 实现了 BeanNameAware、BeanClassLoaderAware 或 BeanFactoryAware 接口,在这里进行回调
	if (System.getSecurityManager() != null) {
		AccessController.doPrivileged((PrivilegedAction<Object>) () -> {
			invokeAwareMethods(beanName, bean);
			return null;
		}, getAccessControlContext());
	}
	else {
		invokeAwareMethods(beanName, bean);
	}

	Object wrappedBean = bean;
	if (mbd == null || !mbd.isSynthetic()) {
		// 调用 BeanPostProcessor 的 postProcessBeforeInitialization 方法(Bean后置处理器的前处理方法)
		// 如果Bean实现了EnvironmentAware、EmbeddedValueResolverAware、ResourceLoaderAware、ApplicationEventPublisherAware
		// MessageSourceAware、ApplicationContextAware接口,会在这进行回调
		// 如果Bean配置了@PostConstruct会在这里调用
		wrappedBean = applyBeanPostProcessorsBeforeInitialization(wrappedBean, beanName);
	}

	try {
		// 调用 bean 定义中的 init-method,或者如果 bean 实现了 InitializingBean 接口,调用 afterPropertiesSet() 方法
		invokeInitMethods(beanName, wrappedBean, mbd);
	}
	catch (Throwable ex) {
		throw new BeanCreationException(
				(mbd != null ? mbd.getResourceDescription() : null),
				beanName, "Invocation of init method failed", ex);
	}
	if (mbd == null || !mbd.isSynthetic()) {
		// 调用 BeanPostProcessor 的 postProcessAfterInitialization 方法(Bean后置处理器的后处理方法)
		// AOP动态代理对象一般在这里创建
		// AnnotationAwareAspectJAutoProxyCreator.postProcessAfterInitialization 创建代理对象
		wrappedBean = applyBeanPostProcessorsAfterInitialization(wrappedBean, beanName);
	}

	return wrappedBean;
}
第一类接口调用的源码:
// AbstractAutowireCapableBeanFactory
private void invokeAwareMethods(final String beanName, final Object bean) {
	if (bean instanceof Aware) {
		if (bean instanceof BeanNameAware) {
			((BeanNameAware) bean).setBeanName(beanName);
		}
		if (bean instanceof BeanClassLoaderAware) {
			ClassLoader bcl = getBeanClassLoader();
			if (bcl != null) {
				((BeanClassLoaderAware) bean).setBeanClassLoader(bcl);
			}
		}
		if (bean instanceof BeanFactoryAware) {
			((BeanFactoryAware) bean).setBeanFactory(AbstractAutowireCapableBeanFactory.this);
		}
	}
}
第二类接口调用的源码:
// ApplicationContextAwareProcessor
@Override
@Nullable
public Object postProcessBeforeInitialization(Object bean, String beanName) throws BeansException {
	if (!(bean instanceof EnvironmentAware || bean instanceof EmbeddedValueResolverAware ||
			bean instanceof ResourceLoaderAware || bean instanceof ApplicationEventPublisherAware ||
			bean instanceof MessageSourceAware || bean instanceof ApplicationContextAware)){
		return bean;
	}
    // 省略几行代码
	if (acc != null) {
		// 省略几行点
	}
	else {
		invokeAwareInterfaces(bean);
	}

	return bean;
}

private void invokeAwareInterfaces(Object bean) {
	if (bean instanceof EnvironmentAware) {
		((EnvironmentAware) bean).setEnvironment(this.applicationContext.getEnvironment());
	}
	if (bean instanceof EmbeddedValueResolverAware) {
		((EmbeddedValueResolverAware) bean).setEmbeddedValueResolver(this.embeddedValueResolver);
	}
	if (bean instanceof ResourceLoaderAware) {
		((ResourceLoaderAware) bean).setResourceLoader(this.applicationContext);
	}
	if (bean instanceof ApplicationEventPublisherAware) {
		((ApplicationEventPublisherAware) bean).setApplicationEventPublisher(this.applicationContext);
	}
	if (bean instanceof MessageSourceAware) {
		((MessageSourceAware) bean).setMessageSource(this.applicationContext);
	}
	if (bean instanceof ApplicationContextAware) {
		((ApplicationContextAware) bean).setApplicationContext(this.applicationContext);
	}
}
从上面的源码可以看出,ResourceLoaderAware 、 ApplicationEventPublisherAware 、 MessageSourceAware 其实都是上下文 applicationContext 对象,ApplicationContext 接口是一个复合接口,源码如下:
public interface ApplicationContext extends EnvironmentCapable, ListableBeanFactory, HierarchicalBeanFactory,
      MessageSource, ApplicationEventPublisher, ResourcePatternResolver
Spring为什么要将 Aware 接口在两个地方进行调用,我也没有想明白。在网上看到一些大神分析,可能是因为版本迭代的原因,起初只有第一类 Aware 接口,后面增加第二类 Aware 接口,基于开闭原则,扩展出了第二种调用方式。
⑶ BeanPostProcessor接口
该类接口在 AbstractAutowireCapableBeanFactory.initializeBean() 方法中被调用,具体的源码可以看 Aware 接口部分的 initializeBean 方法源码。
在一些公司的自研框架中,经常会扩展这类接口的 postProcessAfterInitialization 方法,在Bean初始化完成之后,做一些自定义的操作。Spring生成AOP代理对象就是在这个后处理方法中完成的。
可生成Spring AOP代理对象的 BeanPostProcessor有三个,但是在Spring容器中每次只会存在一个:
InfrastructureAdvisorAutoProxyCreator:只开启Spring事务管理时,注册的是这个,优先级最低。AspectJAwareAdvisorAutoProxyCreator:在XML文件中使用 aop 域名定义AOP时,注册的是这个。AnnotationAwareAspectJAutoProxyCreator:开启注解、开启AOP功能,通过注解的方式配置切点、切面时,注册的是这个,优先级最高。
注意:一些特殊场景生成AOP代理对象时不是使用上面的三个类,例如有@Async注解的Bean的代理对象由AsyncAnnotationBeanPostProcessor生成代理对象,而且这些特殊场景对循环依赖也有一些影响。
⑷ InitializingBean接口
InitializingBean 接口被调用的源码:
// AbstractAutowireCapableBeanFactory
protected void invokeInitMethods(String beanName, final Object bean, @Nullable RootBeanDefinition mbd)
		throws Throwable {
	// bean 实现了 InitializingBean 接口,调用afterPropertiesSet方法
	boolean isInitializingBean = (bean instanceof InitializingBean);
	if (isInitializingBean && (mbd == null || !mbd.isExternallyManagedInitMethod("afterPropertiesSet"))) {
		if (logger.isTraceEnabled()) {
			logger.trace("Invoking afterPropertiesSet() on bean with name '" + beanName + "'");
		}
		if (System.getSecurityManager() != null) {
			try {
				AccessController.doPrivileged((PrivilegedExceptionAction<Object>) () -> {
					((InitializingBean) bean).afterPropertiesSet();
					return null;
				}, getAccessControlContext());
			}
			catch (PrivilegedActionException pae) {
				throw pae.getException();
			}
		}
		else {
			// 调用 InitializingBean 接口的方法
			((InitializingBean) bean).afterPropertiesSet();
		}
	}

	if (mbd != null && bean.getClass() != NullBean.class) {
		// 调用 bean 定义中的 init-method
		String initMethodName = mbd.getInitMethodName();
		if (StringUtils.hasLength(initMethodName) &&
				!(isInitializingBean && "afterPropertiesSet".equals(initMethodName)) &&
				!mbd.isExternallyManagedInitMethod(initMethodName)) {
			invokeCustomInitMethod(beanName, bean, mbd);
		}
	}
}
指定Bean的初始化方法有三种方式,按执行顺序排列如下:
- 使用 @PostConstruct 注解的方法。
- 实现 InitializingBean 接口的 afterPropertiesSet 方法。
- 在Bean定义时指定的初始化方法。
测试代码如下:
// Spring组件
public class InitMethodExecutionSequence implements InitializingBean {
   private static final Logger logger = LoggerFactory.getLogger(InitMethodExecutionSequence.class);

   public InitMethodExecutionSequence() {
      logger.info("MethodExecutionSequence Constructor");
   }

   @PostConstruct
   public void post() {
      logger.info("MethodExecutionSequence#PostConstruct");
   }

   public void init() {
      logger.info("MethodExecutionSequence#init-method");
   }

   @Override
   public void afterPropertiesSet() throws Exception {
      logger.info("#MethodExecutionSequence#afterPropertiesSet");
   }
}

// Bean定义
@Configuration
public class MainConfiguration {
   @Bean(initMethod = "init")
   public InitMethodExecutionSequence methodExecutionSequence() {
      return new InitMethodExecutionSequence();
   }
}
启动Spring容器时的执行结果:

初始化方法执行的调用链:
–> AbstractAutowireCapableBeanFactory.initializeBean()
–> AbstractAutowireCapableBeanFactory.applyBeanPostProcessorsBeforeInitialization()
–> InitDestroyAnnotationBeanPostProcessor.postProcessBeforeInitialization()
–> InitDestroyAnnotationBeanPostProcessor#LifecycleMetadata.invokeInitMethods()
–> —>通过反射的方式,执行@PostConstruct注解的方法
–> AbstractAutowireCapableBeanFactory.invokeInitMethods()
–> InitializingBean.afterPropertiesSet()
–> AbstractAutowireCapableBeanFactory.invokeCustomInitMethod()
–>通过反射的方式,调用Bean定义时指定的初始化方法
⑸ DisposableBean接口
Bean销毁时执行的方法也有三种定义方式,按执行顺序排列如下:
- @PreDestroy 注解的方法
- DisposableBean 接口的 destroy 方法
- Bean定义指定的destroy方法
测试代码如下:
// Spring组件
public class DestroyMethodExecutionSequence implements DisposableBean {
   private static final Logger logger = LoggerFactory.getLogger(DestroyMethodExecutionSequence.class);

   @PreDestroy
   public void preDestroy() {
      logger.info("@PreDestroy注解的方法");
   }

   public void destroyMethod() {
      logger.info("Bean定义指定的destroy方法");
   }

   @Override
   public void destroy() throws Exception {
      logger.info("DisposableBean接口的destroy方法");
   }
}

@Configuration
public class MainConfiguration {
   @Bean(destroyMethod = "destroyMethod")
   public DestroyMethodExecutionSequence destroyMethodExecutionSequence() {
      return new DestroyMethodExecutionSequence();
   }
}
执行结果:

销毁Bean的代码入口是 ConfigurableApplicationContext.close() 方法,AbstractApplicationContext 实现了该方法。销毁的源码相对比较简单。
销毁方法执行的调用链:
–> AbstractApplicationContext.close()
–> AbstractApplicationContext.doClose()
–> AbstractApplicationContext.destroyBeans()
–> DefaultListableBeanFactory.destroySingletons()
–> DefaultSingletonBeanRegistry.destroySingletons()
–> DefaultSingletonBeanRegistry.destroySingleton()
–> DefaultSingletonBeanRegistry.destroyBean()
–> DisposableBeanAdapter.destroy()
–> —> InitDestroyAnnotationBeanPostProcessor.postProcessBeforeDestruction()
–> —> InitDestroyAnnotationBeanPostProcessor.invokeDestroyMethods()
–> —>通过反射的方式,执行@PreDestroy注解的方法
–> DisposableBean.destroy()
–> DisposableBeanAdapter.invokeCustomDestroyMethod()
–>通过反射的方式,执行Bean定义时指定的销毁方法


 6916
6916


 被折叠的 条评论
为什么被折叠?
被折叠的 条评论
为什么被折叠?
 到【灌水乐园】发言


