


学习教程视频链接:https://pan.baidu.com/s/1-mUSaciMNolE1aqBP9suWg
提取码:gz03
一、Git 简介
git历史
1、linus创建linux的时候用diff方式汇总代码
2、bitkeeper授权给linus公司,因为开发samba的andrew视图破解协议被bitmover公司发现了,
要求收回linux社区免费使用bitkeeper的使用权
3、linus两周时间用c写了一个分布式版本控制系统,git
4、linux系统的源码由git管理
5、20008面github免费提供管理
git的两大特点:
1、版本控制
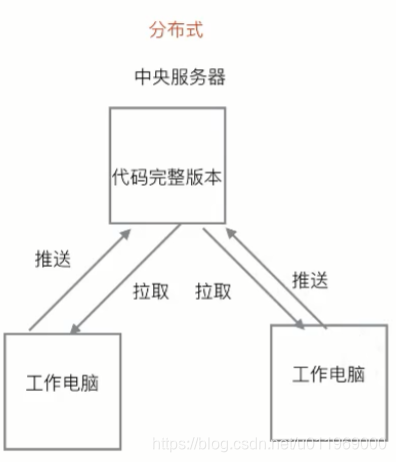
2、分布式
中央服务器:找一台电脑充当,每天24小时开机,也可以用github网站
其他个人工作电脑都从这个服务仓库克隆一份戴自己电脑上,并且各自吧各自的提交推送到服务器仓库里,也从服务器仓库中拉取别人提交的代码,
分布式管理控制和集中管理控制
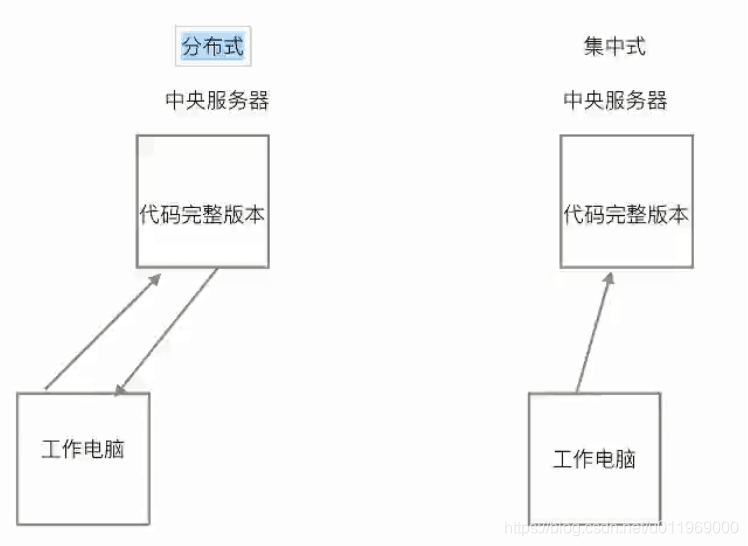
分布式和集中式最大的区别
中央服务器done掉之后,集中式的工作电脑不能工作,而分布式的能够工作
二、安装与配置
安装:
uhuntu:sudo apt-get install git
centos:yum install git
Python:pip install git
最常用的 git 命令有:
add 添加文件内容至索引
bisect 通过二分查找定位引入 bug 的变更
branch 列出、创建或删除分支
checkout 检出一个分支或路径到工作区
clone 克隆一个版本库到一个新目录
commit 记录变更到版本库
diff 显示提交之间、提交和工作区之间等的差异
fetch 从另外一个版本库下载对象和引用
grep 输出和模式匹配的行
init 创建一个空的 Git 版本库或重新初始化一个已存在的版本库
log 显示提交日志
merge 合并两个或更多开发历史
mv 移动或重命名一个文件、目录或符号链接
pull 获取并合并另外的版本库或一个本地分支
push 更新远程引用和相关的对象
rebase 本地提交转移至更新后的上游分支中
reset 重置当前HEAD到指定状态
rm 从工作区和索引中删除文件
show 显示各种类型的对象
status 显示工作区状态
tag 创建、列出、删除或校验一个GPG签名的 tag 对象
命令 ‘git help -a’ 和 ‘git help -g’ 显示可用的子命令和一些指南。参见
‘git help <命令>’ 或 ‘git help <指南>’ 来查看给定的子命令帮助或指南。
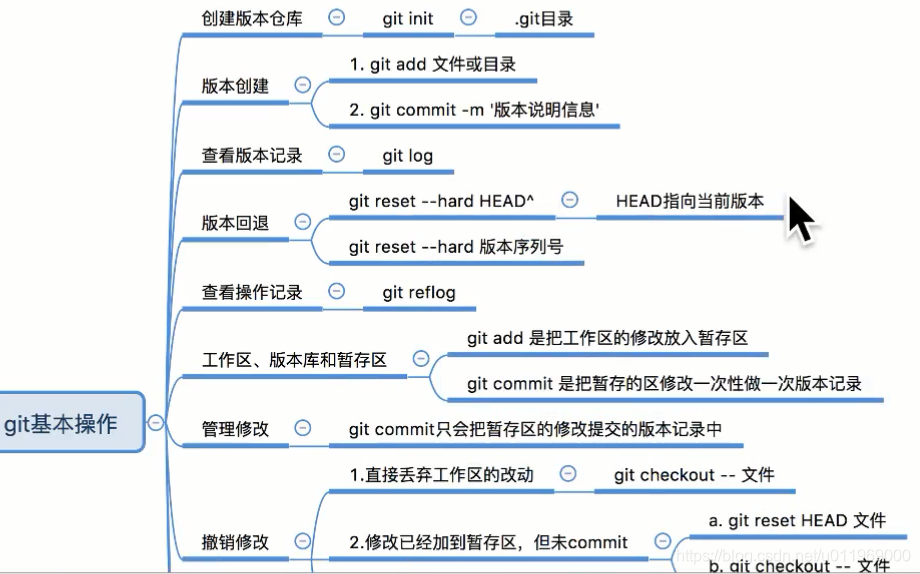
三、创建一个版本库
1、新建一个目录,创建一个版本,git init命令初始化git,生成.git文件
[root@localhost test]# git init
重新初始化现存的 Git 版本库于 /home/github/test/.git/
四、版本的创建和回退
4.1使用
1、创建一个版本库
创建一个空仓库,初始化git,使用git init命令,生成.git文件
2、创建一个提交后版本1
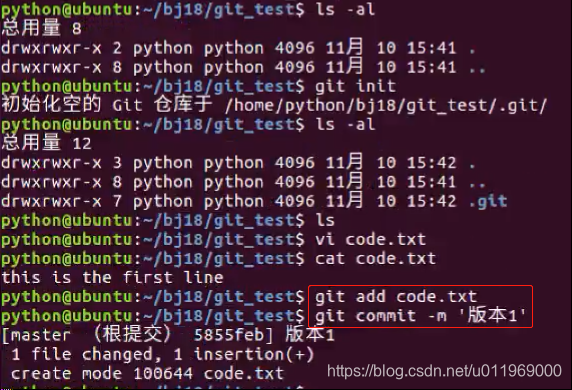 编辑文件code.txt
步骤一:Git add code.txt
创建版本记录
步骤二:Git commit -m '代码1' 说明信息
3、查看版本记录,
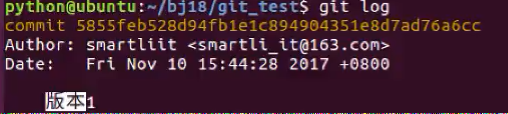
命令1:git log
显示
Commit 序列号
作者:
日期:
说明信息
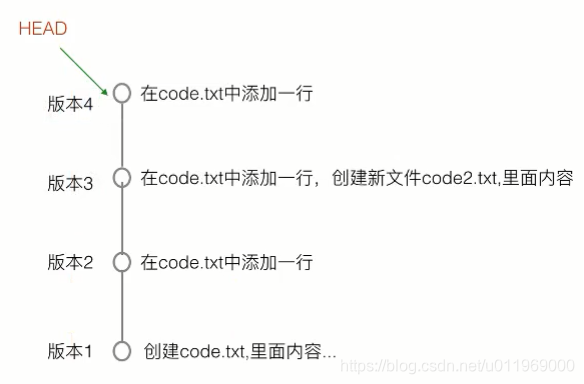
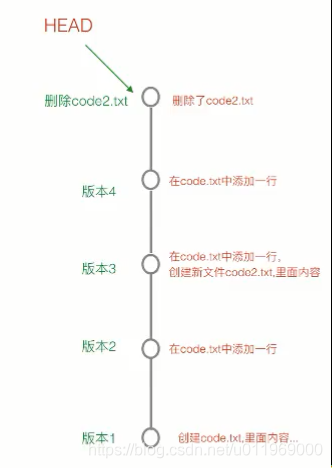
4、版本回退
修改版本,生成版本2

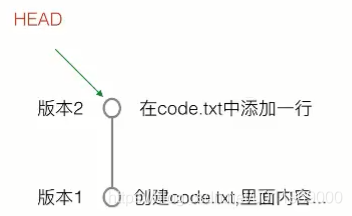
只会记录修改的点,后一个版本依赖于前一个版本
回退练习操作一:使用HEAD回退到版本1,即把指针指到版本1:
Git reset --hard HEAD^
通过前几个历史版本:
HEAD^ 上一个版本
HEAD^^上上个版本
HEAD~1上个版本
HEAD~100前100个版本
回退练习操作二:使用版本号返回到版本2,
通过版本编号
Git reset --hard +版本编号(复制前几位)
回退练习操作三:使用版本号返回到版本2,但是看不到序列号
步骤一:查看之前操作的序列
Git reflog 查看操作序列,找到版本号
步骤二:同操作二,用git reset --hard序列号
4.2、工作区和版本库
1、电脑中的目录是工作区working dir
centos中的git工作区:
[root@localhost test]# pwd
/home/github/test
编辑、创建文件都是在工作区
2、工作区有个隐藏目录,.git是一个版本库(repository)
[root@localhost test]# ll -a
总用量 8
drwxr-xr-x. 3 root root  51 2月   7 06:22 .
drwxr-xr-x. 3 root root  18 2月   7 04:27 ..
-rw-r--r--. 1 root root  47 2月   7 05:29 code2.txt
-rw-r--r--. 1 root root  57 2月   7 06:22 code.txt
drwxr-xr-x. 8 root root 183 2月  14 09:51 .git
其中stage(index)叫暂存区
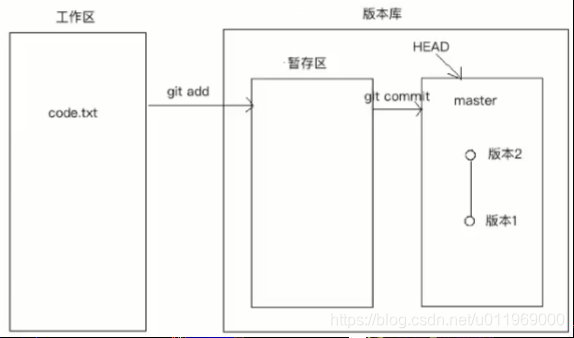
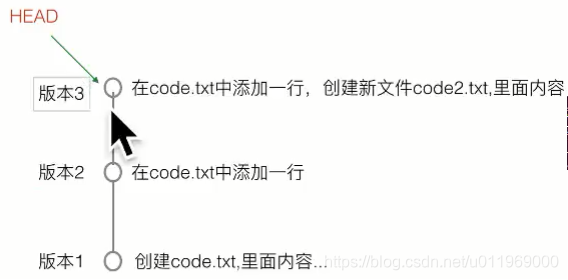
git自动创建的第一个分支master,master的一个指针叫HEAD、
第一步:git add 把工作区的code.txt添加到暂存区,可以多次add
第二步:git commit 从暂存区添加版本记录
熟悉工作区及版本库的操作1:新建code2.txt,编辑code.txt
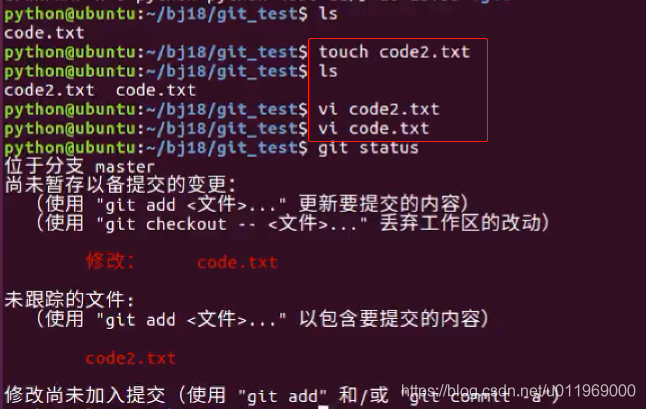
熟悉工作区及版本库的操作2:查看文件状态,没有add就没有跟踪
git status
修改:code.txt(修改)
未跟踪文件:code2.txt(新建)
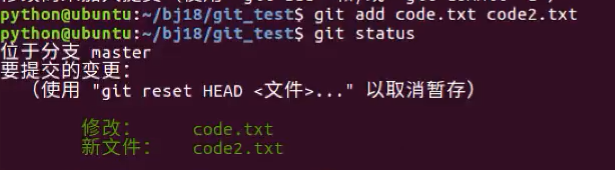
熟悉工作区及版本库的操作3:添加到暂存区
git add把工作区中的文件添加到暂存区,
git add code.txt code2.txt
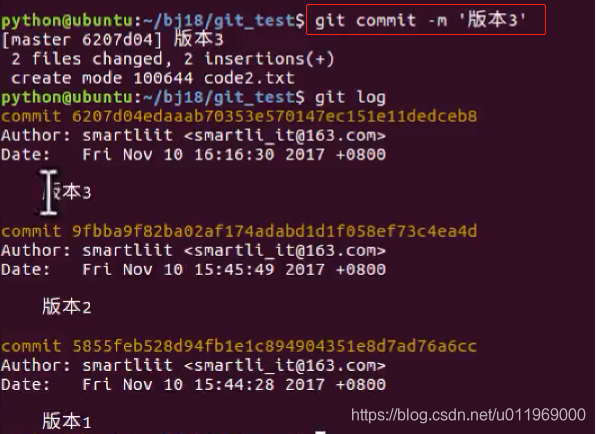
熟悉工作区及版本库的操作4:添加到master
Git commit创建版本记录,提交到master
git commit -m ‘版本3’
Git log 查看版本
当缓存区没有修改信息时
[root@localhost test]# git status
#位于分支 master
无文件要提交,干净的工作区
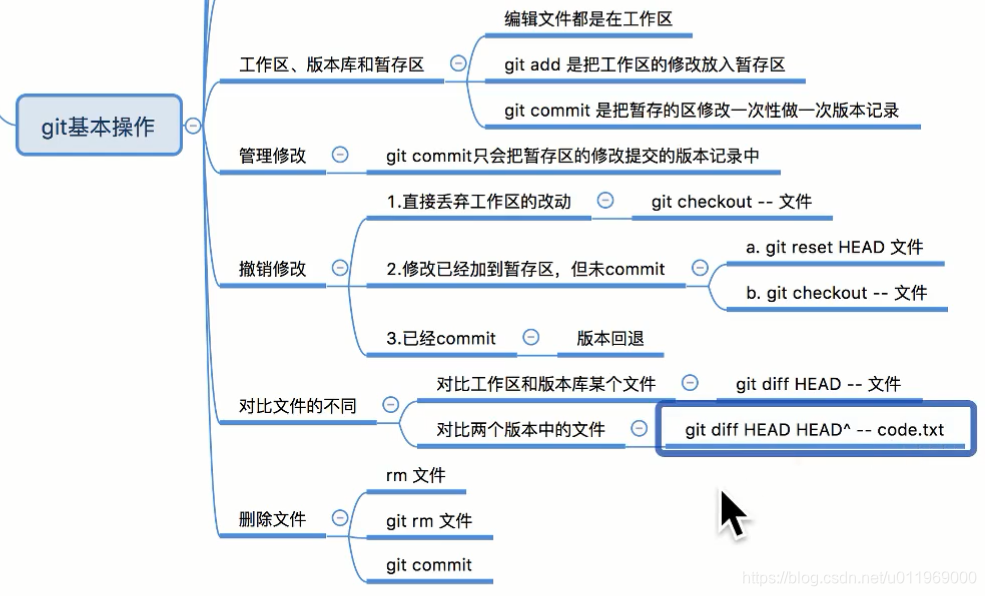
4.3、管理修改,
git管理文件的修改,git只会管理暂存区的修改
git修改操作1:在code.txt增加一行,并git add code.txt 提交到暂存区,查看状态在暂存区未提交变更
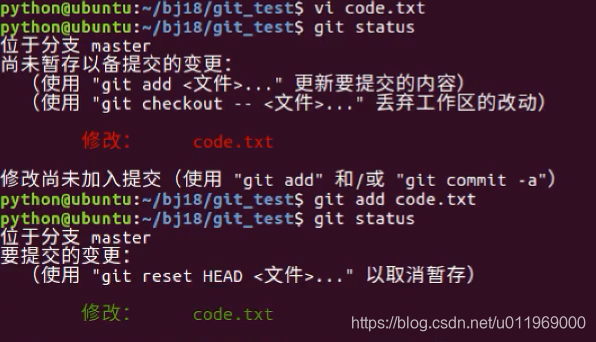
git修改操作2:再在code.txt增加一行,查看状态前一个提交了后一个未提交
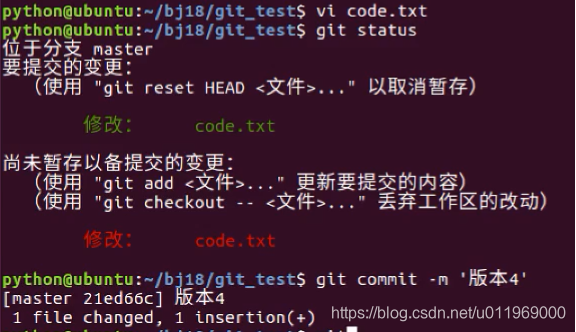
git修改操作3:git commit -m ‘版本4’ :将暂存区的添加到master,查看状态,仍有后一个未提及的不能添加到master
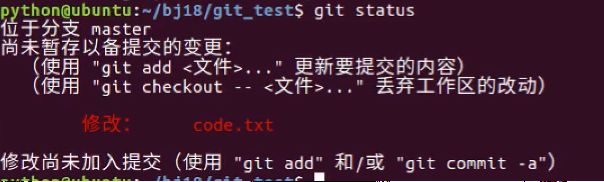
4.4、撤销修改
[root@localhost test]# git status
# 位于分支 master
# 尚未暂存以备提交的变更:
#   (使用 "git add <file>..." 更新要提交的内容)
#   (使用 "git checkout -- <file>..." 丢弃工作区的改动)
#
#       修改:      code.txt
#
修改尚未加入提交(使用 "git add" 和/或 "git commit -a")
当前文件状态:修改了code.txt但暂未提交到暂存区
撤销操作1:(工作区改动未提交到暂存区)丢弃工作区的改动 Git checkout – 文件名
Git checkout – code.txt
[root@localhost test]# cat code.txt
hello world1
hello world2
hello world3
hello world4 new
hello world5
step4.4 chexiao xiugai
[root@localhost test]# git checkout -- code.txt
[root@localhost test]# cat code.txt
hello world1
hello world2
hello world3
hello world4 new
hello world5
[root@localhost test]# git status
# 位于分支 master
无文件要提交,干净的工作区
修改的内容撤回,工作区变为干净
撤销操作2:(工作区改动已提交到暂存区)撤销暂存区的改动 git reset HEAD 文件,
修改变为在工区区的改动未提交到暂存区的状态
Git add code.txt
步骤1:撤出暂存区 git reset HEAD 文件名
git reset HEAD code.txt
步骤2:再按操作2丢弃工作区的改动git checkout – 文件名
git checkout – code.txt
[root@localhost test]# cat code.txt

hello world1
hello world2
hello world3
hello world4 new
hello world5
step4.4 zancunqu chehui
[root@localhost test]# git add code.txt
[root@localhost test]# git status
# 位于分支 master
# 要提交的变更:
#   (使用 "git reset HEAD <file>..." 撤出暂存区)
#
#       修改:      code.txt
#
[root@localhost test]# git reset code.txt
重置后撤出暂存区的变更:
M       code.txt
[root@localhost test]# git status
# 位于分支 master
# 尚未暂存以备提交的变更:
#   (使用 "git add <file>..." 更新要提交的内容)
#   (使用 "git checkout -- <file>..." 丢弃工作区的改动)
#
#       修改:      code.txt
#
修改尚未加入提交(使用 "git add" 和/或 "git commit -a")
[root@localhost test]# cat code.txt
hello world1
hello world2
hello world3
hello world4 new
hello world5
step4.4 zancunqu chehui
[root@localhost test]# git checkout -- code.txt
[root@localhost test]# git status
# 位于分支 master
无文件要提交,干净的工作区
[root@localhost test]# cat code.txt
hello world1
hello world2
hello world3
hello world4 new
hello world5
撤销操作3:(工作区改动已提交到暂存区,暂存区的修改已提交到版本库)
参考版本回退操作
4.5、对比文件的不同
1、工作区与版本库中的对比
Git diff HEAD – code.txt
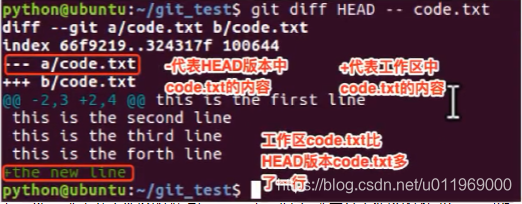
对比文件操作1:对比工作区中修改前后的区别
新增一行
[root@localhost test]# cat code.txt

hello world1
hello world2
hello world3
hello world4 new
hello world5
diff --git a b
[root@localhost test]# git status
# 位于分支 master
# 尚未暂存以备提交的变更:
#   (使用 "git add <file>..." 更新要提交的内容)
#   (使用 "git checkout -- <file>..." 丢弃工作区的改动)
#
#       修改:      code.txt
#
修改尚未加入提交(使用 "git add" 和/或 "git commit -a")
[root@localhost test]# git diff HEAD -- code.txt
diff --git a/code.txt b/code.txt
index 380ffa7..c10711e 100644
--- a/code.txt
+++ b/code.txt
@@ -3,4 +3,5 @@ hello world1
 hello world2
 hello world3
 hello world4 new
-hello world5
+hello world5
+diff --git a b
2、对比两个版本间的文件不同

对比文件操作2:比较工作区两个版本的差异
[root@localhost test]# git checkout -- code.txt
[root@localhost test]# git status
# 位于分支 master
无文件要提交,干净的工作区
[root@localhost test]# git diff HEAD HEAD^ code.txt
diff --git a/code.txt b/code.txt
index 380ffa7..0a6e40c 100644
--- a/code.txt
+++ b/code.txt
@@ -3,4 +3,3 @@ hello world1
 hello world2
 hello world3
 hello world4 new
-hello world5
[root@localhost test]# git diff HEAD^ HEAD code.txt
diff --git a/code.txt b/code.txt
index 0a6e40c..380ffa7 100644
--- a/code.txt
+++ b/code.txt
@@ -3,3 +3,4 @@ hello world1
 hello world2
 hello world3
 hello world4 new
+hello world5
4.6、删除文件
删除文件是工作区的一个改动,
删除文件操作1:在工作区删除,未提到暂存区
第1步:(使用 “git checkout – …” 丢弃工作区的改动) git checkout – code2.txt
[root@localhost test]# ll
总用量 8
-rw-r--r--. 1 root root 31 2月  14 13:27 code2.txt
-rw-r--r--. 1 root root 71 2月  14 16:29 code.txt
[root@localhost test]# rm code2.txt
rm:是否删除普通文件 "code2.txt"?y
[root@localhost test]# ll
总用量 4
-rw-r--r--. 1 root root 71 2月  14 16:29 code.txt
[root@localhost test]# git status
# 位于分支 master
# 尚未暂存以备提交的变更:
#   (使用 "git add/rm <file>..." 更新要提交的内容)
#   (使用 "git checkout -- <file>..." 丢弃工作区的改动)
#
#       删除:      code2.txt
#
修改尚未加入提交(使用 "git add" 和/或 "git commit -a")
[root@localhost test]# git checkout -- code2.txt
[root@localhost test]# git status
# 位于分支 master
无文件要提交,干净的工作区
[root@localhost test]# ll
总用量 8
-rw-r--r--. 1 root root 31 2月  14 13:27 code2.txt
-rw-r--r--. 1 root root 71 2月  14 16:29 code.txt
[root@localhost test]# git log
commit 2ec82cbf1920e1ed453d47771474897647c8d7b0
Author: root <429764001@qq.com>
Date:   Fri Feb 14 14:02:25 2020 +0800

    版本4

commit 056c94652c52636b4fcd8aea9cc440b0cc2ae71d
Author: root <429764001@qq.com>
Date:   Fri Feb 14 13:25:12 2020 +0800

    banben3

commit 4ab69d68308a1e63d6833faa51cb68b7e7d087b2
Author: root <root@localhost.localdomain>
Date:   Fri Feb 7 05:33:04 2020 +0800

    banben3

commit edb6834e4bfa2884e33fd62fdfa0a68df4436687
Author: root <root@localhost.localdomain>
Date:   Fri Feb 7 04:51:42 2020 +0800

    banben2

commit b2475493d7c688317deaa3b71ddf9a06df461df5
Author: root <root@localhost.localdomain>
Date:   Fri Feb 7 04:41:38 2020 +0800
删除文件操作2:在工作区删除,已提交到暂存区,
第1步:使用 “git add/rm …” 更新要提交的内容到暂存区, git rm code2.txt
(使用 “git reset HEAD …” 撤出暂存区) git reset HEAD code2.txt
第2步:(使用 “git checkout – …” 丢弃工作区的改动) git checkout – code2.txt
[root@localhost test]# rm code2.txt
rm:是否删除普通文件 "code2.txt"?y
[root@localhost test]# git status
# 位于分支 master
# 尚未暂存以备提交的变更:
#   (使用 "git add/rm <file>..." 更新要提交的内容)
#   (使用 "git checkout -- <file>..." 丢弃工作区的改动)
#
#       删除:      code2.txt
#
修改尚未加入提交(使用 "git add" 和/或 "git commit -a")
[root@localhost test]# git rm code2.txt
rm 'code2.txt'
[root@localhost test]# git status
# 位于分支 master
# 要提交的变更:
#   (使用 "git reset HEAD <file>..." 撤出暂存区)
#
#       删除:      code2.txt
#
[root@localhost test]# ll
总用量 4
-rw-r--r--. 1 root root 71 2月  14 16:29 code.txt
[root@localhost test]# git reset HEAD code2.txt
重置后撤出暂存区的变更:
D       code2.txt
[root@localhost test]# ll
总用量 4
-rw-r--r--. 1 root root 71 2月  14 16:29 code.txt
[root@localhost test]# git status
# 位于分支 master
# 尚未暂存以备提交的变更:
#   (使用 "git add/rm <file>..." 更新要提交的内容)
#   (使用 "git checkout -- <file>..." 丢弃工作区的改动)
#
#       删除:      code2.txt
#
修改尚未加入提交(使用 "git add" 和/或 "git commit -a")
[root@localhost test]# git checkout -- code2.txt
[root@localhost test]# git status
# 位于分支 master
无文件要提交,干净的工作区
[root@localhost test]# ll
总用量 8
-rw-r--r--. 1 root root 31 2月  14 16:45 code2.txt
-rw-r--r--. 1 root root 71 2月  14 16:29 code.txt
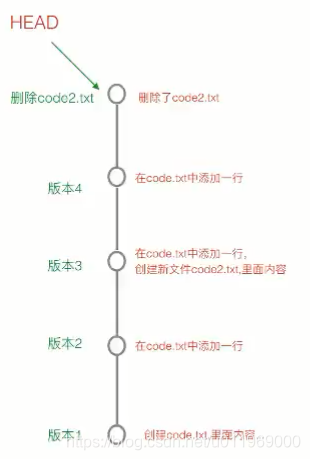
删除文件操作3:在工作区删除,提交到暂存区并提交到版本库master,见版本返回
[root@localhost test]# rm code2.txt
rm:是否删除普通文件 "code2.txt"?y
[root@localhost test]# git status
# 位于分支 master
# 尚未暂存以备提交的变更:
#   (使用 "git add/rm <file>..." 更新要提交的内容)
#   (使用 "git checkout -- <file>..." 丢弃工作区的改动)
#
#       删除:      code2.txt
#
修改尚未加入提交(使用 "git add" 和/或 "git commit -a")
[root@localhost test]# git rm code2.txt
rm 'code2.txt'
[root@localhost test]# git status
# 位于分支 master
# 要提交的变更:
#   (使用 "git reset HEAD <file>..." 撤出暂存区)
#
#       删除:      code2.txt
#
[root@localhost test]# git commit -m '删除 code2.txt'
[master 72520a9] 删除 code2.txt
 1 file changed, 2 deletions(-)
 delete mode 100644 code2.txt
[root@localhost test]# git status
# 位于分支 master
无文件要提交,干净的工作区
[root@localhost test]# git log
commit 72520a9a6dc5f250236e2f8db57abcc680904589
Author: root <429764001@qq.com>
Date:   Fri Feb 14 16:49:15 2020 +0800

    删除 code2.txt

commit 2ec82cbf1920e1ed453d47771474897647c8d7b0
Author: root <429764001@qq.com>
Date:   Fri Feb 14 14:02:25 2020 +0800

    版本4

commit 056c94652c52636b4fcd8aea9cc440b0cc2ae71d
Author: root <429764001@qq.com>
Date:   Fri Feb 14 13:25:12 2020 +0800

    banben3

commit 4ab69d68308a1e63d6833faa51cb68b7e7d087b2
Author: root <root@localhost.localdomain>
Date:   Fri Feb 7 05:33:04 2020 +0800

    banben3

commit edb6834e4bfa2884e33fd62fdfa0a68df4436687
Author: root <root@localhost.localdomain>
Date:   Fri Feb 7 04:51:42 2020 +0800

    banben2
查看日志的简洁版本
git log --pretty=oneline
[root@localhost test]# git log --pretty=oneline
72520a9a6dc5f250236e2f8db57abcc680904589 删除 code2.txt
2ec82cbf1920e1ed453d47771474897647c8d7b0 版本4
056c94652c52636b4fcd8aea9cc440b0cc2ae71d banben3
4ab69d68308a1e63d6833faa51cb68b7e7d087b2 banben3
edb6834e4bfa2884e33fd62fdfa0a68df4436687 banben2
b2475493d7c688317deaa3b71ddf9a06df461df5 banben1
原理:
git基本操作版本小结
删除的补充
如果是在工作区未跟踪的文件即未git add的文件,删除掉了,则无法恢复
[root@localhost test]# touch code3.txt
[root@localhost test]# git status
# 位于分支 master
# 未跟踪的文件:
#   (使用 "git add <file>..." 以包含要提交的内容)
#
#       code3.txt
提交为空,但是存在尚未跟踪的文件(使用 "git add" 建立跟踪)
[root@localhost test]# vi code3.txt
sda a
~
"code3.txt" 1L, 7C written
[root@localhost test]# ll
总用量 8
-rw-r--r--. 1 root root  7 2月  14 17:12 code3.txt
-rw-r--r--. 1 root root 71 2月  14 16:29 code.txt
[root@localhost test]# rm code3.txt
rm:是否删除普通文件 "code3.txt"?y
[root@localhost test]# ll
总用量 4
-rw-r--r--. 1 root root 71 2月  14 16:29 code.txt
[root@localhost test]# git status
# 位于分支 master
无文件要提交,干净的工作区
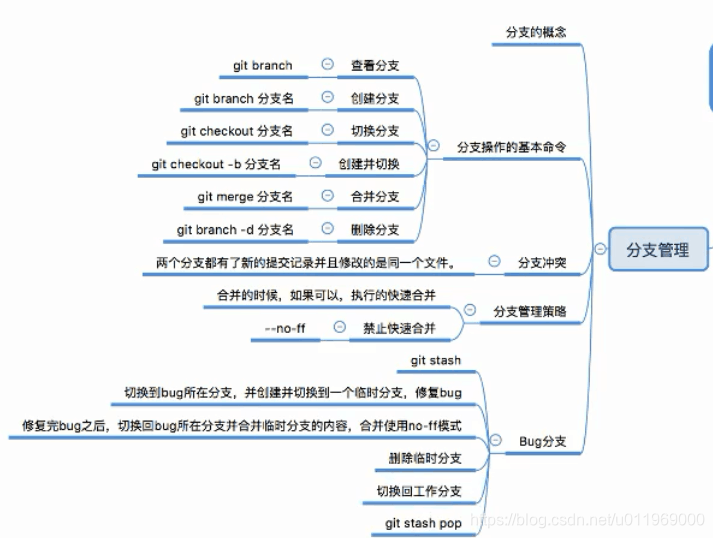
五、分支管理
5.1、分支的概念
流水线里面的两条互不干扰的生产线,直到重合之后才碰见
查看分支 git branch
5.2、创建与合并分支
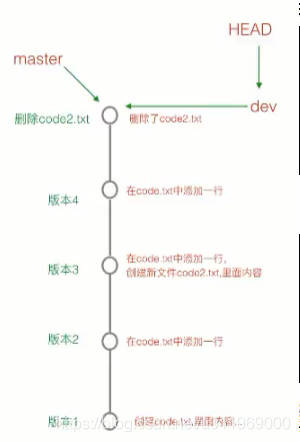
git把每次提交的版本串成一条时间线,即为一个分支,目前只有一条时间线,这个分支叫主分支,及master分支
HEAD指针严格来讲不是指向提交,而是指向master,而master才是指向提交,即HEAD指向当前分支

分支操作1:切换到新分支dev
git branch查看当前的分支
[root@localhost test]# git branch
* dev
  master
git checkout -b dev切换到一个新的分支
切换很快,只是增值一个指针,挪一下位置
[root@localhost test]# git checkout -b dev
切换到一个新分支 ‘dev’
查看git 日志的缩减版
git log --pretty=oneline
[root@localhost test]# git log --pretty=oneline
a92bac7209289793254c5a081d12a0571ea864f1 dev分支提交
72520a9a6dc5f250236e2f8db57abcc680904589 删除 code2.txt
2ec82cbf1920e1ed453d47771474897647c8d7b0 版本4
056c94652c52636b4fcd8aea9cc440b0cc2ae71d banben3
4ab69d68308a1e63d6833faa51cb68b7e7d087b2 banben3
edb6834e4bfa2884e33fd62fdfa0a68df4436687 banben2
b2475493d7c688317deaa3b71ddf9a06df461df5 banben1
分支操作2:在新分支dev操作code.txt,新增一行
[root@localhost test]# cat code.txt
hello world1
hello world2
hello world3
hello world4 new
hello world5
new line for dev
[root@localhost test]# git add code.txt
[root@localhost test]# git commit -m 'dev分支提交'
[dev a92bac7] dev分支提交
 1 file changed, 2 insertions(+), 1 deletion(-)
[root@localhost test]# git status
# 位于分支 dev
无文件要提交,干净的工作区
分支操作3:分支切换回master
[root@localhost test]# git checkout master
切换到分支 'master'
[root@localhost test]# git branch
  dev
* master
[root@localhost test]# git log --pretty=oneline
72520a9a6dc5f250236e2f8db57abcc680904589 删除 code2.txt
2ec82cbf1920e1ed453d47771474897647c8d7b0 版本4
056c94652c52636b4fcd8aea9cc440b0cc2ae71d banben3
4ab69d68308a1e63d6833faa51cb68b7e7d087b2 banben3
edb6834e4bfa2884e33fd62fdfa0a68df4436687 banben2
b2475493d7c688317deaa3b71ddf9a06df461df5 banben1
分支操作4:快速合并fast-forward
git merge dev 合并分支
[root@localhost test]# git merge dev
更新 72520a9..a92bac7
Fast-forward
 code.txt | 3 ++-
 1 file changed, 2 insertions(+), 1 deletion(-)
[root@localhost test]# git log --pretty=oneline
a92bac7209289793254c5a081d12a0571ea864f1 dev分支提交
72520a9a6dc5f250236e2f8db57abcc680904589 删除 code2.txt
2ec82cbf1920e1ed453d47771474897647c8d7b0 版本4
056c94652c52636b4fcd8aea9cc440b0cc2ae71d banben3
4ab69d68308a1e63d6833faa51cb68b7e7d087b2 banben3
edb6834e4bfa2884e33fd62fdfa0a68df4436687 banben2
b2475493d7c688317deaa3b71ddf9a06df461df5 banben1
分支操作5:删除分支 git branch -d dev
[root@localhost test]# git branch -d dev
已删除分支 dev(曾为 a92bac7)。
[root@localhost test]# git log --pretty=oneline
a92bac7209289793254c5a081d12a0571ea864f1 dev分支提交
72520a9a6dc5f250236e2f8db57abcc680904589 删除 code2.txt
2ec82cbf1920e1ed453d47771474897647c8d7b0 版本4
056c94652c52636b4fcd8aea9cc440b0cc2ae71d banben3
4ab69d68308a1e63d6833faa51cb68b7e7d087b2 banben3
edb6834e4bfa2884e33fd62fdfa0a68df4436687 banben2
b2475493d7c688317deaa3b71ddf9a06df461df5 banben1
分支操作小结:
查看分支:git branch
创建分支:git branch
切换分支:git checkout
创建+切换分支:git checkout -b
合并某分支到当前分支:git merge
删除分支:git brach -d
5.3、解决冲突
操作步骤1:创建一个新分支dev
[root@localhost test]# git checkout -b dev
切换到一个新分支 'dev'
[root@localhost test]# git branch
* dev
  master
操作步骤2:修改code.txt内容并提交
[root@localhost test]# vi code.txt
[root@localhost test]# cat code.txt
hello world1
hello world2
hello world3
hello world4 new
hello world5
new line for dev
add one more line for dev
[root@localhost test]# git add code.txt
[root@localhost test]# git commit -m 'dev分支提交2'
[dev 0006741] dev分支提交2
 1 file changed, 2 insertions(+), 1 deletion(-)
[root@localhost test]# git log --pretty=oneline
0006741559e67b60f82830eaa222b9db4b51075f dev分支提交2
a92bac7209289793254c5a081d12a0571ea864f1 dev分支提交
72520a9a6dc5f250236e2f8db57abcc680904589 删除 code2.txt
2ec82cbf1920e1ed453d47771474897647c8d7b0 版本4
056c94652c52636b4fcd8aea9cc440b0cc2ae71d banben3
4ab69d68308a1e63d6833faa51cb68b7e7d087b2 banben3
edb6834e4bfa2884e33fd62fdfa0a68df4436687 banben2
b2475493d7c688317deaa3b71ddf9a06df461df5 banben1
操作步骤3:切换会master分支 git checkout master
[root@localhost test]# git checkout master
切换到分支 'master'
[root@localhost test]# git log --pretty=oneline
a92bac7209289793254c5a081d12a0571ea864f1 dev分支提交
72520a9a6dc5f250236e2f8db57abcc680904589 删除 code2.txt
2ec82cbf1920e1ed453d47771474897647c8d7b0 版本4
056c94652c52636b4fcd8aea9cc440b0cc2ae71d banben3
4ab69d68308a1e63d6833faa51cb68b7e7d087b2 banben3
edb6834e4bfa2884e33fd62fdfa0a68df4436687 banben2
b2475493d7c688317deaa3b71ddf9a06df461df5 banben1
操作步骤4:在master的code.txt添加一行内容并进行提交
[root@localhost test]# git branch
  dev
* master
[root@localhost test]# vi code.txt
[root@localhost test]# cat code.txt
hello world1
hello world2
hello world3
hello world4 new
hello world5
new line for dev
add one more line for master
[root@localhost test]# git add code.txt
[root@localhost test]# git commit -m 'master分支提交'
[master 2000a10] master分支提交
 1 file changed, 2 insertions(+), 1 deletion(-)
[root@localhost test]# git log --pretty=oneline
2000a105cb2f29e5de4cc7e5fd5cb95aa504e2d4 master分支提交
a92bac7209289793254c5a081d12a0571ea864f1 dev分支提交
72520a9a6dc5f250236e2f8db57abcc680904589 删除 code2.txt
2ec82cbf1920e1ed453d47771474897647c8d7b0 版本4
056c94652c52636b4fcd8aea9cc440b0cc2ae71d banben3
4ab69d68308a1e63d6833faa51cb68b7e7d087b2 banben3
edb6834e4bfa2884e33fd62fdfa0a68df4436687 banben2
b2475493d7c688317deaa3b71ddf9a06df461df5 banben1
操作步骤5:将dev分支合并到master分支上,出现冲突,提示冲突的文件
当前位于master分支,把dev分支的合并到master分支中
[root@localhost test]# git merge dev
自动合并 code.txt
冲突(内容):合并冲突于 code.txt
自动合并失败,修正冲突然后提交修正的结果。
操作步骤6:查看冲突,git status
[root@localhost test]# git status
# 位于分支 master
# 您有尚未合并的路径。
#   (解决冲突并运行 "git commit")
#
# 未合并的路径:
#   (使用 "git add <file>..." 标记解决方案)
#
#       双方修改:     code.txt
#
修改尚未加入提交(使用 "git add" 和/或 "git commit -a")
操作步骤7:解决冲突,手动删除融合,修改code.txt,提交新版本
[root@localhost test]# vi code.txt
hello world1
hello world2
hello world3
hello world4 new
hello world5
new line for dev
<<<<<<< HEAD
add one more line for master
=======
add one more line for dev
>>>>>>> dev
~
~
[root@localhost test]# cat code.txt

hello world1
hello world2
hello world3
hello world4 new
hello world5
new line for dev
add one more line for master
add one more line for dev
[root@localhost test]# git add code.txt
[root@localhost test]# git commit -m '解决冲突'
[master c347510] 解决冲突
[root@localhost test]# git log --pretty=oneline
c34751010955795b2f5e0b03128c45f41dcf08bb 解决冲突
2000a105cb2f29e5de4cc7e5fd5cb95aa504e2d4 master分支提交
0006741559e67b60f82830eaa222b9db4b51075f dev分支提交2
a92bac7209289793254c5a081d12a0571ea864f1 dev分支提交
72520a9a6dc5f250236e2f8db57abcc680904589 删除 code2.txt
2ec82cbf1920e1ed453d47771474897647c8d7b0 版本4
056c94652c52636b4fcd8aea9cc440b0cc2ae71d banben3
4ab69d68308a1e63d6833faa51cb68b7e7d087b2 banben3
edb6834e4bfa2884e33fd62fdfa0a68df4436687 banben2
b2475493d7c688317deaa3b71ddf9a06df461df5 banben1
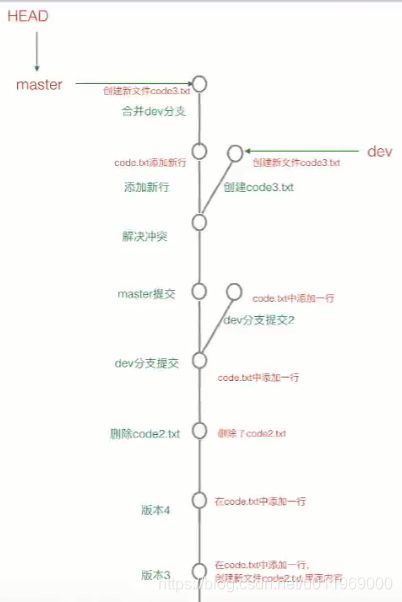
查看冲突分支解决情况git log --graph --pretty=oneline
[root@localhost test]# git log --graph --pretty=oneline
*   c34751010955795b2f5e0b03128c45f41dcf08bb 解决冲突
|\
| * 0006741559e67b60f82830eaa222b9db4b51075f dev分支提交2
* | 2000a105cb2f29e5de4cc7e5fd5cb95aa504e2d4 master分支提交
|/
* a92bac7209289793254c5a081d12a0571ea864f1 dev分支提交
* 72520a9a6dc5f250236e2f8db57abcc680904589 删除 code2.txt
* 2ec82cbf1920e1ed453d47771474897647c8d7b0 版本4
* 056c94652c52636b4fcd8aea9cc440b0cc2ae71d banben3
* 4ab69d68308a1e63d6833faa51cb68b7e7d087b2 banben3
* edb6834e4bfa2884e33fd62fdfa0a68df4436687 banben2
* b2475493d7c688317deaa3b71ddf9a06df461df5 banben1
操作步骤8:删除dev分支
[root@localhost test]# git branch -d dev
已删除分支 dev(曾为 0006741)。
5.4、分支管理策略
情形1、不能使用快速合并时候,使用策略合同,
dev分支新建了一个文件code3.txt,而master又对code.txt编辑了,两者的文件不冲突
快速合并不能成功,且没有冲突,这时,合并之后会做一次新的提交,但这种模式下,删除分支后会丢掉分支信息
操作1:创建切换到dev分支
[root@localhost test]# git checkout -b dev
切换到一个新分支 ‘dev’
操作2:新建文件code3.txt,编辑后做新的提交
[root@localhost test]# cat code3.txt
one line for dev
[root@localhost test]# git branch
* dev
  master
[root@localhost test]# git log --pretty=oneline
c34751010955795b2f5e0b03128c45f41dcf08bb 解决冲突
2000a105cb2f29e5de4cc7e5fd5cb95aa504e2d4 master分支提交
0006741559e67b60f82830eaa222b9db4b51075f dev分支提交2
a92bac7209289793254c5a081d12a0571ea864f1 dev分支提交
72520a9a6dc5f250236e2f8db57abcc680904589 删除 code2.txt
2ec82cbf1920e1ed453d47771474897647c8d7b0 版本4
056c94652c52636b4fcd8aea9cc440b0cc2ae71d banben3
4ab69d68308a1e63d6833faa51cb68b7e7d087b2 banben3
edb6834e4bfa2884e33fd62fdfa0a68df4436687 banben2
b2475493d7c688317deaa3b71ddf9a06df461df5 banben1
[root@localhost test]# git add code3.txt
[root@localhost test]# git commit -m '创建文件code3.txt'
[dev 0459721] 创建文件code3.txt
 1 file changed, 2 insertions(+)
 create mode 100644 code3.txt
[root@localhost test]# git log --pretty=oneline
0459721212039384712f2ea4b759a110222171f1 创建文件code3.txt
c34751010955795b2f5e0b03128c45f41dcf08bb 解决冲突
2000a105cb2f29e5de4cc7e5fd5cb95aa504e2d4 master分支提交
0006741559e67b60f82830eaa222b9db4b51075f dev分支提交2
a92bac7209289793254c5a081d12a0571ea864f1 dev分支提交
72520a9a6dc5f250236e2f8db57abcc680904589 删除 code2.txt
2ec82cbf1920e1ed453d47771474897647c8d7b0 版本4
056c94652c52636b4fcd8aea9cc440b0cc2ae71d banben3
4ab69d68308a1e63d6833faa51cb68b7e7d087b2 banben3
edb6834e4bfa2884e33fd62fdfa0a68df4436687 banben2
b2475493d7c688317deaa3b71ddf9a06df461df5 banben1
操作3:切换回master分支,编辑code.txt添加新行,并提交
[root@localhost test]# git checkout master
切换到分支 'master'
[root@localhost test]# git log --pretty=oneline
c34751010955795b2f5e0b03128c45f41dcf08bb 解决冲突
2000a105cb2f29e5de4cc7e5fd5cb95aa504e2d4 master分支提交
0006741559e67b60f82830eaa222b9db4b51075f dev分支提交2
a92bac7209289793254c5a081d12a0571ea864f1 dev分支提交
72520a9a6dc5f250236e2f8db57abcc680904589 删除 code2.txt
2ec82cbf1920e1ed453d47771474897647c8d7b0 版本4
056c94652c52636b4fcd8aea9cc440b0cc2ae71d banben3
4ab69d68308a1e63d6833faa51cb68b7e7d087b2 banben3
edb6834e4bfa2884e33fd62fdfa0a68df4436687 banben2
b2475493d7c688317deaa3b71ddf9a06df461df5 banben1
[root@localhost test]# cat code.txt
hello world1
hello world2
hello world3
hello world4 new
hello world5
new line for dev
add one more line for master
add one more line for dev
add one more line after chongtu for master
[root@localhost test]# git add code.txt
[root@localhost test]# git commit -m '添加新行'
[master b0f7ca9] 添加新行
 1 file changed, 1 insertion(+)
[root@localhost test]# git log --pretty=oneline
b0f7ca98244d7e490f7de879c1c4b6c6d5aea1c3 添加新行
c34751010955795b2f5e0b03128c45f41dcf08bb 解决冲突
2000a105cb2f29e5de4cc7e5fd5cb95aa504e2d4 master分支提交
0006741559e67b60f82830eaa222b9db4b51075f dev分支提交2
a92bac7209289793254c5a081d12a0571ea864f1 dev分支提交
72520a9a6dc5f250236e2f8db57abcc680904589 删除 code2.txt
2ec82cbf1920e1ed453d47771474897647c8d7b0 版本4
056c94652c52636b4fcd8aea9cc440b0cc2ae71d banben3
4ab69d68308a1e63d6833faa51cb68b7e7d087b2 banben3
edb6834e4bfa2884e33fd62fdfa0a68df4436687 banben2
b2475493d7c688317deaa3b71ddf9a06df461df5 banben1
操作4:合并dev到master,这时候不会起冲突,但不能使用快速提交,因为HEAD指针只移动不能满足合并
合并的时候回自动提交一个新版本,弹窗输入提示信息ctrl+X 输入y,使用的是merge made by the ‘recursive’ strategy
centos系统直接是进入vim编辑器
[root@localhost test]# git merge dev
合并分支

# 请输入一个提交信息以解释此合并的必要性,尤其是将一个更新后的上游分支
# 合并到主题分支。
#
# 以 '#' 开头的行将被忽略,而且空提交说明将会终止提交。
~
~
[root@localhost test]# git log --pretty=oneline
798710985807f7cd162c941a4d61fea40ea09e48 合并分支
b0f7ca98244d7e490f7de879c1c4b6c6d5aea1c3 添加新行
0459721212039384712f2ea4b759a110222171f1 创建文件code3.txt
c34751010955795b2f5e0b03128c45f41dcf08bb 解决冲突
2000a105cb2f29e5de4cc7e5fd5cb95aa504e2d4 master分支提交
0006741559e67b60f82830eaa222b9db4b51075f dev分支提交2
a92bac7209289793254c5a081d12a0571ea864f1 dev分支提交
72520a9a6dc5f250236e2f8db57abcc680904589 删除 code2.txt
2ec82cbf1920e1ed453d47771474897647c8d7b0 版本4
056c94652c52636b4fcd8aea9cc440b0cc2ae71d banben3
4ab69d68308a1e63d6833faa51cb68b7e7d087b2 banben3
edb6834e4bfa2884e33fd62fdfa0a68df4436687 banben2
b2475493d7c688317deaa3b71ddf9a06df461df5 banben1
查看合并的情况git log --graph --pretty=oneline
[root@localhost test]# git log --graph --pretty=oneline
*   798710985807f7cd162c941a4d61fea40ea09e48 合并分支
|\
| * 0459721212039384712f2ea4b759a110222171f1 创建文件code3.txt
* | b0f7ca98244d7e490f7de879c1c4b6c6d5aea1c3 添加新行
|/
*   c34751010955795b2f5e0b03128c45f41dcf08bb 解决冲突
|\
| * 0006741559e67b60f82830eaa222b9db4b51075f dev分支提交2
* | 2000a105cb2f29e5de4cc7e5fd5cb95aa504e2d4 master分支提交
|/
* a92bac7209289793254c5a081d12a0571ea864f1 dev分支提交
* 72520a9a6dc5f250236e2f8db57abcc680904589 删除 code2.txt
* 2ec82cbf1920e1ed453d47771474897647c8d7b0 版本4
* 056c94652c52636b4fcd8aea9cc440b0cc2ae71d banben3
* 4ab69d68308a1e63d6833faa51cb68b7e7d087b2 banben3
* edb6834e4bfa2884e33fd62fdfa0a68df4436687 banben2
* b2475493d7c688317deaa3b71ddf9a06df461df5 banben1
操作5:删除分支
[root@localhost test]# git branch -d dev
情形2、可以使用快速合并,但禁用fast forward时候,git生成一个新的提交,便于在分支历史上看出分支信息
操作1:创建并切换分支
[root@localhost test]# git branch
* master
[root@localhost test]# git checkout -b dev
切换到一个新分支 'dev'
操作2:修改code.txt内容并提交
[root@localhost test]# git log --pretty=oneline
798710985807f7cd162c941a4d61fea40ea09e48 合并分支
b0f7ca98244d7e490f7de879c1c4b6c6d5aea1c3 添加新行
0459721212039384712f2ea4b759a110222171f1 创建文件code3.txt
c34751010955795b2f5e0b03128c45f41dcf08bb 解决冲突
2000a105cb2f29e5de4cc7e5fd5cb95aa504e2d4 master分支提交
0006741559e67b60f82830eaa222b9db4b51075f dev分支提交2
a92bac7209289793254c5a081d12a0571ea864f1 dev分支提交
72520a9a6dc5f250236e2f8db57abcc680904589 删除 code2.txt
2ec82cbf1920e1ed453d47771474897647c8d7b0 版本4
056c94652c52636b4fcd8aea9cc440b0cc2ae71d banben3
4ab69d68308a1e63d6833faa51cb68b7e7d087b2 banben3
edb6834e4bfa2884e33fd62fdfa0a68df4436687 banben2
b2475493d7c688317deaa3b71ddf9a06df461df5 banben1
[root@localhost test]# vi code.txt
hello world1
hello world2
hello world3
hello world4 new
hello world5
new line for dev
add one more line for master
add one more line for dev
add one more line after chongtu for master
add one more line for dev not fastward
[root@localhost test]# git add code.txt
[root@localhost test]# git commit -m '添加新行,策略情形2'
[dev c09d063] 添加新行,策略情形2
 1 file changed, 1 insertion(+)
[root@localhost test]# git log --pretty=oneline
c09d063e7257f35adfce9f0d0cc4b355c1b86dbc 添加新行,策略情形2
798710985807f7cd162c941a4d61fea40ea09e48 合并分支
b0f7ca98244d7e490f7de879c1c4b6c6d5aea1c3 添加新行
0459721212039384712f2ea4b759a110222171f1 创建文件code3.txt
c34751010955795b2f5e0b03128c45f41dcf08bb 解决冲突
2000a105cb2f29e5de4cc7e5fd5cb95aa504e2d4 master分支提交
0006741559e67b60f82830eaa222b9db4b51075f dev分支提交2
a92bac7209289793254c5a081d12a0571ea864f1 dev分支提交
72520a9a6dc5f250236e2f8db57abcc680904589 删除 code2.txt
2ec82cbf1920e1ed453d47771474897647c8d7b0 版本4
056c94652c52636b4fcd8aea9cc440b0cc2ae71d banben3
4ab69d68308a1e63d6833faa51cb68b7e7d087b2 banben3
edb6834e4bfa2884e33fd62fdfa0a68df4436687 banben2
b2475493d7c688317deaa3b71ddf9a06df461df5 banben1
操作3:切换会master分支 git checkout master
[root@localhost test]# git checkout master
切换到分支 'master'
[root@localhost test]# git log --pretty=oneline
798710985807f7cd162c941a4d61fea40ea09e48 合并分支
b0f7ca98244d7e490f7de879c1c4b6c6d5aea1c3 添加新行
0459721212039384712f2ea4b759a110222171f1 创建文件code3.txt
c34751010955795b2f5e0b03128c45f41dcf08bb 解决冲突
2000a105cb2f29e5de4cc7e5fd5cb95aa504e2d4 master分支提交
0006741559e67b60f82830eaa222b9db4b51075f dev分支提交2
a92bac7209289793254c5a081d12a0571ea864f1 dev分支提交
72520a9a6dc5f250236e2f8db57abcc680904589 删除 code2.txt
2ec82cbf1920e1ed453d47771474897647c8d7b0 版本4
056c94652c52636b4fcd8aea9cc440b0cc2ae71d banben3
4ab69d68308a1e63d6833faa51cb68b7e7d087b2 banben3
edb6834e4bfa2884e33fd62fdfa0a68df4436687 banben2
b2475493d7c688317deaa3b71ddf9a06df461df5 banben1
操作4:合并dev分支,禁用fastworad
[root@localhost test]# git merge  --no-ff -m '禁用fastforward' dev
Merge made by the 'recursive' strategy.
 code.txt | 1 +
 1 file changed, 1 insertion(+)
[root@localhost test]# git log --pretty=oneline --graph
*   ee786ebdb2c5ad0fc4f62f18de811810f22cb39f 禁用fastforward
|\
| * c09d063e7257f35adfce9f0d0cc4b355c1b86dbc 添加新行,策略情形2
|/
*   798710985807f7cd162c941a4d61fea40ea09e48 合并分支
|\
| * 0459721212039384712f2ea4b759a110222171f1 创建文件code3.txt
* | b0f7ca98244d7e490f7de879c1c4b6c6d5aea1c3 添加新行
|/
*   c34751010955795b2f5e0b03128c45f41dcf08bb 解决冲突
|\
| * 0006741559e67b60f82830eaa222b9db4b51075f dev分支提交2
* | 2000a105cb2f29e5de4cc7e5fd5cb95aa504e2d4 master分支提交
|/
* a92bac7209289793254c5a081d12a0571ea864f1 dev分支提交
* 72520a9a6dc5f250236e2f8db57abcc680904589 删除 code2.txt
* 2ec82cbf1920e1ed453d47771474897647c8d7b0 版本4
* 056c94652c52636b4fcd8aea9cc440b0cc2ae71d banben3
* 4ab69d68308a1e63d6833faa51cb68b7e7d087b2 banben3
* edb6834e4bfa2884e33fd62fdfa0a68df4436687 banben2
* b2475493d7c688317deaa3b71ddf9a06df461df5 banben1
操作5:删除dev分支
[root@localhost test]# git branch
  dev
* master
[root@localhost test]# git branch -d dev
已删除分支 dev(曾为 c09d063)。
5.5、Bug分支
有bug需要修复时,新建一个临时分支来修复,修复后,合并分支,将临时分支删除
操作1:背景:正在用dev分支修改code.txt文件
[root@localhost test]# git branch
* master
[root@localhost test]# git checkout -b dev
切换到一个新分支 'dev'
[root@localhost test]# ls
code3.txt  code.txt
[root@localhost test]# vi code3.txt
one line for dev
add new line as debug
[root@localhost test]# git status
# 位于分支 dev
# 尚未暂存以备提交的变更:
#   (使用 "git add <file>..." 更新要提交的内容)
#   (使用 "git checkout -- <file>..." 丢弃工作区的改动)
#
#       修改:      code3.txt
#
修改尚未加入提交(使用 "git add" 和/或 "git commit -a")
操作2:有一个001修复bug的指示,使用stash功能,把当前工作线程 储藏 起来,等恢复现场后继续工作
git stash
[root@localhost test]# git stash
Saved working directory and index state WIP on dev: ee786eb 禁用fastforward
HEAD 现在位于 ee786eb 禁用fastforward
[root@localhost test]# git status
# 位于分支 dev
无文件要提交,干净的工作区
操作3:master分支上出现bug需要修复,创建临时分支 bug001
[root@localhost test]# git checkout master
切换到分支 'master'
[root@localhost test]# git checkout -b bug001
切换到一个新分支 'bug001'
[root@localhost test]# git branch
* bug001
  dev
  master
操作4:在bug001分支上修复并提交版本
[root@localhost test]# ls
code3.txt  code.txt
[root@localhost test]# vi code.txt
hello world1
hello world2
hello world3
hello world4 new
hello world5
new line for dev
add one more line for master
add one more line for dev
add one more line after chongtu for master
add one more line for dev not fastward
add one line for bug001  --修复分支
~
[root@localhost test]# git add code.txt
[root@localhost test]# git commit -m '修复bug001'
[bug001 9394566] 修复bug001
 1 file changed, 2 insertions(+), 1 deletion(-)
[root@localhost test]# git status
# 位于分支 bug001
无文件要提交,干净的工作区
[root@localhost test]# git log --pretty=oneline
939456644503d8d743a9a6dd471129dae0e532b6 修复bug001
ee786ebdb2c5ad0fc4f62f18de811810f22cb39f 禁用fastforward
c09d063e7257f35adfce9f0d0cc4b355c1b86dbc 添加新行,策略情形2
798710985807f7cd162c941a4d61fea40ea09e48 合并分支
b0f7ca98244d7e490f7de879c1c4b6c6d5aea1c3 添加新行
0459721212039384712f2ea4b759a110222171f1 创建文件code3.txt
c34751010955795b2f5e0b03128c45f41dcf08bb 解决冲突
2000a105cb2f29e5de4cc7e5fd5cb95aa504e2d4 master分支提交
0006741559e67b60f82830eaa222b9db4b51075f dev分支提交2
a92bac7209289793254c5a081d12a0571ea864f1 dev分支提交
72520a9a6dc5f250236e2f8db57abcc680904589 删除 code2.txt
2ec82cbf1920e1ed453d47771474897647c8d7b0 版本4
056c94652c52636b4fcd8aea9cc440b0cc2ae71d banben3
4ab69d68308a1e63d6833faa51cb68b7e7d087b2 banben3
edb6834e4bfa2884e33fd62fdfa0a68df4436687 banben2
b2475493d7c688317deaa3b71ddf9a06df461df5 banben1
操作5:回到master分支,进行合并bug001,使用禁止快速合并模式提交新的版本
[root@localhost test]# git checkout master
切换到分支 'master'
[root@localhost test]# git log --pretty=oneline
ee786ebdb2c5ad0fc4f62f18de811810f22cb39f 禁用fastforward
c09d063e7257f35adfce9f0d0cc4b355c1b86dbc 添加新行,策略情形2
798710985807f7cd162c941a4d61fea40ea09e48 合并分支
b0f7ca98244d7e490f7de879c1c4b6c6d5aea1c3 添加新行
0459721212039384712f2ea4b759a110222171f1 创建文件code3.txt
c34751010955795b2f5e0b03128c45f41dcf08bb 解决冲突
2000a105cb2f29e5de4cc7e5fd5cb95aa504e2d4 master分支提交
0006741559e67b60f82830eaa222b9db4b51075f dev分支提交2
a92bac7209289793254c5a081d12a0571ea864f1 dev分支提交
72520a9a6dc5f250236e2f8db57abcc680904589 删除 code2.txt
2ec82cbf1920e1ed453d47771474897647c8d7b0 版本4
056c94652c52636b4fcd8aea9cc440b0cc2ae71d banben3
4ab69d68308a1e63d6833faa51cb68b7e7d087b2 banben3
edb6834e4bfa2884e33fd62fdfa0a68df4436687 banben2
b2475493d7c688317deaa3b71ddf9a06df461df5 banben1
[root@localhost test]# git merge --no-ff -m '修复bug001master' bug001
Merge made by the 'recursive' strategy.
 code.txt | 3 ++-
 1 file changed, 2 insertions(+), 1 deletion(-)
[root@localhost test]# git log --pretty=oneline
5e69e5e281b4dd57e2f870e64a4c602691b087a2 修复bug001master
939456644503d8d743a9a6dd471129dae0e532b6 修复bug001
ee786ebdb2c5ad0fc4f62f18de811810f22cb39f 禁用fastforward
c09d063e7257f35adfce9f0d0cc4b355c1b86dbc 添加新行,策略情形2
798710985807f7cd162c941a4d61fea40ea09e48 合并分支
b0f7ca98244d7e490f7de879c1c4b6c6d5aea1c3 添加新行
0459721212039384712f2ea4b759a110222171f1 创建文件code3.txt
c34751010955795b2f5e0b03128c45f41dcf08bb 解决冲突
2000a105cb2f29e5de4cc7e5fd5cb95aa504e2d4 master分支提交
0006741559e67b60f82830eaa222b9db4b51075f dev分支提交2
a92bac7209289793254c5a081d12a0571ea864f1 dev分支提交
72520a9a6dc5f250236e2f8db57abcc680904589 删除 code2.txt
2ec82cbf1920e1ed453d47771474897647c8d7b0 版本4
056c94652c52636b4fcd8aea9cc440b0cc2ae71d banben3
4ab69d68308a1e63d6833faa51cb68b7e7d087b2 banben3
edb6834e4bfa2884e33fd62fdfa0a68df4436687 banben2
b2475493d7c688317deaa3b71ddf9a06df461df5 banben1
[root@localhost test]# git log --pretty=oneline --graph
*   5e69e5e281b4dd57e2f870e64a4c602691b087a2 修复bug001master
|\
| * 939456644503d8d743a9a6dd471129dae0e532b6 修复bug001
|/
*   ee786ebdb2c5ad0fc4f62f18de811810f22cb39f 禁用fastforward
|\
| * c09d063e7257f35adfce9f0d0cc4b355c1b86dbc 添加新行,策略情形2
|/
*   798710985807f7cd162c941a4d61fea40ea09e48 合并分支
|\
| * 0459721212039384712f2ea4b759a110222171f1 创建文件code3.txt
* | b0f7ca98244d7e490f7de879c1c4b6c6d5aea1c3 添加新行
|/
*   c34751010955795b2f5e0b03128c45f41dcf08bb 解决冲突
|\
| * 0006741559e67b60f82830eaa222b9db4b51075f dev分支提交2
* | 2000a105cb2f29e5de4cc7e5fd5cb95aa504e2d4 master分支提交
|/
* a92bac7209289793254c5a081d12a0571ea864f1 dev分支提交
* 72520a9a6dc5f250236e2f8db57abcc680904589 删除 code2.txt
* 2ec82cbf1920e1ed453d47771474897647c8d7b0 版本4
* 056c94652c52636b4fcd8aea9cc440b0cc2ae71d banben3
* 4ab69d68308a1e63d6833faa51cb68b7e7d087b2 banben3
* edb6834e4bfa2884e33fd62fdfa0a68df4436687 banben2
* b2475493d7c688317deaa3b71ddf9a06df461df5 banben1
操作6:bug001修复完成,返回dev工作,当前工作现场是干净的,需要恢复工作现场
[root@localhost test]# git branch -d bug001
已删除分支 bug001(曾为 9394566)。
[root@localhost test]# git branch
  dev
* master
[root@localhost test]# git checkout dev
切换到分支 'dev'
[root@localhost test]# git stash list
stash@{0}: WIP on dev: ee786eb 禁用fastforward
[root@localhost test]# git status
# 位于分支 dev
无文件要提交,干净的工作区
操作7:恢复工作现场,git stash pop
[root@localhost test]# git stash pop
# 位于分支 dev
# 尚未暂存以备提交的变更:
#   (使用 "git add <file>..." 更新要提交的内容)
#   (使用 "git checkout -- <file>..." 丢弃工作区的改动)
#
#       修改:      code3.txt
#
修改尚未加入提交(使用 "git add" 和/或 "git commit -a")
丢弃了 refs/stash@{0} (ede1bae2641f64c38f318c8ab721db9e39ddff63)
[root@localhost test]# git status
# 位于分支 dev
# 尚未暂存以备提交的变更:
#   (使用 "git add <file>..." 更新要提交的内容)
#   (使用 "git checkout -- <file>..." 丢弃工作区的改动)
#
#       修改:      code3.txt
#
修改尚未加入提交(使用 "git add" 和/或 "git commit -a")
[root@localhost test]# git stash list
[root@localhost test]#
git分支小结
六、使用github
中央服务器:自己搭建或者github
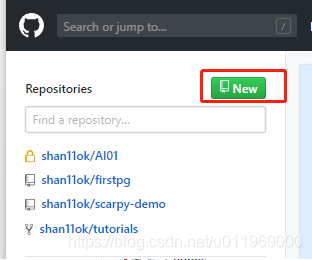
6.1创建仓库 相当于git init
1、添加仓库
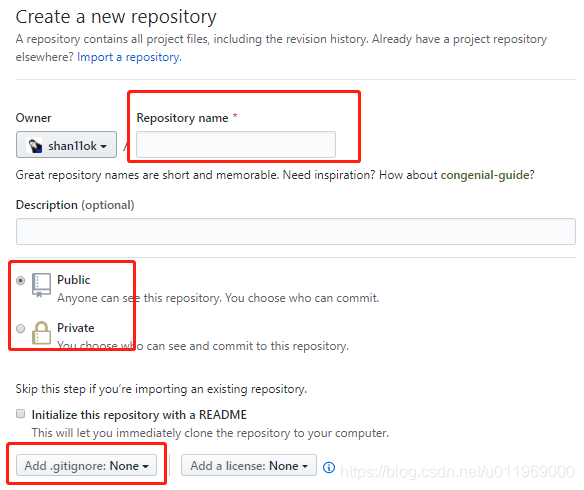
2、填写新仓库名称
3、选择公有或私有
4、添加忽略代码文件,比如python忽略 .pyc临时文件等
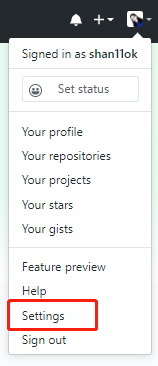
6.2添加ssh账户
如果某太机器需要与github上的仓库交互,那么就要把这台机器的ssh公钥添加到github账户上
1、github网站上添加的位置

2、在电脑上生成公钥
步骤一:找到系统配置的.gitconfig文件,修改name及邮箱
Win10系统通常在C:\Users\shan.gitconfig 文件中
[user]
name = shan
email = 429764001@qq.com
linux系统在HOME目录下
[root@localhost ~]# pwd
/root
[root@localhost ~]# ll -a
总用量 68
dr-xr-x---.  3 root root   188 2月  16 03:11 .
dr-xr-xr-x. 17 root root   224 2月   7 01:32 ..
-rw-r--r--.  1 root root    49 2月  16 03:11 .gitconfig
drwx------.  2 root root    57 2月  16 03:04 .ssh
[root@localhost ~]# cat .gitconfig
[user]
        email = 429764001@qq.com
        name = shan
步骤二:使用命令生成ssh密钥
ssh-keygen -t rsa -C '429764001@qq.com'
keygen生成密钥
rsa生成密钥的方式
-C 注册邮箱
[root@localhost ~]# ssh-keygen -t rsa -C '429764001@qq.com'
Generating public/private rsa key pair.
Enter file in which to save the key (/root/.ssh/id_rsa):
Enter passphrase (empty for no passphrase):
Enter same passphrase again:
Your identification has been saved in /root/.ssh/id_rsa.
Your public key has been saved in /root/.ssh/id_rsa.pub.
The key fingerprint is:
SHA256:U+fyOUewfznX4Vd9ChoYOJ0xfWXOUdA2uCnTSU+/PmE 429764001@qq.com
The key's randomart image is:
+---[RSA 2048]----+
|        o.   .*+.|
|       o +. .* +o|
|      o + ..= O.o|
|       . + = B .o|
|        S o * ..=|
|         . = =.E*|
|          . + *+*|
|             o ++|
|                .|
+----[SHA256]-----+
[root@localhost ~]# cd .ssh/
[root@localhost .ssh]# ll
总用量 8
-rw-------. 1 root root 1679 2月  16 02:38 id_rsa ##——私钥
-rw-r--r--. 1 root root  398 2月  16 02:38 id_rsa.pub  ## ——公钥
[root@localhost .ssh]# cat id_rsa.pub
ssh-rsa AAAAB3NzaC1yc2EAAAADAQABAAABAQC3jQAsyNjApQLWO49PmFQ73WYkEPeW8c2joriofggjCu3zZGGOGxIOjdH4MB9rRhB5uVnh9XRo0Ev4ZAAsFkcOisbZzHvgR/GTMsAdEiuOUO2w8gCQ9qud5aaJA/ks4NYJbm5k1+7oHcNKn9hjikIZt1SdYmP0k6OjJGOhr4DIX0khphwpF3dZC+LecJkVCmtVY/lXmQt5kNcSznfhLbNHcYIBnIIWv2cBu2sDddHJowZUYyfrzc2kb0B4fZTHlgN89sASacmdLz2tkunTDGEuN5JerLTc9kBttE0HuE/a0Xxb21H8lYkpjDy2LL0wSfohY+BY86FKExAVg 429764001@qq.com
复制公钥填入ssh新建keys中
6.3克隆项目
1、进入项目仓库页面,复制git地址
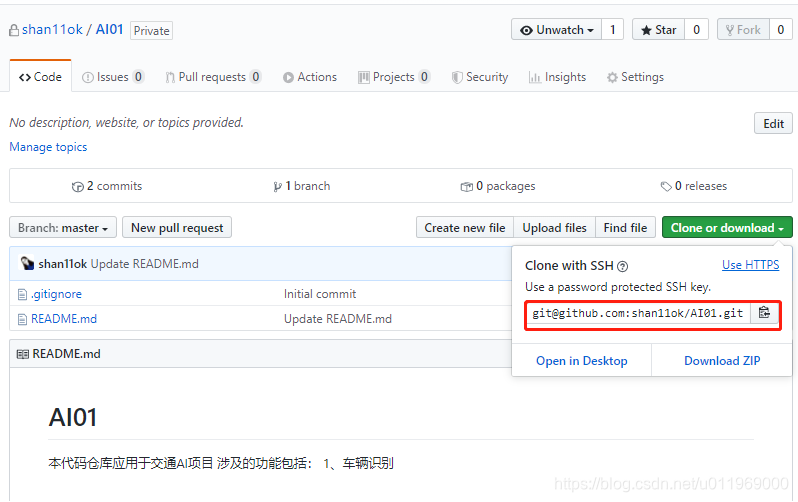
由于添加的是ssh的公钥,要选择ssh方式
2、使用git clone+ssh地址
drwxr-xr-x. 2 root root  6 2月   7 04:27 shan
[root@localhost home]# git clone git@github.com:shan11ok/AI01.git
正克隆到 'AI01'...
Warning: Permanently added the RSA host key for IP address '13.229.188.59' to the list of known hosts.
remote: Enumerating objects: 7, done.
remote: Counting objects: 100% (7/7), done.
remote: Compressing objects: 100% (6/6), done.
remote: Total 7 (delta 0), reused 0 (delta 0), pack-reused 0
接收对象中: 100% (7/7), done.
[root@localhost AI01]# ll -a
总用量 8
drwxr-xr-x. 3 root root   53 2月  16 03:03 .
drwxr-xr-x. 5 root root   44 2月  16 03:03 ..
drwxr-xr-x. 8 root root  163 2月  16 03:03 .git
-rw-r--r--. 1 root root 1799 2月  16 03:03 .gitignore
-rw-r--r--. 1 root root   89 2月  16 03:03 README.md
[root@localhost AI01]# git log
commit 451ad84cd9beac9bccab7077818c012f9ece1337
Author: shan11ok <429764001@qq.com>
Date:   Fri Feb 21 10:14:05 2020 +0800

    Update README.md

commit 8c094efa9f744bb887b47b222c8b90c238e952f1
Author: shan11ok <429764001@qq.com>
Date:   Fri Feb 21 10:10:07 2020 +0800

    Initial commit
3、克隆出错
项目已存在,克隆出错
eval ‘$(ssh-agent -s)’
ssh-add
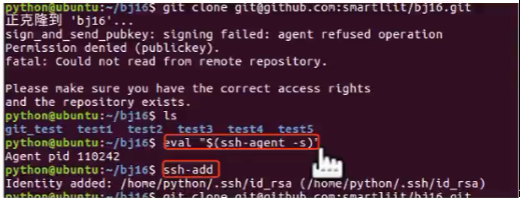
执行后再克隆
6.4上传分支
1、项目克隆到本地后,创建分支dev3
[root@localhost AI01]# git log --pretty=oneline
43a549c6d9603b8507943b1b71a54a96eca15f43 shan的提交
451ad84cd9beac9bccab7077818c012f9ece1337 Update README.md
8c094efa9f744bb887b47b222c8b90c238e952f1 Initial commit
[root@localhost AI01]# git checkout -b dev3
切换到一个新分支 'dev3'
[root@localhost AI01]# git branch
* dev3
  master
2、新建文件,提交代码
[root@localhost AI01]# vi views.py

import numpy
from django.http import HttpResponse

def index(request):
        return HttpResponse
[root@localhost AI01]# ll
总用量 12
-rw-r--r--. 1 root root 39 2月  16 03:17 code.txt
-rw-r--r--. 1 root root 89 2月  16 03:03 README.md
-rw-r--r--. 1 root root 88 2月  16 04:34 views.py
[root@localhost AI01]# git add views.py
[root@localhost AI01]# git commit -m '创建index视图'
[dev3 bb6864f] 创建index视图
 1 file changed, 4 insertions(+)
 create mode 100644 views.py
[root@localhost AI01]# git log --pretty=oneline
bb6864f73297fec503d00690238fdf9e9d326987 创建index视图
43a549c6d9603b8507943b1b71a54a96eca15f43 shan的提交
451ad84cd9beac9bccab7077818c012f9ece1337 Update README.md
8c094efa9f744bb887b47b222c8b90c238e952f1 Initial commit
3、推送分支
把改分支上所有本地提交推送到远程库github分支上,推送时候要指定本地分支
https://github.com/shan11ok/AI01
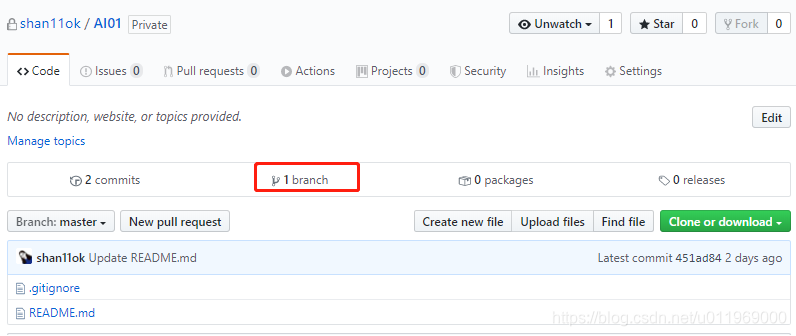
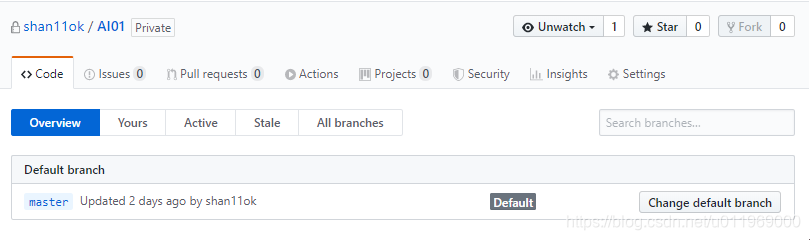
https://github.com/shan11ok/AI01/branches 原分支中只有master
git push origin 分支名称
[root@localhost AI01]# git push origin dev3
Counting objects: 7, done.
Compressing objects: 100% (5/5), done.
Writing objects: 100% (6/6), 643 bytes | 0 bytes/s, done.
Total 6 (delta 1), reused 0 (delta 0)
remote: Resolving deltas: 100% (1/1), done.
remote:
remote: Create a pull request for 'dev3' on GitHub by visiting:
remote: https://github.com/shan11ok/AI01/pull/new/dev3
remote:
To git@github.com:shan11ok/AI01.git
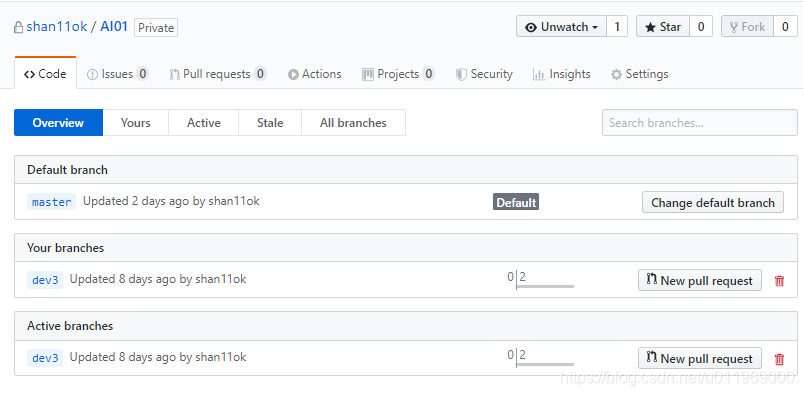
* [new branch] dev3 -> dev3
提交后github中显示多了一个dev3分支

[root@localhost AI01]# git log --pretty=oneline
bb6864f73297fec503d00690238fdf9e9d326987 创建index视图
43a549c6d9603b8507943b1b71a54a96eca15f43 shan的提交
451ad84cd9beac9bccab7077818c012f9ece1337 Update README.md
8c094efa9f744bb887b47b222c8b90c238e952f1 Initial commit
[root@localhost AI01]# git status
# 位于分支 dev3
# 未跟踪的文件:
#   (使用 "git add <file>..." 以包含要提交的内容)
#
#       dev3
提交为空,但是存在尚未跟踪的文件(使用 "git add" 建立跟踪)
6.5将本地分支跟踪服务器分支
git branch --set-upstream-to=origin/smart smart
[root@localhost AI01]# git branch --set-upstream-to=origin/dev3 dev3
分支 dev3 设置为跟踪来自 origin 的远程分支 dev3。
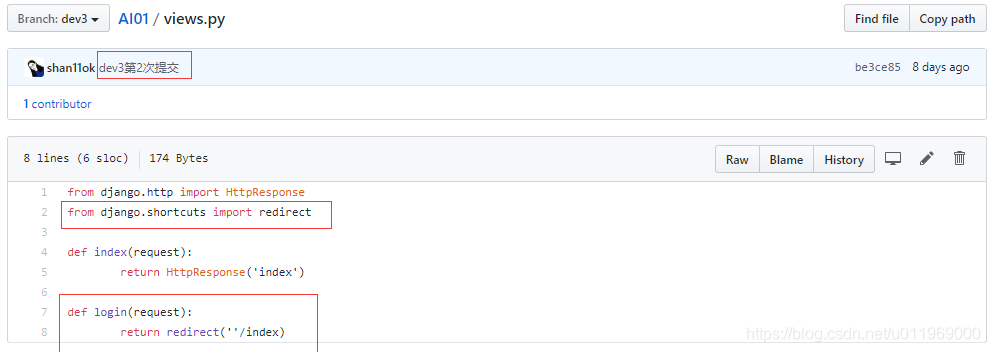
root@localhost AI01]# vi views.py
from django.http import HttpResponse
from django.shortcuts import redirect
def index(request):
return HttpResponse('index')
def login(request):
return redirect(''/index)
~
~
[root@localhost AI01]# git status
# 位于分支 dev3
# 尚未暂存以备提交的变更:
# (使用 "git add <file>..." 更新要提交的内容)
# (使用 "git checkout -- <file>..." 丢弃工作区的改动)
#
# 修改: views.py
#
# 未跟踪的文件:
# (使用 "git add <file>..." 以包含要提交的内容)
#
# dev3
修改尚未加入提交(使用 “git add” 和/或 “git commit -a”)
[root@localhost AI01]# git add views.py
[root@localhost AI01]# git commit -m 'dev3第2次提交'
[dev3 be3ce85] dev3第2次提交
 1 file changed, 4 insertions(+)
[root@localhost AI01]# git branch
* dev3
  master
[root@localhost AI01]# git log --pretty=oneline
be3ce8537119c8ff1aaebc2c33bfadde5c65032c dev3第2次提交
bb6864f73297fec503d00690238fdf9e9d326987 创建index视图
43a549c6d9603b8507943b1b71a54a96eca15f43 shan的提交
451ad84cd9beac9bccab7077818c012f9ece1337 Update README.md
8c094efa9f744bb887b47b222c8b90c238e952f1 Initial commit
[root@localhost AI01]# git status
# 位于分支 dev3
# 您的分支领先 'origin/dev3' 共 1 个提交。
#   (使用 "git push" 来发布您的本地提交)
#
# 未跟踪的文件:
#   (使用 "git add <file>..." 以包含要提交的内容)
#
#       dev3
提交为空,但是存在尚未跟踪的文件(使用 “git add” 建立跟踪)
[root@localhost AI01]# git branch --set-upstream-to=origin/master master
分支 master 设置为跟踪来自 origin 的远程分支 master。
[root@localhost AI01]# git push
warning: push.default 未设置,它的默认值将会在 Git 2.0 由 'matching'
修改为 'simple'。若要不再显示本信息并在其默认值改变后维持当前使用习惯,
进行如下设置:

  git config --global push.default matching

若要不再显示本信息并从现在开始采用新的使用习惯,设置:

  git config --global push.default simple

参见 'git help config' 并查找 'push.default' 以获取更多信息。
('simple' 模式由 Git 1.7.11 版本引入。如果您有时要使用老版本的 Git,
为保持兼容,请用 'current' 代替 'simple' 模式)

Counting objects: 5, done.
Compressing objects: 100% (3/3), done.
Writing objects: 100% (3/3), 371 bytes | 0 bytes/s, done.
Total 3 (delta 1), reused 0 (delta 0)
remote: Resolving deltas: 100% (1/1), completed with 1 local object.
To git@github.com:shan11ok/AI01.git
   bb6864f..be3ce85  dev3 -> dev3
   451ad84..43a549c  master -> master
[root@localhost AI01]# git status
# 位于分支 dev3
无文件要提交,干净的工作区
github中显示新的提交
6.6从远程分支上拉取代码
git pull origin 分支名称
[root@localhost AI01]# git pull origin master
Warning: Permanently added the RSA host key for IP address '52.74.223.119' to the list of known hosts.
来自 github.com:shan11ok/AI01
 * branch            master     -> FETCH_HEAD
七、工作使用git
项目经理:
(1)项目经理搭建项目的框架
(2)搭建完项目框架之后,项目经理把项目框架代码放到服务器
普通员工:
(1)在自己的电脑生成ssh公钥,把公钥给项目经理,项目经理把它添加到服务器上面
(2)项目经理会给每个组员的项目代码的地址,组员把代码下载到自己的电脑上
(3)创建本地的分支dev,在dev分支中进行每天的开发
(4)每个员工开发完自己的代码之后,都需要将代码发布远程的dev分支上
master:用户保存发布的项目代码,v1.0和v2.0
dev:保存开发过程中的代码


 4654
4654


 被折叠的 条评论
为什么被折叠?
被折叠的 条评论
为什么被折叠?
 到【灌水乐园】发言


