


腾讯云对象存储
公司需要把软件日志文件传到服务端
对于 Qt 开发者来说当然不会用它们的 SDK 了,用是不可能用的,又不是不会coding
2021-01-27 看的文档开始开发
开发资料
请求签名 :https://cloud.tencent.com/document/product/436/7778
公共请求头部:https://cloud.tencent.com/document/product/436/7778
上传文件
对,没错,上传文件用的叫 put object
上传文件到存储桶,对没错,这个名字很 OK
put object:https://cloud.tencent.com/document/product/436/7749
为了搞这个上传文件 api, 搞了一天半才测试成功,一直吐槽文档写的跟奥利给一样,气的不行,第一天下班我还提交了工单,腾讯云小姐姐还电话给我问我要错误返回的参数,后来我自己调通了。

putUrl(“1.txt”)
注意把里面的 xxxx 都换成你自己申请的参数
/** hmac-sha1
 * @brief HttpClientClass::hmacSha1
 * @param key    秘钥
 * @param baseString   消息
 * @param isBase64   是否返回base64
 * @return
 */
QByteArray HttpClientClass::hmacSha1(QByteArray key, QByteArray baseString,bool isBase64)
{
    int blockSize = 64; // HMAC-SHA-1 block size, defined in SHA-1 standard
    if (key.length() > blockSize) { // if key is longer than block size (64), reduce key length with SHA-1 compression
        key = QCryptographicHash::hash(key, QCryptographicHash::Sha1);
    }
    QByteArray innerPadding(blockSize, char(0x36)); // initialize inner padding with char"6"
    QByteArray outerPadding(blockSize, char(0x5c)); // initialize outer padding with char"/"
    // ascii characters 0x36 ("6") and 0x5c ("/") are selected because they have large
    // Hamming distance (http://en.wikipedia.org/wiki/Hamming_distance)
    for (int i = 0; i < key.length(); i++) {
        innerPadding[i] = innerPadding[i] ^ key.at(i); // XOR operation between every byte in key and innerpadding, of key length
        outerPadding[i] = outerPadding[i] ^ key.at(i); // XOR operation between every byte in key and outerpadding, of key length
    }
    // result = hash ( outerPadding CONCAT hash ( innerPadding CONCAT baseString ) ).toBase64
    QByteArray total = outerPadding;
    QByteArray part = innerPadding;
    part.append(baseString);
    total.append(QCryptographicHash::hash(part, QCryptographicHash::Sha1));
    QByteArray hashed = QCryptographicHash::hash(total, QCryptographicHash::Sha1);
    if(isBase64){
        return hashed.toBase64();
    }
    return hashed;
}
bool HttpClientClass::putUrl(const QString & filePath)
{
    QFileInfo fileInfo(filePath);
    if(!fileInfo.exists()){
        SCWarning<<QString("Not found file: %1").arg(filePath);
        return false;
    }

    //put到腾讯云
    //(存储桶)Bucket:collection-xxxxxx
    //(区域)Region:ap-shanghai
    QString qiniuPostUrl = "https://collection-xxxxxx.cos.ap-shanghai.myqcloud.com";
    QString SecretId = "AKxxxxxxxxxxxxxxxxxxxxxxxxx";
    QString SecretKey = "xxxxxxxxxxxxxxxxxxxxxxxxxxxx";

    QFile file (fileInfo.filePath());
    if(!file.open(QIODevice::ReadOnly)){
        SCWarning<<QString("Open file failed: %1:%2").arg(filePath).arg(file.errorString());
        return false;
    }
    QByteArray fileData = file.readAll();
    //使用md5值作为文件的唯一名,保证服务器上文件名唯一
    QString md5file = QString(QCryptographicHash::hash( fileData, QCryptographicHash::Md5).toHex());
    //腾讯云需要用的文件名md5 (注意这里的md5计算方式,这里也卡了很久)
    QString fileMd5 = QString(QCryptographicHash::hash( fileData, QCryptographicHash::Md5).toBase64());
    SCDebug<<"fileMd5Str:"<<fileMd5;
    file.close();

    QString ContentLength = QString::number(fileData.size());
    QString ContentType = "text/plain";//text/plan
    //调试时,这里可以改成固定名 QString ContentDisposition = fileInfo.fileName()
    QString ContentDisposition = QString(md5file+"_"+fileInfo.fileName());
    QNetworkRequest req;
    req.setRawHeader("Host","collection-xxxxxx.cos.ap-shanghai.myqcloud.com");
    req.setRawHeader("Content-Length",ContentLength.toLocal8Bit());
    req.setRawHeader("Content-Type", ContentType.toLocal8Bit());
    req.setRawHeader("Content-Disposition", ContentDisposition.toLocal8Bit());
    req.setRawHeader("Content-MD5", fileMd5.toLocal8Bit());
    SCDebug<<"ContentLength:"<<ContentLength;
    QUrl url(qiniuPostUrl+"/"+ContentDisposition);
    req.setUrl(url);
    //有效期
    QDateTime startDateTime = QDateTime::currentDateTime();
    QDateTime endDateTime = startDateTime.addSecs(3600);
    quint64 startTimeS =  startDateTime.toSecsSinceEpoch();
    quint64 endTimeS =  endDateTime.toSecsSinceEpoch();
    QString KeyTime = QString("%1;%2").arg(startTimeS).arg(endTimeS);
    //可以把日期改成,官方提供的测试工具日期一直,方便查看自己的参数哪里出错了
    //    KeyTime = "1611800323;1611807523";
    SCDebug<<"KeyTime:"<<KeyTime;
    QByteArray SignKey = hmacSha1(SecretKey.toLocal8Bit(),KeyTime.toLocal8Bit(),false).toHex();
    SCDebug<<"SignKey:"<<QString(SignKey);
    QByteArray UrlParamList = QByteArray();
    QByteArray HttpParameters =  QByteArray();
    QMap<QString,QString>headMap;
    for(int i=0; i<req.rawHeaderList().size(); ++i){
        auto key = req.rawHeaderList().at(i);
        headMap.insert( key.toLower(),QUrl::toPercentEncoding(req.rawHeader(key)));
    }
    QByteArray  HeaderList = QString(headMap.keys().join(";")).toLocal8Bit();
    SCDebug<<"HeaderList:"<<QString(HeaderList);
    QByteArray HttpHeaders;
    for(int i=0; i<headMap.keys().size(); ++i){
        auto key = headMap.keys().at(i);
        HttpHeaders.append(key);
        HttpHeaders.append('=');
        HttpHeaders.append(headMap.value(key));
        if(i != headMap.keys().size() -1)
            HttpHeaders.append("&");
    }

    SCDebug<<"HttpHeaders:"<<HttpHeaders.size()<<QString(HttpHeaders);
    QString HttpURI = QString(QString("/%1").arg(ContentDisposition));
    //HttpParameters 这里只能用+号拼接,因为urlEncoded字符中可能出现%3这样误拼接
    QByteArray HttpString = QString("put\n"+HttpURI+"\n"+QString(HttpParameters)+"\n"+QString(HttpHeaders)+"\n").toLocal8Bit();
    //.arg(HttpURI).arg(QString(HttpParameters)).arg(QString(HttpHeaders)).toLocal8Bit();
    SCDebug<<"HttpString:"<<QString(HttpString);
    QByteArray httpStringSha1 = QCryptographicHash::hash(HttpString, QCryptographicHash::Sha1).toHex();
    SCDebug<<"httpStringSha1:"<<QString(httpStringSha1);
    QByteArray StringToSign = QString("sha1\n"+KeyTime+"\n"+httpStringSha1+"\n").toLocal8Bit();
    SCDebug<<"StringToSign:"<<QString(StringToSign);
    QByteArray Signature = hmacSha1(SignKey,StringToSign,false).toHex();
    SCDebug<<"Signature:"<<QString(Signature);
    //这里只能用+号拼接,因为urlEncoded字符中可能出现%3这样误拼接
    QString authorization = QString("q-sign-algorithm=sha1"
                                    "&q-ak="+SecretId+
                                    "&q-sign-time="+KeyTime+
                                    "&q-key-time="+KeyTime+
                                    "&q-header-list="+QString(HeaderList)+
                                    "&q-url-param-list="+QString(UrlParamList)+
                                    "&q-signature=")+QString(Signature);
    //            .arg(SecretId).arg(KeyTime).arg(KeyTime)
    //            .arg(QString(HeaderList)).arg(QString(UrlParamList)).arg(QString(Signature));
    SCDebug<<"Authorization:"<<authorization;
    req.setRawHeader("Authorization", authorization.toLocal8Bit());
    //put
    _reply = _pManager->put(req,fileData);
    SCDebug<<"_repley:"<<_reply->url();

    connect(_reply,SIGNAL(finished()),this,SLOT(slotReplyFinished()));
    connect(_reply,SIGNAL(error(QNetworkReply::NetworkError)),this,SLOT(slotReplyError(QNetworkReply::NetworkError)));
    return true;
}
在线调用工具
依这个工具为主,填入参数,切换到 [在线调用] 点击发送请求,会提示返回成功,查看签名过程与程序中输出的是否一致
https://console.cloud.tencent.com/api/explorer?Product=cos&Version=2018-11-26&Action=PutObject&SignVersion=

上传文件MD5计算方式
做完发现腾讯云文档中有几处二义性的地方
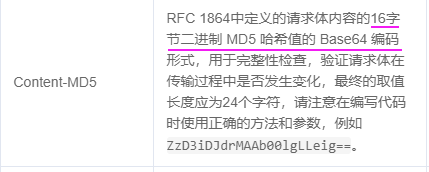
QString fileMd5 = QString(QCryptographicHash::hash( fileData, QCryptographicHash::Md5).toBase64());


 734
734


 被折叠的 条评论
为什么被折叠?
被折叠的 条评论
为什么被折叠?
 到【灌水乐园】发言


