


cookie机制:cookie分发通过扩展http协议来实现的,服务器通过在http的响应头中加上一行特殊的指示来提示浏览器按照指示生成相应的cookie。
Session机制:Session机制是一种服务器端的机制,服务器使用一种类似于散列表的结构(也可能就是使用散列表)来保存信息。
个人理解:我所理解的cookie和session的区别就是cookie是存储在浏览器上的,session是存储在服务器端的数据。如果理解有错,请评论指出。
1.1.cookie的使用,修改../FirstApp/views.py文件。
from django.shortcuts import render
from django.http import HttpResponse,HttpResponseRedirect

# 创建自己的视图
def index(request):
    return render(request, "index.html")

# 登陆方法
def  login_action(request):
    if request.method == 'POST':
        username = request.POST.get('username', '')
        password = request.POST.get('password', '')
        if username == 'admin' and password == 'admin123':
            response = HttpResponseRedirect('/event_manage/')
            response.set_cookie('user', username, 3600) # 添加浏览器cookie
            return response
        else:
            return render(request, 'index.html', {'error':'username or password error!!!'})
        pass
    pass

# 发布会管理
def event_manage(request):
    username = request.COOKIES.get('user', '') # 读取浏览器cookie
    return render(request, "event_manage.html")
说明:
1.当用户登陆成功后,就跳转到event_manage视图函数的过程中,通过set_cookie()方法向浏览器中添加cookie信息。这里给set_cookie()方法传了三个参数,第一个user用于表示写入浏览器的cookie名,第二个参数username是由用户在登陆页上输入的用户名(即“admin”),第三个参数3600用于设置cookie信息在浏览器中的保持时间,默认单位为秒。
2.在event_manage视图函数中,通过request.COOKIES来读取名为user的值,并通过render将它和event_manage.html页面一起返回。
1.2.修改../templates/event_manage.html页面,添加div标签来显示用户名
<!DOCTYPE html>
<html>
<head>
<title>Event Manage Page</title>
</head>
<body>
<h1>Login Success!</h1>
<div style="float: right;">
<a>嘿!{{user}} 欢迎</a><hr/>
</div>
</body>
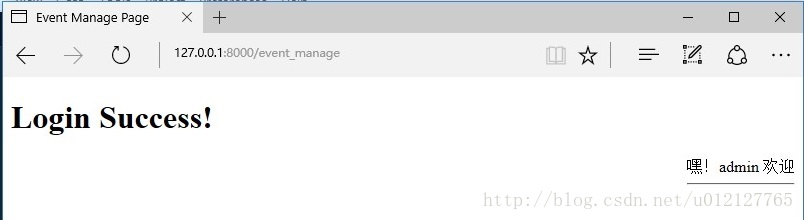
</html>1.3.查看运行结果。
2.1.Session的使用,cookie和session类似,只需将cookie的几步操作替换为session操作即可,修改../FirstApp/views.py文件。
再次运行发现给出:no such table:django_session,这个错误跟session的机制有关,那么一定要有存放用户session id对应信息的地方才行。故,需要创建Django_session表。这些表Django已准备好,只需生成即可。
2.2.使用python3 manage.py migrate命令进行数据迁移。出现下图则证明成功。

之所以能生成数据库表,是因为django已经默认SQLite3数据库。在../FirstProject/settings.py文件夹,查看SQLite3数据库的配置。如下代码。
# Database
# https://docs.djangoproject.com/en/1.10/ref/settings/#databases

DATABASES = {
    'default': {
        'ENGINE': 'django.db.backends.sqlite3',
        'NAME': os.path.join(BASE_DIR, 'db.sqlite3'),
    }
}
2.3.查看结果


 1万+
1万+


 被折叠的 条评论
为什么被折叠?
被折叠的 条评论
为什么被折叠?
 到【灌水乐园】发言


