


Follow this guide to choose and set up a barcode scanner compatible with Odoo’s Inventory and Barcode apps.

Scanner types
Before setting up a barcode scanner, it is important to determine which type of scanner best meets the needs of the business. There are three main types of scanners that can be used with Odoo, each with their own benefits and use cases:
-
USB scanners are connected to a computer, and are suitable for businesses that scan products at a fixed location, like at the checkout line in a grocery store.
-
Bluetooth scanners pair with a smartphone or tablet, making them both a cost-effective and portable barcode scanner option. In this scenario, Odoo is installed on the smartphone, allowing warehouse operators to handle operations, and check stock, directly through their mobile devices.
-
Mobile computer scanners are mobile devices with a built-in barcode scanner.
Important
If using a USB scanner, ensure the scanner is compatible with the keyboard layout of the computer.
If using a mobile computer scanner, ensure the device can run the Odoo mobile app properly. Recent models that use Android OS with the Google Chrome browser, or Windows OS with Microsoft Edge, should work. However, testing is crucial due to the variety of available models and configurations.
See also
Odoo Inventory & Barcode • Compatible Hardware
Configuration
When setting up the barcode scanner, make sure the following configurations are correct so the scanner can properly interpret barcodes with Odoo.
Keyboard layout
When using a USB barcode scanner, match its keyboard layout with the operating system’s layout for proper interpretation of characters. Generally, the scanning mode should be set to accept a USB keyboard (HID), with the language set based on the keyboard that is in use.
To configure the keyboard layout for a Zebra scanner, scan the keyboard wedge barcode for the desired language in the scanner’s user manual.

Examples of keyboard language settings in the Zebra scanner user manual.
Automatic carriage return
Odoo has a default 100-millisecond delay between scans to prevent accidental double scanning. To synchronize with the barcode scanner, set it to include a carriage return (character like the “Enter” key on a keyboard) after each scan. Odoo interprets the carriage return as the end of the barcode input; so Odoo accepts the scan, and waits for the next one.
Typically, on the scanner, a carriage return is included by default. Ensure it is set by scanning a specific barcode in the user manual, like CR suffix ON or Apply Enter for suffix.
Zebra scanner
When using Zebra scanners, ensure the following keystroke configurations are set to prevent errors.
Begin on the Zebra scanner’s home screen, and select the DataWedge app (the app is represented by a (light blue barcode) icon).
On the DataWedge Profiles page, select the profile option to access the Zebra scanner’s settings.
Warning
It is not suggested to use the “DWDemo” profile, as it does not work properly in every circumstance.
Instead, it is recommended to create a new, personal profile. Once a new profile is created, add the Odoo Mobile app and Google Chrome app in the Associated Apps on the scanner’s home screen.
Once the profile is selected, scroll down to the Keyboard Output option, and ensure the Enable/disable keystroke output option is Enabled.
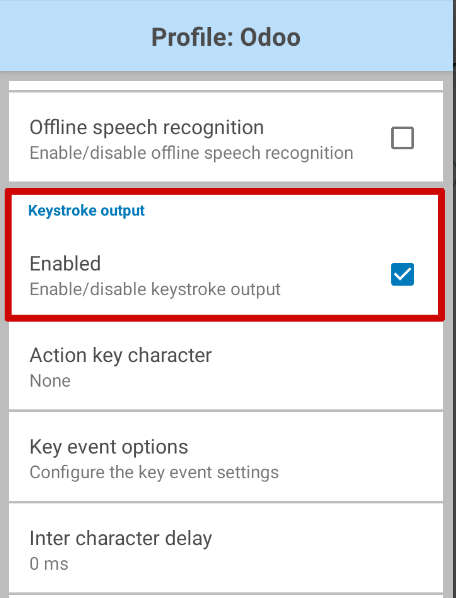
Once that option is enabled, go back to the Profile options page, and go to the Keystroke output section. Then, open the Key event options submenu. Under Characters, ensure the Send Characters as Events option is checked.
Important
The Send Characters as Events option must be checked on the Zebra scanner, or Odoo cannot recognize the barcodes that are scanned.
Once all those steps have been taken, perform a test scan to ensure the Zebra scanner is working properly, as intended.
Honeywell mobile computer scanner
When using Honeywell scanners, follow the instructions below to ensure barcodes can be scanned in Odoo.
Begin on the Honeywell scanner’s home screen, and select Settings, represented by a ⚙️ (gear) icon. Then, click Honeywell Settings, followed by Scanning.
From here, click Internal Scanner, followed by Default Profile. From the resulting list of options, select Data Processing Settings.
The Data Processing Settings specify how barcode data is processed by the computer. Locate the Wedge Method setting. By default, this is set to Standard.

Change the Wedge Method setting to Keyboard.
After completing the steps, conduct a test scan to verify the Honeywell scanner is working as intended.
Cipherlab mobile computer scanner
When using Cipherlab scanners, follow the instructions below to ensure barcodes can be scanned in Odoo.
Begin on the Cipherlab scanner’s home screen, and navigate to the App Drawer (All Applications). Then, click the ReaderConfig app, represented by an orange ⚙️ (gear) icon over a blue (barcode) icon.
Next, select the Default Profile, or create a new profile, if needed.
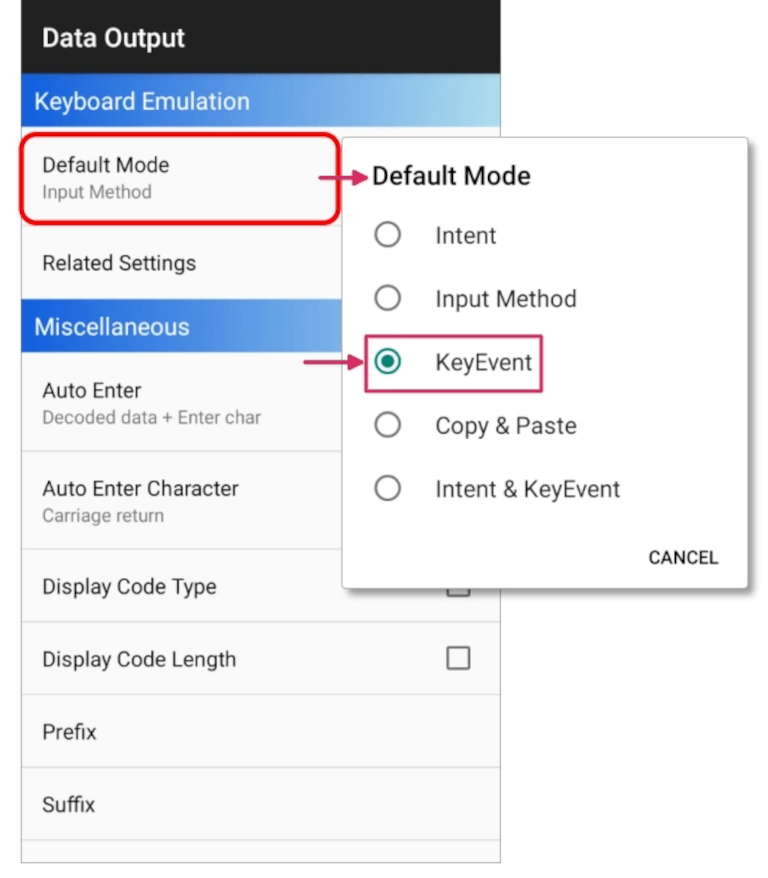
Under the General Settings, click Data Output, followed by Keyboard Emulation.

By default, the Input Method, under Keyboard Emulation, is set to Default Mode. Change this setting to KeyEvent.
After completing the steps, conduct a test scan to verify the Cipherlab scanner is working as intended.
See also


 1008
1008


 被折叠的 条评论
为什么被折叠?
被折叠的 条评论
为什么被折叠?
 到【灌水乐园】发言


