


2017年,好好的整理一下自己所学的知识,温故而知新,可以为师矣~以前的博客写的很零散,希望以后写的条理性更强些。不管做什么,都得有个规范。对于求学方面,每天一小步,坚持前进。
官方链接:https://developer.android.com/training/animation/index.html
动画能够添加微妙的视觉线索,通知用户怎样进入你的app,从app的交互界面来改善用户心里的模型结构。动画是及其有用的,当屏幕状态变化的时候,如加载内容或者新的动作执行的时候。动画能够让你的app看起来很圆滑,这就给人一中高质量app的感觉。
但要记住,过度使用动画或者在错误的时间使用动画,是很不好的,如他们会造成延迟。这节课教你实现一些常用的动画,能够增加可用性和鉴别能力,但不会对用户造成骚扰。
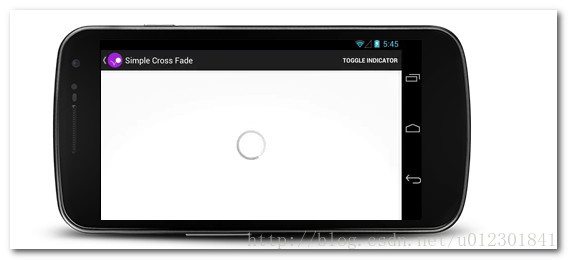
两视图交叉淡入淡出
交叉淡入淡出动画就是一个ui组件逐渐的消失,同时另一个组件逐渐的出现。这个动画效果是很有用的,当app中的内容和视图在切换的时候。淡入淡出是非常精妙地和短促地,但是能够提供一个流畅的过渡效果,在一个界面到下一个界面的时候。当然,如果你不使用它,这个过渡就会很生硬和匆忙。
下面这个例子是从进度条过渡到文本内容的,如果你要想查看源码,请点击文章最后的下载链接。
主要是在这几个文件中
src/CrossfadeActivity.java
layout/activity_crossfade.xml
menu/activity_crossfade.xml
创建视图
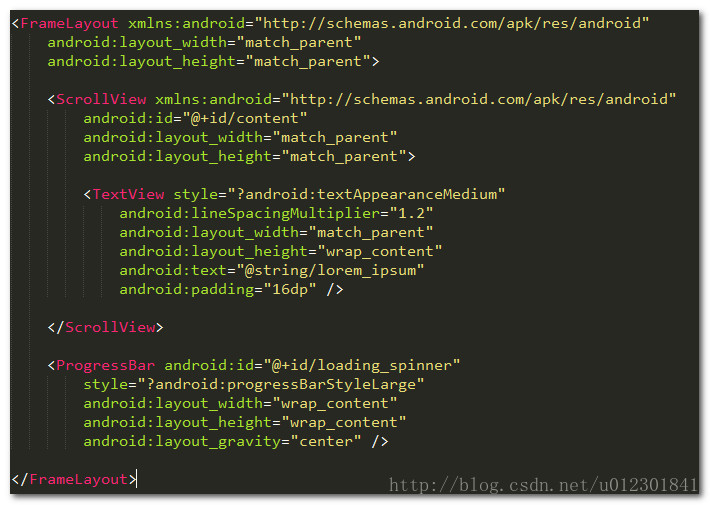
如果你想要淡入淡出效果,就创建两个视图。下面的代码就是创建一个进度条和滚动的文本视图。
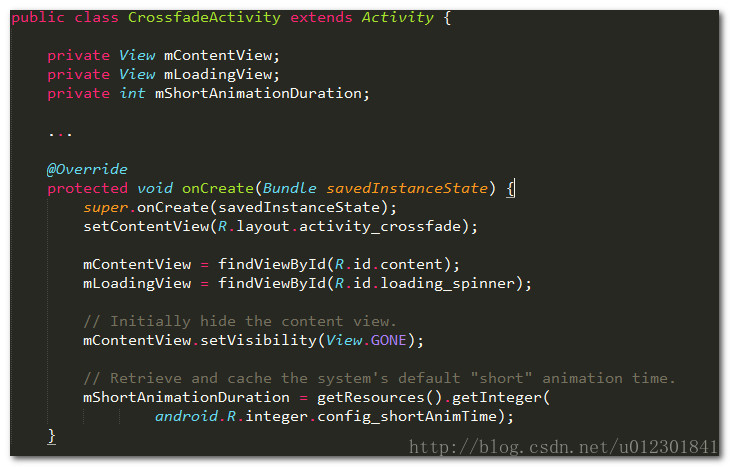
设置动画
1.创建淡入淡出动画视图的成员变量,你后面需要这些引用,当你在动画中修改视图的时候。
2.对于淡入的视图,最开始设置为不可见GONE。这可以防止视图占用空间和忽略它的布局计算,从而加快处理。
3.缓存config_shortAnimTime系统属性的成员变量。这个属性定义了标准的动画持续时间的长短。这个持续时间是理想中动画发生的频次。 config_longAnimTime和config_mediumAnimTime是可用的,如果你要使用他们的话。
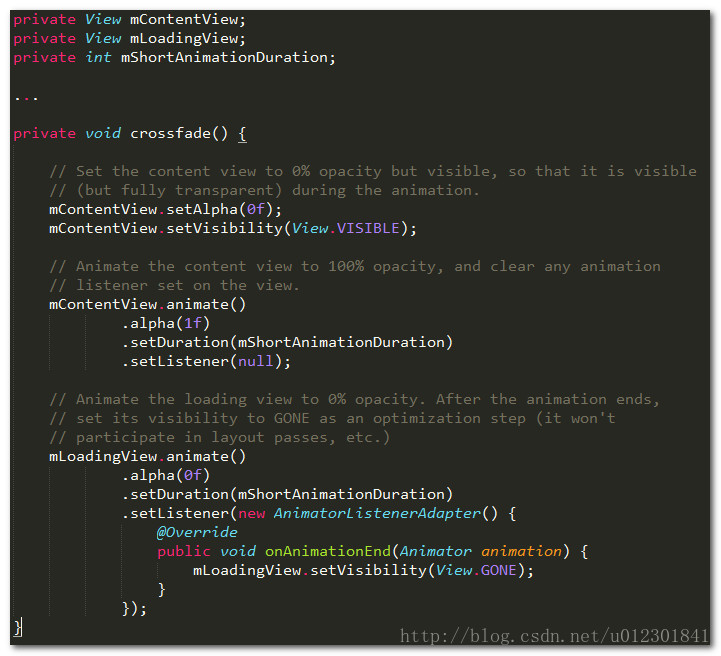
视图的淡入淡出
现在,这个视图已经设置好了,通过下面的操作来让他们淡入淡出~
1.对于淡入的视图,设置透明值为0且可见VISIBLE,最开始它是不可见的。这使得视图可见,但是完全透明。
2.对于淡入的视图,动画的alpha值是从0到1,在相同的时间内,其他的视图淡出,动画的alpha值是从1到0。
3.使用Animator.AnimatorListener动画监听器的onAnimationEnd()方法,设置淡出视图的可见性为GONE,尽管它的alpha值为0,设置它的可见性为GONE,可见防止View占用空间和忽略布局计算,加快处理速度。
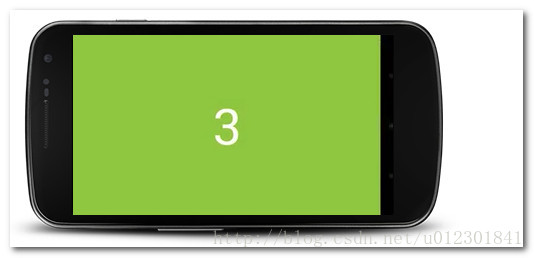
使用ViewPager的屏幕滑动
屏幕滑动时从一整个屏幕到另一个屏幕之间的转化,像设置向导或者滑动指示。这节课教你怎样使用ViewPager来实现屏幕滑动。ViewPager有自动的屏幕滑动动画效果,这个屏幕滑动效果看起来,自然的从第一个内容过渡到下一个。
代码的实现,主要在以下几个文件之中:
src/ScreenSlidePageFragment.java
src/ScreenSlideActivity.java
layout/activity_screen_slide.xml
layout/fragment_screen_slide_page.xml

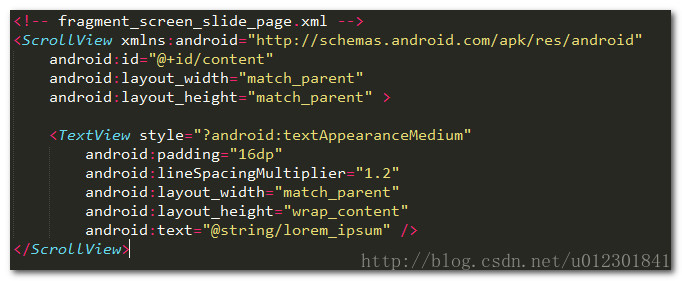
创建视图
创建一个布局文件,你之后将要使用fragment来填充内容区域。这是一个滚动的文本域。
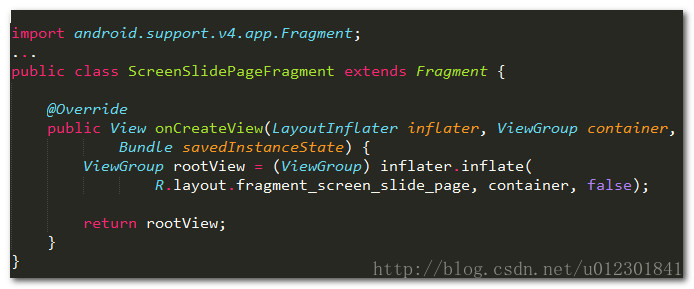
创建Fragment
创建一个Fragment类,在onCreateView()方法中返回一个布局文件。你能在父activity中创建一个fragment的实例,每当你需要给用户展示一个页面的时候。
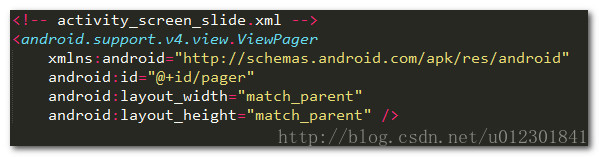
添加一个ViewPager
ViewPager有内置的滑动手势,在页面切换的时候,他们将默认使用滑动动画显示屏幕内容,所以你不需要做任何事情。ViewPager通过PagerAdapter提供一个新的页面来展示,而PagerAdapter使用的就是你早期创建的fragment类。
最开始,布局文件要包含一个ViewPager:
创建一个activity,要做一下的一些事情:
1.在布局中设置内容View为ViewPager。
2.创建一个类继承 FragmentStatePagerAdapter抽象类,实现getItem()方法,返回一个ScreenSlidePageFragment实例作为一个新的页面。这个页面适配器也要实现getCount()方法,返回一共有多少个页面。
3.将PagerAdapter和ViewPager联系在一起。
4.处理设备上的返回按钮,是通过后退虚拟堆栈中的fragment。如果你已经在第一个页面,点击返回将推出activity堆栈。
import android.support.v4.app.Fragment;
import android.support.v4.app.FragmentManager;
...
public class ScreenSlidePagerActivity extends FragmentActivity {
    /**
     * The number of pages (wizard steps) to show in this demo.
     */
    private static final int NUM_PAGES = 5;

    /**
     * The pager widget, which handles animation and allows swiping horizontally to access previous
     * and next wizard steps.
     */
    private ViewPager mPager;

    /**
     * The pager adapter, which provides the pages to the view pager widget.
     */
    private PagerAdapter mPagerAdapter;

    @Override
    protected void onCreate(Bundle savedInstanceState) {
        super.onCreate(savedInstanceState);
        setContentView(R.layout.activity_screen_slide);

        // Instantiate a ViewPager and a PagerAdapter.
        mPager = (ViewPager) findViewById(R.id.pager);
        mPagerAdapter = new ScreenSlidePagerAdapter(getSupportFragmentManager());
        mPager.setAdapter(mPagerAdapter);
    }

    @Override
    public void onBackPressed() {
        if (mPager.getCurrentItem() == 0) {
            // If the user is currently looking at the first step, allow the system to handle the
            // Back button. This calls finish() on this activity and pops the back stack.
            super.onBackPressed();
        } else {
            // Otherwise, select the previous step.
            mPager.setCurrentItem(mPager.getCurrentItem() - 1);
        }
    }

    /**
     * A simple pager adapter that represents 5 ScreenSlidePageFragment objects, in
     * sequence.
     */
    private class ScreenSlidePagerAdapter extends FragmentStatePagerAdapter {
        public ScreenSlidePagerAdapter(FragmentManager fm) {
            super(fm);
        }

        @Override
        public Fragment getItem(int position) {
            return new ScreenSlidePageFragment();
        }

        @Override
        public int getCount() {
            return NUM_PAGES;
        }
    }
}
自定义页面转化动画
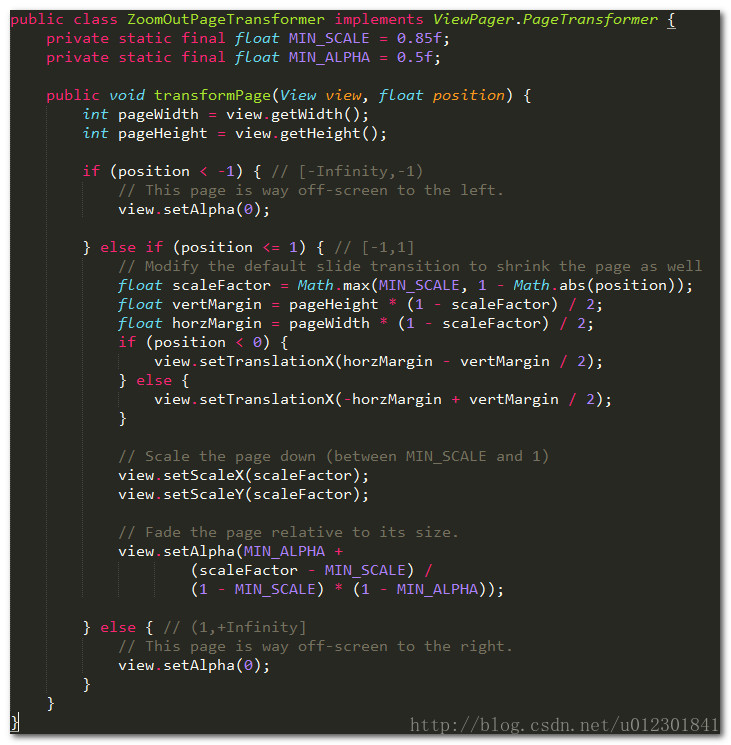
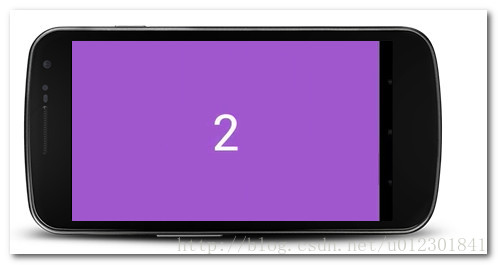
默认的屏幕滑动动画是不同的,要实现ViewPager.PageTransformer接口,提供给它视图的页面。改接口只暴露了transformPage()方法。在屏幕切换的每一个点,页面可见和邻近页面被关闭,该方法都会被调用一次,一般只有一个可见页面。例如,如果页面3可见,用户向页面4拖动, transformPage()方法就会被调用,在页面2,3,4的每一个手势操作中。
在实现transformPage()中,你能创建一个自定义的滑动动画,来决定哪些页面需要根据页面位置在屏幕上进行切换,在transformPage()方法中可以获取到位置的参数。
这个位置的参数表明了制定的页面处于屏幕中心的位置,它是一个动态的属性,当用户滚动页面的时候。当页面填充屏幕时,它的位置的值是0。当页面被滑出屏幕后边缘的时候,它的位置的值是1。如果用户滑动到页面1和页面的中间,页面1的位置是-0.5,页面2的位置是0.5。基于屏幕中页面的位置,你能够创建一个自定义的滑动动画,通过一些方法设置页面的属性,像setAlpha(),setTranslationX(),setScaleY()。
当你实现PageTransformer时,通过setPageTransformer()方法可以应用你自定义的动画。例如:
ViewPager mPager = (ViewPager) findViewById(R.id.pager);
…
mPager.setPageTransformer(true, new ZoomOutPageTransformer());
向放大页面的转换
这个转换效果是相邻的页面在滚动时收缩和变淡,当一个页面靠近中心的时,它会恢复正常的大小并显形。
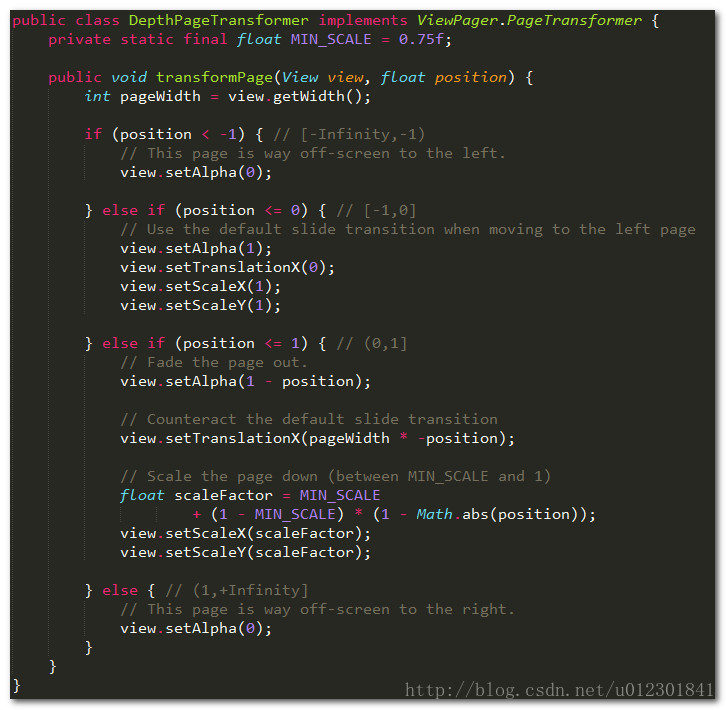
向深度页面的转换
该转换是使用默认的滑动动画,当页面向左滑,右侧页面使用一个变深的动画出来。这个深度的动画淡出页面,并且线性的收缩。
注意:在深度动画期间,默认动画一直在持续,所以你必须要处理掉屏幕滑动中X轴的位移。
view.setTranslationX(-1 * view.getWidth() * position)
显示卡片翻转动画
这节课将教你在自定义fragment动画中显示翻转动画。卡片翻转动画是在两个内容视图之间显示像卡片翻转的动画。
代码的实现,主要在以下几个文件之中:
src/CardFlipActivity.java
animator/card_flip_right_in.xml
animator/card_flip_right_out.xml
animator/card_flip_left_in.xml
animator/card_flip_left_out.xml
layout/fragment_card_back.xml
layout/fragment_card_front.xml

创建动画
创建这个卡片式翻转动画。你将需要2个进场动画,一个从左侧出去,一个从左侧进来,你也需要2个出场动画,一个从右侧出去,一个从右侧进来。
// card_flip_left_in.xml
<set xmlns:android="http://schemas.android.com/apk/res/android">
    <!-- Before rotating, immediately set the alpha to 0. -->
    <objectAnimator
        android:valueFrom="1.0"
        android:valueTo="0.0"
        android:propertyName="alpha"
        android:duration="0" />

    <!-- Rotate. -->
    <objectAnimator
        android:valueFrom="-180"
        android:valueTo="0"
        android:propertyName="rotationY"
        android:interpolator="@android:interpolator/accelerate_decelerate"
        android:duration="@integer/card_flip_time_full" />

    <!-- Half-way through the rotation (see startOffset), set the alpha to 1. -->
    <objectAnimator
        android:valueFrom="0.0"
        android:valueTo="1.0"
        android:propertyName="alpha"
        android:startOffset="@integer/card_flip_time_half"
        android:duration="1" />
</set>

// card_flip_left_out.xml
<set xmlns:android="http://schemas.android.com/apk/res/android">
    <!-- Rotate. -->
    <objectAnimator
        android:valueFrom="0"
        android:valueTo="180"
        android:propertyName="rotationY"
        android:interpolator="@android:interpolator/accelerate_decelerate"
        android:duration="@integer/card_flip_time_full" />

    <!-- Half-way through the rotation (see startOffset), set the alpha to 0. -->
    <objectAnimator
        android:valueFrom="1.0"
        android:valueTo="0.0"
        android:propertyName="alpha"
        android:startOffset="@integer/card_flip_time_half"
        android:duration="1" />
</set>

// card_flip_right_in.xml
<set xmlns:android="http://schemas.android.com/apk/res/android">
    <!-- Before rotating, immediately set the alpha to 0. -->
    <objectAnimator
        android:valueFrom="1.0"
        android:valueTo="0.0"
        android:propertyName="alpha"
        android:duration="0" />

    <!-- Rotate. -->
    <objectAnimator
        android:valueFrom="180"
        android:valueTo="0"
        android:propertyName="rotationY"
        android:interpolator="@android:interpolator/accelerate_decelerate"
        android:duration="@integer/card_flip_time_full" />

    <!-- Half-way through the rotation (see startOffset), set the alpha to 1. -->
    <objectAnimator
        android:valueFrom="0.0"
        android:valueTo="1.0"
        android:propertyName="alpha"
        android:startOffset="@integer/card_flip_time_half"
        android:duration="1" />
</set>

// card_flip_right_out.xml
<set xmlns:android="http://schemas.android.com/apk/res/android">
    <!-- Rotate. -->
    <objectAnimator
        android:valueFrom="0"
        android:valueTo="-180"
        android:propertyName="rotationY"
        android:interpolator="@android:interpolator/accelerate_decelerate"
        android:duration="@integer/card_flip_time_full" />

    <!-- Half-way through the rotation (see startOffset), set the alpha to 0. -->
    <objectAnimator
        android:valueFrom="1.0"
        android:valueTo="0.0"
        android:propertyName="alpha"
        android:startOffset="@integer/card_flip_time_half"
        android:duration="1" />
</set>
创建视图
每一个滑动的卡片是一个分离的布局,可以包含你想要的任何内容,如2个屏幕的文本,2个图片,或者任何组合而成的翻转视图。你将在fragment里面使用2个布局来应用你的动画,下面是布局的代码展示:
<LinearLayout xmlns:android="http://schemas.android.com/apk/res/android"
    android:layout_width="match_parent"
    android:layout_height="match_parent"
    android:orientation="vertical"
    android:background="#a6c"
    android:padding="16dp"
    android:gravity="bottom">

    <TextView android:id="@android:id/text1"
        style="?android:textAppearanceLarge"
        android:textStyle="bold"
        android:textColor="#fff"
        android:layout_width="match_parent"
        android:layout_height="wrap_content"
        android:text="@string/card_back_title" />

    <TextView style="?android:textAppearanceSmall"
        android:textAllCaps="true"
        android:textColor="#80ffffff"
        android:textStyle="bold"
        android:lineSpacingMultiplier="1.2"
        android:layout_width="match_parent"
        android:layout_height="wrap_content"
        android:text="@string/card_back_description" />
</LinearLayout>
每一个卡片的布局展示:
<ImageView xmlns:android="http://schemas.android.com/apk/res/android"
    android:layout_width="match_parent"
    android:layout_height="match_parent"
    android:src="@drawable/image1"
    android:scaleType="centerCrop"
    android:contentDescription="@string/description_image_1" />
创建碎片
创建fragment类给前面和后面的卡片。这些类返回的就是你在onCreateView()方法中返回的布局文件,你能在activity中创建一个fragment的实例,用来给卡片展示。下面就是代码示例:
public class CardFlipActivity extends Activity {
    ...
    /**
     * A fragment representing the front of the card.
     */
    public class CardFrontFragment extends Fragment {
        @Override
        public View onCreateView(LayoutInflater inflater, ViewGroup container,
                Bundle savedInstanceState) {
            return inflater.inflate(R.layout.fragment_card_front, container, false);
        }
    }

    /**
     * A fragment representing the back of the card.
     */
    public class CardBackFragment extends Fragment {
        @Override
        public View onCreateView(LayoutInflater inflater, ViewGroup container,
                Bundle savedInstanceState) {
            return inflater.inflate(R.layout.fragment_card_back, container, false);
        }
    }
}
卡片式翻转动画
现在,你可以在activity里面显示fragment了。为了做到这一点,首先,你要为activity创建一个布局。下面就是activity的布局,你将在运行时添加一个fragment:
<FrameLayout xmlns:android="http://schemas.android.com/apk/res/android"
    android:id="@+id/container"
    android:layout_width="match_parent"
    android:layout_height="match_parent" />
在activity的代码中,你只要将内容视图设置给布局。在你创建activity的时候,显示一个默认的fragment,这是一个好的方法。下面就是示例代码:
public class CardFlipActivity extends Activity {
@Override
protected void onCreate(Bundle savedInstanceState) {
super.onCreate(savedInstanceState);
setContentView(R.layout.activity_activity_card_flip);
if (savedInstanceState == null) {
getFragmentManager()
.beginTransaction()
.add(R.id.container, new CardFrontFragment())
.commit();
}
}
...
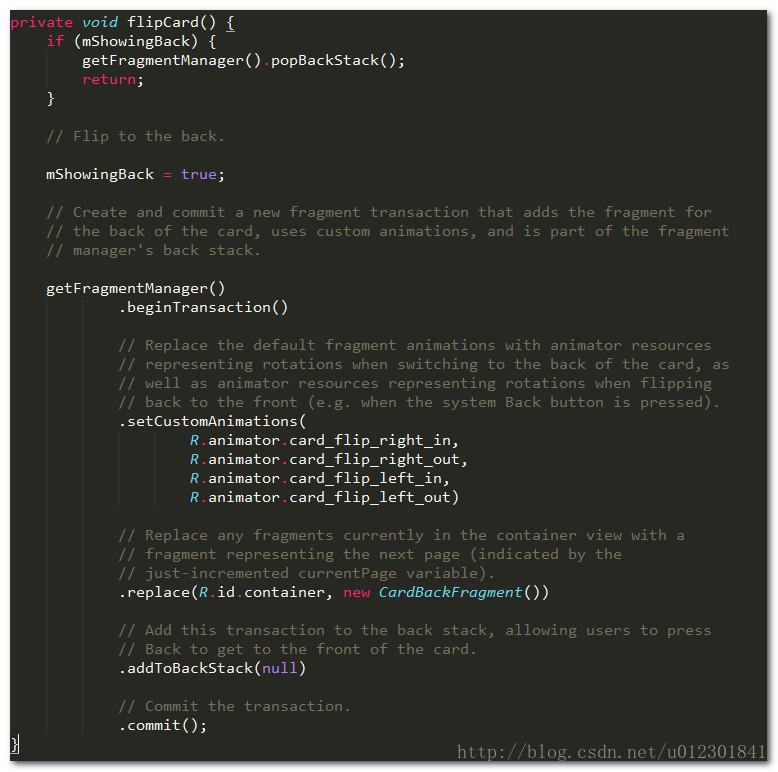
}现在,你有前台的卡片显示,你可以在适当地时候用动画显示卡片的背面。创建一个方法来显示卡片的另一面,需要做以下几件事:
1.设置自定义动画给你前面创建的fragment来做转化效果。
2.用一个新的fragment来代替当前显示的fragment,并且创建时要附带上动画。
3.添加前面的fragment到fragment回退栈中,当你按下返回键的时候,然后卡片翻转过来。
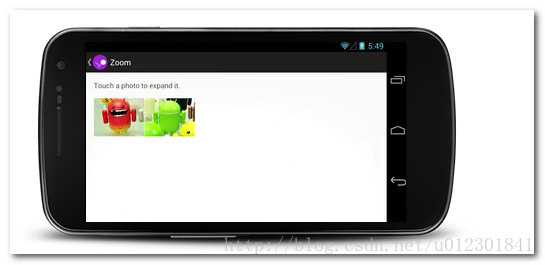
缩放视图
这节课将示范触摸放大动画,这对于一个像图片查看器这样的app是很有用的,能通过点击缩略图而查看全屏的大图片。
代码的实现,主要在以下几个文件之中:
src/TouchHighlightImageButton.java
src/ZoomActivity.java
layout/activity_zoom.xml
创建视图
创建一个布局文件,要包含一个小版本和大版本的内容,是你想要缩放的。下面代码就是一个可点击缩略图的ImageButton,和一个显示大图片的ImageView:
<FrameLayout xmlns:android="http://schemas.android.com/apk/res/android"
    android:id="@+id/container"
    android:layout_width="match_parent"
    android:layout_height="match_parent">

    <LinearLayout android:layout_width="match_parent"
        android:layout_height="wrap_content"
        android:orientation="vertical"
        android:padding="16dp">

        <ImageButton
            android:id="@+id/thumb_button_1"
            android:layout_width="100dp"
            android:layout_height="75dp"
            android:layout_marginRight="1dp"
            android:src="@drawable/thumb1"
            android:scaleType="centerCrop"
            android:contentDescription="@string/description_image_1" />

    </LinearLayout>

    <!-- This initially-hidden ImageView will hold the expanded/zoomed version of
         the images above. Without transformations applied, it takes up the entire
         screen. To achieve the "zoom" animation, this view's bounds are animated
         from the bounds of the thumbnail button above, to its final laid-out
         bounds.
         -->

    <ImageView
        android:id="@+id/expanded_image"
        android:layout_width="match_parent"
        android:layout_height="match_parent"
        android:visibility="invisible"
        android:contentDescription="@string/description_zoom_touch_close" />
</FrameLayout>
设置放大动画
一旦你应用了这个布局文件,设置手指点击时间来缩放动画。下面的代码示例给ImageButton添加一个 View.OnClickListener事件,执行缩放动画,当用户点击button的时候:
public class ZoomActivity extends FragmentActivity {
    // Hold a reference to the current animator,
    // so that it can be canceled mid-way.
    private Animator mCurrentAnimator;

    // The system "short" animation time duration, in milliseconds. This
    // duration is ideal for subtle animations or animations that occur
    // very frequently.
    private int mShortAnimationDuration;

    @Override
    protected void onCreate(Bundle savedInstanceState) {
        super.onCreate(savedInstanceState);
        setContentView(R.layout.activity_zoom);

        // Hook up clicks on the thumbnail views.

        final View thumb1View = findViewById(R.id.thumb_button_1);
        thumb1View.setOnClickListener(new View.OnClickListener() {
            @Override
            public void onClick(View view) {
                zoomImageFromThumb(thumb1View, R.drawable.image1);
            }
        });

        // Retrieve and cache the system's default "short" animation time.
        mShortAnimationDuration = getResources().getInteger(
                android.R.integer.config_shortAnimTime);
    }
    ...
}
放大视图
你的动画需要正常大小的视图,在正常的时候要缩放视图。一般来说,你需要的动画从正常大小的视图变为大尺寸的视图。下面的方法将展示你怎样实现一个缩放动画,这个动画从缩略图变大的过程,需要做以下的事情:
1.将高分辨率的图片的ImageView隐藏,下面的示例在ui线程上加载一个大的图片资源是很愚蠢的,你最好把想要加载的事情放在子线程中,以便防止阻塞ui线程,最后把设置位图放在ui线程中。理想中,位图不应该大于屏幕大小。
2.计算ImageView开始和结束的边界。
3.动画的四个定位和大小属性X,Y,SCALE_X,SCALE_Y,从开始和结束边界同时进行地。这四个动画添加到AnimatorSet中,所以它们能够在同一时间开始。
4.缩放回去的时候是一个类似的动画,当用户触摸屏幕的时候,图片缩放回原状。你可以给ImageView添加一个View.OnClickListener事件来做这些事情。当用户点击的时候,改ImageView回到最小化,也就是图片缩略图的状态,并且设置它为GONE。
private void zoomImageFromThumb(final View thumbView, int imageResId) {
    // If there's an animation in progress, cancel it
    // immediately and proceed with this one.
    if (mCurrentAnimator != null) {
        mCurrentAnimator.cancel();
    }

    // Load the high-resolution "zoomed-in" image.
    final ImageView expandedImageView = (ImageView) findViewById(
            R.id.expanded_image);
    expandedImageView.setImageResource(imageResId);

    // Calculate the starting and ending bounds for the zoomed-in image.
    // This step involves lots of math. Yay, math.
    final Rect startBounds = new Rect();
    final Rect finalBounds = new Rect();
    final Point globalOffset = new Point();

    // The start bounds are the global visible rectangle of the thumbnail,
    // and the final bounds are the global visible rectangle of the container
    // view. Also set the container view's offset as the origin for the
    // bounds, since that's the origin for the positioning animation
    // properties (X, Y).
    thumbView.getGlobalVisibleRect(startBounds);
    findViewById(R.id.container)
            .getGlobalVisibleRect(finalBounds, globalOffset);
    startBounds.offset(-globalOffset.x, -globalOffset.y);
    finalBounds.offset(-globalOffset.x, -globalOffset.y);

    // Adjust the start bounds to be the same aspect ratio as the final
    // bounds using the "center crop" technique. This prevents undesirable
    // stretching during the animation. Also calculate the start scaling
    // factor (the end scaling factor is always 1.0).
    float startScale;
    if ((float) finalBounds.width() / finalBounds.height()
            > (float) startBounds.width() / startBounds.height()) {
        // Extend start bounds horizontally
        startScale = (float) startBounds.height() / finalBounds.height();
        float startWidth = startScale * finalBounds.width();
        float deltaWidth = (startWidth - startBounds.width()) / 2;
        startBounds.left -= deltaWidth;
        startBounds.right += deltaWidth;
    } else {
        // Extend start bounds vertically
        startScale = (float) startBounds.width() / finalBounds.width();
        float startHeight = startScale * finalBounds.height();
        float deltaHeight = (startHeight - startBounds.height()) / 2;
        startBounds.top -= deltaHeight;
        startBounds.bottom += deltaHeight;
    }

    // Hide the thumbnail and show the zoomed-in view. When the animation
    // begins, it will position the zoomed-in view in the place of the
    // thumbnail.
    thumbView.setAlpha(0f);
    expandedImageView.setVisibility(View.VISIBLE);

    // Set the pivot point for SCALE_X and SCALE_Y transformations
    // to the top-left corner of the zoomed-in view (the default
    // is the center of the view).
    expandedImageView.setPivotX(0f);
    expandedImageView.setPivotY(0f);

    // Construct and run the parallel animation of the four translation and
    // scale properties (X, Y, SCALE_X, and SCALE_Y).
    AnimatorSet set = new AnimatorSet();
    set
            .play(ObjectAnimator.ofFloat(expandedImageView, View.X,
                    startBounds.left, finalBounds.left))
            .with(ObjectAnimator.ofFloat(expandedImageView, View.Y,
                    startBounds.top, finalBounds.top))
            .with(ObjectAnimator.ofFloat(expandedImageView, View.SCALE_X,
            startScale, 1f)).with(ObjectAnimator.ofFloat(expandedImageView,
                    View.SCALE_Y, startScale, 1f));
    set.setDuration(mShortAnimationDuration);
    set.setInterpolator(new DecelerateInterpolator());
    set.addListener(new AnimatorListenerAdapter() {
        @Override
        public void onAnimationEnd(Animator animation) {
            mCurrentAnimator = null;
        }

        @Override
        public void onAnimationCancel(Animator animation) {
            mCurrentAnimator = null;
        }
    });
    set.start();
    mCurrentAnimator = set;

    // Upon clicking the zoomed-in image, it should zoom back down
    // to the original bounds and show the thumbnail instead of
    // the expanded image.
    final float startScaleFinal = startScale;
    expandedImageView.setOnClickListener(new View.OnClickListener() {
        @Override
        public void onClick(View view) {
            if (mCurrentAnimator != null) {
                mCurrentAnimator.cancel();
            }

            // Animate the four positioning/sizing properties in parallel,
            // back to their original values.
            AnimatorSet set = new AnimatorSet();
            set.play(ObjectAnimator
                        .ofFloat(expandedImageView, View.X, startBounds.left))
                        .with(ObjectAnimator
                                .ofFloat(expandedImageView,
                                        View.Y,startBounds.top))
                        .with(ObjectAnimator
                                .ofFloat(expandedImageView,
                                        View.SCALE_X, startScaleFinal))
                        .with(ObjectAnimator
                                .ofFloat(expandedImageView,
                                        View.SCALE_Y, startScaleFinal));
            set.setDuration(mShortAnimationDuration);
            set.setInterpolator(new DecelerateInterpolator());
            set.addListener(new AnimatorListenerAdapter() {
                @Override
                public void onAnimationEnd(Animator animation) {
                    thumbView.setAlpha(1f);
                    expandedImageView.setVisibility(View.GONE);
                    mCurrentAnimator = null;
                }

                @Override
                public void onAnimationCancel(Animator animation) {
                    thumbView.setAlpha(1f);
                    expandedImageView.setVisibility(View.GONE);
                    mCurrentAnimator = null;
                }
            });
            set.start();
            mCurrentAnimator = set;
        }
    });
}
动画布局的变化
布局动画是每次更改布局配置时系统运行的预加载动画,你需要在布局中设置一个属性,当布局改变的时候告诉android系统做这些动画,并执行系统的默认动画。
建议:如果你想提供自定义的布局动画,创建一个LayoutTransition对象,并且通过setLayoutTransition()方法设置给布局。
代码的实现,主要在以下几个文件之中:
src/LayoutChangesActivity.java
layout/activity_layout_changes.xml
menu/activity_layout_changes.xml
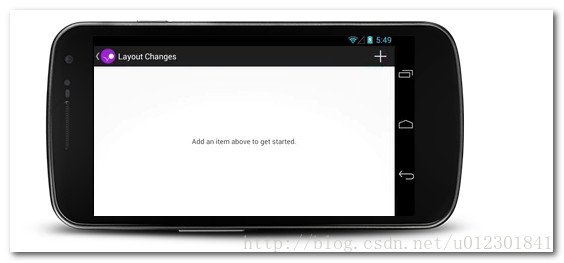
创建布局
在你activity的布局文件中,设置android:animateLayoutChanges属性为true。
<LinearLayout android:id="@+id/container"
    android:animateLayoutChanges="true"
    ...
/>
从布局中添加,更新,移除Item
现在,你需要在布局中做添加,移除,更新条目的操作,可以通过动画来执行。
private ViewGroup mContainerView;
...
private void addItem() {
    View newView;
    ...
    mContainerView.addView(newView, 0);
}


 9753
9753

 被折叠的 条评论
为什么被折叠?
被折叠的 条评论
为什么被折叠?
 到【灌水乐园】发言


