


先上图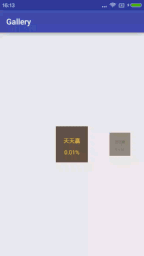
前段时间写选择刻度尺(http://blog.csdn.net/u012305710/article/details/52059901)的时候发现选择存款时间写的还挺炫的,在加上看过一篇用Viewpage实现的查看qq附近的人就决定自己也来写写看。
先讲这篇文章能学到的东西吧。
- 分析问题的能力
- Android中Matrix的使用
- 数学加减运算
下面进入正文:
分析问题
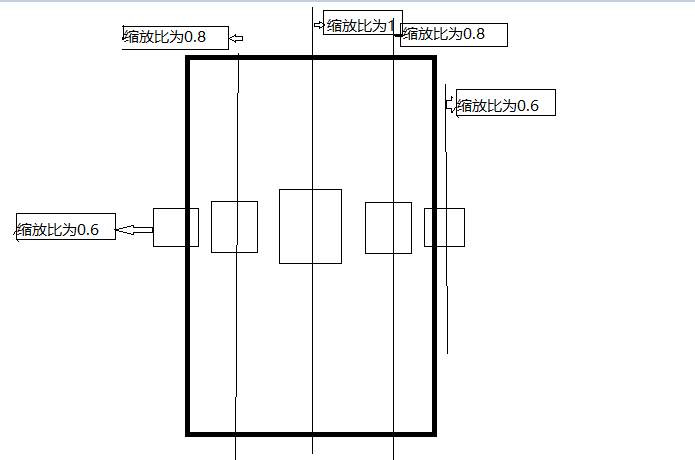
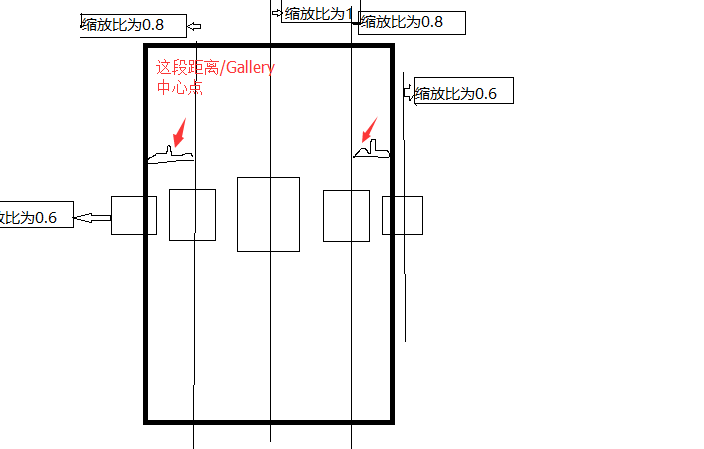
需要实现的效果总共包括:缩放、透明度变化,View在Gallery中心的时候发现中间最大和最亮,向左滑发现左边的View越来越小,右边的View越来越大,到这里先冷静下,发现只要一个缩放比就可以了。
下面就是怎么计算缩放比了?(缩放比为0,1)
需要找一个基准这里就找了gallery的中心点。下面就要分两种情况计算缩放比了中心点左面和中心点右面。
中心点左面的计算公式定义如下:
(View的中心点位置)/Gallery的中心点位置
中心点右面的计算公式定义如下:
(屏幕宽度-View的中心点位置)/Gallery的中心点位置
现在为止整个项目需要计算的地方就完了。下面就是怎么将这个变化应用到View中?
这时需要重写getChildStaticTransformation这个方法的作用就是返回Gallery中item子图形的变化效果。
下面贴下getChildStaticTransformation方法中的代码:
protected boolean getChildStaticTransformation(View child, Transformation t) {
        LinearLayout item = (LinearLayout) child;
            tvTitle = (TextView) child.findViewById(R.id.tv_title);
            tvNumber = (TextView) child.findViewById(R.id.tv_number);
        if (android.os.Build.VERSION.SDK_INT >= 16) {
            item.invalidate();
        }

        final int childWidth = item.getWidth();
        final int childHeight = item.getHeight();
        t.clear();
        t.setTransformationType(Transformation.TYPE_BOTH);

        final Matrix matrix = t.getMatrix();
            float scale=1;
            viewCenter = child.getWidth() / 2 + child.getLeft();
            if (viewCenter < galleryCenter) {
                scale = (viewCenter) *1.0f/ galleryCenter;
            } else {
                scale = (galleryCenter * 2 - viewCenter )*1.0f/ galleryCenter;
            }
            if (scale < MIN_SCALE) {
                scale =MIN_SCALE;
            } else if (scale > 1) {
                scale=1.0f;
            }
            if (scale>=0.85&&scale <= 1) {
                tvTitle.setTextColor(Color.parseColor("#FFCE43"));
                tvNumber.setTextColor(Color.parseColor("#FFCE43"));
            } else {
                tvTitle.setTextColor(Color.parseColor("#333333"));
                tvNumber.setTextColor(Color.parseColor("#333333"));
            }
            t.setAlpha(scale);
            final float translateX = childWidth / 2.0f;
            final float translateY = childHeight / 2.0f;
            matrix.postScale(scale, scale);  //进行缩放
            matrix.preTranslate(-translateX, -translateY);  //矩阵前乘
            matrix.postTranslate(translateX, translateY);   //矩阵后乘

        return true;
    }
看效果发现选中的时候文字是黄色的,当View的中心点等于Gallery的中心点代表当中View处于中心。
关于矩阵前乘和后乘:matrix.preTranslate(-translateX, -translateY);是因为Android中图形旋转和缩放他们轴点是基于原点。
关于具体解释可以看下这篇文章http://blog.csdn.net/linmiansheng/article/details/18820599,想看效果可以直接注释掉看下没有添加的效果。这里就只解释了重要的方法,使用和Listview都是类似都是创建一个适配器。
总结下其实有的时候东西难的地方在于不敢亲自去实践,不敢亲自动手敲敲,只要敢于开头肯定可以写出来的,最后其实数学很重要。
下载地址:http://download.csdn.net/detail/u012305710/9598407


 5843
5843

 被折叠的 条评论
为什么被折叠?
被折叠的 条评论
为什么被折叠?
 到【灌水乐园】发言


