


声明:本文是在此博文http://blog.csdn.net/xiaanming/article/details/10163203的基础上添加了扫码生成名片表单信息,仿照微信名片实现。
转载请注明出处:http://blog.csdn.net/u012324136/article/details/50843314
在此先贴出原文
了解二维码这个东西还是从微信中,当时微信推出二维码扫描功能,自己感觉挺新颖的,从一张图片中扫一下竟然能直接加好友,不可思议啊,那时候还不了解二维码,呵呵,然后做项目的时候,老板说要加上二维码扫描功能,然后自己的屁颠屁颠的去百度,google啥的,发现很多朋友都有介绍二维码扫描的功能,然后我就跟着人家的介绍自己搞起了二维码扫描功能,跟着人家的帖子,很快我的项目就加入了扫描二维码的功能,然后自己还很开心。
随着微信的到来,二维码越来越火爆,随处能看到二维码,比如商城里面,肯德基,餐厅等等,对于二维码扫描我们使用的是google的开源框架Zxing,我们可以去http://code.google.com/p/zxing/下载源码和Jar包,之前我项目中的二维码扫描功能只实现了扫描功能,其UI真的是其丑无比,一个好的应用软件,其UI界面也要被大众所接纳,不然人家就不会用你的软件啦,所以说应用软件功能和界面一样都很重要,例如微信,相信微信UI被很多应用软件所模仿,我也仿照微信扫描二维码效果进行模仿,虽然没有微信做的那么精致,但是效果还是可以的,所以将自己修改UI的代码和扫描二维码的代码分享给大家,一是自己以后项目遇到同样的功能直接拷贝来用,二是给还没有加入二维码功能的人一个参考,站在巨人的肩膀上,哈哈,我之前也是站在巨人的肩膀上加上此功能,接下来跟着我一步一步来实现此项功能,里面去除了很多不必要的文件
我们先看下项目的结构
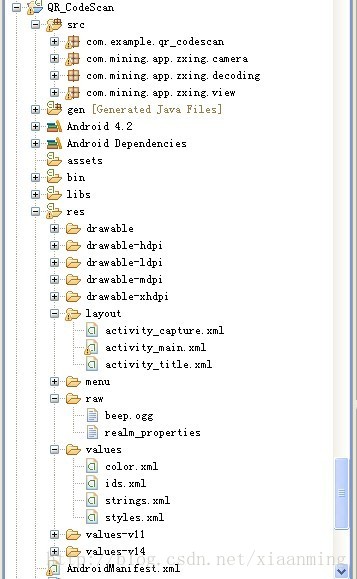
- 如果你项目也想加入此功能,你直接将com.mining.app.zxing.camera,com.mining.app.zxing.decoding,com.mining.app.zxing.view这三个包拷贝到你的项目中,然后引入相对应的资源进去,我也是从我的项目中直接引用过来的,包名都没改呢,当然还需要引用Zxing.jar
- com.example.qr_codescan包里面有一个MipcaActivityCapture,也是直接引入我之前项目的代码的,这个Activity主要处理扫描界面的类,比如,扫描成功有声音和振动等等,主要关注里面的handleDecode(Result result, Bitmap barcode)方法,扫描完成之后将扫描到的结果和二维码的bitmap当初参数传递到handleDecode(Result result, Bitmap barcode)里面,我们只需要在里面写出相对应的处理代码即可,其他的地方都不用改得,我这里处理扫描结果和扫描拍的照片
- /**
- * 处理扫描结果
- * @param result
- * @param barcode
- */
- public void handleDecode(Result result, Bitmap barcode) {
- inactivityTimer.onActivity();
- playBeepSoundAndVibrate();
- String resultString = result.getText();
- if (resultString.equals("")) {
- Toast.makeText(MipcaActivityCapture.this, "Scan failed!", Toast.LENGTH_SHORT).show();
- }else {
- Intent resultIntent = new Intent();
- Bundle bundle = new Bundle();
- bundle.putString("result", resultString);
- bundle.putParcelable("bitmap", barcode);
- resultIntent.putExtras(bundle);
- this.setResult(RESULT_OK, resultIntent);
- }
- MipcaActivityCapture.this.finish();
- }
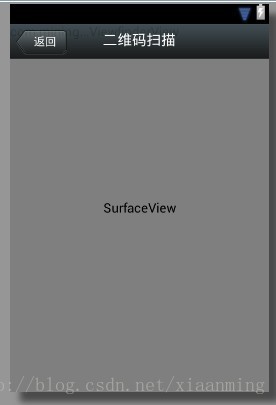
- 我对MipcaActivityCapture界面的布局做了自己的改动,先看下效果图,主要是用到FrameLayout,里面嵌套RelativeLayout,里面的图片也是从微信里面拿出来的,平常我看到需要什么图片就去微信里面找,没有美工的公司的程序员就是苦逼
布局代码如下
- <?xml version="1.0" encoding="utf-8"?>
- <FrameLayout xmlns:android="http://schemas.android.com/apk/res/android"
- android:layout_width="fill_parent"
- android:layout_height="fill_parent" >
- <RelativeLayout
- android:layout_width="fill_parent"
- android:layout_height="fill_parent" >
- <SurfaceView
- android:id="@+id/preview_view"
- android:layout_width="fill_parent"
- android:layout_height="fill_parent"
- android:layout_gravity="center" />
- <com.mining.app.zxing.view.ViewfinderView
- android:id="@+id/viewfinder_view"
- android:layout_width="wrap_content"
- android:layout_height="wrap_content" />
- <include
- android:id="@+id/include1"
- android:layout_width="fill_parent"
- android:layout_height="wrap_content"
- android:layout_alignParentTop="true"
- layout="@layout/activity_title" />
- </RelativeLayout>
- </FrameLayout>
- <?xml version="1.0" encoding="utf-8"?>
- <RelativeLayout xmlns:android="http://schemas.android.com/apk/res/android"
- android:layout_width="fill_parent"
- android:layout_height="wrap_content"
- android:background="@drawable/mmtitle_bg_alpha" >
- <Button
- android:id="@+id/button_back"
- android:layout_width="75.0dip"
- android:text="返回"
- android:background="@drawable/mm_title_back_btn"
- android:textColor="@android:color/white"
- android:layout_height="wrap_content"
- android:layout_centerVertical="true"
- android:layout_marginLeft="2dip" />
- <TextView
- android:id="@+id/textview_title"
- android:layout_width="wrap_content"
- android:layout_height="wrap_content"
- android:layout_alignBaseline="@+id/button_back"
- android:layout_alignBottom="@+id/button_back"
- android:layout_centerHorizontal="true"
- android:gravity="center_vertical"
- android:text="二维码扫描"
- android:textColor="@android:color/white"
- android:textSize="18sp" />
- </RelativeLayout>
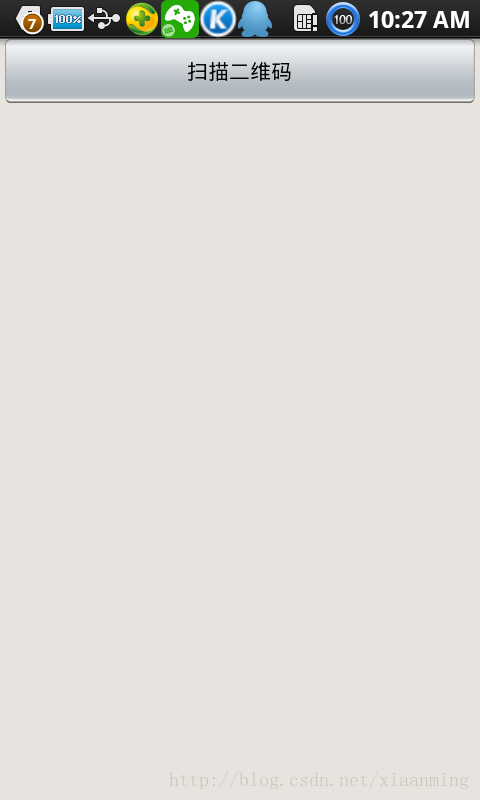
- 在我这个demo里面,有一个主界面MainActivity,里面一个Button, 一个ImageView和一个TextView,点击Button进入到二维码扫描界面,当扫描OK的时候,回到主界面,将扫描的结果显示到TextView,将图片显示到ImageView里面,然后你可以不处理图片,我这里随带的加上图片,主界面的布局很简单如下
- <RelativeLayout xmlns:android="http://schemas.android.com/apk/res/android"
- xmlns:tools="http://schemas.android.com/tools"
- android:layout_width="match_parent"
- android:layout_height="match_parent"
- android:background="#ffe1e0de" >
- <Button
- android:id="@+id/button1"
- android:layout_width="fill_parent"
- android:layout_height="wrap_content"
- android:layout_alignParentTop="true"
- android:text="扫描二维码" />
- <TextView
- android:id="@+id/result"
- android:layout_width="fill_parent"
- android:layout_height="wrap_content"
- android:layout_below="@+id/button1"
- android:lines="2"
- android:gravity="center_horizontal"
- android:textColor="@android:color/black"
- android:textSize="16sp" />
- <ImageView
- android:id="@+id/qrcode_bitmap"
- android:layout_width="fill_parent"
- android:layout_height="fill_parent"
- android:layout_alignParentLeft="true"
- android:layout_below="@+id/result"/>
- </RelativeLayout>
- MainActivity里面的代码如下,里面的功能在上面已经说了
- package com.example.qr_codescan;
- import android.app.Activity;
- import android.content.Intent;
- import android.graphics.Bitmap;
- import android.os.Bundle;
- import android.view.View;
- import android.view.View.OnClickListener;
- import android.widget.Button;
- import android.widget.ImageView;
- import android.widget.TextView;
- public class MainActivity extends Activity {
- private final static int SCANNIN_GREQUEST_CODE = 1;
- /**
- * 显示扫描结果
- */
- private TextView mTextView ;
- /**
- * 显示扫描拍的图片
- */
- private ImageView mImageView;
- @Override
- protected void onCreate(Bundle savedInstanceState) {
- super.onCreate(savedInstanceState);
- setContentView(R.layout.activity_main);
- mTextView = (TextView) findViewById(R.id.result);
- mImageView = (ImageView) findViewById(R.id.qrcode_bitmap);
- //点击按钮跳转到二维码扫描界面,这里用的是startActivityForResult跳转
- //扫描完了之后调到该界面
- Button mButton = (Button) findViewById(R.id.button1);
- mButton.setOnClickListener(new OnClickListener() {
- @Override
- public void onClick(View v) {
- Intent intent = new Intent();
- intent.setClass(MainActivity.this, MipcaActivityCapture.class);
- intent.setFlags(Intent.FLAG_ACTIVITY_CLEAR_TOP);
- startActivityForResult(intent, SCANNIN_GREQUEST_CODE);
- }
- });
- }
- @Override
- protected void onActivityResult(int requestCode, int resultCode, Intent data) {
- super.onActivityResult(requestCode, resultCode, data);
- switch (requestCode) {
- case SCANNIN_GREQUEST_CODE:
- if(resultCode == RESULT_OK){
- Bundle bundle = data.getExtras();
- //显示扫描到的内容
- mTextView.setText(bundle.getString("result"));
- //显示
- mImageView.setImageBitmap((Bitmap) data.getParcelableExtra("bitmap"));
- }
- break;
- }
- }
- }
- 上面的代码还是比较简单,但是要想做出像微信那样只的扫描框,紧紧上面的代码是没有那种效果的,我们必须重写com.mining.app.zxing.view包下面的ViewfinderView类,微信里面的都是用的图片,我是自己画出来的,代码注释的比较清楚,大家直接看代码吧,相信你能理解的,如果你要修改扫描框的大小,去CameraManager类里面修改
- /*
- * Copyright (C) 2008 ZXing authors
- *
- * Licensed under the Apache License, Version 2.0 (the "License");
- * you may not use this file except in compliance with the License.
- * You may obtain a copy of the License at
- *
- * http://www.apache.org/licenses/LICENSE-2.0
- *
- * Unless required by applicable law or agreed to in writing, software
- * distributed under the License is distributed on an "AS IS" BASIS,
- * WITHOUT WARRANTIES OR CONDITIONS OF ANY KIND, either express or implied.
- * See the License for the specific language governing permissions and
- * limitations under the License.
- */
- package com.mining.app.zxing.view;
- import java.util.Collection;
- import java.util.HashSet;
- import android.content.Context;
- import android.content.res.Resources;
- import android.graphics.Bitmap;
- import android.graphics.Canvas;
- import android.graphics.Color;
- import android.graphics.Paint;
- import android.graphics.Rect;
- import android.graphics.Typeface;
- import android.util.AttributeSet;
- import android.view.View;
- import com.example.qr_codescan.R;
- import com.google.zxing.ResultPoint;
- import com.mining.app.zxing.camera.CameraManager;
- /**
- * This view is overlaid on top of the camera preview. It adds the viewfinder
- * rectangle and partial transparency outside it, as well as the laser scanner
- * animation and result points.
- *
- */
- public final class ViewfinderView extends View {
- private static final String TAG = "log";
- /**
- * 刷新界面的时间
- */
- private static final long ANIMATION_DELAY = 10L;
- private static final int OPAQUE = 0xFF;
- /**
- * 四个绿色边角对应的长度
- */
- private int ScreenRate;
- /**
- * 四个绿色边角对应的宽度
- */
- private static final int CORNER_WIDTH = 10;
- /**
- * 扫描框中的中间线的宽度
- */
- private static final int MIDDLE_LINE_WIDTH = 6;
- /**
- * 扫描框中的中间线的与扫描框左右的间隙
- */
- private static final int MIDDLE_LINE_PADDING = 5;
- /**
- * 中间那条线每次刷新移动的距离
- */
- private static final int SPEEN_DISTANCE = 5;
- /**
- * 手机的屏幕密度
- */
- private static float density;
- /**
- * 字体大小
- */
- private static final int TEXT_SIZE = 16;
- /**
- * 字体距离扫描框下面的距离
- */
- private static final int TEXT_PADDING_TOP = 30;
- /**
- * 画笔对象的引用
- */
- private Paint paint;
- /**
- * 中间滑动线的最顶端位置
- */
- private int slideTop;
- /**
- * 中间滑动线的最底端位置
- */
- private int slideBottom;
- private Bitmap resultBitmap;
- private final int maskColor;
- private final int resultColor;
- private final int resultPointColor;
- private Collection<ResultPoint> possibleResultPoints;
- private Collection<ResultPoint> lastPossibleResultPoints;
- boolean isFirst;
- public ViewfinderView(Context context, AttributeSet attrs) {
- super(context, attrs);
- density = context.getResources().getDisplayMetrics().density;
- //将像素转换成dp
- ScreenRate = (int)(20 * density);
- paint = new Paint();
- Resources resources = getResources();
- maskColor = resources.getColor(R.color.viewfinder_mask);
- resultColor = resources.getColor(R.color.result_view);
- resultPointColor = resources.getColor(R.color.possible_result_points);
- possibleResultPoints = new HashSet<ResultPoint>(5);
- }
- @Override
- public void onDraw(Canvas canvas) {
- //中间的扫描框,你要修改扫描框的大小,去CameraManager里面修改
- Rect frame = CameraManager.get().getFramingRect();
- if (frame == null) {
- return;
- }
- //初始化中间线滑动的最上边和最下边
- if(!isFirst){
- isFirst = true;
- slideTop = frame.top;
- slideBottom = frame.bottom;
- }
- //获取屏幕的宽和高
- int width = canvas.getWidth();
- int height = canvas.getHeight();
- paint.setColor(resultBitmap != null ? resultColor : maskColor);
- //画出扫描框外面的阴影部分,共四个部分,扫描框的上面到屏幕上面,扫描框的下面到屏幕下面
- //扫描框的左边面到屏幕左边,扫描框的右边到屏幕右边
- canvas.drawRect(0, 0, width, frame.top, paint);
- canvas.drawRect(0, frame.top, frame.left, frame.bottom + 1, paint);
- canvas.drawRect(frame.right + 1, frame.top, width, frame.bottom + 1,
- paint);
- canvas.drawRect(0, frame.bottom + 1, width, height, paint);
- if (resultBitmap != null) {
- // Draw the opaque result bitmap over the scanning rectangle
- paint.setAlpha(OPAQUE);
- canvas.drawBitmap(resultBitmap, frame.left, frame.top, paint);
- } else {
- //画扫描框边上的角,总共8个部分
- paint.setColor(Color.GREEN);
- canvas.drawRect(frame.left, frame.top, frame.left + ScreenRate,
- frame.top + CORNER_WIDTH, paint);
- canvas.drawRect(frame.left, frame.top, frame.left + CORNER_WIDTH, frame.top
- + ScreenRate, paint);
- canvas.drawRect(frame.right - ScreenRate, frame.top, frame.right,
- frame.top + CORNER_WIDTH, paint);
- canvas.drawRect(frame.right - CORNER_WIDTH, frame.top, frame.right, frame.top
- + ScreenRate, paint);
- canvas.drawRect(frame.left, frame.bottom - CORNER_WIDTH, frame.left
- + ScreenRate, frame.bottom, paint);
- canvas.drawRect(frame.left, frame.bottom - ScreenRate,
- frame.left + CORNER_WIDTH, frame.bottom, paint);
- canvas.drawRect(frame.right - ScreenRate, frame.bottom - CORNER_WIDTH,
- frame.right, frame.bottom, paint);
- canvas.drawRect(frame.right - CORNER_WIDTH, frame.bottom - ScreenRate,
- frame.right, frame.bottom, paint);
- //绘制中间的线,每次刷新界面,中间的线往下移动SPEEN_DISTANCE
- slideTop += SPEEN_DISTANCE;
- if(slideTop >= frame.bottom){
- slideTop = frame.top;
- }
- canvas.drawRect(frame.left + MIDDLE_LINE_PADDING, slideTop - MIDDLE_LINE_WIDTH/2, frame.right - MIDDLE_LINE_PADDING,slideTop + MIDDLE_LINE_WIDTH/2, paint);
- //画扫描框下面的字
- paint.setColor(Color.WHITE);
- paint.setTextSize(TEXT_SIZE * density);
- paint.setAlpha(0x40);
- paint.setTypeface(Typeface.create("System", Typeface.BOLD));
- canvas.drawText(getResources().getString(R.string.scan_text), frame.left, (float) (frame.bottom + (float)TEXT_PADDING_TOP *density), paint);
- Collection<ResultPoint> currentPossible = possibleResultPoints;
- Collection<ResultPoint> currentLast = lastPossibleResultPoints;
- if (currentPossible.isEmpty()) {
- lastPossibleResultPoints = null;
- } else {
- possibleResultPoints = new HashSet<ResultPoint>(5);
- lastPossibleResultPoints = currentPossible;
- paint.setAlpha(OPAQUE);
- paint.setColor(resultPointColor);
- for (ResultPoint point : currentPossible) {
- canvas.drawCircle(frame.left + point.getX(), frame.top
- + point.getY(), 6.0f, paint);
- }
- }
- if (currentLast != null) {
- paint.setAlpha(OPAQUE / 2);
- paint.setColor(resultPointColor);
- for (ResultPoint point : currentLast) {
- canvas.drawCircle(frame.left + point.getX(), frame.top
- + point.getY(), 3.0f, paint);
- }
- }
- //只刷新扫描框的内容,其他地方不刷新
- postInvalidateDelayed(ANIMATION_DELAY, frame.left, frame.top,
- frame.right, frame.bottom);
- }
- }
- public void drawViewfinder() {
- resultBitmap = null;
- invalidate();
- }
- /**
- * Draw a bitmap with the result points highlighted instead of the live
- * scanning display.
- *
- * @param barcode
- * An image of the decoded barcode.
- */
- public void drawResultBitmap(Bitmap barcode) {
- resultBitmap = barcode;
- invalidate();
- }
- public void addPossibleResultPoint(ResultPoint point) {
- possibleResultPoints.add(point);
- }
- }
上面的代码中,中间那根线微信是用的图片,我这里是画的,如果你想更加仿真点就将下面的代码
- canvas.drawRect(frame.left + MIDDLE_LINE_PADDING, slideTop - MIDDLE_LINE_WIDTH/2, frame.right - MIDDLE_LINE_PADDING,slideTop + MIDDLE_LINE_WIDTH/2, paint);
改成
- Rect lineRect = new Rect();
- lineRect.left = frame.left;
- lineRect.right = frame.right;
- lineRect.top = slideTop;
- lineRect.bottom = slideTop + 18;
- canvas.drawBitmap(((BitmapDrawable)(getResources().getDrawable(R.drawable.qrcode_scan_line))).getBitmap(), null, lineRect, paint);
那条扫描线自己去微信里面找一下,我贴出来的失真了,下载微信apk,将后缀名改成zip,然后解压就行了
画扫描框下面字体的代码需要修改下,这样子能根据字体自动排列在中间,如果字太长我没有处理,那个要自动换行,你可以自行处理
- paint.setColor(Color.WHITE);
- paint.setTextSize(TEXT_SIZE * density);
- paint.setAlpha(0x40);
- paint.setTypeface(Typeface.DEFAULT_BOLD);
- String text = getResources().getString(R.string.R.string.scan_text);
- float textWidth = paint.measureText(text);
- canvas.drawText(text, (width - textWidth)/2, (float) (frame.bottom + (float)TEXT_PADDING_TOP *density), paint)
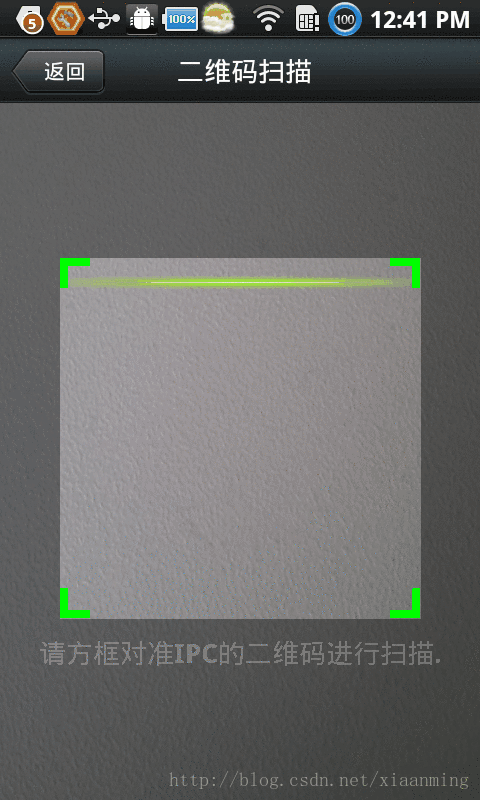
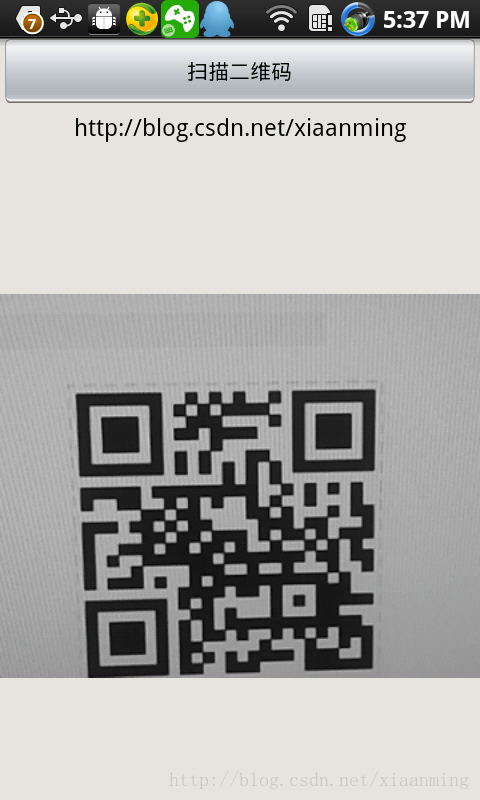
运行界面截图,其中中间的那根绿色的线会上下移动,跟微信的效果差不多,当然运行你还需要相对应的权限问题,有兴趣的朋友可以去下载demo
从8点多写这篇博客写到现在,看起来这么点字,但实际上还是比较耗时间的,如果你觉得这篇文章对你有帮助,你就顶一下,哈哈,洗澡睡觉去了,上面的项目中还有一些资源文件我没有贴出来,想要看效果可以下载源码
我在Android 基于google Zxing实现对手机中的二维码进行扫描这篇文章中实现了对手机中二维码照片的扫描,并且替换了中间的扫描线,和微信效果更加相似。
以上是参考文章。接下来我们来实现扫码生成仿微信名片表单
生成表单正文
以上就实现了生成并扫码功能了,接下来,我们来看看生成表单。
首先,在生成二维码的时候,我们需要设置属于自己的字符串开头标识,用来扫码时判断属于我们内部的名片格式,可以生成我们的表单。
具体代码如下
/**
	 * 生成二维码 要转换的地址或字符串,可以是中文
	 *
	 * /**
		 * 拆分扫描得到的字符串str acbee&开头为本公司的二维码 格式: name:Aleck_ age:22 work:小蜜蜂
		 * tel:13655555555
		 * remark:好好学习,天天向上。好好学习,天天向上。好好学习,天天向上。好好学习,天天向上。好好学习,天天向上。 str=
		 * "Aleck_&&22&&小蜜蜂&&13655555555&&好好学习,天天向上。好好学习,天天向上。好好学习,天天向上。好好学习,天天向上。好好学习,天天向上。"
		 */
	 /**
	 * @param url
	 * @param width
	 * @param height
	 * @return
	 */
	public Bitmap createQRImage(String url, final int width, final int height) {
		try {
			// 判断URL合法性
			if (url == null || "".equals(url) || url.length() < 1) {
				return null;
			}
			Hashtable<EncodeHintType, String> hints = new Hashtable<EncodeHintType, String>();
			hints.put(EncodeHintType.CHARACTER_SET, "utf-8");
			// 图像数据转换,使用了矩阵转换
			BitMatrix bitMatrix = new QRCodeWriter().encode(url,
					BarcodeFormat.QR_CODE, width, height, hints);
			int[] pixels = new int[width * height];
			// 下面这里按照二维码的算法,逐个生成二维码的图片,
			// 两个for循环是图片横列扫描的结果
			for (int y = 0; y < height; y++) {
				for (int x = 0; x < width; x++) {
					if (bitMatrix.get(x, y)) {
						pixels[y * width + x] = 0xff000000;
					} else {
						pixels[y * width + x] = 0xffffffff;
					}
				}
			}
			// 生成二维码图片的格式,使用ARGB_8888
			Bitmap bitmap = Bitmap.createBitmap(width, height,
					Bitmap.Config.ARGB_8888);
			bitmap.setPixels(pixels, 0, width, 0, 0, width, height);
			return bitmap;
		} catch (WriterException e) {
			e.printStackTrace();
		}
		return null;
	}
此方法将带有我们的标识的固定格式的字符串生成唯一的二维码,接下类我们来看看扫码读取字符串并生成表单代码
// private String titleData[][] = new String[][] {
	// { "ID", "姓名", "EMAIL", "地址" },
	// { "01", "小李", "xiaoli",
	// "北京" },
	// { "02", "小张", "xiaozhang", "天津" } }; // 定义要显示的数据
	//

	@Override
	protected void onCreate(Bundle savedInstanceState) {
		// TODO Auto-generated method stub
		super.onCreate(savedInstanceState);

		super.onCreate(savedInstanceState);
		// 不显示标题
		requestWindowFeature(Window.FEATURE_NO_TITLE);

		// Window window = getWindow();
		// window.addFlags(WindowManager.LayoutParams.FLAG_KEEP_SCREEN_ON);
		setContentView(R.layout.scan_result);

		// tex_result=(TextView)findViewById(R.id.txt_result);
		btn_back = (Button) findViewById(R.id.button_back);
		txt_name = (TextView) findViewById(R.id.txt_name);
		txt_age = (TextView) findViewById(R.id.txt_age);
		txt_work = (TextView) findViewById(R.id.txt_work);
		txt_tel = (TextView) findViewById(R.id.txt_tel);
		//txt_remark = (TextView) findViewById(R.id.txt_email);

		// 返回按钮事件
		btn_back.setOnClickListener(new OnClickListener() {

			@Override
			public void onClick(View v) {
				finish();

			}
		});

		Intent intent = getIntent(); // 获取Intent对象

		Bundle bundle = intent.getExtras(); // 获取传递的数据包
		str = bundle.getString("result");

		/**
		 * 拆分扫描得到的字符串str acbee&开头为本公司的二维码 格式: name:彭伟桃 age:22 work:小蜜蜂
		 * tel:13655555555
		 * remark:好好学习,天天向上。好好学习,天天向上。好好学习,天天向上。好好学习,天天向上。好好学习,天天向上。 str=
		 * "Aleck_&&22&&小蜜蜂&&13655555555&&好好学习,天天向上。好好学习,天天向上。好好学习,天天向上。好好学习,天天向上。好好学习,天天向上。"
		 */
		String[] temp = null;
		temp = str.split("&&");
		if (temp[0].equals("acbee") ) { // 判断为本软件生成的二维码,acbee为标识前缀
			txt_name.setText(temp[1]);
			txt_age.setText(temp[2]);
			txt_work.setText(temp[3]);
			txt_tel.setText(temp[4]);
			//txt_remark.setText(temp[5]);

		}

		// etShow.setText(temp[0] + " linc " + temp[1]);

		// tex_result.setText(str);

		// /**
		// * 动态生成表格行
		// */
		// TableLayout layout = new TableLayout(this); // 定义表格布局
		// TableLayout.LayoutParams layoutParam = new TableLayout.LayoutParams(
		// ViewGroup.LayoutParams.FILL_PARENT,
		// ViewGroup.LayoutParams.FILL_PARENT); // 定义布局管理器的参数
		// //layout.setBackgroundResource(R.drawable.mldn_logo); // 定义背景图片
		// for (int x = 0; x < this.titleData.length; x++) { // 循环设置表格行
		// TableRow row = new TableRow(this); // 定义表格行
		// for (int y = 0; y < this.titleData[x].length; y++) {
		// TextView text = new TextView(this);
		// text.setText(this.titleData[x][y]); // 设置文本内容
		// row.addView(text, y); // 加入一个编号
		// }
		// layout.addView(row); // 向表格之中增加若干个表格行
		// }
		// super.setContentView(layout, layoutParam); // 设置显示

	}
代码比较简单,大家使用时可以自行封装,这里使用静态的表单格式。
再看看布局文件吧,也很简单
<?xml version="1.0" encoding="UTF-8"?>
<LinearLayout xmlns:android="http://schemas.android.com/apk/res/android"
    android:layout_width="match_parent"
    android:layout_height="match_parent"
    android:orientation="vertical"
    android:background="#ffffff" >

    <RelativeLayout
    android:layout_width="fill_parent"
    android:layout_height="wrap_content"
    android:background="@drawable/mmtitle_bg_alpha" >

    <Button
        android:id="@+id/button_back"
        android:layout_width="75.0dip"
        android:text="返回"
        android:background="@drawable/mm_title_back_btn"
        android:textColor="@android:color/white"
        android:layout_height="wrap_content"
        android:layout_centerVertical="true"
        android:layout_marginLeft="2dip" />

    <TextView
        android:id="@+id/textview_title"
        android:layout_width="wrap_content"
        android:layout_height="wrap_content"
        android:layout_alignBaseline="@+id/button_back"
        android:layout_alignBottom="@+id/button_back"
        android:layout_centerHorizontal="true"
        android:gravity="center_vertical"
        android:text="扫描结果"
        android:textColor="@android:color/white"
        android:textSize="18sp" />

</RelativeLayout>


<TableLayout
        android:layout_width="match_parent"
        android:layout_height="wrap_content"
        android:layout_alignParentLeft="true"
        android:layout_alignParentTop="true"
        android:gravity="left"
        >

        <TableRow
            android:id="@+id/tableRow1"
            android:layout_width="wrap_content"
            android:layout_height="wrap_content"
             >

        <TextView
            android:id="@+id/TextView1"
            android:layout_width="wrap_content"
            android:layout_height="wrap_content"
            android:text="姓名"
            android:textSize="16sp"
			android:width="70dp"

            android:layout_marginTop="10dp"
            android:layout_marginLeft="10dp"
             />
        <TextView
            android:id="@+id/txt_name"
            android:layout_width="wrap_content"
            android:layout_height="wrap_content"
            android:textColor="#000000"
            android:textSize="18sp"
            android:text=""
            android:layout_marginTop="10dp"
            android:layout_marginLeft="10dp"
             >
        </TextView>

        </TableRow>

        <TableRow
            android:id="@+id/tableRow1"
            android:layout_width="wrap_content"
            android:layout_height="wrap_content"
             >

        <TextView
            android:id="@+id/TextView5"
            android:layout_width="wrap_content"
            android:layout_height="wrap_content"
            android:text="年龄"
            android:textSize="16sp"
            android:width="70dp"
            android:layout_marginTop="10dp"
            android:layout_marginLeft="10dp"
             />
        <TextView
            android:id="@+id/txt_age"
            android:layout_width="wrap_content"
            android:layout_height="wrap_content"
            android:textColor="#000000"
            android:textSize="18sp"
            android:text=""
            android:layout_marginTop="10dp"
            android:layout_marginLeft="10dp"
             >
        </TextView>

        </TableRow>


        <TableRow
            android:id="@+id/tableRow2"
            android:layout_width="wrap_content"
            android:layout_height="wrap_content" >

        <TextView
            android:id="@+id/TextView2"
            android:layout_width="wrap_content"
            android:layout_height="wrap_content"
            android:text="工作单位"
            android:textSize="16sp"

            android:layout_marginTop="10dp"
            android:layout_marginLeft="10dp"

             />
        <TextView
            android:id="@+id/txt_work"
            android:layout_width="wrap_content"
            android:layout_height="wrap_content"
            android:textColor="#000000"
            android:textSize="18sp"
            android:text=""

            android:layout_marginTop="10dp"
            android:layout_marginLeft="10dp"

             >
        </TextView>

        </TableRow>

        <TableRow
            android:id="@+id/tableRow3"
            android:layout_width="wrap_content"
            android:layout_height="wrap_content"
             >

        <TextView
            android:id="@+id/TextView3"
            android:layout_width="wrap_content"
            android:layout_height="wrap_content"
            android:text="电话"
            android:textSize="16sp"
            android:width="70dp"
            android:layout_marginTop="10dp"
            android:layout_marginLeft="10dp"
             />
        <TextView
            android:id="@+id/txt_tel"
            android:layout_width="wrap_content"
            android:layout_height="wrap_content"
            android:textColor="#000000"
            android:textSize="18sp"
            android:text=""
            android:layout_marginTop="10dp"
            android:layout_marginLeft="10dp"
             >
        </TextView>

        </TableRow>
    </TableLayout>

</LinearLayout>
以上就可以实现仿微信扫描二维码生成用户信息的表单了,接下来展示一下效果页面


首页 扫描页


生成二维码 生成表单结果(大家可以自行添加更丰富内容)
这里只显示了名字电话等信息,大家可以自行添加头像图片等,这只是一个小的Demo实例。接下来奉上源码,代码注释详细,简介易懂。


 4228
4228

 被折叠的 条评论
为什么被折叠?
被折叠的 条评论
为什么被折叠?
 到【灌水乐园】发言


