


利用Spring与ActiveMQ整合发送、接收消息实例,同时使用Queue与Topic两种模式。
1.运行环境:Win10+Eclipse Java EE IDE Oxygen Release (4.7.0)+jdk1.8
2.web-inf/lib 中依赖jar包:activemq-all-5.15.0.jar
spring-aspects-4.1.0.RELEASE.jar
spring-beans-4.2.2.RELEASE.jar
spring-context-4.1.0.RELEASE.jar
spring-context-support-4.1.0.RELEASE.jar
spring-expression-4.2.2.RELEASE.jar
spring-messaging-4.1.0.RELEASE.jar
3.向topic发送消息的生产者TopicSender代码:
public class TopicSender {

    @Resource
	private JmsTemplate jmsTopicTemplate;

	//发送消息
	public void sendMessage(Destination destination,final String message) {
		System.out.println("TopicSender发送消息:"+message);
		jmsTopicTemplate.send(destination, new MessageCreator() {

			@Override
			public Message createMessage(Session session) throws JMSException {
				// TODO Auto-generated method stub
				return session.createTextMessage(message);
			}
		});
	}
}4.向queue发送消息的生产者QueueSender代码:
public class QueueSender {

	@Resource
	private JmsTemplate jmsQueueTemplate;

	//发送消息
	public void sendMessage(Destination destination,final String message) {
		System.out.println("QueueSender发送消息:"+message);
		jmsQueueTemplate.send(destination, new MessageCreator() {

			@Override
			public Message createMessage(Session session) throws JMSException {
				// TODO Auto-generated method stub
				return session.createTextMessage(message);
			}
		});
	}
}
5.接收topic消息的消费者1:
public class TopicReceiver1 implements MessageListener {

	/*
	 * (非 Javadoc) <p>Title: onMessage</p> <p>Description: </p>
	 *
	 * @param arg0
	 *
	 * @see javax.jms.MessageListener#onMessage(javax.jms.Message)
	 */
	@Override
	public void onMessage(Message message) {
		// TODO Auto-generated method stub
		TextMessage textMessage = (TextMessage) message;
		try {
			System.out.println("TopicReceiver1接收到消息内容是:" + textMessage.getText());
		} catch (JMSException e) {
			// TODO Auto-generated catch block
			e.printStackTrace();
		}
	}
}
6.接收topic消息的消费者2:
public class TopicReceiver2 implements MessageListener {

	/*
	 * (非 Javadoc) <p>Title: onMessage</p> <p>Description: </p>
	 *
	 * @param arg0
	 *
	 * @see javax.jms.MessageListener#onMessage(javax.jms.Message)
	 */
	@Override
	public void onMessage(Message message) {
		// TODO Auto-generated method stub
		TextMessage textMessage = (TextMessage) message;
		try {
			System.out.println("TopicReceiver2接收到消息内容是:" + textMessage.getText());
		} catch (JMSException e) {
			// TODO Auto-generated catch block
			e.printStackTrace();
		}
	}
}
7.接收queue消息的消费者1:
public class QueueReceiver1 implements MessageListener {

	/*
	 * (非 Javadoc) <p>Title: onMessage</p> <p>Description: </p>
	 *
	 * @param arg0
	 *
	 * @see javax.jms.MessageListener#onMessage(javax.jms.Message)
	 */
	@Override
	public void onMessage(Message message) {
		// TODO Auto-generated method stub
		TextMessage textMessage = (TextMessage) message;
		try {
			System.out.println("QueueReceiver1接收到消息内容是:" + textMessage.getText());
		} catch (JMSException e) {
			// TODO Auto-generated catch block
			e.printStackTrace();
		}

	}

}
8.接收queue消息的消费者2:
public class QueueReceiver2 implements MessageListener {
	/*
	 * (非 Javadoc) <p>Title: onMessage</p> <p>Description: </p>
	 *
	 * @param arg0
	 *
	 * @see javax.jms.MessageListener#onMessage(javax.jms.Message)
	 */
	@Override
	public void onMessage(Message message) {
		// TODO Auto-generated method stub
		TextMessage textMessage = (TextMessage) message;
		try {
			System.out.println("QueueReceiver2接收到消息内容是:" + textMessage.getText());
		} catch (JMSException e) {
			// TODO Auto-generated catch block
			e.printStackTrace();
		}
	}
}
9.控制生产者产生消息的控制器:
@RunWith(SpringJUnit4ClassRunner.class)
@ContextConfiguration("/applicationContext.xml")
public class ActivemqController {
	@Resource
	private QueueSender queueSender;

	@Resource
	private TopicSender topicSender;

	@Resource
	@Qualifier("queueDestination")
	private Destination queueDestination;

	@Resource
	@Qualifier("topicDestination")
	private Destination topicDestination;

	@Test
	public void testSend() {
		for (int i = 0; i < 5; i++) {
			queueSender.sendMessage(queueDestination, "queue生产者产生消息:" + (i + 1));
		}

		for (int i = 0; i < 5; i++) {
			topicSender.sendMessage(topicDestination, "topic生产者产生消息:" + (i + 1));
		}
	}
}
10.web.xml配置文件:
<?xml version="1.0" encoding="UTF-8"?>
<web-app xmlns:xsi="http://www.w3.org/2001/XMLSchema-instance"
	xmlns="http://java.sun.com/xml/ns/javaee"
	xmlns:web="http://java.sun.com/xml/ns/javaee"
	xsi:schemaLocation="http://java.sun.com/xml/ns/javaee http://java.sun.com/xml/ns/javaee/web-app_3_0.xsd"
	version="3.0">
	<display-name>ActiveMQANDSpring</display-name>
	<filter>
		<filter-name>characterEncoding</filter-name>
		<filter-class>org.springframework.web.filter.CharacterEncodingFilter
		</filter-class>
		<init-param>
			<param-name>encoding</param-name>
			<param-value>UTF-8</param-value>
		</init-param>
		<init-param>
			<param-name>forceEncoding</param-name>
			<param-value>true</param-value>
		</init-param>
	</filter>
	<filter-mapping>
		<filter-name>characterEncoding</filter-name>
		<url-pattern>/*</url-pattern>
	</filter-mapping>
	<context-param>
		<param-name>contextConfigLocation</param-name>
		<param-value>classpath*:applicationContext.xml,classpath*:ActiveMQ.xml
		</param-value>
	</context-param>
	<listener>
		<listener-class>org.springframework.web.context.ContextLoaderListener
		</listener-class>
	</listener>
</web-app>
11.applicationContext.xml配置:
<?xml version="1.0" encoding="UTF-8"?>
<beans xmlns="http://www.springframework.org/schema/beans"
	xmlns:xsi="http://www.w3.org/2001/XMLSchema-instance" xmlns:oxm="http://www.springframework.org/schema/oxm"
	xmlns:aop="http://www.springframework.org/schema/aop" xmlns:context="http://www.springframework.org/schema/context"
	xsi:schemaLocation="http://www.springframework.org/schema/beans
						http://www.springframework.org/schema/beans/spring-beans-3.0.xsd
						http://www.springframework.org/schema/oxm
						http://www.springframework.org/schema/oxm/spring-oxm-3.0.xsd
						http://www.springframework.org/schema/aop
						http://www.springframework.org/schema/aop/spring-aop-3.0.xsd
						http://www.springframework.org/schema/context
						http://www.springframework.org/schema/context/spring-context-3.0.xsd">
	<context:annotation-config />
	<context:component-scan base-package="com.sgcc.SpringActivemq" />
	<import resource="ActiveMQ.xml" />
</beans>
12.ActiveMQ.xml配置:
<?xml version="1.0" encoding="UTF-8"?>
<beans xmlns="http://www.springframework.org/schema/beans"
	xmlns:context="http://www.springframework.org/schema/context"
	xmlns:xsi="http://www.w3.org/2001/XMLSchema-instance" xmlns:amq="http://activemq.apache.org/schema/core"
	xmlns:jms="http://www.springframework.org/schema/jms"
	xsi:schemaLocation="http://www.springframework.org/schema/beans
        http://www.springframework.org/schema/beans/spring-beans-4.0.xsd
        http://www.springframework.org/schema/context
        http://www.springframework.org/schema/context/spring-context-4.0.xsd
        http://www.springframework.org/schema/jms
        http://www.springframework.org/schema/jms/spring-jms-4.0.xsd
        http://activemq.apache.org/schema/core
        http://activemq.apache.org/schema/core/activemq-core-5.8.0.xsd">
	<!-- 配置connectionFactory -->
	<!-- ActiveMQ连接工厂 -->
	<!-- 由对应的 JMS服务厂商提供的ConnectionFactory -->
	<!-- 连接URL以及用户名,密码 -->
	<amq:connectionFactory id="amqConnectionFactory"
		brokerURL="tcp://localhost:61616" userName="admin" password="admin" />
	<!-- Spring Caching连接工厂 -->
	<!-- Spring用于管理真正的ConnectionFactory -->
	<bean id="connectionFactory"
		class="org.springframework.jms.connection.CachingConnectionFactory">
		<!-- 目标ConnectionFactory对应真实的可以产生JMS Connection的ConnectionFactory -->
		<property name="targetConnectionFactory" ref="amqConnectionFactory" />
		<!-- session缓存数量 -->
		<property name="sessionCacheSize" value="100" />
	</bean>

	<!-- Spring JMS Template -->
	<!-- 生产者 -->
	<!-- Queue类型 -->
	<bean id="jmsQueueTemplate" class="org.springframework.jms.core.JmsTemplate">
		<!-- 这个connectionFactory对应的是我们定义的Spring提供的那个ConnectionFactory对象 -->
		<constructor-arg ref="connectionFactory"></constructor-arg>
		<!-- 非pub/sub模型(发布/订阅),即队列模式 -->
		<property name="pubSubDomain" value="false" />
	</bean>
	<bean id="queueSender" class="com.sgcc.SpringActivemq.mq.producer.queue.QueueSender"></bean>
	<bean id="topicSender" class="com.sgcc.SpringActivemq.mq.producer.topic.TopicSender"></bean>

	<!-- 定义JmsTemplate的Topic类型 -->
	<bean id="jmsTopicTemplate" class="org.springframework.jms.core.JmsTemplate">
		<!-- 这个connectionFactory对应的是我们定义的Spring提供的那个ConnectionFactory对象 -->
		<constructor-arg ref="connectionFactory" />
		<!-- pub/sub模型(发布/订阅) -->
		<property name="pubSubDomain" value="true" />
	</bean>
	<!--Spring JmsTemplate 的消息生产者 end -->

	<!-- 消息监听器 -->
	<bean id="queueReceiver1"
		class="com.sgcc.SpringActivemq.mq.consumer.queue.QueueReceiver1"></bean>
	<bean id="queueReceiver2"
		class="com.sgcc.SpringActivemq.mq.consumer.queue.QueueReceiver2"></bean>
	<bean id="topicReceiver1"
		class="com.sgcc.SpringActivemq.mq.consumer.topic.TopicReceiver1"></bean>
	<bean id="topicReceiver2"
		class="com.sgcc.SpringActivemq.mq.consumer.topic.TopicReceiver2"></bean>


	<!-- 消息消费者 start -->
	<!-- 定义Queue监听器容器 -->
	<jms:listener-container destination-type="queue"
		container-type="default" connection-factory="connectionFactory"
		acknowledge="auto">
		<jms:listener destination="queue" ref="queueReceiver1" />
		<jms:listener destination="queue" ref="queueReceiver2" />
	</jms:listener-container>
	<!-- 定义Topic监听器容器 -->
	<jms:listener-container destination-type="topic"
		container-type="default" connection-factory="connectionFactory"
		acknowledge="auto">
		<jms:listener destination="topic" ref="topicReceiver1" />
		<jms:listener destination="topic" ref="topicReceiver2" />
	</jms:listener-container>
	<!-- 消息消费者 end -->

	<!-- 定义队列目的地 ,点对点 -->
	<bean id="queueDestination" class="org.apache.activemq.command.ActiveMQQueue">
		<constructor-arg>
			<value>queue</value>
		</constructor-arg>
	</bean>
	<!-- 定义主题目的地 -->
	<bean id="topicDestination" class="org.apache.activemq.command.ActiveMQTopic">
		<constructor-arg>
			<value>topic</value>
		</constructor-arg>
	</bean>

</beans>
程序配置好之后run as -> JUnit Test 可以看到运行结果:
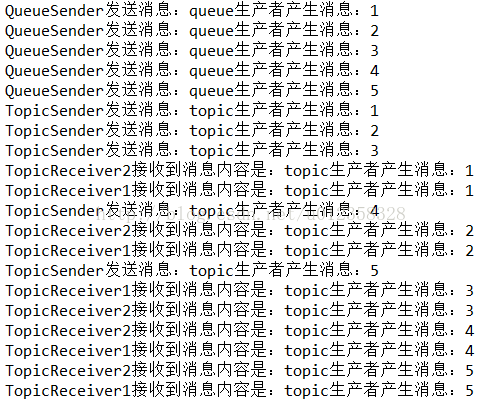
可以看出queue的消息只能被消费一次,topic的消息可以由多个订阅的消费者消费。


 3316
3316


 被折叠的 条评论
为什么被折叠?
被折叠的 条评论
为什么被折叠?
 到【灌水乐园】发言


