


1.ToolBar的拓展:http://www.codeceo.com/article/android-toolbar-develop.html
——————————————————————————————————————————————————————
1.ToolBar
(1)隐藏掉系统原先的导航栏
直接在BaseActivity中调用 supportRequestWindowFeature(Window.FEATURE_NO_TITLE) 去掉了默认的导航栏
(注意,我的BaseActivity是继承了AppCompatActivity的,如果是继承Activity就应该调用 requestWindowFeature(Window.FEATURE_NO_TITLE) )
(2)如果你想修改标题和子标题的字体大小、颜色等,可以调用 setTitleTextColor 、 setTitleTextAppearance 、
setSubtitleTextColor 、 setSubtitleTextAppearance 这些API
(3)logo 、 navigationIcon 、 subtitle 、 title 在布局中不生效
设置xmlns:toolbar="http://schemas.android.com/apk/res-auto"(这里的toolbar可以换成你想要其他命名,做过自定义控件的童鞋相比很熟悉此用法了)
(4)Action Menu Item 的文字颜色设置无效?
2.android:drawableLeft="@mipmap/icon_search"
3.自定义属性中获取图片资源
<attr name="rightButtonIcon" format="reference"/>
final Drawable rightIcon = a.getDrawable(R.styleable.MyToolBar_rightButtonIcon);
——————————————————————————————————————————————————————
2.效果图:
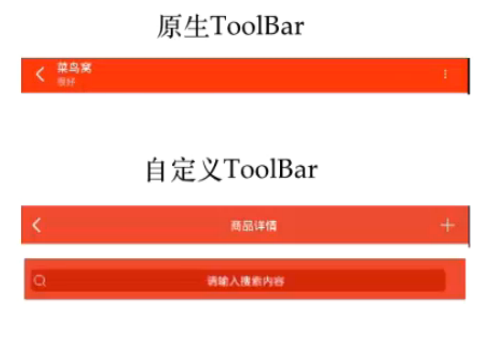
3.布局
(1)toolBar.xml
<?xml version="1.0" encoding="utf-8"?>

<RelativeLayout
    xmlns:android="http://schemas.android.com/apk/res/android"
    android:layout_width="fill_parent"
    android:layout_height="wrap_content">

    <EditText
        android:id="@+id/toolbar_searchview"
        android:layout_width="match_parent"
        android:layout_height="wrap_content"
        android:layout_gravity="center"
        android:layout_centerVertical="true"
        android:gravity="center"
        android:drawableLeft="@mipmap/icon_search"
        style="@style/search_view"
        android:hint="请输入搜索内容"

        android:visibility="gone"
        />

    <TextView
        android:id="@+id/toolbar_title"
        android:layout_width="wrap_content"
        android:layout_height="wrap_content"
        android:layout_centerInParent="true"
        android:layout_gravity="center"
        android:gravity="center"
        android:textColor="@color/white"
        android:textSize="20sp"
        android:visibility="gone"
        />

    <Button
        android:id="@+id/toolbar_rightButton"
        android:layout_width="wrap_content"
        android:layout_height="wrap_content"
        android:layout_alignParentRight="true"
        android:layout_centerVertical="true"
        android:textColor="@color/white"
        android:visibility="gone"
        style="@android:style/Widget.Material.Toolbar.Button.Navigation"
        />

</RelativeLayout>
***EditText改变样式 --------使用shape 改变控件
<item name="android:background">@drawable/selector_search_view</item>
<?xml version="1.0" encoding="utf-8"?>

    <selector
        xmlns:android="http://schemas.android.com/apk/res/android">
        <item android:state_enabled="false" >
            <shape android:shape="rectangle">
                <corners android:radius="8dp" />
                <solid android:color="#eb4f38" />
            </shape>
        </item>
        <item android:state_pressed="true">
            <shape android:shape="rectangle">
                <corners android:radius="8dp" />
                <solid android:color="#eb4f38" />
            </shape>
        </item>
        <item>
            <shape android:shape="rectangle">
                <corners android:radius="8dp" />
                <solid android:color="#D82917" />
            </shape>
        </item>
    </selector>
(2)ToolBar中引用布局
<?xml version="1.0" encoding="utf-8"?>
<LinearLayout xmlns:android="http://schemas.android.com/apk/res/android"
    xmlns:tools="http://schemas.android.com/tools"
    android:layout_width="match_parent"
    android:layout_height="match_parent"
    xmlns:app="http://schemas.android.com/apk/res-auto"
    android:orientation="vertical">

    <com.liguangjie.myshop.widget.MyToolBar
        android:id="@+id/toolbar"
        android:background="?attr/colorPrimary"
        android:layout_width="match_parent"
        app:isShowSearchView="true"
        android:minHeight="?attr/actionBarSize"
        android:layout_height="wrap_content">
    </com.liguangjie.myshop.widget.MyToolBar>

    <FrameLayout
        android:id="@+id/realtabcontent"
        android:layout_width="match_parent"
        android:layout_height="0dp"
        android:layout_weight="1"
        android:background="@color/bg_color"
        ></FrameLayout>

 <com.liguangjie.myshop.widget.FragmentTabHost
    android:layout_width="match_parent"
    android:layout_height="wrap_content"
    android:id="@android:id/tabhost"
    android:background="@color/white"
    >
    <FrameLayout
        android:layout_width="0dp"
        android:layout_height="0dp"
        android:id="@android:id/tabcontent">
    </FrameLayout>
</com.liguangjie.myshop.widget.FragmentTabHost>

</LinearLayout>
(3)自定义属性 attr.xml
<?xml version="1.0" encoding="utf-8"?>
<resources>
<!--自定义属性-->
    <declare-styleable name="CNiaoToolBar">

        <attr name="rightButtonIcon" format="reference"/>
        <!--隐藏SearchView-->
        <attr name="isShowSearchView" format="boolean"/>
        <attr name="rightButtonText" format="string"/>

    </declare-styleable>
</resources>
(4)自定义ToolBar, 继承ToolBar CNiaoToolBar
------查看ToolBar源码
------查看ToolBar源码
import android.annotation.TargetApi;
import android.content.Context;
import android.graphics.drawable.Drawable;
import android.os.Build;
import android.support.v7.internal.widget.TintTypedArray;
import android.support.v7.widget.Toolbar;
import android.util.AttributeSet;
import android.view.Gravity;
import android.view.LayoutInflater;
import android.view.View;
import android.view.ViewGroup;
import android.widget.Button;
import android.widget.EditText;
import android.widget.TextView;

import cniao5.com.cniao5shop.R;


/**
 * 自定义一个ToolBar,因为要用到原生toolbar部分功能
 */
public class CNiaoToolBar extends Toolbar {


    private LayoutInflater mInflater;//引用布局所用的类

    private View mView;
    private TextView mTextTitle;
    private EditText mSearchView;
    private Button mRightButton;


    public CNiaoToolBar(Context context) {
       this(context,null);
    }

    public CNiaoToolBar(Context context, AttributeSet attrs) {
        this(context, attrs, 0);
    }

    public CNiaoToolBar(Context context, AttributeSet attrs, int defStyleAttr) {
        super(context, attrs, defStyleAttr);


        initView(); //初始化布局
        //重写ToolBar的方法,设置边距
        setContentInsetsRelative(10,10);


        //自定义属性
        if(attrs !=null) {
            //获取attrs.xml设置的属性
            final TintTypedArray a = TintTypedArray.obtainStyledAttributes(getContext(), attrs,
                    R.styleable.CNiaoToolBar, defStyleAttr, 0);

            //设置图片
            final Drawable rightIcon = a.getDrawable(R.styleable.CNiaoToolBar_rightButtonIcon);
            if (rightIcon != null) {
                //setNavigationIcon(navIcon);
                setRightButtonIcon(rightIcon);
            }

            //设置是否隐藏
            boolean isShowSearchView = a.getBoolean(R.styleable.CNiaoToolBar_isShowSearchView,false);

            if(isShowSearchView){

                showSearchView();
                hideTitleView();

            }


            CharSequence rightButtonText = a.getText(R.styleable.CNiaoToolBar_rightButtonText);
            if(rightButtonText !=null){
                setRightButtonText(rightButtonText);
            }


            a.recycle();
        }

    }

    private void initView() {


        if(mView == null) {

            mInflater = LayoutInflater.from(getContext());
            mView = mInflater.inflate(R.layout.toolbar, null);


            mTextTitle = (TextView) mView.findViewById(R.id.toolbar_title);
            mSearchView = (EditText) mView.findViewById(R.id.toolbar_searchview);
            mRightButton = (Button) mView.findViewById(R.id.toolbar_rightButton);

            //参数分别未宽,高,对齐方式
            LayoutParams lp = new LayoutParams(ViewGroup.LayoutParams.MATCH_PARENT, ViewGroup.LayoutParams.WRAP_CONTENT, Gravity.CENTER_HORIZONTAL);
            //往ToolBar中添加布局
            addView(mView, lp);
        }


    }


    @TargetApi(Build.VERSION_CODES.JELLY_BEAN)
    public void  setRightButtonIcon(Drawable icon){

        if(mRightButton !=null){

            mRightButton.setBackground(icon);
            mRightButton.setVisibility(VISIBLE);
        }

    }

    public void  setRightButtonIcon(int icon){

        setRightButtonIcon(getResources().getDrawable(icon));
    }


    //设置监听事件
    public  void setRightButtonOnClickListener(OnClickListener li){

        mRightButton.setOnClickListener(li);
    }

    public void setRightButtonText(CharSequence text){
        mRightButton.setText(text);
        mRightButton.setVisibility(VISIBLE);
    }

    public void setRightButtonText(int id){
        setRightButtonText(getResources().getString(id));
    }


    public Button getRightButton(){

        return this.mRightButton;
    }


    @Override
    public void setTitle(int resId) {

        setTitle(getContext().getText(resId));
    }

    //重写ToolBar标方法,否则会冲突
    @Override
    public void setTitle(CharSequence title) {

        initView(); //因为继承了Toolbar,所以会先走ToolBar的构造方法,不会先执行initView();
        if(mTextTitle !=null) {
            mTextTitle.setText(title);
            showTitleView();
        }


    }


    public  void showSearchView(){

        if(mSearchView !=null)
            mSearchView.setVisibility(VISIBLE);

    }


    public void hideSearchView(){
        if(mSearchView !=null)
            mSearchView.setVisibility(GONE);
    }

    public void showTitleView(){
        if(mTextTitle !=null)
            mTextTitle.setVisibility(VISIBLE);
    }


    public void hideTitleView() {
        if (mTextTitle != null)
            mTextTitle.setVisibility(GONE);

    }


//
//    private void ensureRightButtonView() {
//        if (mRightImageButton == null) {
//            mRightImageButton = new ImageButton(getContext(), null,
//                    android.support.v7.appcompat.R.attr.toolbarNavigationButtonStyle);
//            final LayoutParams lp = generateDefaultLayoutParams();
//            lp.gravity = GravityCompat.START | (Gravity.VERTICAL_GRAVITY_MASK);
//            mRightImageButton.setLayoutParams(lp);
//        }
//    }


}
***标题栏和搜索框会冲突


 被折叠的 条评论
为什么被折叠?
被折叠的 条评论
为什么被折叠?
 到【灌水乐园】发言


